- Drawable. Фигуры и градиенты
- Shape и ShapeDrawable
- Элементы фигуры
- rectangle (Прямоугольник)
- oval (Эллипс)
- ring (Кольцо)
- line (Горизонтальная линия)
- Градиенты: gradient и GradientDrawable
- linear
- radial
- sweep
- Примеры с shape
- Закругляем уголки у компонентов
- Овальный кабинет
- Simplifying layouts with layer-list drawables
- a reliable way of positioning drawables within layer-lists
- Android Shape, Selector Examples
- 1. Custom Drawable File Overview.
- 2. Shape.
- 2.1 Shape’s Sub Element.
- 3. Selector.
- 3.1 View Component’s State.
- 3.2 Selector Definition.
Drawable. Фигуры и градиенты
Shape и ShapeDrawable
Фигуры являются подмножеством Drawable-ресурсов.
Данный вид ресурсов на основе класса ShapeDrawable позволяет описывать простые геометрические фигуры, указывая их размеры, фон и контур с помощью тега .
Можно создавать ресурсы фигур на основе стандартных фигур вроде прямоугольника, эллипса, линии. Для использования ресурсов фигур нужно создать в подкаталоге res/drawable XML-файл, в котором будет присутствовать тег , который в свою очередь может содержать дочерние элементы , ,
Имя файла без расширения будет служить идентификатором (ID): R.drawable.filename в Java-коде и @[package:]drawable/filename в XML-файлах.
Элементы фигуры
— отступы. Возможные атрибуты: android:left, android:top, android:right, android:bottom
rectangle (Прямоугольник)

shape_rect.xml — Атрибут android:shape здесь необязателен: rectangle — это значение по умолчанию.
Пример с градиентным прямоугольником в качестве разделителя
Создадим файл separator.xml:
В разметке приложения добавим код:
У первого разделителя ширина 1dp, у второго — 3dp. Получили красивую полоску.

У прямоугольников можно скруглить углы при помощи тега corners

Можно закруглить углы по отдельности:

oval (Эллипс)

Другой вариант с пунктиром:

ring (Кольцо)

shape_ring.xml — Для кольца имеются дополнительные атрибуты:
innerRadius Внутренний радиус innerRadiusRatio Отношение между внешним и внутренним радиусами. По умолчанию равно 3 thickness Толщина кольца (т.е. разница между внешним и внутренним радиусами) thicknessRatio Отношение ширины кольца к его толщине. По умолчанию равно 9
line (Горизонтальная линия)

shape_line.xml — Линия может быть только горизонтальной
Градиенты: gradient и GradientDrawable
Тег gradient (класс GradientDrawable) позволяет создавать сложные градиентные заливки. Каждый градиент описывает плавный переход между двумя или тремя цветами с помощью линейного/радиального алгоритма или же используя метод развертки.
Тег gradient внутри тега shape. Основные атрибуты: type, startColor (обязателен), endColor (обязателен) и middleColor (необязателен). Также иногда оказывается полезным атрибут centerColor.
Используя атрибут type, вы можете описать свой градиент:
linear

- android:type=»linear» можно опустить, он так и есть по умолчанию. Отображает прямой переход от цвета startColor к цвету endColor под углом, заданным в атрибуте angle.
- Атрибут android:angle используется только линейным градиентом и должен быть кратным значению 45.
Дополнительный материал: Android Dev Tip #3 — помните о прозрачности, который может привести к другому результату.
Также можно задействовать атрибуты centerX и centerY.
radial
Интересный эффект получается при использовании множества радиальных градиентов.

sweep
Рисует развёрточный градиент с помощью перехода между цветами startColor и endColor вдоль внешнего края фигуры (как правило, кольца).

Можно использовать атрибуты android:centerX и android:centerY.

Попробуйте также такой вариант.
А почему бы не повращать?
Примеры с shape
Закругляем уголки у компонентов
Создадим отдельный файл res/drawable/roundrect.xml и с его помощью скруглим уголки у LinearLayout, ImageView, TextView, EditText:
В разметке активности пишем следующее:

Овальный кабинет
В Белом доме есть Овальный кабинет. Если вам придётся писать приложение для администрации президента США, то все элементы нужно сделать овальными. Создадим файл res/drawable/oval.xml:
Заменим в предыдущем примере android:background=»@drawable/roundrect» на android:background=»@drawable/oval».
Источник
Simplifying layouts with layer-list drawables
a reliable way of positioning drawables within layer-lists

Mar 21, 2016 · 4 min read
I always thought the compound drawable (e.g. drawableLeft) was a nifty feature of the TextView. Unfortunately I remember thousands of times when it wasn’t nifty enough for my needs. There was usually something missing. Something I couldn’t overcome by a proper usage of other attributes (including the drawablePadding).
I was recently developing an app in which the navigation drawer wasn’t following the Material Design Guidelines 100%. To be honest, only the list items were somehow following the material list-item guidelines.
Adapting NavigationV i ew from the Support Design Library to fit my needs wasn’t really an option for me. Writing the navigation menu from the scratch was going to take much less time. At least I thought that at the moment…
I wanted to create a regular NavigationDrawer list item in the most elegant and easy way possible. Just a text with an icon. As simple as that.
The rest of this post describes my struggle on performing that simple task.

If you’re lucky and you know the exact width of your icons, it should be super-easy. E.g. if your icons for the NavigationDrawer are exactly 24dp wide, this:
should do the job just fine.

But… if you can’t predict the size of the icon, things will probably get a bit uglier. It’s not something unusual, I’ve been there multiple times. The solution I was ending up with, was usually something like this:

It’s working fine, even with icons with different dimensions (as in the example), but I can’t really say that’s an elegant solution. Imagine a layout with 5 or 10 of this sort of list-items stacked on top of each other. There must be a better way!
So I got back to square one (using compound drawable in a TextView) and started messing around with a special drawable.
I thought to myself:
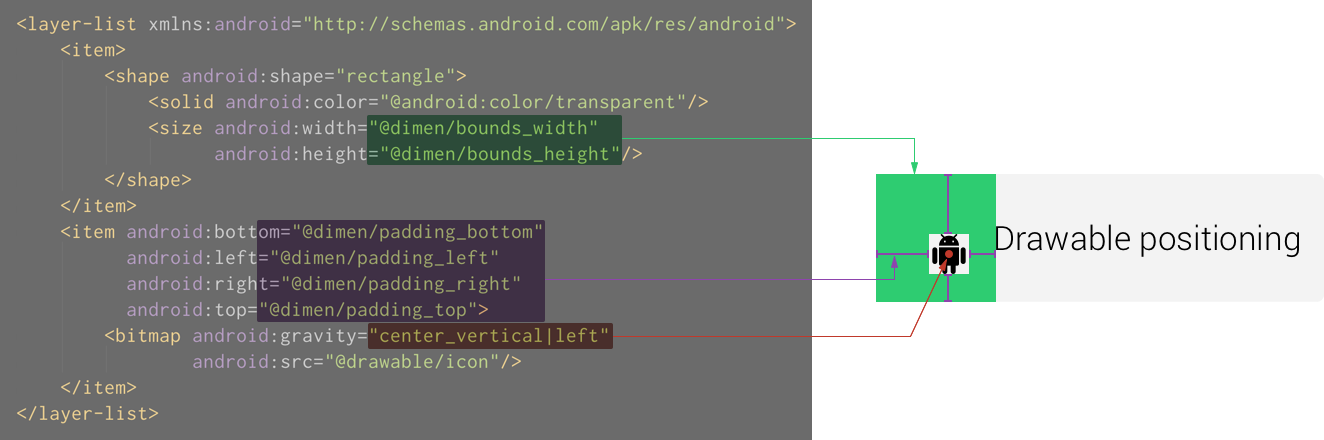
I just have to anchor the icon at the left border of the 72dp space and shift it by 16dp to the right. That doesn’t sound that difficult. I should be able to do that easily with a layer-list!
This is what I came up with:

Two simple layers. The first one that would force the 72dp-wide bounds for the icon. And the second one with the icon itself — shifted. It really worked. It looked promising!

With just a single, simple TextView:
Unfortunately this is what I saw on a random Samsung device with 4.X Android:

It wouldn’t respect the first layer at all! Even if I specified a for it. So I dived back into the layer-list and began a painful process of developing a Samsung-proof solution.
This is what I ended up with:

And it was actually almost correct… almost, because another device (another Samsung… I wonder if that was just a coincidence or not) had a different issue with it:

Some devices seem to be displaying black if there is no tag specified within it.
A small change fixes the issue (this time a copyable version):
And to generalize this whole idea a bit:
If you want to see some of layer-lists that I tried (especially those that weren’t working correctly on all devices) you can see my demo app here.
Источник
Android Shape, Selector Examples
Shape, selector, and layer-list are usually used to create custom drawable resources in android development. Those three XML elements can save a lot of UI resources and time if being used properly. This article will show you how to use them correctly.
1. Custom Drawable File Overview.
- All the three XML elements should be defined in an XML file under the app/res/drawable folder. The file name is just the drawable resource id.
- For example, if app/res/drawable/my_layer_list.xml is just the file. Then you can refer to it in both java code or other XML files.
- Refer to the my_layer_list.xml in Java Code: R.drawable.my_layer_list.
- Refer to the my_layer_list.xml in Xml Code : Android:background=”@drawable/my_layer_list”.
2. Shape.
The shape is used to define custom shapes in android drawable resources. It is used in both selector and layer-list elements. It has the below properties.
- Android:shape : Value can be “line“, “rectangle“, “oval” or “ring“.
2.1 Shape’s Sub Element.
2.1.1 .
- The gradient XML element is used to define color gradual change style. It has the below attributes.
- Android:startColor: Start color value.
- Android:endColor: End color value.
- Android:angle: Gradient angle, 0 means from left to right, 90 means from bottom to top, the value should be an integer that is multiple of 45, the default value is 0.
- Android:type: linear, radial, and sweep.
- Below is an example of the gradient XML element.
- Below is the above example’s XML source code.
- The solid XML element is used to define shape internal fill color. It will override the attributes effect. It has the below attributes.
- Android:color: The color value that is used to fill the shape.
- Below is an example of the solid XML element.
- Below is the above example’s XML source code.
- The stroke XML element is used to define shape bolder style. It has the below XML attributes.
- Android:width : Border width.
- Android:color: Border color.
- Android:dashWidth : Dash border width.
- Android:dashGap: Gap between two dashes of the border.
- Below is an example of the stroke XML element.
- Below is the above example’s XML source code.
- The corners XML element is used to define shape corner style. It has the below XML attributes.
- Android:radius: The radius of the corner. The bigger the radius value, the round-shaped the corner.
- Android:topRightRadius: Top right corner radius value.
- Android:bottomLeftRadius: Bottom left radius value.
- Android:topLeftRadius: Top left radius value.
- Android:bottomRightRadius: Bottom right radius value.
- Below is an example of the corners XML element.
- Below is the above example’s XML source code.
- The padding XML element is used to define the padding values. It has the below XML attributes.
- android:top: Top padding value.
- android:bottom: Bottom padding value.
- android:left: Left padding value.
- android:right: Right padding value.
- Below is an example of the corners XML element. There are two custom shapes in the below example. The green shape is drawn at the top because it is defined at last in the layer-list definition.
- Below is the above example’s XML source code.
- The size XML element is used to define the shape width and height value.
3. Selector.
The selector is used to define the view component’s background color or background image by it’s various states.
3.1 View Component’s State.
A view component has various state. For example, a button has following states:
- android:state_pressed : Boolean value, true means button is pressed, false means button is not pressed.
- android:state_enabled : Boolean value, true means button is enabled, false means button is disabled.
- android:state_focused : Boolean value, true means button is focused, false means button lost focus.
- android:state_window_focused : Boolean value, this is the button default state. It is same as do not specify button state.
3.2 Selector Definition.
You should define a selector in a xml file under app / res / drawable folder. Such as my_selector.xml
You can define several items in the selector definition xml file. Each item include a drawable object (color or image) that will be used for a button state.
Android system will check each item in the selector by it’s list order, if one item match current button state, then use that drawable object. If no state match, then use default item.
Please Note : The default state item should be written in the end of the selector xml. If you put it at the beginning of selector xml, no other state will take effect.
From above example, we can see below default state item at the end of the xml.
It behaves same as below default state item.
If we apply above selector drawable to a button as background.
We can see below screen effect. When the button is pressed, the background color is green, when not pressed the background color change to orange.
If you can not watch the above video, you can see it on the youtube URL https://youtu.be/t-D2511VoYg
Above example use some custom color variables, if you do not know, please read How To Define Custom Color Variables In Android Studio.
Источник


