- Atomic Spin
- Atomic Object’s blog on everything we find fascinating.
- Data Binding with Live Data for RecyclerView in Kotlin
- A Simple Example
- Fixing the Live Data for RecyclerViews
- keima / HowToUseActivity.kt
- This comment has been minimized.
- fmatosqg commented Mar 18, 2019
- This comment has been minimized.
- kibotu commented Jun 24, 2019
- This comment has been minimized.
- sudeshim3 commented Sep 12, 2019 •
- Выбор элементов recylerView при помощи dataBinding’а
- Сразу за дело
- Selection helper
- Переписываем adadpter
- Модифицируем наш итем
- Результат
- Заключение
- Android Architecture Components. Часть 2. Lifecycle
Atomic Spin
Atomic Object’s blog on everything we find fascinating.
Data Binding with Live Data for RecyclerView in Kotlin
When working on an app in Kotlin or Android, it’s very common to use RecyclerViews to display lists of information. Typically, this data will be built up in ViewModels and passed to a list adapter. This works fine for most things and allows interaction with the items. Usually, they don’t need to change directly in the current fragment.
In some cases, however, you want the items to change directly by some live data in the ViewModel. One example might be when you have a list of options and want to display the current selection. This will require data binding with live data for the RecyclerView.
A Simple Example
To keep things simple, I’ll provide sample code for a RecyclerView with an options selection.
First, we’ll look at the MainViewModel that contains live data for the current selected option ID and a function that will change the selected option.
The main fragment is simple enough, just a RecyclerView in a ConstraintLayout.
This is the item layout that will be used in the RecyclerView. Note that we will data-bind the optionID and ViewModel. This allows us to set an onClick method to toggle function in the ViewModel, passing the optionID. And we can observe the selectedID from the ViewModel to show if the RadioButton should be checked.
Next, we’ll look at the MainFragment. Note that the layout is inflated, and the list adapter has been created and set to the RecyclerView. We submit a list of ints to the adapter.
The MainListAdapter creates the binding for each item and binds the data. There’s nothing really fancy here.
The DataBoundViewHolder simply extends the ViewHolder to be used for layouts that have data binding.
Lastly, the DataBoundListAdapter will allow us to create any list adapters in our app that will work with data binding.
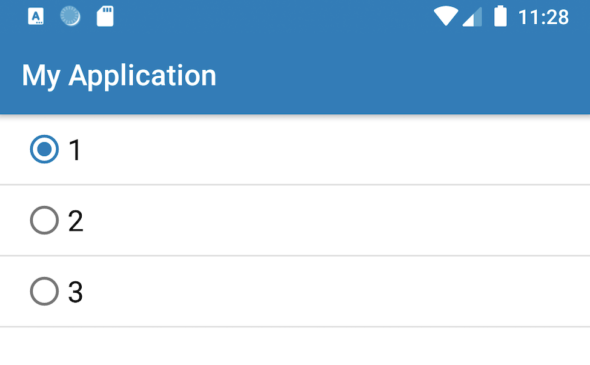
With our code out of the way, what do we get when running the app?
Not much, apparently. We can see that our list is visible and the text is set on each option, but clicking them does nothing. Why? We have data binding, we pass the ViewModel, and we observe data. But it doesn’t work.
The issue is that the RecyclerView ViewHolders are not able to observe changes to live data. This is because they are not LifecycleOwners, unlike what we might have for fragments.
Fixing the Live Data for RecyclerViews
The solution to the problem is quite simple. We need to make the ViewHolders LifecycleOwners.
Because the ViewHolders can be added and removed as the RecyclerView list changes, we need to update the state of the lifecycle.
In the DataBoundListAdapter, we need to set the LifecycleOwner of the binding and override the attach and detach functions to trigger the lifecycle changes. Since they only get destroyed when the fragment is destroyed a list of them needs to be maintained so we can destroy all the viewHolder lifecycles when the fragment is destroyed.
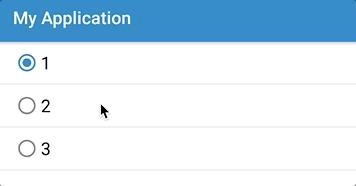
After these small changes, we can rerun our app.
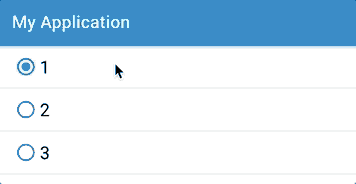
We can see now that the radio buttons change when we click them. Those simple changes allow us to give any RecyclerView ViewHolder data binding and observable live data.
This is a more generic approach than what is provided in this post on Lua Software Code.
This post has been updated from the original, there’s some things that won’t be available or work out of the box, the appExecutors, autoCleared, Injectable, @Inject. These are provided in the dependencyInjection folder and is mostly code from Google example projects.
The code for this project can be found here.
Источник
keima / HowToUseActivity.kt
This file contains bidirectional Unicode text that may be interpreted or compiled differently than what appears below. To review, open the file in an editor that reveals hidden Unicode characters. Learn more about bidirectional Unicode characters
| import android.os.Bundle |
| import android.util.Log |
| import android.view.ViewGroup |
| import android.widget.TextView |
| import androidx.appcompat.app.AppCompatActivity |
| import androidx.databinding.DataBindingUtil |
| import androidx.lifecycle.Lifecycle |
| import androidx.lifecycle.LifecycleObserver |
| import androidx.lifecycle.OnLifecycleEvent |
| import app.keima.android.recyclerviewsandbox.databinding.ActivityMainBinding |
| class MainActivity : AppCompatActivity () < |
| private lateinit var binding : ActivityMainBinding |
| override fun onCreate ( savedInstanceState : Bundle ? ) < |
| super .onCreate(savedInstanceState) |
| binding = DataBindingUtil .setContentView( this , R .layout.activity_main) |
| binding.recyclerView. apply < |
| adapter = MyAdapter ( |
| arrayOf( |
| » A » , » B » , » C » , » D » , |
| » A » , » B » , » C » , » D » , |
| » A » , » B » , » C » , » D » , |
| » A » , » B » , » C » , » D « |
| ) |
| ) |
| > |
| > |
| > |
| class MyAdapter ( private val dataset : Array String >) : |
| LifecycleRecyclerAdapter MyAdapter . MyViewHolder >() < |
| class MyViewHolder ( private val textView : TextView ) : LifecycleViewHolder(textView) < |
| private val observer = MyObserver () |
| init < |
| lifecycle.addObserver(observer) |
| > |
| fun bindData ( data : String ) < |
| textView.text = data |
| observer.data = data |
| > |
| > |
| class MyObserver () : LifecycleObserver < |
| var data : String = » ? « |
| @OnLifecycleEvent( Lifecycle . Event . ON_CREATE ) |
| fun onCreate () < |
| Log .d( » MyObserver » , » appear: $data » ) |
| > |
| @OnLifecycleEvent( Lifecycle . Event . ON_DESTROY ) |
| fun onDestroy () < |
| Log .d( » MyObserver » , » disappear: $data » ) |
| > |
| > |
| override fun onCreateViewHolder ( parent : ViewGroup , viewType : Int ): MyViewHolder < |
| return MyViewHolder ( TextView (parent.context). apply < |
| setPadding( 8 , 40 , 8 , 40 ) |
| >) |
| > |
| override fun onBindViewHolder ( holder : MyViewHolder , position : Int ) < |
| holder.bindData( » $ |
| > |
| override fun getItemCount () = dataset.size |
| > |
This gist snippet is Public Domain.
This file contains bidirectional Unicode text that may be interpreted or compiled differently than what appears below. To review, open the file in an editor that reveals hidden Unicode characters. Learn more about bidirectional Unicode characters
| import androidx.recyclerview.widget.RecyclerView |
| abstract class LifecycleRecyclerAdapter T : LifecycleViewHolder > : RecyclerView . Adapter T >() < |
| override fun onViewAttachedToWindow ( holder : T ) < |
| super .onViewAttachedToWindow(holder) |
| holder.onAppear() |
| > |
| override fun onViewDetachedFromWindow ( holder : T ) < |
| super .onViewDetachedFromWindow(holder) |
| holder.onDisappear() |
| > |
| > |
This file contains bidirectional Unicode text that may be interpreted or compiled differently than what appears below. To review, open the file in an editor that reveals hidden Unicode characters. Learn more about bidirectional Unicode characters
| import android.view.View |
| import androidx.lifecycle.Lifecycle |
| import androidx.lifecycle.LifecycleOwner |
| import androidx.lifecycle.LifecycleRegistry |
| import androidx.recyclerview.widget.RecyclerView |
| abstract class LifecycleViewHolder ( itemView : View ) : |
| RecyclerView . ViewHolder (itemView), LifecycleOwner < |
| private val lifecycleRegistry = LifecycleRegistry ( this ) |
| init < |
| lifecycleRegistry.currentState = Lifecycle . State . INITIALIZED |
| > |
| fun onAppear () < |
| lifecycleRegistry.currentState = Lifecycle . State . CREATED |
| > |
| fun onDisappear () < |
| lifecycleRegistry.currentState = Lifecycle . State . DESTROYED |
| > |
| override fun getLifecycle (): Lifecycle < |
| return lifecycleRegistry |
| > |
| > |
This comment has been minimized.
Copy link Quote reply
fmatosqg commented Mar 18, 2019
I’m implementing something very close to this but I’m having a nasty bug. Sometimes my row gets attached to the new data before detaching from the old one, causing wrong data to display or bad data to flicker before settling. Have you experienced this?
This comment has been minimized.
Copy link Quote reply
kibotu commented Jun 24, 2019
onAppear should also call
lifecycleRegistry.markState(Lifecycle.State.STARTED)
also markState is deprecated now, and currentState should be used 🙂
thanks for sharing though
This comment has been minimized.
Copy link Quote reply
sudeshim3 commented Sep 12, 2019 •
onAppear should also call
lifecycleRegistry.markState(Lifecycle.State.STARTED)
also markState is deprecated now, and currentState should be used 🙂
thanks for sharing though
yes, markState is deprecated. write onAppear() and onDisappear() as
Источник
Выбор элементов recylerView при помощи dataBinding’а
Всем привет. На днях столкнулся с проблемой реализации выбора нескольких элементов в RecyclerView с использованием dataBinding’а.
Сразу за дело
Для начала напишем базовый адаптер, поддерживающий dataBinding.
Так же для работы DiffUtil я сделал интерфейс, который показывает, что элемент имеет уникальное поле
До недавнего времени, данный адаптер позволял решить почти все задачи со списками. В зависимости от проекта onClick можно заменить на onBind: (binding: ViewDataBinding) -> Unit, тем самым можно сделать настройку отдельных элементов итема.
Selection helper
Настало время магии, пора писать сам SelectionHelper, который будет работать для dataBinding’а и иметь высокую производительность.

За время написания возможности выбора элементов из списка, была создана куча костылей, которые обладали очень медленным перфомансом при поиске выбранных элементов, или же код реализации был кривым.
Вот самый лучший, на мой взгляд, вариант:
Из преимуществ такого подхода можно выделить:
Со стороны viewModel мы можем иметь быстрый доступ к выбранным элементам через selectionHelper.getSelectedItems, при надобности.
Возможность использовать DataBinding, без надобности как-то уведомлять adapter о изменении состояния итема
Выделение можно делать как под копотом адаптера, так и настраивать все через тот же самый onBind
Теперь для работы с таким хелпером нам надо:
Создать сам хелпер в viewModel/presenter или где угодно, где он нужен
Передать его в адаптер
Модифицировать xml итема
С первым пунктом не должно быть каких-либо проблем, а вот вторым мы сейчас и займемся
Переписываем adadpter
Сейчас при каждом клике элемент будет менять свое состояние выбран/не выбран, это поведение можно поменять, сделав метод onBind, или же как-либо по другому.
Весь код адаптера
Модифицируем наш итем
И так, пришло время немного переписать xml итема, добавляем наш selectionHelper как пременную в xml
Сейчас для выделения я сделал padding = 1dp, для того, что бы менять фон выделенного изображения, по факту отображение выделения зависит только от вашей фантазии.
Добавляем новый bindingAdapter для обработки изменений в selectionHelper
Таким вот образом, если элемент выбран мы меняем ему background.
Результат
Вот список элементов до клика по ним:
После кликов получаем вот такой результат:

Заключение
По результату мы получили довольно простой инструмент для выделения элементов списка. Если отойти от обычного выделения рамкой, можно будет менять состояние, допустим, чекбокса, в зависимости от того, выбран элемент или нет.
По аналогии можно сделать кучу разных вариаций использования данного хэлепера.
Спасибо за прочтение, это моя первая статья, так что не судите строго, а так же держите котика.
Источник
Android Architecture Components. Часть 2. Lifecycle

Как я уже упоминал в предыдущем материале, компонент Lifecycle призван упростить работу с жизненным циклом, а имено избежать калбеков с Activity/Fragment в наш компонент, который должен реагировать на события жизненого цикла. В этой статье, мы подробно разберем как он устроен и как с ним работать.
Сам компонент состоит из классов: Lifecycle, LifecycleActivity, LifecycleFragment, LifecycleService, ProcessLifecycleOwner, LifecycleRegistry. Интерфейсов: LifecycleOwner, LifecycleObserver, LifecycleRegistryOwner.
Lifecycle — класс, который хранит информацию про состояние жизненного цикла и разрешает другим объектам отслеживать его c помощью реализации LifecycleObserver. Состоит из методов: addObserver(LifecycleObserver), removeObserver(LifecycleObserver) и getCurrentState(). Как понятно из названий для добавления подписчика, удаления и соответственно получения текущего состояния.
Для описания состояния есть два enum. Первый Events — который обозначает изменение цикла и второй State — который описывает текущее состояние.
Events — повторяет стадии жизненного цикла и состоит из ON_CREATE, ON_RESUME, ON_START, ON_PAUSE, ON_STOP, ON_DESTROY, а также ON_ANY который информирует про изменения состояния без привязки к конкретному этапу. Отслеживание изменений цикла происходит с помощью пометки метода в обсервере аннотацией OnLifecycleEvent, которому как параметр передается интересуещее нас событие.
State — состоит из следующих констант: INITIALIZED, CREATED, STARTED, RESUMED, DESTROYED. Для получения состояния используеться метод getCurrentState() из Lifecycle. Также в Enum State реадизован метод itAtLeast(State), который отвечает на вопрос являтся State выше или равным от переданого как параметр.
Для работы с компонентом Lifecycle, нам нужно определить owner, то есть владельца жизненного цикла и observer, того кто на него будет подписан. У owner может быть любое количество подписчиков, также стоит отметить что observer будет проинформирован про изменение состояния, еще до того как у owner будет вызван метод super() на соответствующий метод жизненного цикла.
Owner должен реализовывать интерфейс LifecycleOwner, который содержит один метод getLifecycle(), который возвращает екземпляр класса холдера Lifecycle.
Observer должен реализовать интерфейс маркер LifecycleObserver.
Для самостоятельного обьявления кастомной Activity/Fragment, как owner-а, которые еще не поддерживают новый компонент и соответственно не имеют реализации Lifecycle, созданы: класс LifecycleRegistry и интерфейс LifecycleRegistryOwner.
Интерфейс LifecycleRegistryOwner, который в свою очередь расширяет интерфейс LifecycleOwner с единственым отличием в том что метод getLifecycle() возвращает LifecycleRegistry вместо Lifecycle.
Класс LifecycleRegistry, который являеться расширением Lifecycle и берет всю работу по поддержке на себя, нам лишь нужно создать его экземпляр.
Вот как выглядит реализация:
В пакете android.arch.lifecycle приведено 4 реализации owner: LifecycleActivity, LifecycleFragment, LifecycleService, ProcessLifecycleOwner.
LifecycleActivity — это FragmentActivity c реализацией LifecycleRegistryOwner. Является временным решением для упрощения работы и как сказано в документации будет пока Lifecycle не будет интегрирован с support library.
LifecycleFragment — это Fragment c пакета support.v4, который также как и в случае с LivecycleActivity реализовывает LifecycleRegistryOwner и является временным решением.
LifecycleService — это Service, который является также LifecycleOwner.
ProcessLifecycleOwner — это класс, который представляет Lifecycle всего процесса. Этот класс будет полезен если вам нужно отслеживать уход приложения в бэкграунд или возврат его на передний план.
Для того чтоб, связать owner и observer нужно у owner вызвать getLifecycle().addObserver(LifecycleObserver) Ниже я продемонстрирую работу всех этих классов. Для демонстрации, я создал класс SomeObserver, который будет логировать вызовы ON_CREATE и ON_STOP, я его буду использовать для всех видов owner-ов, поэтому для упрощения я добавил enum, константа с которого будет передаваться в конструктор и потом использоваться, чтоб отличить владельца по логам:
В целом же работа со всеми классами аналогичная, все что нам нужно это создать экземпляр обсервера и подписать его на Lifecycle, в моей реализации мы передаем наш Lifecycle в конструктор обсервера, подпиской занимаеться уже сам обсервер. Данный подход, является всего лишь делом вкуса и не более.
Листинг LifecycleService, он отрабатывает 5 секунд и завершается, его я запускаю из Application:
И для ProcessLifecycleOwner я решил расширить Application, как можно заметить ProcessLifecycleOwner сделан как singleton и являеться абсолютно самостоятельным компонентом:
Полный листинг вы можете посмотреть по линке: here
Также полезные ссылки: раз и два.
В следующей статье мы более подробно разберем LiveData компонент.
Источник


