- Deepshikha Puri
- Mobile App Developer (Android & iOS)
- Get all images from gallery in android programmatically
- Rate this:
- Share this:
- Like this:
- Related
- Deepshikha Puri
- 49 thoughts on “ Get all images from gallery in android programmatically ”
- Add yours
- Learn2Crack
- Android Custom ListView with Images and Text – Example
- Creating Project:
- Download Complete Project:
- Creating Layout:
- Creating Activity:
- Creating Manifest:
- Android List View
- List View
- ListView Attributes
- ArrayAdapter
- Example
- SimpleCursorAdapter
Deepshikha Puri
Mobile App Developer (Android & iOS)
Get all images from gallery in android programmatically
» data-image-caption=»» data-medium-file=»https://deepshikhapuri.files.wordpress.com/2017/03/gallery.png?w=169″ data-large-file=»https://deepshikhapuri.files.wordpress.com/2017/03/gallery.png?w=576″/>
Rate this:
Share this:
Like this:
Related
Deepshikha Puri
Deepshikha Puri, the young Indian Entrepreneur heading the mobile development trade from years to successive extent, has worked with numerous clients and many tremendous brands in this industry of mobile encompassing in India and overseas maintaining promising work relationships with each of them with an impression to manage it’s whole thing. Along with creating a meaningful opportunity for herself, she has formulated a couple of blogs & articles to share factual information about mobile development holding her immense understanding with the aim of developing technology solutions to the modern digital world.
49 thoughts on “ Get all images from gallery in android programmatically ”
Add yours
Thanks this is great.
Once all images are open how can I click the image and dispaly that image in full screen?
Just get the item clicked position and pass that position to new activity By using this:
listview.setonitemclickedposition:
Now pass that position to new activity:
Intent intent = new Intent(getApplicationcontext, NewActivity.this)
intent.putExtra(“position”,i);
startactivity(intent);
Now get this position on your new activity:
int int= getIntent(“position”);
Now create your arraylist static on your MainActivity.
Now load it in your new activity:
Glide.with(context).load(“file://” + al_video.get(position).getStr_thumb())
.skipMemoryCache(false)
.into(iv_image);
If still you have any issue then let me know.
Thanks for your quick reply.
Where do I need to put listview.setonitemclickedposition and call the next activity. Is this from the main activity. Sorry I’m quite new to this.
Yes its from Mainactivity like this:
lv.setOnItemClickListener(new OnItemClickListener()
<
@Override
public void onItemClick(AdapterView adapter, View v, int position,
long arg3)
<
String value = (String)adapter.getItemAtPosition(position);
// assuming string and if you want to get the value on click of list item
// do what you intend to do on click of listview row
>
>);
Thank you so much for this blog.
I need to select all images from gallery which are between given date range. Can you please help me how I can achieve this requirement ?
First of all you have to create the custom gallery. then you have to sort the images according to date. Then select the start and end date. Show data according to that date.
I am very new to android. Can you show me the process to do it ? How to make custom gallery and get the dates of the images?
I changed small code in your mainActivity to get the images which are in the given date range,
int column_index_data, column_index_folder_name;
long to = 2017-03-03;
long from = 2017-01-01;
String absolutePathOfImage = null;
uri = MediaStore.Images.Media.EXTERNAL_CONTENT_URI;
final String orderBy = MediaStore.Images.Media.DATE_TAKEN;
Actually I want to show only those images in the folder which are in the given date range. I will hard code the date range in my program for testing.
I think what I did above is not right. I just want to load those images which are in given date range. Can you please help me.
try to get the file date like this:
File file = new File(filePath);
Date lastModDate = new Date(file.lastModified());
Log.i(“File last modified @ : “+ lastModDate.toString());
Can you please explain what is the difference between your GridViewAdapter and Adapter_photosfolder classes?
ma’am i have an error in the line .
Glide.with(context).load(“file + al_menu.get(int_position).getAl_imagepath().get(position))
its saying iilegal line end in the sring literal. what does that mean where have i gone wrong ??
Did you add the dependency of glide in your gradle file
Yes i did that all the other error were solved only this error is occurring..
I copied the code each file at a time (for studying purposes), from the website. I didn’t download the source code from the link. I had the same problem as you did, and perhaps by now you might had fixed it.
In any case, if anyone else is stuck at this error:
Some closing double quotes are missing after the “file”.
It would be like this:
This happens in the Adapters_PhotosFolder.java file and in the GridViewAdapter.java file.
Deepshikhapuri thank you for this example! There isn’t anything like this in the whole network, as easy to implement as this one. Thanks!!
Please help me out,how can i get the selected image Uri from folder
Hello use this method to get the images :
public ArrayList fn_imagespath() <
al_images.clear();
int int_position = 0;
Uri uri;
Cursor cursor;
int column_index_data, column_index_folder_name;
String absolutePathOfImage = null;
uri = MediaStore.Images.Media.EXTERNAL_CONTENT_URI;
final String orderBy = MediaStore.Images.Media.DATE_TAKEN;
cursor = getApplicationContext().getContentResolver().query(uri, projection, null, null, orderBy + ” DESC”);
column_index_data = cursor.getColumnIndexOrThrow(MediaStore.MediaColumns.DATA);
column_index_folder_name = cursor.getColumnIndexOrThrow(MediaStore.Images.Media.BUCKET_DISPLAY_NAME);
while (cursor.moveToNext()) <
absolutePathOfImage = cursor.getString(column_index_data);
Log.e(“Column”, absolutePathOfImage);
Log.e(“Folder”, cursor.getString(column_index_folder_name));
Hello,
Thanks for your interesting blog. The code works such a charm.
I am very new in android programming.
I was wondering how to add an extra folder, named let’s say “all photos”, including all the existing photos.
Thanks in advance!
Lavi
Just create the directory and then copy all the files in your folder
hello,
when i run code , my app only show folder but problem to show image
anyone can help me
?
Where you are getting issue can u plz explain.
Источник
Learn2Crack

Android Custom ListView with Images and Text – Example
In this tutorial we are going to show you how to implement custom ListView in Android with Images and Text for each list item. In order to display a series of data you can use ListView.
Creating Project:
Make sure you have properly setup the Android SDK, AVD for Testing the Application. Create a New project in Eclipse IDE with the package as “learn2crack.customlistview”. Create the Main Activity as “MainActivity” and the main Layout as “activity_main”.
Download Complete Project:
Creating Layout:
The Main layout for our project is “activity_main” which has a ListView to display the array with images.
activity_main.xml
Next step is to create a layout for the list item that is to be displayed in ListView. Create the layout as list_single.xml which has a TextView to display to the Array and a ImageView to display set of images in each list item. Here I have created the layout as TableLayout with ImageView and TextView in a Row.
list_single.xml
Creating Activity:
Before Creating the MainActivity we must create a CustomList class for our custom ListView.
CustomList.java
Next step is to create MainActivity. Here we are defining the array “web” which is displayed as text in ListView. Next we define a array imageId to store the Image Id. The images should be placed in the location /res/drawable/. Next custom list adapter is displayed. When a list item is clicked it shows a Toast that it is clicked.
MainActivity.java
Creating Manifest:
No other special Permissions are required for our project.
Источник
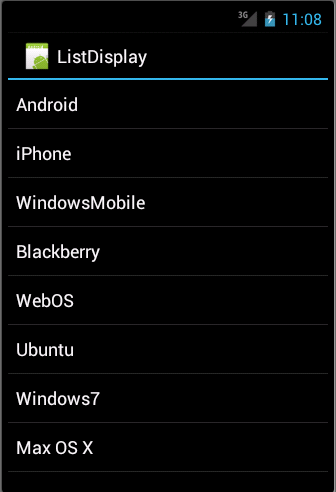
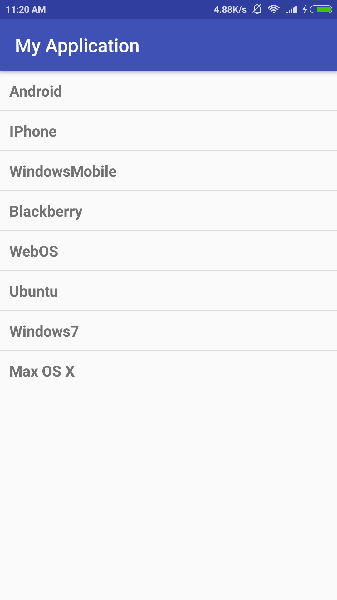
Android List View
Android ListView is a view which groups several items and display them in vertical scrollable list. The list items are automatically inserted to the list using an Adapter that pulls content from a source such as an array or database.
List View
An adapter actually bridges between UI components and the data source that fill data into UI Component. Adapter holds the data and send the data to adapter view, the view can takes the data from adapter view and shows the data on different views like as spinner, list view, grid view etc.
The ListView and GridView are subclasses of AdapterView and they can be populated by binding them to an Adapter, which retrieves data from an external source and creates a View that represents each data entry.
Android provides several subclasses of Adapter that are useful for retrieving different kinds of data and building views for an AdapterView ( i.e. ListView or GridView). The common adapters are ArrayAdapter,Base Adapter, CursorAdapter, SimpleCursorAdapter,SpinnerAdapter and WrapperListAdapter. We will see separate examples for both the adapters.
ListView Attributes
Following are the important attributes specific to GridView −
| Sr.No | Attribute & Description | |||||||||||
|---|---|---|---|---|---|---|---|---|---|---|---|---|
| 1 |
| Step | Description |
|---|---|
| 1 | You will use Android Studio IDE to create an Android application and name it as ListDisplay under a package com.example.ListDisplay as explained in the Hello World Example chapter. |
| 2 | Modify the default content of res/layout/activity_main.xml file to include ListView content with the self explanatory attributes. |
| 3 | No need to change string.xml, Android studio takes care of default string constants. |
| 4 | Create a Text View file res/layout/activity_listview.xml. This file will have setting to display all the list items. So you can customize its fonts, padding, color etc. using this file. |
| 6 | Run the application to launch Android emulator and verify the result of the changes done in the application. |
Following is the content of the modified main activity file src/com.example.ListDisplay/ListDisplay.java. This file can include each of the fundamental life cycle methods.
Following will be the content of res/layout/activity_main.xml file −
Following will be the content of res/values/strings.xml to define two new constants −
Following will be the content of res/layout/activity_listview.xml file −
Let’s try to run our modified Hello World! application we just modified. I assume you had created your AVD while doing environment set-up. To run the app from Android studio, open one of your project’s activity files and click Run  icon from the tool bar. Android studio installs the app on your AVD and starts it and if everything is fine with your set-up and application, it will display following Emulator window −
SimpleCursorAdapter
You can use this adapter when your data source is a database Cursor. When using SimpleCursorAdapter, you must specify a layout to use for each row in the Cursor and which columns in the Cursor should be inserted into which views of the layout.
For example, if you want to create a list of people’s names and phone numbers, you can perform a query that returns a Cursor containing a row for each person and columns for the names and numbers. You then create a string array specifying which columns from the Cursor you want in the layout for each result and an integer array specifying the corresponding views that each column should be placed −
When you instantiate the SimpleCursorAdapter, pass the layout to use for each result, the Cursor containing the results, and these two arrays −
The SimpleCursorAdapter then creates a view for each row in the Cursor using the provided layout by inserting each from Columns item into the corresponding toViews view.
Источник


