- ListAdapter: A RecyclerView Adapter Extension
- ListAdapter: A RecyclerView Adapter Extension
- Howdy people! We have been using RecyclerView for such a long time. It seems pretty easy to implement, isn’t it? All we…
- ListAdapter
- Gradle Dependencies
- Required Classes
- Create DiffUtil.ItemCallback Implementation
- Adapting to ListAdapter
- Split the difference
- Android | RecyclerView Using Support Library ListAdapter
- Environment, Tools & Library
- Overview
- ( 1 ) Create new Android Project
- Android: Как удалить элемент из listView и arrayAdapter
- 8 ответов
- ArrayAdapter
- Создание адаптера
- Используем ресурсы
- Динамическое наполнение
- ListAdapter
- SpinnerAdapter
- Переопределяем адаптер
- Несколько советов
ListAdapter: A RecyclerView Adapter Extension

Originally published at:
ListAdapter: A RecyclerView Adapter Extension
Howdy people! We have been using RecyclerView for such a long time. It seems pretty easy to implement, isn’t it? All we…
Howdy people! We have been using RecyclerView for such a long time. It seems pretty easy to implement, isn’t it? All we need to do is extend RecyclerView.Adapter class and implement at least 3 methods:
- getItemCount()
- onCreateViewHolder()
- onBindViewHolder()
That’s it! After that generally, we provide a way to set data to adapter by adding a method like setList() and then in the method we assign a new list and then we call notifyDataSetChanged() to update RecyclerView.
But that’s not it. The method notifyDataSetChanged() refreshes whole list. As a result onBindViewHolder() is called for all of the items in the list even if the item doesn’t have any change at all. We don’t want to refresh our whole list every time some item is added, removed or changed. It doesn’t look good and it is not even performance friendly when you have last number of items in the list.
DiffUtil comes to the rescue! It provides a way to calculate difference between the two list and calls related methods on the adapter like notifyItemInserted(), notifyItemRemoved(), notifyItemChanged(), etc. As a result, the whole list doesn’t get refreshed. Only the items that have been changed are refreshed. It also animates the item changes a little bit so it looks quite nice and it is also performance efficient.
Before we continue further, If you don’t know what DiffUtil is, what it does and how to implement it with RecyclerView then I suggest you to go and learn that first. If you wish to continue reading further then I assume you have enough knowledge of DiffUtil and its implementation.
To use DiffUtil, we need to do a little bit of setup. First, we need to create a class that extends DiffUtil.Callback class. then after we need to calculate the difference between old list and new list using an instance of the class that we have created extending DiffUtil.Callback.
This is the all setup we need to do in order to implement DiffUtil and it works fine for small lists. The problem is that DiffUtil calculates the difference on main thread which leads to performance issues when the adapter holds larger amount of data in the list. To avoid that, we need to run DiffUtil on background thread and pass results to the main thread.
Now, that’s quite a lot of things to setup. There must be some easy way to do that, right? Guess what, there is! I’m not talking about using any utils or third party libraries. It is right there in the support library itself! ListAdapter comes to the rescue!
ListAdapter
If you have paid close attention to the RecyclerView library releases then you might have came across this class but perhaps I assume you didn’t (neither did I) so here we are. Let’s see what is this all about. ListAdapter was added in version 27.1.0 and belongs to maven artifact com.android.support:recyclerview-v7:28.0.0-alpha1 . Here’s what android docs page says:
It is RecyclerView.Adapter base class for presenting List data in a RecyclerView , including computing diffs between Lists on a background thread.
It computes Diffs on background thread which means we don’t need to implement it by ourselves. Also, it provides more convenient and easy implementation of DiffUtil rather than implementing diffs with normal RecyclerView.Adapter.
This class is a convenience wrapper around AsyncListDiffer that implements Adapter common default behavior for item access and counting.
AsyncListDiffer is helper class for computing the difference between two lists via DiffUtil on a background thread.
ListAdapter provides a method submitList(List) to provide new or modified data to RecyclerView.Adapter and handles all the diffs computation. So we don’t need to do much of setup here. All we need to do is provide a instance of DiffUtil.ItemCallback that determines whether the item is changed or not. So, Let’s take a dive into the implementation of ListAdapter.
Gradle Dependencies
Required Classes
To implement ListAdapter, we’ll need RecyclerView.ViewHolder implementation and a model/POJO class. We must provide a model class type (e.g. User) to ListAdapter as it would be managing list for us.
Create DiffUtil.ItemCallback Implementation
ListAdapter takes a DiffUtil.ItemCallback instance as an constructor input. Let’s create an implementation for DiffUtil.ItemCallback :
Notice that we have used oldItem == newItem expression for checking whether the contents are same or not and it works perfectly as we’re using data class which provides implementation for equals() method by default.
Now let’s implement ListAdapter . Unlike RecyclerView.Adapter implementation, we don’t need to override getItemCount() method as ListAdapter manages the list for us. So we only need to implement two methods onCreateViewHodler() and onBindViewHolder() .
However if you do want to override getItemCount() method for some reason then you must call super method to get item count and then use it further. Here’s an example that we generally use to provide empty list implementation:
All we have to do now is submit new list whenever we have it.
That’s it! Diffs will be calculated on background thread and adapter will be notified with the results on main thread. This is the easiest implementation I have found for DiffUtil on Background thread. No boilerplate! That’s amazing!
If you wish to have more control over adapter behavior then you can use AsyncListDiffer class which can be connected to a RecyclerView.Adapter , and will signal the adapter of changes between submitted lists.
Thanks for reading! If you liked what you read, don’t forget to clap. Happy coding folks!
Источник
Adapting to ListAdapter
This is the second in a series of articles which cover the fundamentals of creating and using RecyclerView . If you already have a solid understanding of how to create a RecyclerView , then carry on. Otherwise, consider starting with this post.
RecyclerView is a great way to display a list of data items efficiently. For displaying a list of static data, the default adapter works great. However, in most use cases, RecyclerView data is dynamic. Take a todo list app for example: new items are added, and completed items are removed. notifyItemInserted() can insert new tasks at a specified index, but the issue comes when removing items. notifyItemRemoved() is only useful if you have the position of the task you want to remove. It is possible to write code to get the position of the task to be removed and then call notifyItemRemoved() , but this code can get messy. Calling notifyDataSetChanged() is an option, but it redraws the entire view, even the unchanged parts, which is an expensive operation. ListAdapter handles addition and removal without the need to redraw the entire view, and even animate those changes.
Another benefit of using ListAdapter is that it comes with animations for when an item is added or removed. This provides a nice visual cue for the user to see the changes in the list. Animations are possible without ListAdapter but they must be implemented by the developer and won’t have the same performance because the view will likely need to be redrawn along with being animated.
Split the difference
DiffUtil is the secret ingredient that makes it possible for ListAdapter to change the items in the list efficiently. DiffUtil compares the new list with the old list to figure out what was added, moved, and removed and outputs a list of update operations that converts the first list into the second efficiently.
In order to identify new data, DiffUtil requires you to override areItemsTheSame() and areContentsTheSame() . areItemsTheSame() checks if two items are actually the same item. areContentsTheSame() checks if two items have the same data.
Источник
Android | RecyclerView Using Support Library ListAdapter
 ListAdapter for RecyclerView has been introduced in Revision 27.1.0 Release of Support Library. ListAdapter uses DiffUtil under the hood to compute list diffs on a background thread. This will help RecyclerView animate changes automatically with less work on the UI thread.
Environment, Tools & Library
- Android Studio 3.1.4
- Android Support Library com.android.support:recyclerview-v7:28.0.0
- Java 1.8+ for Lambda experssions support
Overview
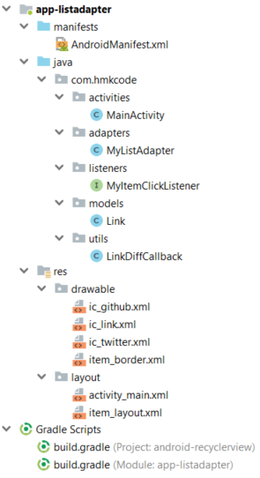
We will build an app that displays a list of hard-coded instances of class Link in a RecyclerView . We will use ListAdapter instead of the usual RecyclerView.Adapter as shown in a previous post Create a List with RecyclerView. To display items on RecyclerView you need to the following:
- RecyclerView widget added to the activity layout.
- A class extending DiffUtil.ItemCallback
- A class extending ListAdapter .
- A class extending RecyclerView.ViewHolder .
- Layout for RecyclerView items.
Files we need for this app are shown in the image below.
( 1 ) Create new Android Project
Create new android application keep default options. This app is targeting API 19 or later
Источник
Android: Как удалить элемент из listView и arrayAdapter
у меня есть коллекция элементов в ArrayList. Я добавляю их к адаптеру клиента следующим образом:
у меня есть кнопка удаления для каждого из этих элементов в моем списке, но я не уверен, как подключить кнопку удаления onClick() с исходным элементом в ArrayList. Может кто-нибудь объяснить, как это сделать или указать мне учебник, где я могу прочитать об этом? Не-саркастические / не-снисходительные ответы очень ценятся.
8 ответов
можно назвать remove() метод ArrayList
и тогда вам нужно позвонить notifyDataSetChanged(); на вашем адаптере для обновления ListView
вот мое решение до сих пор:
на getView() метод я делаю что-то вроде этого:
похоже getTag() возвращает объект. Поэтому я сначала преобразовал position int в объект Integer. Похоже, это работает.
на OnClickListener() Я делаю следующее:
пока все хорошо.
вы можете получить индекс элемента, просто заметив, что представление списка является коллекцией дочерних представлений (строк списка).
вы можете сделать что-то подобное в ваш код:
(например, внутри метода getView ())
то есть решение-просто использовать метод indexOfChild (View), чтобы получить индекс дочернего представления, который пользователь (долго) нажал.
следующие работы для меня:
передача здесь является экземпляром основного класса. каждый раз, когда я нажимаю deletebutton, он затем передает позицию этого элемента в списке в этой строке.
Если вы используете контекстное меню, то вы можете получить AdapterContextMenuInfo и эта структура дает индекс и идентификатор щелкнутого элемента.
Кажется, что вы можете получить индекс (или позиция) выбранного элемента в ListView следующим образом:
поэтому вам нужно прослушать клики по представлениям, а затем взять индекс из этого.
Источник
ArrayAdapter
Создание адаптера
ArrayAdapter является простейшим адаптером, который специально предназначен для работы с элементами списка типа ListView, Spinner, GridView и им подобным. Создать адаптер этого вида можно так:
В параметрах используется контекст, XML-разметка для отдельного элемента списка и массив данных. Контекстом может быть сама активность (this), под разметкой подразумевается компонент, в котором выводится текст, например, TextView, а данными является подготовленный массив, все элементы которого по очереди вставляются в указанную разметку.
Разметку можно создать самостоятельно, а можно использовать готовую системную разметку. Если посмотреть на исходники файла simple_list_item_1.xml в документации Android SDK, то увидим, что он содержит TextView. В этом коде мы создали адаптер ArrayAdapter, в котором данные элемента TextView представлены в виде строк.
Чтобы код был более читаемым, можно сделать ещё так:
Мы вынесли массив строк в отдельную переменную.
Используем ресурсы
Если у нас есть готовый файл ресурсов (массив строк), то можно использовать специальный метод createFromResource(), который может создать ArrayAdapter из ресурсов:
Подготовим массив строк:
Теперь мы можем воспользоваться адаптером и применить к Spinner:
В этом примере мы использовали системную разметку android.R.layout.simple_spinner_item, которая тоже содержит TextView.
При использовании этого метода вы можете применять локализованные версии, что очень удобно.
Или можно пойти другим путём. Получить массив из ресурсов и вставить его в адаптер, как в самом первом примере.
Динамическое наполнение
Также мы можем создать массив программно.
ListAdapter
ListAdapter является интерфейсом. По сути ничего не меняется. Заменяем ArrayAdapter adapter на ListAdapter adapter и получаем тот же результат.
Данный интерфейс может пригодиться при создании собственного адаптера, а для стандартных случаев выгоды не вижу.
SpinnerAdapter
SpinnerAdapter также является интерфейсом и может использоваться при создании собственных адаптеров на основе ArrayAdapter. В стандартных ситуациях смысла использования его нет. Вот так будет выглядеть код:
Переопределяем адаптер
По умолчанию ArrayAdapter использует метод toString() из объекта массива, чтобы наполнять данными элемент TextView, размещённый внутри указанной разметки. Если вы используете ArrayAdapter , где в параметре используется ваш собственный класс, а не String, то можно переопределить метод toString() в вашем классе. Пример такого решения есть в конце статьи Android: Простейшая база данных. Часть вторая.
Другой способ. Мы хотим выводить данные не в одно текстовое поле, а в два. Стандартная разметка для списка с одним TextView нам не подойдёт. Придётся самостоятельно создавать нужную разметку и наполнять её данными.
В этому случае нужно наследоваться от класса ArrayAdapter, указывая конкретный тип и переопределяя метод getView(), в котором указать, какие данные должны вставляться в новой разметке.
Метод getView() принимает следующие параметры: позицию элемента, в котором будет выводиться информация, компонент для отображения данных (или null), а также родительский объект ViewGroup, в котором указанный компонент поместится. Вызов метода getItem() вернёт значение из исходного массива по указанному индексу. В результате метод getView() должен вернуть экземпляр компонента, наполненный данными.
Допустим, у нас есть простой класс Cat с двумя полями — имя и пол. Нашему списку понадобится специальная разметка, состоящая из двух текстовых полей. Создадим адаптер, который будет использовать класс Cat вместо String и будем извлекать данные из объекта класса.

Как видите, достаточно просто изменить программу, используя свой класс вместо String.
В методе getView() используется не совсем корректная версия метода inflate(). Подробнее об этом читайте в статье LayoutInflater
Класс ArrayAdapter позволяет динамически изменять данные. Метод add() добавляет в конец массива новое значение. Метод insert() добавляет новое значение в указанную позицию массива. Метод remove() удаляет объект из массива. Метод clear() очистит адаптер. Метод sort() сортирует массив. После него нужно вызвать метод notifyDataSetChanged.
Несколько советов
ArrayAdapter имеет шесть конструкторов.
- ArrayAdapter(Context context, int resource)
- ArrayAdapter(Context context, int resource, int textViewResourceId)
- ArrayAdapter(Context context, int resource, T[] objects)
- ArrayAdapter(Context context, int resource, int textViewResourceId, T[] objects)
- ArrayAdapter(Context context, int resource, List objects)
- ArrayAdapter(Context context, int resource, int textViewResourceId, List objects)
У них у всех первые два параметра — это контекст и идентификатор ресурса для разметки. Если корневой элемент разметки является контейнером вместо TextView, то используйте параметр textViewResourceId, чтобы подсказать методу getView(), какой компонент используется для вывода текста.
Сам адаптер работает с данными, как со списками. Если вы используете стандартный массив, то адаптер переконвертирует его в список. Сами данные необязательно сразу передавать адаптеру, можно сделать это позже через метод addAll().
Другие полезные методы адаптера:
- add() — добавляет объект в коллекцию
- remove() — удаляет объект из коллекции
- getItem(int position) — возвращает объект из позиции position
- getContext() — получает контекст
На последний метод следует обратить внимание при создании собственного адаптер на основе ArrayAdapter. Не нужно в своём классе объявлять контекст таким образом.
Через метод getContext() вы уже можете получить доступ к контексту, не объявляя новой переменной.
Тоже самое применимо и к массивам. Не нужно объявлять массив:
Используйте метод getItem(position), который может получить доступ к массиву.
Если позволяет логика, используйте списки вместо массивов для большей гибкости. Тогда вы можете добавлять и удалять данные через методы add() и remove().
Источник


