ziginsider
Введение
Поскольку мы Android разработчики, нам не сложно реализовать прокручиваемый список тем способом, который соответствует задаче. Но два наиболее популярных пути — ListView и RecyclerView.
Первый из них прекрасный виджет, который был доступен с API 1. До Android Lollipop мы главным образом использовали этот способ, что было довольно неплохо — API был интуитивно понятен. Но к сожалению мы могли создать только вертикально прокручиваемый список, и чтобы он прокручивался плавно, прриходилось делать все надлежлащим способом. Кроме того, класс ListView довольно тяжелый — у него множество обязанностей. Всякий раз, когда нам требовалось обработать список, т.е. сконфигурировать его, единственный путь сделать это был через объект ListView внутри адаптера.
Сегодня мы используем RecyclerView. Как я упоминал, он появился в Android Lollipop и сразу изменил правила игры. Большинство вещей, которые мы ненавидели в ListView были убраны или изменены в RecyclerView. По умолчанию, мы получали больше возможностей. Создание макетов (LayoutManager) отделено, и мы получили больше свободы для манипуляции с данными, чем манипулирование только внутри адаптера.
Если вы хотите узнать больше об этих механизмах, вы можете глянуть мои статьи, которые рассказывают, как реализовать ListView и RecyclerView
(От переводчика) O RecyclerView можно узнать больше в этой моей заметке https://ziginsider.github.io/RecyclerView/
Итак, опишем наиболее существенные различия между этими двумя механизмами..
ViewHolder
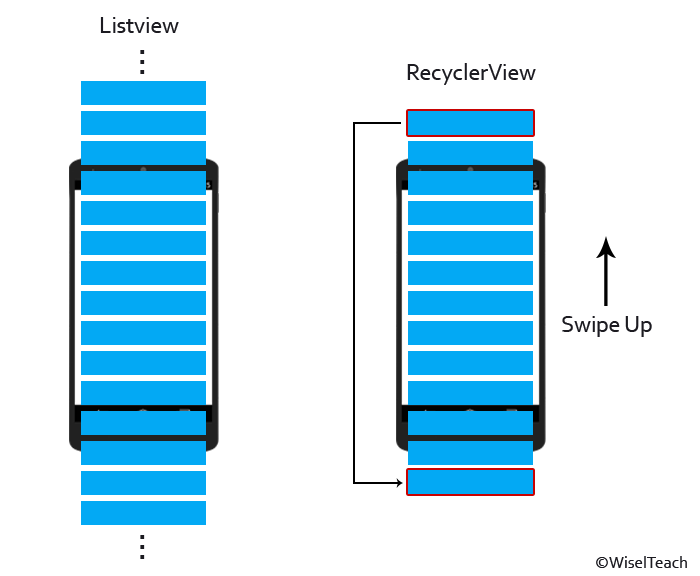
Паттерн ViewHolder помогает сделать прокрутку нашего списка плавной. Он сохраняет ссылки на элементы списка, чтобы затем адаптер мог их переиспользовать. Благодаря этому надувание View элемента (inflating) и вызов дорогого метода findViewById() происходит всего пару раз, а не для каждого элемента списка.
Адаптер RecyclerView в обязательном порядке заставляет нас реализовать надувание элемента списка с помощью двух методов — onCreateViewHolder() и onBindViewHolder().
ListView, с другой стороны, не делает обязательным реализацию ViewHolder. И, если мы не реализуем надувание сами, внутри getView(), мы останемся без эффективной прокрутки в списке.
LayoutManager
LayoutManager берет на себя ответсвенность за макетирование представления элементов. Благодаря этому у RecyclerView нет ответственности за поозиционирование элементов в списке. LayoutManager дает возможность выбирать позиционирование элементов списка относительно друг друга и выбирать способ прокрутки. Например, если нам нужен вертикальный или горизонтальный список, мы выбираем LinearLayoutManager. Для табличного представления более подходит GridLayoutManager.
Раньше, с помощью ListView, мы могли создать список только с вертикальной прокруткой. Это было не удобно. Чтобы реализовать табличное представление, мы должны были использовать другой виджет — GridView.
ItemDecoration
Обязанности ItemDecoration просты в теории — декорировать элементы списка (рисование за ними, перед ними, между ними)- но нетривиальны в реализации. Вы должны наследоваться от класса ItemDecoration и реализовать ваше решение. У RecyclerView по-умолчанию нет разделителей между строк — это соответствует гайдлайнам Material Design. Однако, если нам необходим разделитель, мы можем использовать DividerItemDecoration и добавить его в RecyclerView.
В случае ListView мы можем добавить разделитель прямо в описании layout ListView в файле xml. Но у нас нет гибкого механизма, наподобие ItemDecoration, для реализации разделителя.
ItemAnimator
Последнее, но не менее важное отличие RecyclerView это наличие ItemAnimator. Как мы можем догадаться, он обрабатывает анимации появления или исчезновения элементов списка, или их изменения. По-умолчанию анимации RecyclerView красивые и плавные. Конечно, мы можем изменить эти анимации, реализовав свой ItemAnimator, но это также не очень просто. Чтобы упростить себе жизнь, мы можем расширить класс SimpleItemAnimator и реализовать методы, которые нам нужны (просто добавить анимации во ViewHolder наших View)
Честно говоря, реализация анимации в ListView была болью в заднице. Опять же, нам нужно было выяснять как мы справимся с этой задачей. Ничего хорошего. Я рад, что это закончилось.
Notifying adapter
У нас есть несколько классных механизмов уведомления (notify) в адаптере RecyclerView. Мы все еще можем использовать notifyDataSetChanged(), но, если нам необходимо изменить только один элемент списка, к нашим услугам notifyItemInserted(), notifyItemRemoved() или даже notifyItemChanged() и т.д. Мы должны использовать подходящее уведомление, чтобы сработала надлежащая анимация. Используя ListView мы можем использовать лишь notifyDataSetChanged(), а со всем остальным мы должны были справляться сами.
Вывод
ListView служил нам долгое время. Мы могли покрыть большинство случаев с его помощью. Но потребности пользователей сегодня более сложные. Дизайн списков становится все более и более сложным и ListView уже не справляется. Material Design принес другие изменения — красивее, но сложнее в реализации.
К счастью, когда был представлен RecyclerView, многие проблемы ушли. Этот механизм более эффективен по-умолчанию, анимации проще, макетирование проще и API намного приятнее.
Поэтому, если вы когда-либо задумываетесь какой из них выбрать — ваша первая мысль определенно должна быть о RecyclerView.
NB от переводчика: Так и хочется добавить в конце статьи “Аминь!”. Автор мастер рассказывать очевидные вещи. Но, мне кажется, он не совсем ясно дал понять, что RecyclerView намеренно сделан более сырым (т.е. “не из коробки”), чтобы быть более гибким в реализации. И он определенно более сложен. Но это не должно пугать начинающих, т.к. c практикой реализация его не вызывает сложностей. Но, однако, есть очень много хитростей, которые я пока только начал описывать в заметке https://ziginsider.github.io/RecyclerView/
А в тривиальных случаях вполне уместно использовать ListView.
Источник
ListView vs RecyclerView

Sep 4, 2018 · 3 min read
As an Android developer, Many people asked me what’s the difference between ListView and RecyclerView. In fact I myself was not aware of the differences unless I dig deep down and explored more.
Based on my experience of using both the components, I would like to place here few points which might help you understanding in a better way.
With the advent of Android Lollipop, the RecyclerView made its way officially. The RecyclerView is much more powerful, flexible and a major enhancement over ListView.
As per Android d e veloper site, RecyclerView added in version 22.1.0 and it belongs to Maven artifact com.android.support:recyclerview-v7:28.0.0-alpha1.
In a ListView, it was recommended to use the ViewHolder pattern but it was never a compulsion. In case of RecyclerView, this is mandatory using the RecyclerView.ViewHolder class. This is one of the major differences between the ListView and the RecyclerView.
It makes things a bit more complex in RecyclerView but a lot of problems that we faced in the ListView are solved efficiently.
This is another massive enhancement brought to the RecyclerView. In a ListView, the only type of view available is the vertical ListView. There is no official way to even implement a horizontal ListView.
Now using a RecyclerView, we can have a
i) LinearLayoutManager — which supports both vertical and horizontal lists,
ii) StaggeredLayoutManager — which supports Pinterest like staggered lists,
iii) GridLayoutManager — which supports displaying grids as seen in Gallery apps.
And the best thing is that we can do all these dynamically as we want.
3. Item Animator
ListViews are lacking in support of good animations, but the RecyclerView brings a whole new dimension to it. Using the RecyclerView.ItemAnimator class, animating the views becomes so much easy and intuitive.
4. Item Decoration
In case of ListViews, dynamically decorating items like adding borders or dividers was never easy. But in case of RecyclerView, the RecyclerView.ItemDecorator class gives huge control to the developers but makes things a bit more time consuming and complex.
Intercepting item clicks on a ListView was simple, thanks to its AdapterView.OnItemClickListenerinterface. But the RecyclerView gives much more power and control to its developers by the RecyclerView.OnItemTouchListener but it complicates things a bit for the developer.
In simple words, the RecyclerView is much more customizable than the ListView and gives a lot of control and power to its developers.
6. Performance on Loading
RecyclerView prepares view just ahead and behind the visible entries, which is great if you are fetching bitmaps in background. Performance is dramatically faster, especially if you use RecyclerView.setHasFixedSize. The old ListView is based on the premise that there’s no way to precalculate or cache the size of entries in the list, which causes insane complications when scrolling and performing layout. Takes a while to get used to it, but once you do, you’ll never go back
For more detailed description, You can always refer here.
You can find more details here.
That’s all now.. I know its limited content. I hope to update more details in this page soon with examples and applications.
Thanks for reading this, I hope you liked it, give a clap.
Источник
RecyclerView & ListView basic comparison

Feb 5, 2017 · 5 min read

Do you remember the good old ListView? Back then it was the only option for showing items in scrolling lists. Then, at some point, a new player entered the field — the RecyclerView. For some period of time I was definitely confused about which one should I use. But day by day the RecyclerView took the whole stage and there was almost nothing left for the old ListView. Nowadays, if you need a listing functionality, the RecyclerView is the place to go. But what was the reason behind the success of the RecyclerView? Let’s try to find out!
RecyclerView info
Th e RecyclerView was introduced with Android 5.0 (Lollipop). Of course, it is included in the Support Library. Thus, it is compatible event with Android API Level 7.
Similarly to the ListView, the RecyclerView’s main idea is to provide listing functionality. But as you know, this is done in a performance friendly manner. The ‘Recycler’ part of this view’s name is not there by coincidence. The RecyclerView can actually recycle the items with which it’s currently working. Surprise! Surprise! The recycling process is done thanks to a pattern called View Holder. By using it, there is no need to call findViewById() each time we go through the getView() method of our adapter. The references to all views for each list row are kept in-memory. This significantly increases the performance. Of course, you can use this pattern together with a ListView, but it is optional. If you want to use a RecyclerView, you have no other option, but to implement the View Holder pattern. It is mandatory.
Also, the RecyclerView does less things than the ListView. It’s always better to do less, but do it right. That sounds like the RecyclerView has less features than the ListView. But this is not true. It’s actually more flexible and more feature rich. Just all these options are distributed into different entities like the LayoutManager and ItemAnimator. Have you ever heard something about ‘Separation of concerns’? If not, check the Wiki page in the ‘See also’ section.
Another great thing about the RecyclerView is the way it interacts with LayoutManager and ItemAnimator. These two provide some useful functionalities.Thanks to the LayoutManager we can create lists with vertical and horizontal scrolling (LinearLayoutManager) and uniform and staggered grids (GridLayoutManager, StaggeredLayoutManager). Or we can create our own manager with extra bit of customization. Thanks to the ItemAnimator we can make use of different animations. There are animations for adding, updating and removing items from the RecyclerView.
And let’s not forget the great integration with the DiffUtil class. Long story short, this class helps us to calculate the difference between two lists of data. It’s a must when using the RecyclerView! You can check the article about the DiffUtil class in the ‘See also’ section.
Of course, there are some drawbacks when using the RecyclerView. The distribution of responsibilities to the LayoutManager and the ItemAnimator, adds extra complexity. And if we include the mandatory usage of the ViewHolder pattern, the learning curve becomes not so smooth. Our brains are not capable of working with many different components at the same time. Thus it can be harder to get used to the way of using the RecyclerView.
Another inconvenient thing is the lack of a listener like the OnItemClickListener. Of course, we can easily overcome that by using simple interfaces, but it’s still worth mentioning.
Pros & Cons of RecyclerView
- integrated animations for adding, updating and removing items
- enforces the recycling of views by using the ViewHolder pattern
- supports both grids and lists
- supports vertical and horizontal scrolling
- can be used together with DiffUtil
- adds complexity
- no OnItemClickListener
ListView info
The ListView has been around since the very beginning of Android. It was available even in API Level 1 and it has the same purpose like the RecyclerView.
The usage of the ListView is actually really simple. In this aspect, it’s not like its successor. The learning curve is smoother than the one for the RecyclerView. Thus, it is easier to grasp. We don’t have to deal with things like the LayoutManager, ItemAnimator or DiffUtil.
If we want to keep things simple, we can even use default adapters. They can be used to show a simple text as a content for our items. There is no need of extending other classes or implementing interfaces. Of course, there is no problem to make our row elements more complicated, if we want to. Then we will have to construct our own custom adapters.
What about the OnItemClickListener? Well, it is one of these small, cool things in the life of the developer. It’s really simple to use and doesn’t increase complexity at all. The thing it does is self-explanatory. And I prefer working with such a listener, rather then creating my own interfaces for handling the same events in the RecyclerView. But that’s life! 🙂
We should also mention the ExpandableListView which is heavily based on the ListView. Actually, it extends the functionality of the ListView. It provides a two-level list, consisting of parent and child items. Each parent item is associated with many child items. That allows the usage of expanding and collapsing functionality for the child items. To use the ExpandableListView, we must construct our own custom adapter.
If we want to optimize the performance of our ListView, we can use the idea of the ViewHolder pattern here as well. The thing is, that the usage of this pattern is not mandatory. Thus, folks who are not familiar with it, can construct their ListView without a ViewHolder. That can decrease the performance.
Pros & Cons of ListView
- simple usage
- default adapters
- available OnItemClickListener
- it’s the foundation of the ExpandableListView
- doesn’t embrace the usage of the ViewHolder pattern
Источник


