- Listview With Button Android Studio Example
- Wait for one minute
- Creating Listview With Button Android Example
- Step 1: Create a new project in the android studio.
- Step 2: Updating activity_main.xml file
- Step 3: Creating Model.java class
- Step 4: Creating Integer Resource File
- Step 5: Creating row layout for listview
- Step 6: Creating CustomAdapter.java class:
- Step 7: Setting tag for position and convertView
- Step 8: Getting tags in buttons onClick() method
- Step 9: Creating NextActivity
- Step 10: Updating NextActivtiy code
- Step 11: Updating MainActivity.java class
- Обработка нажатия на отдельный View в элементе списка
- Kotlin ListView Button Android Tutorial With Example Click Listener
- Before you start
- Step 1. Model Class
- Step 2. Creating row layout file
- Step 3: Integer Resource File
- Step 4. Preparing Custom Adapter
- Step 5. Next Activity To Send Data
- Step 6. Changing Main Activity
- Android ListView Tutorial | CheckBox, Button, EditText, Image,Text
- 1. Android ListView With Image and Text
- Step 1. Create a new project
- Step 2. Necessary Images
- download this images
- Step 3. Update activity_main.xml
- Step 4. Create java class named CustomeAdapter.java
- Layout File
- Step 5. Create a class named ImageModel.java
- Step 6. Finally, update MainActivity.java class.
- 2. ListView with CheckBox In Android
- Step 1. Create a new project in the Android Studio.
- Step 2. Create a class named Model.java
- Step 3. Creating lv_item.xml layout file
- Step 4. Updating activity_main.xml
- Step 5. Create one class and name it: CustomAdapter.java
- Step 6. Copy and paste following code in MainActivity.java
- Step 7. Create a new activity and name it NextActivity.
- 3. Android ListView with EditText Example
- 1. Create a model class
- 2. Making ListView Item
- 3. Preparing Custom Adapter
- Explanation
- 4. Changing MainActivity
- Update your activity_main.xml
- 5. NextActivity Creation
- 4. Android ListView with Button Tutorial
- Step 1: Create a new project in the android studio.
- Step 2: Updating activity_main.xml file
- Step 3: Creating Model.java class
- Step 4: Creating Integer Resource File
- Step 5: Creating row layout for listview
- Step 6: Creating CustomAdapter.java class:
- Step 7: Setting tag for position and convertView
- Step 8: Getting tags in buttons onClick() method
- Step 9: Creating NextActivity
- Step 10: Updating NextActivtiy code
- Step 11: Updating MainActivity.java class
- 3 thoughts on “Android ListView Tutorial | CheckBox, Button, EditText, Image,Text”
Listview With Button Android Studio Example

Hello, In this listview with button android tutorial, you will learn how to use a button in listview item.
We will see how to handle button’s click listeners in every row item of listview.
I have created listview elements with multiple clickable buttons in this tutorial example.
There are some problems like
- You click on first button, but system clicks on last button
- Quantity number of item change when scroll the listview.
Implementing button in the listview is a little complex task.
But you can do it smoothly if you follow proper method with the efficient code snippets.
Getting the proper position of clicked button and set onclick event for button required some additional coding lines.
I will go through all these problems and teach you how to solve them easily.
First of all check out the output of this example, so that you can have an idea what we are developing at the end of the tutorial.
Wait for one minute
If you have not basic idea about listview and adapter, check out listview with image and text tutorial first.
Check listview with checkbox android example for gaining knowledge about how to use a checkbox in listview row.
Creating Listview With Button Android Example
Step 1: Create a new project in the android studio.
Empty Activity is the option, you need to select when creating a new project in the android studio.
Step 2: Updating activity_main.xml file
Add following code into activity_main.xml file
Step 3: Creating Model.java class
Create a new class named Model.java and add following
This class represents the various methods to set and get the data in the adapter class.
Objects of this class will be used to maintain the proper data structure.
Step 4: Creating Integer Resource File
In this tutorial, we need to create integer resources.
Integer resources are same as string resources which are written at string.xml file in values directory.
To define integer resources, we need to create integer.xml file in values directory.
To create integer.xml file, right click on values folder -> New -> Value resource file
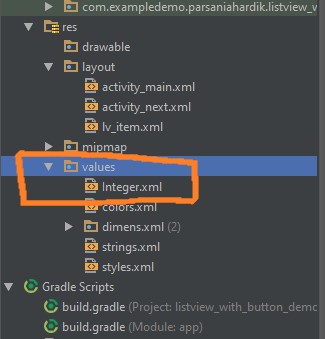 Directory for integer.xml
Copy following code in an integer.xml file
Step 5: Creating row layout for listview
Create one layout resource file and name it as lv_item.xml and copy below code
This layout file says us how every row of the listview will be look a like.
- Mainly two textviews and two buttons are present in this file. One button will increase the fruit quantity and the other one decrease it.
- One textview represnts the name of the fruit.
- Other textview shows the quantity of that fruit in terms of numbers.
Step 6: Creating CustomAdapter.java class:
Create new java class named CustomAdapter and add following code
- We are using an arraylist which is defined in the Main Activity.
- This arraylist gives the data information to populate the listview.
- Every object of the arraylist have value for fruit name and the quantity number.
- Quantity number is changing with respect to the click event of plus and minus buttons.
Step 7: Setting tag for position and convertView
Look at this code
When listview is populating, we can set tags for postion and views as per above code.
We have set tags on btn_plus for position and converView.
setTag(key,value) method is used for this.
key for tag is used from the integer.xml file, we created earlier.
Your key should be unique for setting each tag.
Step 8: Getting tags in buttons onClick() method
- You can get position and converView by using getTag(key) method.
- We are setting tempview with view got from getTag() method.
- In getTag() method we are using same key, which we used in setTag() method.
- Similarly we can get position also using getTag() method and proper key.
- Here tempview is a whole row view which contains two textView and two button.
You can inflate views of row view and set values to them. Here we are setting textView’s value by following code
- Similarly, for btn_minus, all tags are set and get and values of textView are updated.
Step 9: Creating NextActivity
To open new activity in android studio, click on File tab which is present at the left top bar.
Now go to File->New->Activity->Empty Activity and give name of activity as NextActivity.
Step 10: Updating NextActivtiy code
Add following code into activity_next.xml
Add following into NextActivity.java class
Step 11: Updating MainActivity.java class
Put below code in MainActivity.java
Consider the below code
getModel() method creates an arraylist with the objects of the Model class.
This arraylist works as a data provider for the listview adapter.
Number of objects in the arraylist is equals to the number of rows in the listview.
So it was all about implementing listview with button android feature in our android app programmatically. Thank you and keep coding!
Источник
Обработка нажатия на отдельный View в элементе списка
В этой статье я опишу способ обработки нажатия на отдельную часть элемента списка. Кого заинтересовало, прошу под кат.
ПРЕДИСТОРИЯ
Недавно передо мной встала задача: реализовать возможность нажатия на отдельный View в элементе списка. Сложность заключалась в том, что метод onListItemClick() вызывается при нажатии на любую часть элемента списка (неважно, какой View находится под пальцем). Поискав решение, я ничего полезного не нашёл. Проведя несколько экспериментов, я всё-таки достиг цели.
СОЗДАНИЕ ПРОЕКТА
Создадим проект. Имя, пакет, версия ANDROID – на ваше усмотрение. Сначала разметка для элемента списка и Activity:
Я специально использую ListActivity, чтоб сократить урок. Использовать мы будем, разумеется, свой кастомный адаптер. Чтобы не морочиться с SimpleAdapter и его ArrayList > или BaseAdapter с его обязательными методами, я наследую свой адаптер от ArrayAdapter. Я не стал добавлять ViewHolder – он нам сейчас не нужен. Ну и наконец-то, сам код адаптера:
Давайте разбираться, что мы здесь накодили. В методе getView(int position, View convertView, ViewGroup parent) мы создаём вьюху для каждого элемента списка и там же находим кнопку и присваиеваем ей обработчик нажатия. Когда кнопку нажимают, появляется тост с позицией этого элемента. Как видите, всё очень просто! Правда, при этом почему-то перестаёт работать onListItemClick(ListView l, View v, int position, long id) (по крайней мере у меня). Поэтому придётся кодить обработку нажатия на нужную кнопку и на все остальные View в самом адаптере :(. Но можно сделать, как я написал выше — присвоить всем элементам OnClickListener, а потом смотреть — если наша кнопка, то одно действие, иначе — другое. А ещё лучше вынести все другие вьюхи в отдельный LinearLayout или RelativeLayout и присваивать слушатель только ему.
Ну вот в общем-то и всё. Буду рад, если этот пост поможет кому-нибудь.
Источник
Kotlin ListView Button Android Tutorial With Example Click Listener

Android Kotlin ListView Button Tutorial With Example is covered in this article.
In this example, we will make a listview with button and textview in every child row of the listview.
You will learn how to manage clicklistener for every button.
There are some common problems like,
- You have clicked the button of first row but it affects last row.
- When you scroll down through the listview, click effect is gone
In this tutorial, we will solve above problems.
After following all the steps, you should have following output for kotlin listview button example
There are two buttons and one textview in every row of the listview. Textview will represent the counter(an integer number).
We will update the counter with two buttons – plus and minus.
Before you start
Make sure you are familiar with the model method to implement listview.
If you do not know about model structure for listview then read how to make model in listview example with kotlin.
When you need to put checkbox in listview then visit kotlin listview with checkbox tutorial.
Step 1. Model Class
Open a new class with name Model.kt
Source code for this class contains following lines.
We will create various objects of model class and will set them in one arraylist.
This arraylist will give the data like name of the fruit and the quantity of the fruits for each row of listview.
Step 2. Creating row layout file
We need to create one layout resource file, which will represent the each row layout of the listview.
Make a file and give it a name lv_item.xml
Add below code in it.
Step 3: Integer Resource File
Now make one integer resource file named integer.xml
This file includes constant integer values with specific key names.
To create integer.xml file, right click on values folder -> New -> Value resource file
How to create integer.xml
Following is the source code for this file.
Here, btn_plus_view, btn_plus_pos etc. are the keys and 1,2 are the values for their keys.
Step 4. Preparing Custom Adapter
Custom Adapter will send data to th listview about button names and textview’s value in string format.
Open a fresh new class with name CustomAdapter.kt
Source code should look like following
For updating counter with plus and minus button clicks, we need to capture button of which row is clicked.
For this purpose, we will set tags to each button in every row of listview. Then we will retrieve position of clicked by getting those tags.
This is the main logic of this whole tutorial.
For setting tags, setTag() method is used and getTag() method will give access to clicked button.
Consider following code lines
With every minus button, view and position are tagged with unique key.
Now following code will get this tag.
As you can see, first of all we will get view of whole row layout and we store it in the tempview variable.
Then, with the help of tempview, we will get the textview and will update it’s value.
We need to update the quantity of fruits with plus and minus button click. This is done by following line
Here, modelArrayList is defined in the Main Activity and it’s access is defines as public, so we can use it in any class of whole application.
Step 5. Next Activity To Send Data
Prepare a new activity named NextActivity.
We will send data to this next activity.
It will generate two file : NextActivity.kt and activity_next.xml
Put below code into the NextActivity.kt
Now add following into the activity_next.xml
Step 6. Changing Main Activity
There are some necessary changes needed to be done in MainActivity.kt class.
Replace your existing source code with below one.
Now change your activity_main.xml file’s code with below
So it was all the details about making kotlin listview button in android studio.
If you have any queries then comment it out, We will respond you quickly.
Do not forget to share DemoNut’s resources in your social media.
Источник
Android ListView Tutorial | CheckBox, Button, EditText, Image,Text

Android Listview with image and text example tutorial will guide you today.
This article consists four different example as the below table.
Listview is used when you want to display multiple items which have a dynamic number of items.
1. Android ListView With Image and Text
We will create a listview which contains image and text in it’s every row item.
I have put one divider between every listview row item. Divider helps user to differentiate among listview items easily.
Watch this video to have a brief idea about the output of this tutorial.
Step 1. Create a new project
Make a new project in the Android Studio.
Step 2. Necessary Images
We require few images in this example to use them in the listview.
Click on the below link to download these images.
download this images
Now put these images in the drawable folder.
Step 3. Update activity_main.xml
copy and paste following code
I have taken one listview in the above code.
Step 4. Create java class named CustomeAdapter.java
copy following code in it.
getView() method will create layout for every listview row item.
Below two lines from getView() method will set the Image and Text.
Compiler will get the appropriate object from the imageModelArrayList using position.
From that object, it will use getName() and getImage_drawable() method to get related text and image resource.
Layout File
While developing listview, we need to create adapter class in which we can define code for each cell of listview.
We need to create one layout resource file(lv_item.xml here in our example, you can name it as you like) in the resource folder.
This file will contain components like TextView,ImageView, etc. as per requirement.
This file represents a single cell of the listview. In our example it contains one ImageView and one TextView.
Thus, every row will contain one image and one text.
In getView() method, lv_item.xml is inflated, and all the components of lv_item can be set here for each cell of listview as per requirement.
Code for lv_item.xml is like:
Step 5. Create a class named ImageModel.java
Add following source code in it.
Step 6. Finally, update MainActivity.java class.
Copy and paste below code in MainActivity.java
Consider below source code
I have declared one integer array in above code.
This integer array includes the drawable references to the images which are stored in the drawable folder.
We have used this integer reference to set the images in the imageview in adapter class.
Above code have declared a string variable. This variable includes the names of the vehicles.
Adapter have used this string array to fill the text in every row of the listview.
Read below code for populateList() method
populateList() method will create one arraylist. This arraylist contains the objects of the ImageModel class.
Compiler will create the object of the ImageModel class and will add it into the arraylist in the every iteration of the for loop.
After the successful operation of populateList() method, we will send arraylist to the adapter.
Now run your project, and yes, it will work like shown in the video.
If you have any questions regarding this tutorial, feel free to ask in comment section.
2. ListView with CheckBox In Android
In Listview with Checkbox in Android Studio example,learn how to make custom Listview with a checkbox.
You will have to create a listview with checkbox in Android Studio when you want to show certain options to the user and wants to take more than one options to be selected.
There is a common problem like “checkbox unchecked when I scroll listview.”
We will solve this problem in this listview with checkbox in Android Studio.
We will use listview’s onitemclicklistener() and checkbox’s OnClickListener() method to get checked items.
In this example, we will get single selection, multiple selection and also select all scenario.
Check out the output of Listview with Checkbox in Android Studio tutorial below which is prepared by Demonuts.com:
Step 1. Create a new project in the Android Studio.
Choose empty as your Main Activity.
Step 2. Create a class named Model.java
copy the following source code in it:
This class represents the various methods to set and get the data in the adapter class.
Objects of this class will be used to maintain the proper data structure.
Step 3. Creating lv_item.xml layout file
Create a new layout resource file named lv_item.xml file and add following
This file will create the layout for all the rows of the listview. Adapter class will use this file.
It contains one checkbox and one textview.
Step 4. Updating activity_main.xml
Copy and Paste following source code in activity_main.xml
I have taken one listview and three buttons in main layout.
Step 5. Create one class and name it: CustomAdapter.java
Copy and paste following code in this class:
We are getting one arraylist of the objects of the Model class in the constructor.
We are using this arraylist in the below method.
Now check following code snippet:
Check first two lines of above snippet. Two tags are set to checkbox
One for getting position (checkbox.setTag())
And other for getting whole row view in which checkbox is present. (checkbox.getTag())
To set the Tag of view, we need to assign key which is R.integer.btnplusview here.
When we are getting this view using getTag, we used the same key to get the whole view as shown in the checkbox.OnClickListener().
Now you might say what is R.integer.btnplusview??
It is nothing but same as you define your string resources in the string.xml, you can define your integer resources in an integer.xml file.
When you create a project in the android studio, string.xml is generated automatically, while you have to manually create integer.xml , that’s it, nothing special.
Create integer.xml under res/values directory(same directory in which string.xml is present) and copy following code:
The Logic for updating value of each model item is written on OnClickListener() of the checkbox.
We have used setTag and getTag to get which checkbox is clicked(position of clicked checkbox), and we can also get the whole view of row item which is clicked, and it is taken as tempview in above code.
Using tempview, you can inflate all views(TextView, EditText,ImageView etc.) of that particular row(row which is clicked).
TextView is inflated from tempview, and then we can get the value of this textview to use as per requirements.
Step 6. Copy and paste following code in MainActivity.java
There are three buttons in the above code snippet.
Below is the onclick for first one
When the user clicks on this button, all the checkboxes in the listview are automatically selected or checked.
Next button will take the user to the Next Activity.
Consider below code
When the user clicks the deselect button, all the checkboxes in the listview are deselected.
This select all and deselect all feature is very useful for user when he wants to do all the process from scratch.
Look at the below method
getModel() method will create an arraylist of the objects of the model class.
This arraylist is sent to the adapter class via constructor where it will work as the data provider.
Step 7. Create a new activity and name it NextActivity.
Now when clicking on Next button, a new activity opens with names of selected animals as shown in the output video.
So you will have two files: 1. NextActivity.java and 2. activity_next.xml
Copy and paste following code into NextActivity.java class:
for loop in the above code will check all the object one by one. It will print the animal name which are checked.
Copy following in activity_next.xml
Observe all the code snippets for listview with checkbox example carefully and understand it throughout so that you can change all things as per your different requirements.
All for Listview with Checkbox in Android Studio.
3. Android ListView with EditText Example
Android Listview Edittext With TextView Tutorial Example is today’s topic.
We will implement Custom Listview with EditText and will set and get text values of all edittext in all child elements of listview.
Many developers have oftern several problems regarding this topic like:
- Value of edittext changes when scrolling
- How to set edittext value in listview items
- How to retain edittext value while scrolling
- How to get all the text values of all the edittexts of listview and pass it to next activity.
Today’s tutorial will give perfect answers and solutions of above problems.
TextWatcher class is used to put logic when user enter text in any Edittext of Listview.
We will pass all the edittext values to next activity so that they can be used as per requirement of app.
Check out the output of Android Listview Edittext With TextView tutorial.
1. Create a model class
Create a new class named “EditModel.java” and copy below code
We will use objects of this model to perfectly retain the edittext value when scrolling listview.
Getter and Setter methods are the key for every mode class. So we have created in this model also.
2. Making ListView Item
Open new resource layout file and give it a name lv_item.xml
This is the complete view of every single row item of listview.
It contains a textview along with edittext.
3. Preparing Custom Adapter
Make a new java class named “CustomeAdapter.java”.
Add following into this class
Explanation
This class is the heart of the whole tutorial.
The main logic is inside this lines of code
When user enter any text value, above method will be called.
Now we are using an ArrayList of the objects of EditModel class. So every single object of EditModel class contains value of edittext.
Now suppose, when user enters the text in the 1st edittext of listview, 1st object from ArrayList is called and the value of edittext is updated in that. Thus when user scrolls the listview, again listview will be populated and updated value of 1st edittext will be printed.
The ArrayList is defined as public static, so that it can be used in any other activity.
4. Changing MainActivity
Change you MainActivity.java class as per below
ListView is populated in MainActivity with the object of customAdapter class.
Button click event is also defined in above class.
Update your activity_main.xml
5. NextActivity Creation
Make a new activity and give it a name “NextActivity”
Now write following source code into NextActivity.java class
This class simply prints the text valued of all the edittexts.
We have used ArrayList of the objects of EdiModel class which was defined in CustomAdapter.
Add below into activity_next.xml
Thus, you have seen that implementing a custom listview with edittext and textview is not a big deal.
It is also easy to retain the value even when user scrolls the listview.
And finally, getting values of edittexts to any other future activities is also not complex.
4. Android ListView with Button Tutorial
Hello, In this listview with button android tutorial, you will learn how to use a button in listview item.
We will see how to handle button’s click listeners in every row item of listview.
I have created listview elements with multiple clickable buttons in this tutorial example.
There are some problems like
You click on first button, but system clicks on last button
Quantity number of item change when scroll the listview.
Implementing button in the listview is a little complex task.
But you can do it smoothly if you follow proper method with the efficient code snippets.
Getting the proper position of clicked button and set onclick event for button required some additional coding lines.
I will go through all these problems and teach you how to solve them easily.
First of all check out the output of this example, so that you can have an idea what we are developing at the end of the tutorial.
Step 1: Create a new project in the android studio.
Empty Activity is the option, you need to select when creating a new project in the android studio.
Step 2: Updating activity_main.xml file
Add following code into activity_main.xml file
Step 3: Creating Model.java class
Create a new class named Model.java and add following
This class represents the various methods to set and get the data in the adapter class.
Objects of this class will be used to maintain the proper data structure.
Step 4: Creating Integer Resource File
In this tutorial, we need to create integer resources.
Integer resources are same as string resources which are written at string.xml file in values directory.
To define integer resources, we need to create integer.xml file in values directory.
To create integer.xml file, right click on values folder -> New -> Value resource file
Copy following code in an integer.xml file
Step 5: Creating row layout for listview
Create one layout resource file and name it as lv_item.xml and copy below code
This layout file says us how every row of the listview will be look a like.
Mainly two textviews and two buttons are present in this file. One button will increase the fruit quantity and the other one decrease it.
One textview represnts the name of the fruit.
Other textview shows the quantity of that fruit in terms of numbers.
Step 6: Creating CustomAdapter.java class:
Create new java class named CustomAdapter and add following code
We are using an arraylist which is defined in the Main Activity.
This arraylist gives the data information to populate the listview.
Every object of the arraylist have value for fruit name and the quantity number.
Quantity number is changing with respect to the click event of plus and minus buttons.
Step 7: Setting tag for position and convertView
Look at this code
When listview is populating, we can set tags for postion and views as per above code.
We have set tags on btn_plus for position and converView.
setTag(key,value) method is used for this.
key for tag is used from the integer.xml file, we created earlier.
Your key should be unique for setting each tag.
Step 8: Getting tags in buttons onClick() method
You can get position and converView by using getTag(key) method.
We are setting tempview with view got from getTag() method.
In getTag() method we are using same key, which we used in setTag() method.
Similarly we can get position also using getTag() method and proper key.
Here tempview is a whole row view which contains two textView and two button.
You can inflate views of row view and set values to them. Here we are setting textView’s value by following code
Similarly, for btn_minus, all tags are set and get and values of textView are updated.
Step 9: Creating NextActivity
To open new activity in android studio, click on File tab which is present at the left top bar.
Now go to File->New->Activity->Empty Activity and give name of activity as NextActivity.
Step 10: Updating NextActivtiy code
Add following code into activity_next.xml
Add following into NextActivity.java class
Step 11: Updating MainActivity.java class
Put below code in MainActivity.java
Consider the below code
getModel() method creates an arraylist with the objects of the Model class.
This arraylist works as a data provider for the listview adapter.
Number of objects in the arraylist is equals to the number of rows in the listview.
So it was all about implementing listview with button android feature in our android app programmatically. Thank you and keep coding!
So we have considered all the possible examples of android listview widget.
3 thoughts on “Android ListView Tutorial | CheckBox, Button, EditText, Image,Text”
In edit text section, its like we know the number of edit text we want in our listview prior to creation, but what if we want to add edit text to listview on click during run time, like instead using for loop . Help me with this. Thanks
In my 40+ years of experience, I have read or watched hundreds of tutorials. Believe me when I say; this is one of the better ones.. Thanks.
in the Android ListView with EditText Example , I have entered all the code which compiles cleanly and the program runs, but when I select the textbox to type into, the keyboard appears and then does not allow me to type any text into the box. Any ideas why this should happen please?
Источник


