- ListView внутри ScrollView
- Полный список
- ListView. Списки со значками
- Полосатый ListView
- Using lists in Android wth ListView — Tutorial
- 1. Using lists in Android
- 2. Android and the ListView widget
- 2.1. Views for handling lists
- 2.2. Possible input types for lists
- 2.3. Adapters
- 2.4. Filtering and sorting
- 2.5. Data updates in the adapter
- 2.6. Listener
- 3. Default adapter
- 3.1. Default platform adapter
- 3.2. Using ArrayAdapter
- 3.3. ListView example with ArrayAdapter
- 4. Custom adapter implementations
- 4.1. Developing a custom adapter
- 4.2. Preparing a row for the list
- 4.3. Example for a custom adapter
- 4.4. Updating the data model from the adapter
- 5. ListActivity and ListFragment
- 5.1. Default container for using ListView
- 5.2. ListActivity and custom layout
- 5.3. Placeholder for an empty list
- 6. Exercise: Using ListView and ListActivity
- 7. Exercise: ListActivity with custom layout
- 8. Tutorial: Implementing your customer adapter
- 9. ListViews and performance
- 9.1. Motivation
- 9.2. Time consuming operations
- 9.3. Avoiding layout inflation and object creation
- 9.4. View holder pattern
- 9.5. Example
- 10. Storing the selection of a view
ListView внутри ScrollView
В работе над проектом возникла необходимость отрисовать лейаут такого вида: сверху компактным блоком располагаются детали топика, а под ними – список комментариев к этому топику. Сначала оно было реализовано естественным образом: лейаут деталей топика, а под ним – список. Позже ТЗ поменялось, и получилось, что нужно заголовок скролить вместе со списком.
Первым побуждением было сделать то, что вынесено в заголовок: поместить ListView внутрь ScrollView. Получившаяся штука отображалась некорректно, что заставило меня зарыться поглубже в гугл.
Во многих местах в сети (например, тут: https://groups.google.com/forum/#!topic/android-beginners/LRpLgGOy2Pc или тут: http://stackoverflow.com/questions/1526831/android-scrollview-layout-problem) напрямую говорится о том, что так делать нельзя. Для реализации таких вещей у ListView предусмотрены штатные заголовки (headers).
Добавление заголовков производится вызовом метода класса ListView:
где View v можно создавать любым способом (или явным вызовом конструктора, или через inflater).
View hv = . ;
listView.addHeaderView(hv);
Заголовков у ListView может быть больше одного. С их количеством, кстати, связана ещё одна особенность: по умолчанию заголовки тоже кликабельны, как и обычные элементы списка, клик на них вызывает отработку лиснеров, заданных вызовами setOnItemClickListener и setOnItemLongClickListener, так что позиция кликнутого элемента, которая передаётся в лиснеры в параметре position, будет смещена на количество заголовков. Этот факт нужно обязательно учитывать в лиснерах при обработке. Для этого у ListView есть метод:
который возвращает количество заголовков списка. На значение, которое он возвращает, можно, например, уменьшить значение position, полученное в лиснере, перед позиционированием во внутреннем списке данных.
protected OnItemClickListener itemClickListener = new OnItemClickListener() <
public void onItemClick(final AdapterView l, final View v, final int position, final long id) <
MyItem myItem = myItems.get(position — listView.getHeaderViewsCount());
// do something to myItem
>
>;
Существует ещё один метод для добавления заголовков, чуть более сложный:
Он предоставляет возможность сделать заголовок некликабельным: если в третий параметр передать false, то при клике на заголовок не будет отрабатывать onItemClickListener списка. Лиснеры же, заданные для views, расположенных внутри такого заголовка, будут отрабатывать штатно. Однако, даже в этом случае, несмотря на некликабельность заголовка, нумерация элементов для position всё равно будет учитывать их наличие.
View hv = . ;
listView.addHeaderView(hv, null, false);
Для полноты изложения скажу, что вторым параметром (Object data), смысл которого не очень понятен из документации, на самом деле задаются данные, которые будут возвращаться методом Adapter.getItem() (взято тут: http://stackoverflow.com/questions/4311693/what-does-the-second-parameter-in-addheaderview-in-the-class-listview-do).
Аналогичный набор методов есть у списка и для футеров (footers):
Источник
Полный список
— рассматриваем события ListView: нажатие — onItemClick, выделение — onItemSelect, прокрутка — onScroll
При взаимодействии со списком может возникнуть необходимость обрабатывать события – нажатие на пункт и прокрутка. Попробуем это сделать.
Создадим проект:
Project name: P0441_SimpleListEvents
Build Target: Android 2.3.3
Application name: SimpleListEvents
Package name: ru.startandroid.develop.p0441simplelistevents
Create Activity: MainActivity
Нарисуем экран main.xml:
На экране только ListView.
Так же, как и на прошлом уроке добавим список имен в ресурс res/values/strings.xml:
Пишем код MainActivity.java:
Смотрим код. Мы находим экранные элементы, создаем и присваиваем списку адаптер. Далее списку мы присваиваем два обработчика событий:
1) OnItemClickListener – обрабатывает нажатие на пункт списка
parent – View-родитель для нажатого пункта, в нашем случае — ListView
view – это нажатый пункт, в нашем случае – TextView из android.R.layout.simple_list_item_1
position – порядковый номер пункта в списке
id – идентификатор элемента,
Мы в лог будем выводить id и position для элемента, на который нажали.
2) OnItemSelectedListener – обрабатывает выделение пунктов списка (не check, как на прошлом уроке)
Предоставляет нам метод , android.view.View, int, long)» target=»_blank»>onItemSelected полностью аналогичен по параметрам методу onItemClick описанному выше. Не буду повторяться.
Также есть метод )» target=»_blank»>onNothingSelected – когда список теряет выделение пункта и ни один пункт не выделен.
Все сохраним и запустим приложение.
Ткнем какой-нибудь элемент, например — Петр. Смотрим лог:
itemClick: position = 2, >
Все верно. Т.к. позиция считается не с единицы, а с нуля – Петр имеет позицию 2. (В нашем случае id равен position. Я пока не встречал случаев id != position, но наверняка они есть)
Теперь покрутите колесо мышки или понажимайте клавиши вверх вниз на клавиатуре. Видно что идет визуальное выделение элементов списка.
А в логах мы видим такие записи:
itemSelect: position = 2, > itemSelect: position = 3, > itemSelect: position = 4, > itemSelect: position = 5, > itemSelect: position = 4, > itemSelect: position = 3, > itemSelect: position = 2, >
Т.е. обработчик фиксирует какой пункт выделен. Честно говоря, я не очень понимаю как можно использовать такое выделение. Но обработчик для него есть и я решил про него рассказать. Пусть будет.
Снова нажмем теперь на любой пункт списка, мы видим, что выделение пропало. Логи:
itemSelect: nothing
itemClick: position = 3, >
Ничего не выделено и нажат пункт с позицией 3.
Давайте добавим к списку еще один обработчик:
OnScrollListener – обрабатывает прокрутку списка.
view – это прокручиваемый элемент, т.е. ListView
scrollState – состояние списка. Может принимать три значения:
SCROLL_STATE_IDLE = 0, список закончил прокрутку
SCROLL_STATE_TOUCH_SCROLL = 1, список начал прокрутку
SCROLL_STATE_FLING = 2, список «катнули», т.е. при прокрутке отпустили палец и прокрутка дальше идет «по инерции»
Вывод в лог я пока закаментил, чтобы не мешалось. Чуть позже раскаментим.
view – прокручиваемый элемент
firstVisibleItem – первый видимый на экране пункт списка
visibleItemCount – сколько пунктов видно на экране
totalItemCount – сколько всего пунктов в списке
Причем для параметров firstVisibleItem и visibleItemCount пункт считается видимым на экране даже если он виден не полностью.
Все сохраним и запустим.
Теперь потаскайте список туда-сюда курсором (как будто пальцем) и смотрите логи. Там слишком много всего выводится. Я не буду здесь выкладывать. Но принцип понятен – меняется первый видимый пункт (firstVisibleItem) и может на единицу меняться кол-во видимых пунктов (visibleItemCount).
Теперь закоментируем вывод в лог в методе onScroll (чтобы не спамил нам лог) и раскаментим в onScrollStateChanged.
Схватим список, немного потягаем туда сюда и отпустим. Смотрим лог:
scrollState = 1
scrollState = 0
Отработали два события – список начал прокрутку, список закончил прокрутку.
Попробуем взять список, «катнуть» его и отпустить.
scrollState = 1
scrollState = 2
scrollState = 0
Видим три события – прокрутка началась, список «катнули», прокрутка закончилась.
Полный код урока:
На следующем уроке:
— строим список-дерево ExpandableListView
Присоединяйтесь к нам в Telegram:
— в канале StartAndroid публикуются ссылки на новые статьи с сайта startandroid.ru и интересные материалы с хабра, medium.com и т.п.
— в чатах решаем возникающие вопросы и проблемы по различным темам: Android, Kotlin, RxJava, Dagger, Тестирование
— ну и если просто хочется поговорить с коллегами по разработке, то есть чат Флудильня
— новый чат Performance для обсуждения проблем производительности и для ваших пожеланий по содержанию курса по этой теме
Источник
ListView. Списки со значками
Расширим возможности списка, добавив в него значки. Такой список будет выглядеть гораздо интереснее для пользователя. За основу возьмём пример обычного списка с именами котов.
Подготовим разметку для отдельного элемента списка, который должен уметь отображать текст и значок (файл res/layout/list_item.xml):
Теперь переходим к java-коду. Мы воспользуемся ListActivity и код станет очень коротким.
В методе setListAdapter() мы сообщаем, что разметку для отдельного элемента списка надо брать из R.layout.list_item, текст размещать в компоненте с идентификатором R.id.text_view_cat_name, а массив текстов брать из mCatNames.
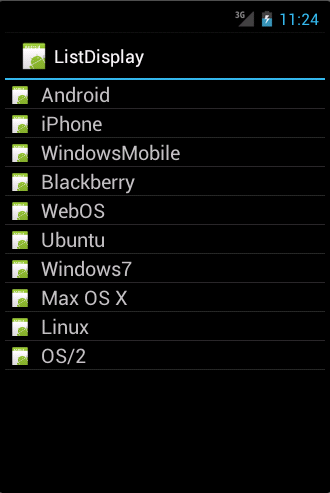
Запустив пример, мы получим готовое приложение, состоящее из списка с одинаковыми значками. Вы можете, как и прежде, щёлкать по пунктам и прокручивать список.
В некоторых случаях этого вполне достаточно. А в некоторых не совсем. Представьте себе, что мы хотим создать список, состоящий из знаков зодиака. Естественно, у каждого знака зодиака должнен быть свой значок.
Вся магия содержится в методе адаптера getView(). Мы можем задать для каждого элемента списка свой значок. Добавим в проект значки для знаков зодиака. Для простоты в этом примере я покажу изменение одного знака зодиака Лев, который относится к семейству кошачьих. Разметка может оставаться прежней, только поменяйте идентификатор у TextView (по коду вы должны сами понять, на какой именно).
По такому же принципу вы можете усложнять пример, например, вычислять чётные и нечётные элементы списка и выводить значки, раскрашивать зеброй и т.д.
Немного информации о классе LayoutInflater. Класс берёт данные из XML-файла разметки и превращает их в реальные компоненты, которые становятся частью списка. Вам надо только указать источник для конвертации через метод inflate().
После этого, система понимает, где искать отдельные компоненты разметки. Мы вызываем знакомый нам метод findViewById(), только он уже относится не к активности, а к корневому элементу разметки. Поэтому мы вызываем метод из row.
Но чего-то не хватает в этом примере. Давайте под каждым названием будем выводить еще дату, которая относится к знаку зодиака. Стандартный подход здесь не сработает. Во-первых, у нас будет два отдельных массива строк (названия и даты), а стандартный адаптер работает с одним массивом. Выход — опять написать собственный адаптер под нашу задачу. Заодно подключим и остальные значки.
Сначала изменим макет для списка.
Теперь напишем свой адаптер и внесём изменения в код
Готовый результат выглядит гораздо лучше предыдущих примеров.
Здесь сразу хочу обратить внимание на сравнение if (convertView == null). Для данного примера это не принципиально, так как у нас список состоит всего из 12 элементов. Если счёт элементов пойдёт на сотни, то это уже вызовет проблемы с памятью. Вы просите систему создать более сотни новых компонентов, да ещё с картинками. Но в реальности вы на экране не видите сто элементов списка одновременно, а только часть из них. И был предложен хитрый механизм — не создавать новую строку списка при прокрутке, а использовать уже созданный ранее элемент и подгружать в него данные. Таким образом мы создаём элементы только для первых строк списка, видимых на экране. Допустим, экран вмещает десять строк списка, а остальные 90 с лишним элементов подгрузятся динамически. Это самый простой, но эффективный способ повышения производительности. Более продвинутые способы повышения производительности смотрите в статье Производительность при работе с ListView.
Полосатый ListView
Коты бывают полосатыми. Давайте и ListView сделаем полосатым. Делается элементарно, всего одной строчкой кода.
В метод getView() из предыдущего примера вставляем:
В этом уроке рассматривается более продвинутый вариант полосатой разметки.
При подготовке материала использовалась статья Программирование для android — Списки
Напоследок советую вам использовать в качестве корневого элемента RelativeLayout вместо LinearLayout — первый вариант использует намного меньше ресурсов и постоянно пропагандируется в документации.
Источник
Using lists in Android wth ListView — Tutorial
This tutorial describes how to use ListView together with activities and fragments in Android.
1. Using lists in Android
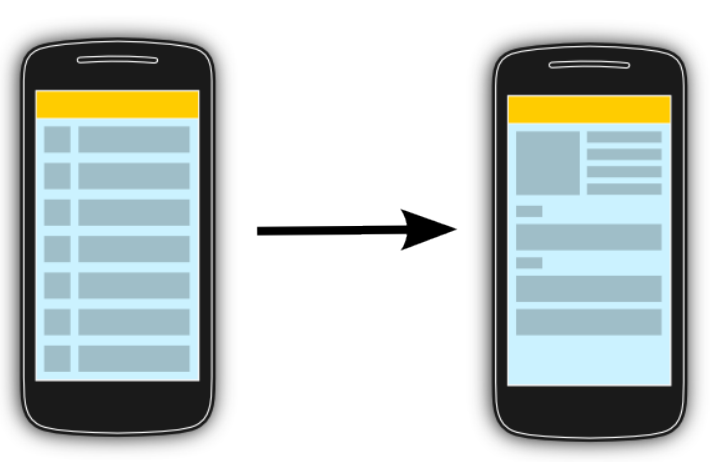
The display of elements in a list is a very common pattern in mobile applications. The user sees a list of items and can scroll through them. Such an activity is depicted in the following picture.

Typically the user interacts with the list via the toolbar, for example, via a button which refreshes the list. Individual list items can be selected. This selection can update the toolbar or can trigger a detailed screen for the selection. The following graphic sketches that. On the selection of a list item another activity is started.
2. Android and the ListView widget
2.1. Views for handling lists
Android provides the ListView and the ExpandableListView classes which are capable of displaying a scrollable list of items. The ExpandableListView class supports a grouping of items.
2.2. Possible input types for lists
The input of a list (items in the list) can be arbitrary Java objects. The adapter extracts the correct data from the data object and assigns this data to the views in the row of the ListView .
These items are typically called the data model of the list. An adapter can receive data as input.
2.3. Adapters
An adapter manages the data model and adapts it to the individual entries in the widget. An adapter extends the BaseAdapter class.
Every line in the widget displaying the data consists of a layout which can be as complex as you want. A typical line in a list has an image on the left side and two text lines in the middle as depicted in the following graphic.

A layout file for such a line might look like the following.
The adapter would inflate the layout for each row in its getView() method and assign the data to the individual views in the row.
The adapter is assigned to the ListView via the setAdapter method on the ListView object.
| Adapters are not only used by ListView , but also by other views which extend AdapterView as, for example, Spinner , GridView , Gallery and StackView . |
2.4. Filtering and sorting
The filtering and sorting of the data is handled by the adapter. You need to implement the logic in your custom adapter implementation.
2.5. Data updates in the adapter
The notifyDataSetChanged() method on the adapter is called if the data has changed or if new data is available.
The notifyDataSetInvalidated() method is called if the data is not available anymore.
2.6. Listener
To react to selections in the list, set an OnItemClickListener to your ListView .
3. Default adapter
3.1. Default platform adapter
Android provides default adapter implementations; the most important are ArrayAdapter and CursorAdapter . ArrayAdapter can handle data based on Arrays or java.util.List . SimpleCursorAdapter can handle database related data.
3.2. Using ArrayAdapter
The ArrayAdapter class can handle a list or arrays of Java objects as input. Every Java object is mapped to one row. By default, it maps the toString() method of the object to a view in the row layout.
You can define the ID of the view in the constructor of the ArrayAdapter otherwise the android.R.id.text1 ID is used as default.
The ArrayAdapter class allows to remove all elements in its underlying data structure with the clear() method call. You can then add new elements via the add() method or a Collection via the addAll() method.
You can also directly modify the underlying data structure and call the notifyDataSetChanged() method on the adapter to notify it about the changes in data.
| If you want to change the data in your adapter, the underlying data structure must support this operation. This is, for example, the case for the ArrayList class, but not for arrays. |
3.3. ListView example with ArrayAdapter
The following listing shows a layout file called activity_listviewexampleactivity.xml which includes a ListView .
The following example shows the usage of the ListView view in an activity. It uses a default layout from the Android platform for the row layout. It also demonstrates the removal of list items and uses animations for the removal.
4. Custom adapter implementations
4.1. Developing a custom adapter
The ArrayAdapter is limited as it supports only the mapping of toString() to one view in the row layout. To control the data assignment and to support several views, you have to create your custom adapter implementation.
For this you would extend an existing adapter implementation or subclass the BaseAdapter class directly.
| Frequently you extend ArrayAdapter to write a custom adapter, as this is simpler than extending BaseAdapter directly. |
4.2. Preparing a row for the list
The adapter needs to create a layout for each row of the list. The ListView instance calls the getView() method on the adapter for each data element. In this method the adapter creates the row layout and maps the data to the views in the layout.
This root of the layout is typically a ViewGroup (layout manager) and contains several other views, e.g., an ImageView and a TextView . The following graphic shows a list with different layouts for odd and even rows.

Within the getView() method you would inflate an XML based layout and then set the content of the individual views based on the Java object for this row. To inflate the XML layout file, you can use the LayoutInflator system service.
| This layout inflator service can get accessed via the getLayoutInflator() method of the activity or via the context.getSystemService(Context.LAYOUT_INFLATER_SERVICE) method call. |
After the adapter inflated the layout, it searches for the relevant views in the layout and fills them with the data. The individual elements in the layout can be found via the findViewById() method call on the top level view.
4.3. Example for a custom adapter
The following code shows an implementation of a custom adapter. This adapter assumes that you have two png files (no.png and ok.png) in one of your directory]]res/drawable folders. The coding inflates an XML layout file, finds the relevant views in the layout and sets their content based on the input data.
4.4. Updating the data model from the adapter
The row can also contain views which interact with the underlying data model via the adapter. For example, you can have a Checkbox in your row layout and if the Checkbox is selected, the underlying data is changed.
5. ListActivity and ListFragment
5.1. Default container for using ListView
Android provides specialized fragment and activity classes to simplify list handling.
The classes are the ListActivity class, if you want to use lists in activities, and the ListFragment class, if you want to use lists in fragments.
You do not have to assign a layout to these elements. If you do not define a layout, the activity or fragment contains a single ListView by default. ListActivity and ListFragment also allow you to override a onListItemClick() method for handling selection of list items.
Both classes allow you to set the adapter to the default ListView via the setListAdapter() method.
The following example code shows a simple ListFragment implementation.
The next example code demonstrates the usage of a ListActivity .
5.2. ListActivity and custom layout
You can use a custom layout with ListActivity or ListFragment . In this case the fragment or activity searches in the provided layout for a ListView with the predefined android:id attribute set to @android:id/list . This usage is demonstrated by the following code snippet.
| If you do not use this ID or do not include a ListView into your layout, the application crashes once you try to display the activity or the fragment. |
5.3. Placeholder for an empty list
You can also use a view with the @android:id/empty ID in your layout. The corresponding activity and fragment shows this view automatically if the ListView is empty and hides it otherwise. For example, you could display an error message in such a view.
6. Exercise: Using ListView and ListActivity
The following exercise demonstrates how to use a ListView in an ListActivity . You use the predefined ArrayAdapter class and an existing Android layout for the rows.
Create a new Android project called de.vogella.android.listactivity with the activity called MyListActivity .
Change MyListActivity class based on the following code example. Note that the setContentView() method is not used.
7. Exercise: ListActivity with custom layout
In our example your will define your layout for the rows and use it in your adapter.
Create the rowlayout.xml layout file in the directory]]res/layout folder of the de.vogella.android.listactivity project.
Change your activity so that it uses the new layout.
8. Tutorial: Implementing your customer adapter
The following uses two images «no.png» and «ok.png». I placed them in the «res/drawable-mdpi» folder. You must create your own icons. In case you do not find any icons just copy «icon.png» and use a drawing program to change it a little bit and create a second one.
Create the class MySimpleArrayAdapter which will serve as our adapter.
To use this adapter, change the activity to the following.
If you run this example you should get a list with different icons for the certain elements.

9. ListViews and performance
9.1. Motivation
Performance is especially important on Android as users expect fast reaction times. Compared to desktop computers an Android device is relatively slow from the hardware perspective.
This part describes how to reduce these operations to implement your custom list adapter efficiently. The default Android adapters like ArrayAdapter are already performance optimized.
9.2. Time consuming operations
Every view which gets inflated from an XML layout file will result in a Java object. Inflating layouts and creating Java objects are expensive with regards to time and memory consumption.
In addition using the findViewById() method is relatively time consuming, even though it is not as bad as XML inflating.
9.3. Avoiding layout inflation and object creation
A ListView typically contains more data than the number of displayed rows. If the user scrolls the list, then the rows and their associated views will be scrolled out of the visible area. The Java objects which represent the rows can be reused for newly visible rows.
If Android determines that a row is not visible anymore, it allows the getView() of the adapter method to reuse the associated view via the convertView parameter.
The adapter can assign new data to the views contained in the view hierarchy of the convertView . This avoids inflating an XML file and creating new Java objects.
In case Android cannot reuse a row, the Android system passes null to the convertView parameter. Therefore the adapter implementation needs to check for this.
9.4. View holder pattern
A ViewHolder implementation allows to avoid the findViewById() method in an adapter.
A ViewHolder class is typically a static inner class in your adapter which holds references to the relevant views in your layout. This reference is assigned to the row view as a tag via the setTag() method.
If we receive a convertView object, we can get the instance of the ViewHolder via the getTag() method and assign the new attributes to the views via the ViewHolder reference.
While this sounds complex this is approximately 15 % faster than using the findViewById() method.
9.5. Example
The following code shows a performance optimized adapter implementation which reuses existing views and implements the holder pattern.
10. Storing the selection of a view
By default a ListView has no selection mode active. You can activate it via the setChoiceMode() method call. Pass ListView.CHOICE_MODE_MULTIPLE for multiple selections or ListView.CHOICE_MODE_SINGLE for single selections to this method.
To get the selected items of a ListView , use the getCheckedItemPosition() for a single selection method or listView.getCheckedItemPositions() for multiple selections. If you have stable ID, you could also use the getCheckedItemIds() method to get the selected IDs.
Android already provides a default layout for this: the android.R.layout.simple_list_item_multiple_choice layout which contains a configured CheckedTextView view.
The following activities demonstrate how to use these selection modes. If you use these modes, the ListView stores the selected values. It is not persisted in your data model.
Источник


