- Android: динамически подгружаем фрагменты из сети
- Создаем фрагмент
- Реализуем загрузку классов
- Открываем из фрагмента другие фрагменты
- Подгружаем из сети xml-разметку
- Послесловие
- Android load class from file
- Saving Files
- This lesson teaches you to
- You should also read
- Choose Internal or External Storage
- Obtain Permissions for External Storage
- Save a File on Internal Storage
- Save a File on External Storage
- Query Free Space
- Delete a File
Android: динамически подгружаем фрагменты из сети
В этой статье мы рассмотрим, как загружать классы (в том числе, фрагменты) из сети во время выполнения программы, и использовать их в своем Android-приложении. Область применения подобной технологии на практике — это отдельная тема для разговора, мне же сама по себе реализация данной функциональности показалась довольно интересной задачей.
Создаем фрагмент
Для начала создадим некий фрагмент Fragment0 и реализуем у него метод onCreateView():
Стандартный метод создания разметки из xml в нашем случае работать не будет, поэтому для первого фрагмента мы создаем ее программно.
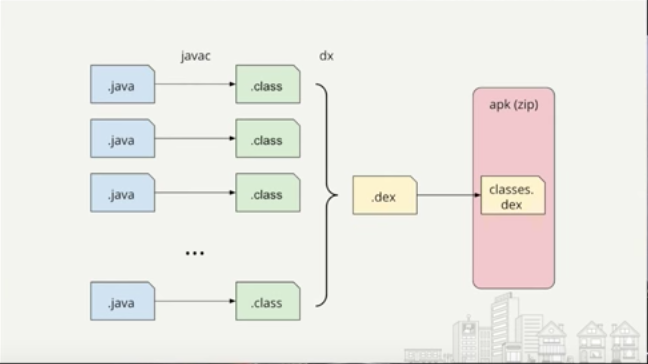
Далее нам нужно на основе модуля, содержащего фрагмент, создать APK, распаковать его с помощью unzip, и выложить файл classes.dex на сервер.
Реализуем загрузку классов
В отдельном модуле создадим класс NetworkingActivity и реализуем в нем следующие методы:
Открываем из фрагмента другие фрагменты
Для этого в классе LoadableFragment (суперкласс всех наших фрагментов) реализуем следующий метод:
Надеюсь, здесь все понятно.
Наш следующий фрагмент мы попробуем создать несколько иначе.
Подгружаем из сети xml-разметку
Для начала, создаем и выкладываем на сервер файл разметки. Я нашел на github библиотеку, которая умеет парсить xml layout из строки. Для корректной работы пришлось ее немного подпилить.
И так, добавим в наш класс LoadableFragment следующие методы:
Теперь с помощью этого всего создадим фрагмент Fragment1:
Послесловие
Полностью исходный код проекта можно посмотреть на github. Готовый APK можно скачать здесь.
Источник
Android load class from file
This repository hosts an example of dynamically loading an APK and in-depth documentation.
This repo demonstrates how APKs can be loaded into an installed app via ClassLoader. Users can automatically update their application without reinstalling it. Once developers fix any bug or update new features, there is no need to re-build your APK (ClassLoader APK). Developers upload patch APKs to their server.
- Build a ClassLoader APK and patch APK(s).
- Upload the patch APK to your server. Only users who have installed ClassLoader APK can download it.
- Users install ClassLoader APK.
- Users open the ClassLoader app and download the patch APK(s), which include(s) the main business logic of your app.
- Verify patch APK(s) and load classes into the ClassLoader app.
Next, you will repeat the following steps again and again in your development life cycle:
- Add new features or fix bugs
- Build patch APK
- Update the patch APK in your server
- Users open the ClassLoader app to download the patch APK. The app will load all the changes.
To do so, you must create two projects, ClassLoader and patch APK, which combines features and/or layouts.
The main job of the ClassLoader app
- Download and validate the patch APK(s) automatically.
- Load classes of the patch APK(s).
- Shrink your app and hide your code in patch APK(s).
- Switch patch APKs. I.e., You can run each patch APK independently without polluting their resources.
The main job of patch APK(s)
- Provide features like instant messaging, taking photos, scanning QR codes, login, or anything.
- UI components and business logic are both supported.
In this demo, ClassLoader app loads Resource1.apk and Resource2.apk.
Getting through the basis
There are three classLoaders used when running JVM:
- Bootstrap class loader Loads classes from /jre/lib directory
- Extension class loader Loads classes from /jre/lib/ext directory
- System class loader Loads classes from the system classpath (which is the same as the environment variable — CLASSPATH).
Besides, you could create your ClassLoader, aka. ‘User-defined class loaders’.
Android virtual machine loads classes just like the way Java does, but they’re slightly different.
In an Android device, it packages your classes into one or more dex files located in an APK and optimizes those dex files loading with Dalvik.
Here are class loaders works on Android:
| Class Loader | Summary |
|---|---|
| BootClassLoader | The top parent of the following classLoaders. |
| PathClassLoader | Load classes located in data/app/. where your app installed. Android uses this class for its system class loader and its application class loader(s). |
| DexClassLoader | Load classes from .jar and .apk files containing a classes.dex entry. This can be used to execute code not installed as part of an application. |
| URLClassLoader | @hide This class loader is used to load classes and resources from a search path of URLs referring to both JAR files and directories. |
First, assume focus on PathClassLoader and DexClassLoader. They both extend BaseDexClassLoader.
It is noticeable that:
- The optimizedDirectory references to optimize dex files.
- PathClassLoader does not accept the optimizedDirectory argument, so it is forced to associate the original, optimized dex files.
- You can pass the optimizedDirectory argument to DexClassLoader(). I.e., you can cache optimized dex files placed in internal storage.
That’s why you can call DexClassLoader to load the user-defined APK, dexes, and .jar files, whereas PathClassLoader is responsible for loading the installed Apk.
The code snippet shows how ClassLoader works:
It shows three steps to load a class.
Step1, check if the class has already been loaded
Step2, when the class is not found, check if the class has already been loaded with the parent.
Step3, if still not found, then invoke findClass to find the class.
The preceding code snippet presents that once a class has been loaded, it’ll never be load again.
Play with some scenarios of class loaders.
| Class Loader | Methods |
|---|---|
| BootClassLoader | String.class.getClassLoader() |
| PathClassLoader[[DexPathList[[directory. | MainActivity.class.getClassLoader() AppCompatActivity.class.getClassLoader() ClassLoader.getSystemClassLoader() |
| PathClassLoader[DexPathList[[zip file. | getClassLoader() |
- User-defined classes and libraries are loaded via PathClassLoader.
- Core java libraries such as java.lang.String are loaded via BootClassLoader. Thus, you cannot create a String class and replace java.lang.String no matter they share the same package name and class name. Android believes that they are two different classes because they are from different class loaders.
In Java, object A equates to Object B when they share the same package name, class name, and ClassLoader
How to use this app
- This app is used to load classes from another APK. You can launch activities or call methods wrapped in another APK. That’s why there is nothing but updating loading and verifying APKs in this app.
- Use getClassLoader().loadClass() to get activities from another APK, and access methods or fields by using Java reflection.
Here are some reflection examples:
Assume Utils is the latest released feature. It will be loaded to your ClassLoader app.
However, you cannot find the Utils class in your ClassLoader app. You cannot import it like any other classes as usual. You will need to leverage Java reflection to access it.
- Or maybe you don’t want to use any methods or fields. You launch the activity
Read the instructions carefully to make sure your app works properly.
- Update Android Studio Settings
Disabled Instant Run when running classLoader application 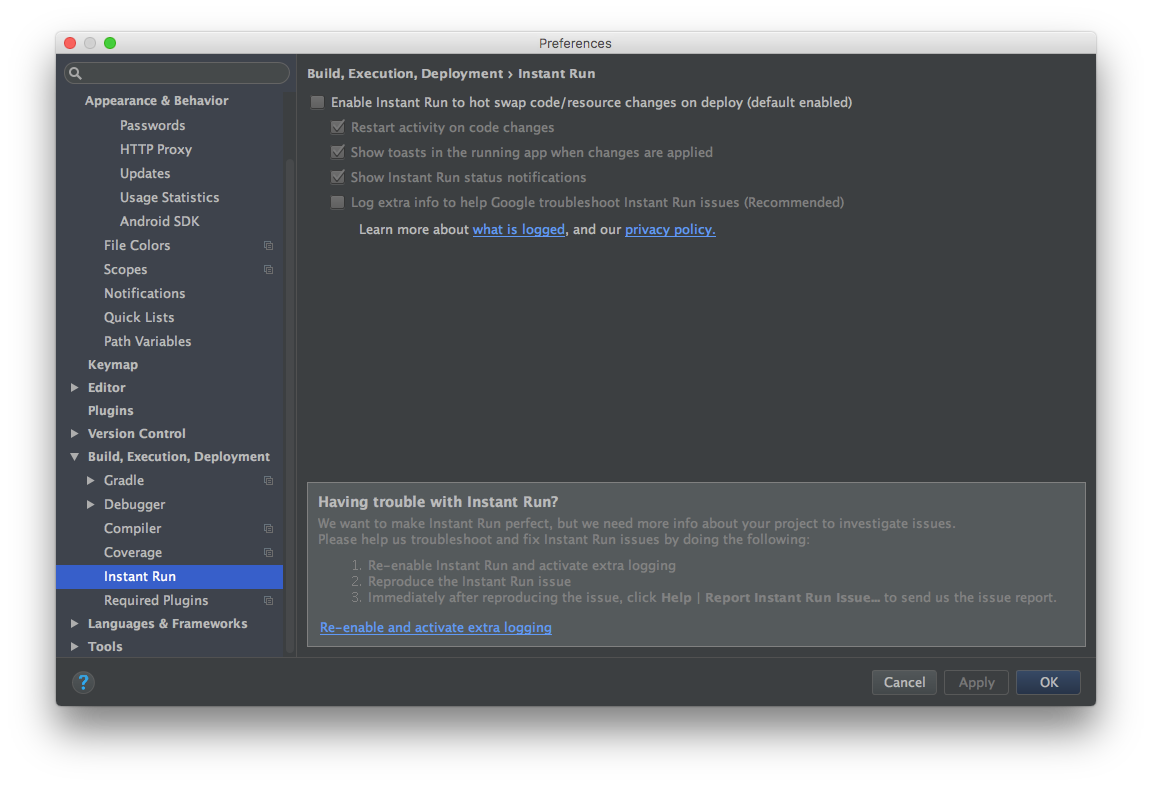
- Place patch Apks in advance
Resources path: Android/data/package/files/xxx.apk
- Register patch APK’s activities and permissions in ClassLoader app’s Manifest
Android studio probably throws some errors likes ‘Unresolved package. ‘, ignore them. And don’t forget to add the prefix of your activity name with its package.
In your patch APK, you cannot map the view by calling setContentView(@LayoutRes int layoutResID) . Your ClassLoader app cannot find your resources via that method. You must use View.inflate() . Because applications access resources via Resource, they cannot refer to new resources in the original Resource object.
Do not use this:
Instead, replace it with:
- How many patch APKs should I load?
Typically, you don’t need to load multiple patch APKs. Multiple patch APKs might cause resource conflicts.
Assuming you import the support-v4 library in both APK1 and APK2, and then you load APK1 first, you will load APK2.
You will find your ClassLoader app crashes or some resource errors happens. To fix it, you must have APK2 run on another process so that you can perfectly release loaded resources by terminating the process before you switch to another patch APK.
Источник
Saving Files
This lesson teaches you to
You should also read
Android uses a file system that’s similar to disk-based file systems on other platforms. This lesson describes how to work with the Android file system to read and write files with the File APIs.
A File object is suited to reading or writing large amounts of data in start-to-finish order without skipping around. For example, it’s good for image files or anything exchanged over a network.
This lesson shows how to perform basic file-related tasks in your app. The lesson assumes that you are familiar with the basics of the Linux file system and the standard file input/output APIs in java.io .
Choose Internal or External Storage
All Android devices have two file storage areas: «internal» and «external» storage. These names come from the early days of Android, when most devices offered built-in non-volatile memory (internal storage), plus a removable storage medium such as a micro SD card (external storage). Some devices divide the permanent storage space into «internal» and «external» partitions, so even without a removable storage medium, there are always two storage spaces and the API behavior is the same whether the external storage is removable or not. The following lists summarize the facts about each storage space.
- It’s always available.
- Files saved here are accessible by only your app by default.
- When the user uninstalls your app, the system removes all your app’s files from internal storage.
Internal storage is best when you want to be sure that neither the user nor other apps can access your files.
- It’s not always available, because the user can mount the external storage as USB storage and in some cases remove it from the device.
- It’s world-readable, so files saved here may be read outside of your control.
- When the user uninstalls your app, the system removes your app’s files from here only if you save them in the directory from getExternalFilesDir() .
External storage is the best place for files that don’t require access restrictions and for files that you want to share with other apps or allow the user to access with a computer.
Tip: Although apps are installed onto the internal storage by default, you can specify the android:installLocation attribute in your manifest so your app may be installed on external storage. Users appreciate this option when the APK size is very large and they have an external storage space that’s larger than the internal storage. For more information, see App Install Location.
Obtain Permissions for External Storage
To write to the external storage, you must request the WRITE_EXTERNAL_STORAGE permission in your manifest file:
Caution: Currently, all apps have the ability to read the external storage without a special permission. However, this will change in a future release. If your app needs to read the external storage (but not write to it), then you will need to declare the READ_EXTERNAL_STORAGE permission. To ensure that your app continues to work as expected, you should declare this permission now, before the change takes effect.
However, if your app uses the WRITE_EXTERNAL_STORAGE permission, then it implicitly has permission to read the external storage as well.
You don’t need any permissions to save files on the internal storage. Your application always has permission to read and write files in its internal storage directory.
Save a File on Internal Storage
When saving a file to internal storage, you can acquire the appropriate directory as a File by calling one of two methods:
getFilesDir() Returns a File representing an internal directory for your app. getCacheDir() Returns a File representing an internal directory for your app’s temporary cache files. Be sure to delete each file once it is no longer needed and implement a reasonable size limit for the amount of memory you use at any given time, such as 1MB. If the system begins running low on storage, it may delete your cache files without warning.
To create a new file in one of these directories, you can use the File() constructor, passing the File provided by one of the above methods that specifies your internal storage directory. For example:
Alternatively, you can call openFileOutput() to get a FileOutputStream that writes to a file in your internal directory. For example, here’s how to write some text to a file:
Or, if you need to cache some files, you should instead use createTempFile() . For example, the following method extracts the file name from a URL and creates a file with that name in your app’s internal cache directory:
Note: Your app’s internal storage directory is specified by your app’s package name in a special location of the Android file system. Technically, another app can read your internal files if you set the file mode to be readable. However, the other app would also need to know your app package name and file names. Other apps cannot browse your internal directories and do not have read or write access unless you explicitly set the files to be readable or writable. So as long as you use MODE_PRIVATE for your files on the internal storage, they are never accessible to other apps.
Save a File on External Storage
Because the external storage may be unavailable—such as when the user has mounted the storage to a PC or has removed the SD card that provides the external storage—you should always verify that the volume is available before accessing it. You can query the external storage state by calling getExternalStorageState() . If the returned state is equal to MEDIA_MOUNTED , then you can read and write your files. For example, the following methods are useful to determine the storage availability:
Although the external storage is modifiable by the user and other apps, there are two categories of files you might save here:
Public files Files that should be freely available to other apps and to the user. When the user uninstalls your app, these files should remain available to the user.
For example, photos captured by your app or other downloaded files.
Private files Files that rightfully belong to your app and should be deleted when the user uninstalls your app. Although these files are technically accessible by the user and other apps because they are on the external storage, they are files that realistically don’t provide value to the user outside your app. When the user uninstalls your app, the system deletes all files in your app’s external private directory.
For example, additional resources downloaded by your app or temporary media files.
If you want to save public files on the external storage, use the getExternalStoragePublicDirectory() method to get a File representing the appropriate directory on the external storage. The method takes an argument specifying the type of file you want to save so that they can be logically organized with other public files, such as DIRECTORY_MUSIC or DIRECTORY_PICTURES . For example:
If you want to save files that are private to your app, you can acquire the appropriate directory by calling getExternalFilesDir() and passing it a name indicating the type of directory you’d like. Each directory created this way is added to a parent directory that encapsulates all your app’s external storage files, which the system deletes when the user uninstalls your app.
For example, here’s a method you can use to create a directory for an individual photo album:
If none of the pre-defined sub-directory names suit your files, you can instead call getExternalFilesDir() and pass null . This returns the root directory for your app’s private directory on the external storage.
Remember that getExternalFilesDir() creates a directory inside a directory that is deleted when the user uninstalls your app. If the files you’re saving should remain available after the user uninstalls your app—such as when your app is a camera and the user will want to keep the photos—you should instead use getExternalStoragePublicDirectory() .
Regardless of whether you use getExternalStoragePublicDirectory() for files that are shared or getExternalFilesDir() for files that are private to your app, it’s important that you use directory names provided by API constants like DIRECTORY_PICTURES . These directory names ensure that the files are treated properly by the system. For instance, files saved in DIRECTORY_RINGTONES are categorized by the system media scanner as ringtones instead of music.
Query Free Space
If you know ahead of time how much data you’re saving, you can find out whether sufficient space is available without causing an IOException by calling getFreeSpace() or getTotalSpace() . These methods provide the current available space and the total space in the storage volume, respectively. This information is also useful to avoid filling the storage volume above a certain threshold.
However, the system does not guarantee that you can write as many bytes as are indicated by getFreeSpace() . If the number returned is a few MB more than the size of the data you want to save, or if the file system is less than 90% full, then it’s probably safe to proceed. Otherwise, you probably shouldn’t write to storage.
Note: You aren’t required to check the amount of available space before you save your file. You can instead try writing the file right away, then catch an IOException if one occurs. You may need to do this if you don’t know exactly how much space you need. For example, if you change the file’s encoding before you save it by converting a PNG image to JPEG, you won’t know the file’s size beforehand.
Delete a File
You should always delete files that you no longer need. The most straightforward way to delete a file is to have the opened file reference call delete() on itself.
If the file is saved on internal storage, you can also ask the Context to locate and delete a file by calling deleteFile() :
Note: When the user uninstalls your app, the Android system deletes the following:
- All files you saved on internal storage
- All files you saved on external storage using getExternalFilesDir() .
However, you should manually delete all cached files created with getCacheDir() on a regular basis and also regularly delete other files you no longer need.
Источник


