- Полный список
- Логи приложения
- Всплывающие сообщения
- How to Print to the Console in Android Studio?
- What is Logcat Window?
- Introduction and Types of Log Class
- Kotlin
- How to Print to the Console in Android Studio using Log Class?
- Button in Logcat Window
- Search Logcat Window
- Filter in Logcat Window
- Логирование в Android Studio без кода
- Damir’s Corner .
- Viewing Console Log from an Android Device
- Using Visual Studio Code Debugger
- Using Chrome Developer Tools
- Using Logcat in Android Studio
Полный список
В этом уроке мы:
— рассмотрим логи приложения и всплывающие сообщения
Project name: P0121_LogAndMess
Build Target: Android 2.3.3
Application name: LogAndMess
Package name: ru.startandroid.develop.logandmess
Create Activity: MainActivity
Создадим в main.xml экран, знакомый нам по прошлым урокам про обработчики:
Алгоритм приложения будет тот же. По нажатию кнопок меняется текст. Обработчик — Activity.
Сохраним, запустим. Убедимся, что все работает.
Логи приложения
Когда вы тестируете работу приложения, вы можете видеть логи работы. Они отображаются в окне LogCat. Чтобы отобразить окно откройте меню Window > Show View > Other … В появившемся окне выберите Android > LogCat

Должна появится вкладка LogCat

Рассмотрим эту вкладку подробней. Логи имеют разные уровни важности: ERROR, WARN, INFO, DEBUG, VERBOSE (по убыванию). Кнопки V D I W E (в кружках) – это фильтры и соответствуют типам логов. Опробуйте их и обратите внимание, что фильтр показывает логи не только своего уровня, но и уровней более высокой важности. Также вы можете создавать, редактировать и удалять свои фильтры – это мы рассмотрим чуть дальше.
Давайте смотреть, как самим писать логи. Делается это совсем несложно с помощью класса Log и его методов Log.v() Log.d() Log.i() Log.w() and Log.e(). Названия методов соответствуют уровню логов, которые они запишут.
Изменим код MainActivity.java. Возьмем все каменты из кода и добавим в DEBUG-логи с помощью метода Log.d. Метод требует на вход тэг и текст сообщения. Тэг – это что-то типа метки, чтобы легче было потом в куче системных логов найти именно наше сообщение. Добавим описание тега (TAG) и запишем все тексты каментов в лог.
Eclipse ругнется, что не знает класс Log. Обновите импорт (CTRL+SHIFT+O) и, если спросит, выберите android.util.Log. Запустим приложение, понажимаем кнопки и посмотрим логи

Видно, что все отлично записалось. Чтобы сделать просмотр удобней, создадим свой фильтр. Жмем значок +

Имя фильтра произвольное, например, «My logs». Log Tag – это как раз значение константы TAG, которая описана в нашем коде и использовалась в методе Log.d, т.е. — «myLogs«. Pid оставляем пустым, это id процесса. Уровень поставим Debug

и жмем OK. Появилась новая вкладка My logs, на которой отображаются логи, соответствующие только что созданному фильтру.
Мы помещали в лог текст, но разумеется, вы можете писать, например, значения интересующих вас переменных (приведенные к типу String).
Иногда бывает, что логи не отображаются во вкладке LogCat, хотя AVD запущен, приложение работает без проблем. В таком случае должно помочь следующее: в Eclipse идем в меню Window > Open Perspective > Other > DDMS. Откроется немного другой набор окон чем обычно. Там найдите вкладку Devices и в ней должно быть видно ваше AVD-устройство, кликните на него и логи должны появиться. Чтобы вернуться в разработку: Window > Open Perspective > Java.
Всплывающие сообщения
Приложение может показывать всплывающие сообщения с помощью класса Toast. Давайте подредактируем метод onClick. Сделаем так, чтобы всплывало сообщение о том, какая кнопка была нажата.
Разберем синтаксис вызова. Статический метод makeText создает View-элемент Toast. Параметры метода:
— context – пока не будем вдаваться в подробности, что это такое и используем текущую Activity, т.е. this.
— text – текст, который надо показать
— duration – продолжительность показа ( Toast.LENGTH_LONG — длинная, Toast.LENGTH_SHORT — короткая )
Toast создан и чтобы он отобразился на экране, вызывается метод show(). Сохраняем, запускаем, проверяем.

Если у вас есть Андроид-смартфон, я думаю вы уже видели подобные сообщения. Теперь вы знаете, как это делается )
На следующем уроке:
— создаем пункты меню
Присоединяйтесь к нам в Telegram:
— в канале StartAndroid публикуются ссылки на новые статьи с сайта startandroid.ru и интересные материалы с хабра, medium.com и т.п.
— в чатах решаем возникающие вопросы и проблемы по различным темам: Android, Kotlin, RxJava, Dagger, Тестирование
— ну и если просто хочется поговорить с коллегами по разработке, то есть чат Флудильня
— новый чат Performance для обсуждения проблем производительности и для ваших пожеланий по содержанию курса по этой теме
Источник
How to Print to the Console in Android Studio?
In computer technology, the console is simply a combination of a monitor and an input device. Generally, the input device is referred to here as the pair of mouse and keyboard. In order to proceed with the topic, we have to understand the terminology of computer science, which is an important part of the process of developing software, and it’s called debugging. Debugging is the process of identifying a bug or an error and fixing it properly for the software. We have to test the software before producing it on market in multiple phases. We have to debug the errors also, then only software will be pure error-free and it will be ready for production. The most of the things which computer does with our code is invisible for us. For Debugging, we have to identify the error first then only we can solve that error. If you want to see the error, then you have to print or log it to our console directly. There are many and different methods in different programming languages for doing it.
In C, We do it using printf(), in C++ we will use cout, and in Java, we generally use System.out.println. We all know, that in the android studio we have to code in a different way. Android has its own methods and components, we have to code the application using them. This is slightly different from normal programming. In today’s article we are going to learn about that how can we print to the console in Android Studio.
What is Logcat Window?
The Logcat is a window in android studio, which displays system information when a garbage collection occurs and also the messages which you have added to your Log class. It displays the message in real-time. It also keeps the history of the messages. You can also learn more about the Logcat window from Here.
Introduction and Types of Log Class
The log class is a pre-defined class in android studio which allows the developer to print messages in Logcat Window, which is the console for Android Studio. Every message is written using a log, Contains a special type or format that represents for what purpose the message is being written.
Kotlin
Above is the sample of a default code for printing something to the logcat. The d is the symbol here that the message is written for debugging the code. More symbols and types are below mentioned in the Log class. The priority of verbose is the lowest and the assert has the highest priority. Below is the list of types of messages in the log class in chronological order.
- V (Verbose)
- D (Debug)
- I (Information)
- W (Warning)
- E (Error)
- A (Assert)
Log class always takes two arguments, the tag, and the message. The tag is like an identifier of your message you can choose it according to preference and in place of messages, you have to type your log message.
How to Print to the Console in Android Studio using Log Class?
Now, we are aware that in the android studio we have to use the Log Class to print something on the Logcat window which is the console for android. So, Let’s see a real-world implementation of this method called Logcat.
Step 1: Start a New Project in Android Studio or Open an existing project on which you want to work. Here is the guide to Starting a new project on Android Studio.
Step 2: Go to your Java or Kotlin file for the activity, and in your onCreate method write the log messages with help of the Log class. Below is our code that we have used in the MainActivity for Random number generation and Printing log messages.
Note: Choose your desired activity, for which you want to print on console. For example, here we are working on MainActivity and generating a random number, and printing it using conditional statements. You can do this or can do something similar to it.
At bottom of the page, we will also share the GitHub repository of the application which we have made in this article. You can refer to that.
Step 3: Now try to build and run your android application, in the meantime also click on the Logcat button which will be on the bottom. Log messages will appear according to the condition cause here we have used the conditional statements.
Button in Logcat Window
In the logcat window, these are the buttons for many tasks:
- Clear logcat: Clears the visible Logcat window
- Scroll to the end: Take you to the end of the logcat window, where you can see the latest messages.
- Up the stack trace and Down the stack trace: Navigates up and down the stack traces in the log
- Use soft wraps: Enables the line wrapping and prevents the horizontal scrolling
- Print: Print logcat messages on paper or save them as a PDF.
- Restart: Clears the log and restarts it.
- Logcat header: Open customization options for log messages
- Screen capture: Captures the logcat window as an image
- Screen record: Records the video up to 3 Minutes of logcat window.
Search Logcat Window
You can select regex optionally, for using a regular expression search pattern. Then type something in the search field which you want to search. The search results will be displayed. If you want to store the search string in this session then press enter after typing the search string.
Filter in Logcat Window
On the top right corner of the logcat window, you will see a filter button and will find three options:
- Show only selected applications: Displays the messages generated by the app code only.
- No Filters: Apply no filters
- Edit Filter Configurations: Modify your custom filter or create new filters
GitHub link as a Resource: Click Here
Источник
Логирование в Android Studio без кода

Вам больше не нужно ставить Log.d() в каждой строке кода!
Когда мы отлаживаем приложения, мы иногда начинаем плодить логи по всему коду, чтобы разобраться с какой-либо проблемой.
Это прекрасно работает, но бывает так, что мы забываем удалить логи перед тем как закоммитаться, и они «благополучно» попадают в продакшн код.
Хорошая практика — не оставлять логи для отладки после её завершения, даже если вы используете ProGuard для их автоматического удаления в скомпилированном коде, так как они оказывают пагубное влияние на общую читабельность вашего кода. Как и комментарии, логи могут легко начать расходиться с окружающим их кодом, в лучшем случае становясь бесполезными, а в худшем вводящими в заблуждение.
Ситуация усложняется, когда выведение логов требует соблюдения определённых условий. Теперь это не просто бесполезное нагромождение if else , но ещё и потенциально дорогостоящий код.
Но, оказывается, есть очень простой способ решения этой проблемы. IntelliJ и Android Studio позволяют создавать точки прерывания (англ. breakpoints), не прерывающие исполнение кода (да, это законно).
Сначала создайте точку прерывания на любой строке, либо щелкнув в левой части редактора, либо с помощью сочетания клавиш Ctrl-F8 . Затем вы можете отредактировать точку прерывания, либо щелкнув по ней правой кнопкой мыши, либо используя комбинацию клавиш Ctrl-Shift-F8 . Вы увидите такое окно:

Затем снимите флажок Suspend (рус. приостановить), и вы увидите больше параметров в этом модальном окне:
Теперь добавьте любые логи в поле Evaluate and log следующим образом:
И после удаления всех логов из кода и добавления их в точки прерывания ваш код будет выглядеть чистым:
Гораздо лучше, правда? Теперь идите и используйте непрерывающиеся точки прерывания! Все, что вам нужно сделать, это запустить приложение в режиме отладки, и сообщения будут выводиться в консоль.
О других хитростях в Android Studio читайте здесь
Источник
Damir’s Corner .
Viewing Console Log from an Android Device
In a previous blogpost, I’ve described how to intercept console log output when the application is running on the device, so that it can later be exported using the standard sharing functionality. Although this is usually the most convenient approach for testers, it’s an overkill during development when the device is connected to the computer most of the time or even the emulator is used instead of an actual device. In such a scenario, it’s more effective to look at the console output from the debugger.
Using Visual Studio Code Debugger
I’m doing all my Ionic development in Visual Studio Code, therefore this is my primary tool for debugging and also for inspecting the console log output from the application. For debugging an Ionic application (or any Cordova application) on the device, the Cordova Tools extension is required.
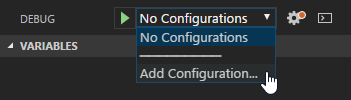
With it, you can add a launch configuration for attaching to the application when running on the device or in the emulator. Open the Debug Side Bar and select Add Configuration. from the configurations dropdown at the top.
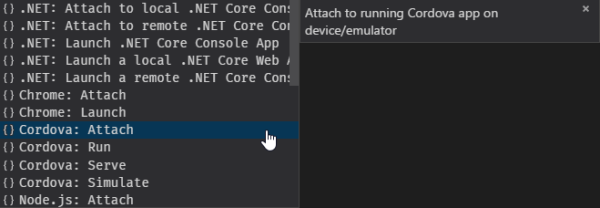
If you don’t have a .vscode/launch.json file yet, Cordova options might not be available to you. If that’s the case, just select any of the available options (you can remove it later). Once the file is created Cordova: Attach will show up as one of the entries in the pop up inside the editor window.
Select it and fill in the choices for platform and target. The following configuration would be used to attach to an Android device:
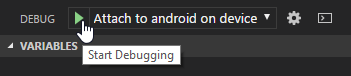
With the Android device connected to your computer and running the application, just start debugging with configuration selected to attach to the application.
Once attached, just open the Debug Console to view in real time everything that’s emitted using console.log() inside the application. You’ll also see any messages that were logged from the application before you attached the debugger to it.
Unfortunately, the same is not true for errors. You’ll only see them if the debugger was already attached to the application when they were emitted.
Using Chrome Developer Tools
If you don’t have Visual Studio Code installed and your preferred editor doesn’t have similar support for Android debugging, you can use the Android debugger that’s built into Chrome.
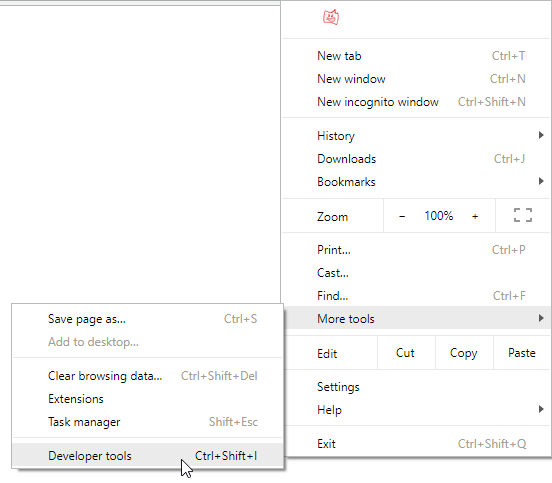
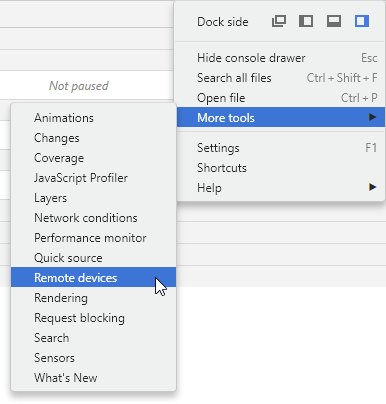
To access it, open the Chrome Developer tools from the More tools menu.
Inside it you need to open the Remote devices view from the More tools menu.
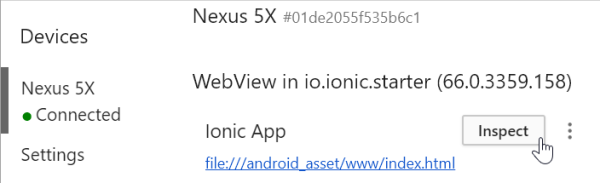
The view will list all attached Android devices and running emulator instances, each with its own list of active web views. By clicking Inspect you can attach to any one of them.
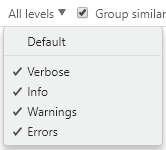
You can view the console log output from the Console view. Unlike Visual Studio Code, it will contain both the log messages and errors which were emitted already before attaching to the application. Just make sure that the output is not filtered by the log level dropdown.
Using Logcat in Android Studio
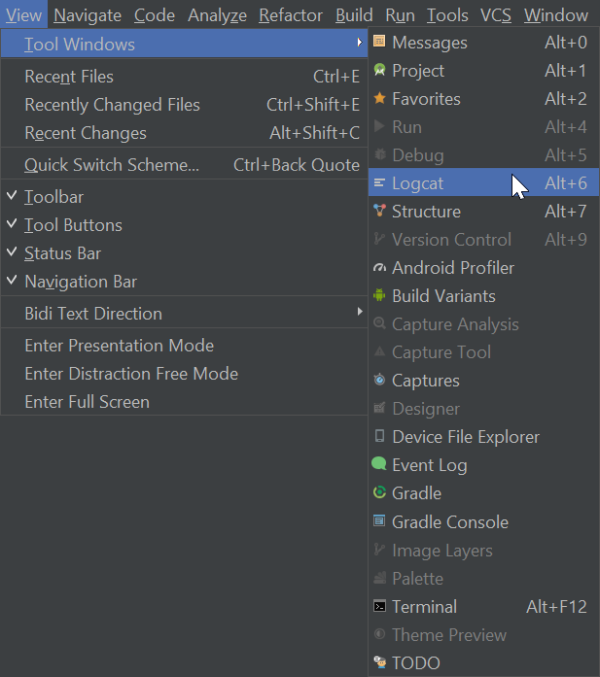
Both approaches so far will only work with development builds. Attaching a debugger to a release build will not be possible. However, all the console log output is still emitted to Android’s system log by the web view. To view it, you can use the Logcat tool integrated in Android Studio.
If you have more than one device attached, you can select the right one from the dropdown on the left. Set the text filter to chromium and remove all other filters to see all the output from the web view.

You’ll only see console log outputs (even from before connecting the device), but no error outputs. To see those, you’ll need to handle them in a global error handler and emit them as console log output.
Источник


