- а для чего постоянно создается папка lost+found?
- Re: а для чего постоянно создается папка lost+found?
- Re: а для чего постоянно создается папка lost+found?
- Re: а для чего постоянно создается папка lost+found?
- Re: а для чего постоянно создается папка lost+found?
- Re: а для чего постоянно создается папка lost+found?
- Re: а для чего постоянно создается папка lost+found?
- Re: а для чего постоянно создается папка lost+found?
- Re: а для чего постоянно создается папка lost+found?
- Re: а для чего постоянно создается папка lost+found?
- Re: а для чего постоянно создается папка lost+found?
- Re: а для чего постоянно создается папка lost+found?
- Re: а для чего постоянно создается папка lost+found?
- Re: а для чего постоянно создается папка lost+found?
- Re: а для чего постоянно создается папка lost+found?
- Re: а для чего постоянно создается папка lost+found?
- Re: а для чего постоянно создается папка lost+found?
- Re: а для чего постоянно создается папка lost+found?
- Re: а для чего постоянно создается папка lost+found?
- Re: а для чего постоянно создается папка lost+found?
- Re: а для чего постоянно создается папка lost+found?
- Что такое папка lost + found в Linux и macOS?
- Что потерял + нашел Для
- Где вы найдете потерянные + найденные папки
- Как просмотреть содержимое утерянной + найденной папки
- Восстановление данных часто сложно
- Android lost and found
- How To Find A Lost or Stolen Android Device
- General Tips:
- How to locate your lost Android device
- 1. Call your phone.
- 2. Using Android Device Manager.
- 3. View your Google location history.
- 4. Remotely install a security application.
- 5. Inform the police.
- Best Apps To Find Stolen/Lost Android Phone
- 1. Android Device Manager (official)
- 2. Android Lost / Lost Android (Install)
- 3. Where’s My Droid (Install)
- 4. Find My Phone – Security (Install)
- 5. Most Antivirus apps
а для чего постоянно создается папка lost+found?
собственно сабж, постоянно наблюдаю в ней какие-то файлы с нечитаемым содержимым (да, когда форматировал винт под reiserfs, такого не было)
Re: а для чего постоянно создается папка lost+found?
1. Нет такого слова «папка».
2. В каталог lost+found складывается то, что обнаружила fsck при проверке раздела.
Re: а для чего постоянно создается папка lost+found?
>1. Нет такого слова «папка».
Как это слова нет? Мамка есть, а папки нет?

Re: а для чего постоянно создается папка lost+found?
не понял, а что такое можно обнаружить при проверке, что надо складывать куда-то? разве ошибки не исправляются автоматически?

Re: а для чего постоянно создается папка lost+found?
файлы без названий 😉

Re: а для чего постоянно создается папка lost+found?
В lost+found скидываются файлы, на которых не было ссылок ни в одном каталоге, хотя их иноды не были помечены как свободные.

Re: а для чего постоянно создается папка lost+found?
в винде никогда не находил lost chains? И файлы chk0001.chk? Вот тут то же самое.

Re: а для чего постоянно создается папка lost+found?
возможно, так твой винт готовится отойти в мир иной и пытается предупредить хозяина. Это особый язык, но рано или поздно его осваивают. Лучше рано, чем поздно 🙂

Re: а для чего постоянно создается папка lost+found?
Re: а для чего постоянно создается папка lost+found?
а как такое может получиться? и почему с reiserfs такого ни разу не было?
Re: а для чего постоянно создается папка lost+found?
Питание отрубается часто?
Re: а для чего постоянно создается папка lost+found?
Потому что reiserfsck потерянные файлы не умеет восстанавливать. Она в лучшем случае восстановит работоспособность фс.
Re: а для чего постоянно создается папка lost+found?
а отчего файлы теряются-то? где хваленая стабильность?
Re: а для чего постоянно создается папка lost+found?
Ну и что я должен ответить на твой вопрос, по-твоему? Я вроде ничего тут не хвалил. 🙂 Обращайся к тем, кто хвалил, наверное.
Re: а для чего постоянно создается папка lost+found?
надо ответить, куда просто так могут деться файлы, и зачем их складывать в непонятное место
Re: а для чего постоянно создается папка lost+found?
Re: а для чего постоянно создается папка lost+found?
🙂 Это ты пральна сказанул (:
Re: а для чего постоянно создается папка lost+found?
> а как такое может получиться? и почему с reiserfs такого ни разу не было?
Удаление файла в Unix-системах — это две операции:
1. Удаление ссылки из каталога;
2. Удаление инода.
Если выполнилась первая операция и произошёл сбой, например, выключилось питание, то в системе останется потерянный инод, который вроде как и указывает на корректный файл, но этот файл не содержится ни в одном каталоге. В нежурналируемых файловых системах (например, ext2), в которых нет средства определения такого сбоя, задача восстановления таких файлов ложится на fsck. Он находит иноды, на которые нет ссылок, и создаёт на них ссылки в lost+found. Предполагается, что после этого пользователь сможет просмотреть файлы и при необходимости переместить им куда надо, вернув нужные имена.
Такая же ситуация теоретически может произойти при создании нового файла, если инод уже создан, а ссылка в каталоге — нет.
В журналируемых файловых системах (а к ним относятся ext3 и ReiserFS) fsck просто просматривает журнал, видит, что операция на завершилась полностью, и откатывает её. Поэтому и потерянные иноды находятся там реже.
Re: а для чего постоянно создается папка lost+found?
reiserfs вообще как-то сильно по-другому устроена, там аналогии с ext2 не стоит применять. Хотя подробностей я не знаю. 🙂
Re: а для чего постоянно создается папка lost+found?
и кудаже мне надо перемещать файлы, набитые мусором? это наверное какие-то служебные? или их сразу удалять можно, раз они создаются при кривом удалении? у меня ext3

Re: а для чего постоянно создается папка lost+found?
ИМХО, файлы на ext2/ext3 теряются при выключении без отмонтирования диска при неработающем журнале, при сбоях железа (шлейф отошёл) и при поиске приключений на свою задницу.
У меня такие файлы в lost+found возникают при ошибках при ковырянии в настройках ФС и изменении размера разделов. Просматриваю в mc и конквероре (или в чём-нибудь ещё, что умеет угадывать формат по содержимому), определяю формат, открываю соответствующей программой, по результатам — переименовываю или удаляю. Ещё там часто оказываются обрывки логов (если попытка загрузиться в новой конфигурации закончилась ресетом).
Источник
Что такое папка lost + found в Linux и macOS?

Папка lost + found является частью Linux, macOS и других UNIX- подобных операционных систем. Каждая файловая система, то есть каждый раздел, имеет свой собственный каталог lost + found. Вы найдете восстановленные биты поврежденных файлов здесь.
Что потерял + нашел Для
В Linux команда fsck — сокращение от «проверка файловой системы» — проверяет ваши файловые системы на наличие ошибок. fsck может найти биты «потерянных» или поврежденных файлов в файловой системе. Если это так, fsck удаляет эти поврежденные биты данных из файловой системы и помещает их в папку lost + found.
Например, если вы внезапно выключили компьютер во время его работы и файлы были записаны на жесткий диск, инструмент fsck может автоматически проверить вашу файловую систему при следующей загрузке компьютера. Если он находит какие-либо поврежденные данные, он помещает их в папку lost + found файловой системы.
Это работает аналогично в MacOS. Если вы запустите Disk Utility и проверите свой диск на наличие проблем с файловой системой, он может найти поврежденные биты данных и сохранить их в папке lost + found.
Большинство файловых систем UNIX имеют папку lost + found, включая ext2, ext3 и ext4 в Linux, а также файловую систему HFS + в macOS. Некоторые файловые системы могут не использовать папку lost + found, но они менее распространены в этих операционных системах.
Где вы найдете потерянные + найденные папки
Каждая файловая система имеет свою собственную папку lost + found, так что вы найдете ее на каждом жестком диске или в разделе. Это означает, что вы найдете папку lost + found в корневом каталоге, например, в / lost + found.
Если у вас смонтированы другие разделы, вы также найдете папку lost + found на каждом из них. Например, если у вас есть отдельный раздел для вашего домашнего каталога, смонтированный в / home, вы найдете папку lost + found в / home / lost + found. Потерянные данные из домашнего раздела будут помещены в / home / lost + found вместо / lost + found.
Если у вас есть USB-накопитель или другой внешний накопитель, отформатированный в файловой системе Linux, вы также увидите на нем каталог lost + found.
Эта папка часто скрыта, поэтому вам может потребоваться показать скрытые файлы и папки, чтобы увидеть ее.
Как просмотреть содержимое утерянной + найденной папки
Эта папка, как правило, доступна только пользователю root, что не позволяет обычным пользователям заглядывать внутрь и получать доступ к восстановленным данным, к которым у них обычно нет прав доступа. Не думайте, что поврежденные файлы лежат вокруг только потому, что вы видите папку lost + found — во многих системах она может быть пустой.
Чтобы увидеть, что внутри, откройте окно терминала и последовательно выполните следующие команды:
(Если первая команда не работает, попробуйте запустить su вместо sudo su каждый дистрибутив Linux немного отличается.)
Терминал перечислит любые файлы в папке lost + found. Если ничего не возвращается, папка пуста.
Восстановление данных часто сложно
Если что-то находится в папке lost + found, обычно это не целые файлы. Вместо этого вы увидите небольшие фрагменты файлов или фрагменты поврежденных данных, и вы не сможете ничего с ними сделать.
Если вы не потеряли важные данные, вам, вероятно, не нужно беспокоиться о том, что находится в папке lost + found. Если вы потеряли данные, вы можете просмотреть папку lost + found и попытаться восстановить часть из них. Если вы найдете здесь полный файл, вы можете попытаться переместить файл обратно в исходное местоположение и использовать его. Но есть небольшая вероятность, что вы можете сделать что-нибудь с поврежденными частичными файлами. Команда fsck поместила их туда на всякий случай.
Вы также не можете удалить папку lost + found, так как это постоянная часть файловой системы. Однако, если вы найдете бесполезные фрагменты файлов внутри папки lost + found, которые вы не можете собрать вместе, вы можете удалить их с помощью терминала, чтобы освободить место.
Источник
Android lost and found
Table of Contents
Lost & Found is an android application that allows CUNY students to post what they lost or found. The application has two main screen, Lost and Found tab. Lost tab is for user who lost their items on campus, whether it’s laptop or water bottle. The Found tab is for user who found items through the campus, for example school ID. Users can create post by taking a photo and writing a description of the lost/found item. The owner of the item can contact the user who found the item through Message, Call or Track features. Users can message each other by using the built-in messaging system. Users can also call if preferred. To return the item to the owner, user can use the Track feature. The Track is a feature that send an email to the user who found the item so that he/she can contact the owner of the item. User must fill out a form to verify the user identify (e.g. full name, school id, phone number). Then, the user need to sign the form through the built-in signature pad to accept the terms and conditions.
- Open up the app and create an account.
- Verify the account using the email you registered with.
- Login and set up your profile and save your information.
- Material UI
- Android
- Firebase

Unified Modeling Language

Activities
- LoginActivity — Activity for user to enter their email and password.
- RegisterActivity — Activity for user to register for an account using their email and password.
- MainActivity — Home activity for user to view between the Lost & Found tab to see other users’ post.
- MessageActivity — Activity to allow user to message another user.
- MessageViewActivity — Activity to view chats the user has created.
- PostActivity — Activity to allow user to post for a lost or found item.
- PostViewActivity — Activity to view other user’s post, either lost or found.
- ProfileActivity — Activity to view the user’s profile and edit user’s information.
- ProfileViewActivity — Activity to view other user’s profile
Fragments
- LostFragment — Fragment of the Lost tab.
- FoundFragment — Fragment of the Found tab.
Classes
- Message — Class to hold a message data e.g. user and message.
- MessageList — Class to hold all message data of that user.
- Post — Class to hold a post information (e.g. title and description).
- PostList — Class to hold all post data of either Lost or Found tab.
- SecurityQuestions — Class to hold the security questions when a user want to track and contact other user.
- Upload — Class to hold the post image url.
- User — Class to hold a user information e.g. name, phonenumber, id,and school
- GMailSender — Class to send email to a user gmail account when a user is using track feature.
- JSSEProvider — Class to send email to a user gmail account when a user is using track feature.
Adapters
- MessageAdapter — Extends ArrayAdapter to populates a list of messages into a messageview.
- MessageViewAdapter — Extends ArrayAdapter to populates a list of chats into a chatting view.
- PostAdapter — Extends ArrayAdapter to populates a list of posts into a Lost or Found fragment view.
- ViewPagerAdapter — Extends FragmentPagerAdapter to add fragments,lost & found, to switch between lost & found tab.
Источник
How To Find A Lost or Stolen Android Device
With the huge increase in smartphone use, losing a phone has become a normal thing. Everyone loses their phone sometime. And with the higher end devices, smartphone theft is also becoming widespread, so much so, that you can actually buy insurance for your phone. When you suddenly lose your phone, sometimes it becomes hard to take the right steps quickly. How do you find a small lost or stolen android device if it is not responding to phone calls?
If you are an Android user, here is a list of things you can do if you have lost your phone, or if your phone has been stolen. You may also have undergone the ‘lost phone experience’ in the past, so continue reading to learn how you can use the latest tools to help you protect your phone in the future, be it loss or theft.
General Tips:
- Try remembering where it was that you last used your phone and search the place thoroughly.
- Inform all your contacts that your phone has been lost. Being an android user, you most probably have your contacts safely backed up with Google.
- Use the ‘Logout of all devices’ feature on Facebook and any other social network whose app you had installed on your phone.
- As an added measure change all your passwords too.
How to locate your lost Android device
1. Call your phone.
There might be chance someone has found the phone and is looking to return it to its owner.
2. Using Android Device Manager.
Log onto the Google Play Store on a computer and go to the Android Device Manager. (Click on the Gear icon in the navigation bar and then click on ‘Android Device Manager’).
This would show you your device’s last detected location, the time it was last detected. If you have the Android Device Manager App already installed on your phone and made system administrator (See Below), you can also erase, lock or ring your phone from the browser window itself.
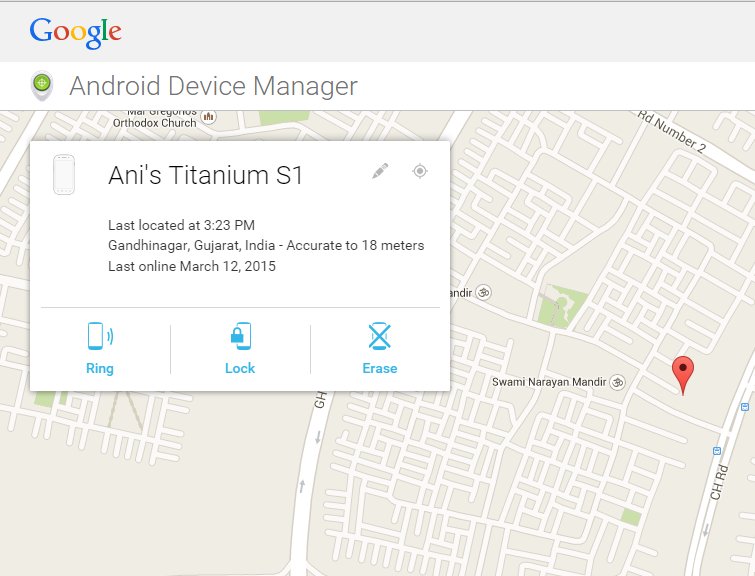
The only prerequisite is that your android device is still signed into your Google account, so if your device is stolen, and someone has signed out of your account, this method is not really effective.
3. View your Google location history.
This will help you identify where your phone was last seen, and if it still is signed into your Google account, it will be updating its location information to Google. This is a possible alternative in case android device manager fails.
4. Remotely install a security application.
To do this, your device must be signed into your account, and be connected to the internet. There are many great apps for this, but Android Lost is the one that stands out. It can remotely control nearly every aspect of your phone (And shows up in your launcher as Personal Notes). Full details given in the section below.
5. Inform the police.
Law Enforcement Agencies can track down a phone, provided you have its IMEI (International Mobile Station Equipment Identity) number. If you don’t know your phone’s IMEI number, it can be found on the box the phone came in.
Bonus Tip: Find Your Phone with Android Wear Smartwatch
If you own an Android wear smartwatch then you can try calling your lost/misplaced phone by installing Google Device Manager in your smartwatch. All you have to do is to say is ‘Ok, Google. Start. Find my phone, and your phone will start ringing.
Note: This feature is not yet available in all Android wear devices but it will be made available to every android based smartwatch within a couple of weeks.
Best Apps To Find Stolen/Lost Android Phone
1. Android Device Manager (official)
Most phones come pre installed with ADM these days, but if your phone does not have this app, do install it immediately. Android Device Manager is a Google App which lets you remotely lock and track your phone. It also has a handy feature to force your phone to ring.
After installing Android Device Manager, add it to your list of system administrators, so you can use it for magical things like erasing your phone if it has been stolen. We have already discussed on how to use ADM to find/erase your device.
Steps:
- Go to the security tab of settings.
- Click on device administrators.
- Select the check-box for ‘Android Device Manager’.
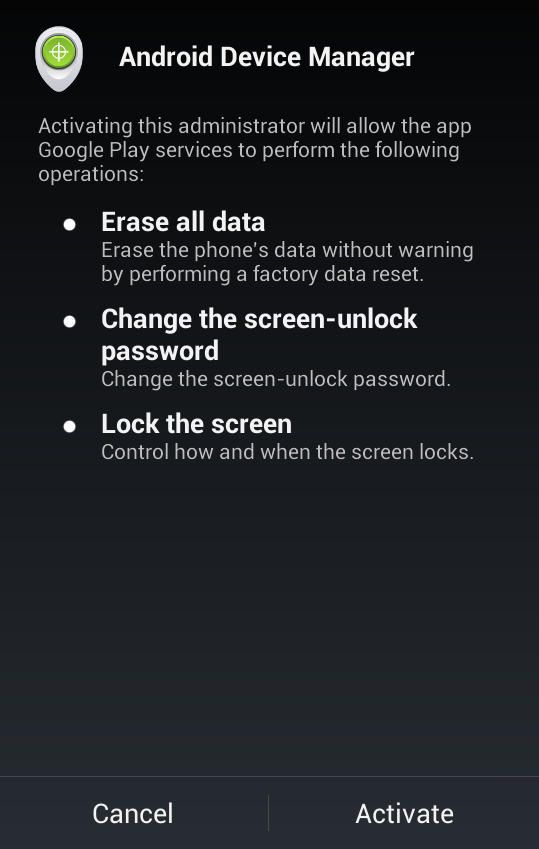
Note: By doing this you give ADM full control of your device. It now has full access to do nearly anything with your android smartphone/tablet.
2. Android Lost / Lost Android (Install)
This is an all-in-one app for securing your phone against theft or loss. Feature-wise, it beats ADM hands down. Most features are fully free, but you will need to pay for using the remote shutdown/restart feature as well as to take remote screenshots. As of now, Android Lost lets you try the Premium features free for a week.
You can fully control a lost phone by browser, or by SMS. Here is a (small) list of everything Android Lost boasts to do, remotely:
- GPS tracking
- Read/Delete SMS conversations, and send new SMS’s via browser
- Take pictures with your phone camera, and record through your phone’s mic
- Start/Stop phone services like Wi-Fi, Data Connections, GPS
- Get notifications when your phone SIM has been changed
- Play any audio message from your phone
- Hide the app from the launcher
Needless to say, if you can trust Android Lost enough to install it on your phone, locating a lost phone becomes child’s play.
Although there are ways that even Android Lost can fail, if, for instance you lose a phone that is out of charge and no one finds it. Also, If your phone has been stolen, and you have NOT hidden this app, you can wave goodbye any chance of using Android Lost to recover the device.
How to use Android Lost:
Android Lost can be controlled either through the web interface, or by SMS. Just log into the web interface with your Google account and go on ahead to the Controls tab.
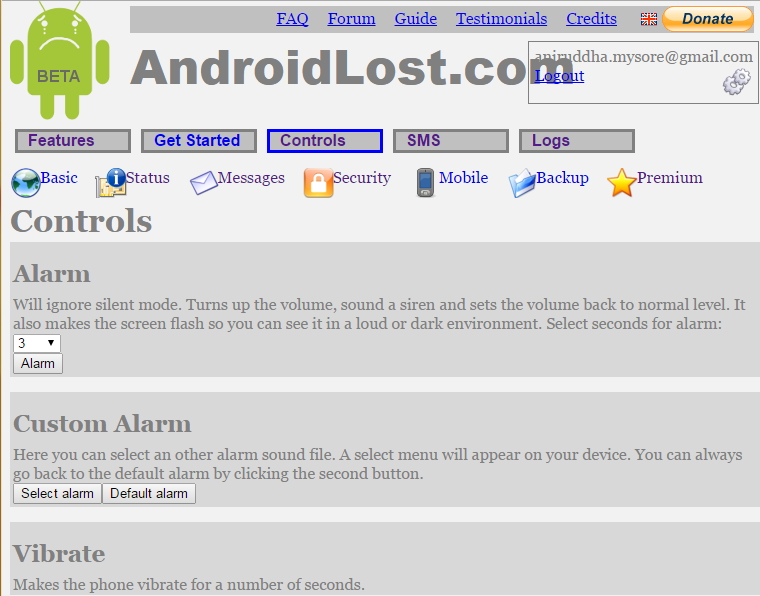
The interface clearly does not win any points for design, but it does pack several powerful features. The custom alarm is very interesting for sure. You can also set an overlay message as well as a boot message for your lost phone ‘ in-case a friendly guy finds the phone ‘ as the Android Lost website puts it.
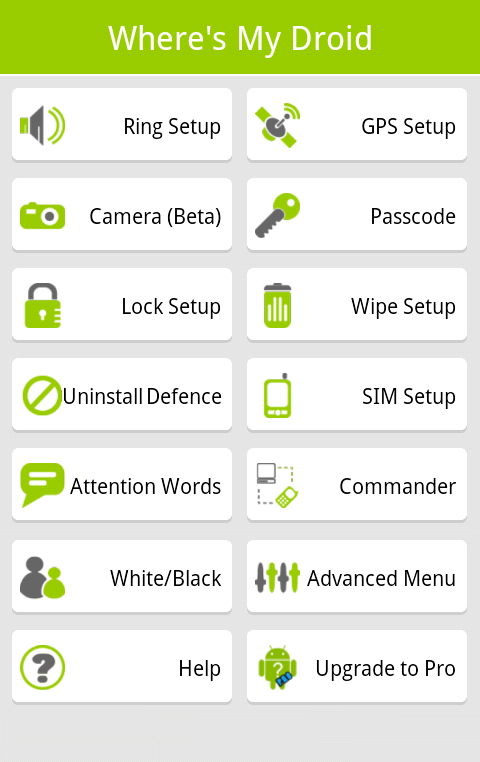
3. Where’s My Droid (Install)
A plethora of excellent features, but ultimately requires you to pay for the pro version if you actually want to use any of the more useful features like remotely locking/wiping your SD card, or taking pictures with your device camera. This app has most of the features Android Lost has, although it cannot turn off the phone’s Wi-Fi connections or GPS.
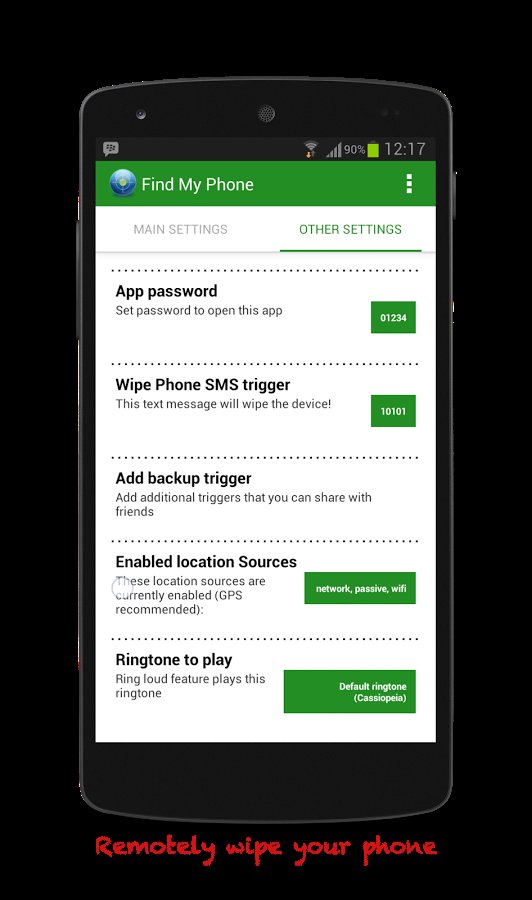
4. Find My Phone – Security (Install)
A free app to help locate your android smartphone. It tends to work better with older versions of android than some other apps. The developer also has a Pro version of the app called ‘Find My Phone – Anti-Loss Pro’ which offers an ad-free experience with some extra features like remotely tracking the phone battery usage.
5. Most Antivirus apps
Most Antivirus and phone security apps also include features to help track, and erase a stolen phone. These are mostly paid apps which claim to be all-in-solutions for all your phone security issues. If you’re interested in this category, only use apps which have been released from trusted companies, because after all, the best way for a hacker to spy on you is by having you install an app that claims to protect you. We will not go into these apps here as they form an entire app category on their own. 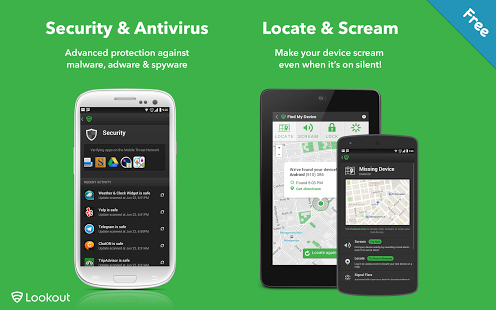 Lookout is one of the more popular apps in this category
In the end, luck plays a big part in recovering a lost or stolen phone. If your phone has been stolen, it is usually not wise to directly confront the thief, or so most law enforcement agencies say.
Below, we have listed some of the most frequently lost android smartphones.
| Android Phone List | |
|---|---|
| Samsung Galaxy S4 I9500 (16GB) | Sony Ericsson Xperia Arc S |
| Samsung Galaxy E7 | Nokia Lumia 920 |
| Micromax Canvas Knight A350 | Samsung Galaxy S4 Zoom |
| Sony Xperia C3 | Sony Xperia P |
| HTC Desire 816G Dual SIM | Samsung Galaxy Mega 2 |
| Samsung Galaxy Note 3 Neo N750 (16GB) | Nokia Lumia 925 |
| HTC Desire 820 | HTC One M8 Eye |
| Samsung Galaxy A5 | Nokia Lumia 800 |
| Samsung Galaxy S5 SM-G900H (16GB) | Samsung Galaxy Mega 6.3 i9200 |
| Sony Xperia Z Ultra | LG Google Nexus 5 32GB |
| Samsung Galaxy Note 3 N9000 (32GB) | HTC One Dual SIM 802D (CDMA + GSM) |
| Samsung Galaxy Note 4 | Sony Xperia ZL |
| Micromax Canvas Gold A300 | Sony Xperia S |
| Sony Xperia Z1 | Samsung Galaxy Golden |
| Sony Xperia Z3 | Nokia Lumia 820 |
| Samsung Galaxy A7 | HTC One Mini |
| Sony Xperia Z2 | Sony Xperia Ion |
| Samsung Galaxy Alpha | LG G2 (32 GB) |
| HTC Desire 816 | HTC Desire 600 |
| Sony Xperia T2 Ultra | HTC Desire 601 |
| HTC Desire 816G Octa Core | LG Nexus 4 |
| Samsung Galaxy A3 | Samsung Galaxy S2 Plus |
| HTC Desire 820Q | HTC Butterfly |
| Samsung Galaxy Note 2 GT-N7100 (16GB) | HTC One Dual SIM |
| LG Google Nexus 5 D821 | HTC Desire X |
| Sony Xperia T2 Ultra Dual | LG G Flex |
| Nokia Lumia 830 | Samsung Galaxy Mega 5.8 I9152 |
| Sony Xperia Z C6602 (16GB) | Samsung Galaxy S3 I9300 32GB |
| HTC One (M8) | Nokia Lumia 900 |
| Nokia Lumia 1020 (EOS) | HTC Desire 500 |
| Samsung Galaxy Note Edge | LG G Pro 2 |
| Sony Xperia Z1 Compact | HTC Desire 600C Dual SIM |
| Samsung Galaxy S2 I9100 | HTC One Max |
| Nokia Lumia 930 | HTC Sensation |
| Sony Xperia Z3 Compact | HTC One S |
| HTC One E8 Dual SIM | HTC Evo 4G (16GB) |
| Sony Xperia M2 | Samsung S Advance I9070 |
| HTC Desire 820s | HTC 8X |
| HTC One | LG Flex 4G |
| LG G2 | HTC Desire SV |
| Nokia Lumia 720 | HTC One X+ |
| Samsung Galaxy Note | HTC ONE (M8) Dual-SIM |
| HTC Desire EYE | HTC Sensation XL |
| Sony Xperia ZR C5502 (8GB) | LG Optimus G Pro |
| Nokia Lumia 1520 | HTC Radar |
| LG G3 32GB | LG Optimus Vu |
| HTC Desire 700 | LG Optimus 3D P920 |
| LG G3 16GB | LG Optimus G |
| LG Optimus 4X | LG Optimus G E988 (16GB) |
| LG Optimus 3D Max P725 | Motorola Nexus 6 |
| Samsung Galaxy S6 | Motorola Moto X 2ng Gen 32GB |
| OnePlus One 64GB | Xiaomi Mi4 |
| Samsung Galaxy S6 edge | Gionee Elife S5.1 |
| Motorola Moto Turbo | Lenovo Vibe X2 |
We hope our tips help you find your precious smartphone.
Please share this article if you found it useful, and do comment below if you any queries.
Источник


