- How to install user apps as Android system apps
- Warning
- Requirements
- Installing a System App with ES File Explorer
- Installing a System App via ADB
- 2 Ways to Convert User App to System App on Android
- Way 1: Convert to System App via Application Manager
- Way 2: Make an App a System App by Changing OS
- Option 1: Directly Copy APK to Install in /system/app
- Option 2: Convert User App to System App with Android SDK and Command
- Developing System Apps using an emulator
- Deploying systems apps on your AOSP emulator
- OS Customization for XR Device
- XR devices need OS customization to support the enterprise’s needs. Sharing my experience of building a custom android…
- Android Emulator Setup to develop System applications
- Step 1 — Setting up the emulator
- Step 2 — The Applications Manifest
- Step 3 — Writing to System partition of the emulator
- Step 4 — Confirming System app status
How to install user apps as Android system apps

Part of the benefits of having an Android device is being able to install an app on it. Installing is as simple as one, two, three; just search for your desired app on the Google Play Store and hit the Install button. Though installing apps is easy, they can be installed as either user apps or system apps.
User apps are installed in the typical way via the Google Play Store, Amazon Appstore, third-party markets, or sideloading. In contrast, system apps are apps pre-installed in the phone’s system partition with your ROM and typically, Android device users don’t have the access to the system partition. This means that, ordinarily, users cannot directly install apps to or uninstall from the system partition.
You can install user apps as system apps by using such apps as Titanium Backup, but you have to go for the paid version of the app to be able to enjoy such feature. However, there are other methods to install user apps as system apps without paying fees. Check out this guide for methods of installing ordinary user apps as system apps.
Warning
- The information in this guide is provided for instructional and educational purposes only. There is no guarantee that these instructions will work under your specific and unique circumstances.
- Use these instructions at your own risk. We shall not hold any responsibility or liability for whatever happens to you or your device arising from your use of the info in this guide.
- Read and understand the whole guide first before actually performing the instructions.
Requirements
- A rooted Android device. If you haven’t rooted your Android device yet, you can check out our list of the rooting methods we’ve covered.
- Enable USB debugging on your Android device. On most Android devices, you can find USB Debugging in Settings > Applications > Development.
- Backup all personal data on your phone to make sure you have a copy of your personal data (e.g., contacts, SMS, MMS, Internet settings, Wi-Fi passwords, and the like) in case the procedure in this guide erases such data.
-
- For backup tips, check our guides on how to sync your data to the cloud and how to create local backups of your mobile data.
- Maintain a battery charge of 70% or more to make sure that you have sufficient power for the entire procedure.
Installing a System App with ES File Explorer
For this method, you will need root access and the ES File Explorer app. You can download this app free from the Google Play Store.
- Configure ES File Explorer by doing the following steps:
- Launch ES File Explorer.
- Select Menu and choose Settings.
- Under Settings, enable the options for Up to root and Root Explorer. A message will appear, requiring you to confirm your action. You will also need to confirm Superuser access.
- Enable Mount File System.
- Go back to the app’s main menu.
- Get a copy of the APK (Android Package) of the app that you want to save as a system file by doing the following steps (skip to step 3 if you already have the app’s APK file):
- Install an app from the Google Play Store. For this guide, we will be using the app BioRhythms as an example.
- Launch ES File Explorer and navigate to /data/app.
- Locate the APK file that you want to install as a system app. If you don’t know the APK’s filename, simply go to the Google Play Store link of your chosen app. View the link and take note of the words after “?id=”. This will be your APK’s filename. For instance, the BioRhythms app link is https://play.google.com/store/apps/details?id=app.biorhythms. The BioRhythms’ APK is app.biorhythms-1.apk.
- Create a backup of the chosen APK by copying it to the phone’s SD Card.
- After creating a backup, long tap on the APK file and a menu will appear. Choose Cut. A blue arrow will appear at the bottom of the screen.
- Go back to the main menu and navigate to /system/app/.
- Drag the little arrow at the bottom of the screen. It will bring up the icon of the APK file.
- Tap the APK file and it will be transferred to /system/app/.
- Find the APK file in /system/app/. Press and hold it and a menu will appear.
- Select Properties on the menu. The dialog properties will show up.
- Tap Change and it will show the permissions dialog box.
- Check the boxes for the following permissions in the dialog box:
- User: Read and Write
- Group: Read
- Other: Read
- Select OK once the required settings have been made.
- Reboot your device.
You app is now saved as a system app.
Installing a System App via ADB
For this method, make sure that you have installed ADB (Android Debug Bridge) on your computer. You can get ADB by setting up the Android Software Development Kit (SDK) on your computer.
Источник
2 Ways to Convert User App to System App on Android
How to make an user app a system app? Follow two ways below to convert an app to system app. Then the app would not be easily uninstalled or changed.
Way 1: Convert to System App via Application Manager
If you have learned convert between user app and system app, you would know third-party application manager could easily convert user app to system app, such as RE and LINK2SD.
By comparing RE and LINK2SD, you would find LINK2SD seems easier to make a system app with user app.
Step 1: Download Link2SD APK and install it on your Android phone.
Step 2: Run it on android and look for the app you want to convert to system app.
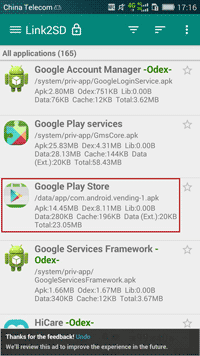
Step 3: Click the app, and select Convert to system app in the right pop-up menu.
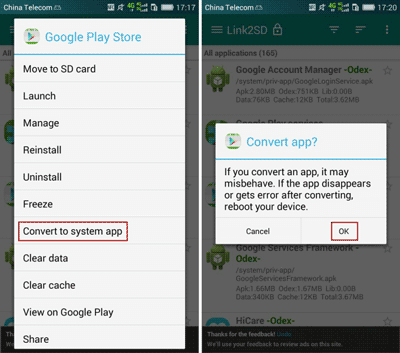
Sometimes, probably you cannot find «Convert to system app» option when you click a user app in Link2SD. This happens is possibly because the app cannot be installed as system app. So don’t worry it is your Android phone problem. When this really happens, I think you should give up to converting to system app.
Step 4: On Convert app dialog, click «OK» to confirm to convert this app, and undertake the possible risk.
For example, the app disappears or gets error after converting.
Way 2: Make an App a System App by Changing OS
Option 1: Directly Copy APK to Install in /system/app
If you have permissions to write in /system/app, you can follow this way to change user app to system app. If not, please follow option 2 to do.
2. The Android will prompt you the system is upgrading. Wait for Android upgrade successfully.
3. Find the app saved in the sdcard, and click its APK to install it on Android phone.
Now the app has been converted to system app. If you are not sure, you just need to open Settings Manage apps, and choose the app and try to uninstall it. If it cannot be uninstalled or the system app prompting message appears without root privileges, you can be sure it is system app now.
Option 2: Convert User App to System App with Android SDK and Command
Compared to above two ways, this way looks more difficult for android users. But if you don’t want help from third-party application manager, or you would like to learn the principles about how user app can be converted to system app, it will be more valuable than above two.
Preparation:
- 1. Android phone root access.
- 2. Android SDK has been installed and ADB is ready to use.
- 3. Obtain the APK file of the app you want to convert it to system app.
- 4. Place the .apk file in the specific directory of the device, /sdcard.
Step 1: Plug your Android phone into computer and enable USB debug.
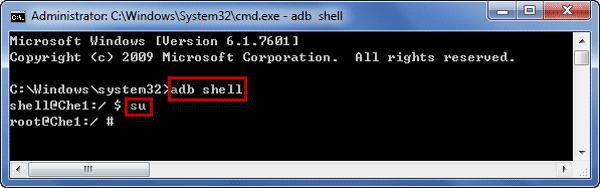
Step 2: Open CMD and enter Android system with command.
Run Command Prompt as administrator, type «adb shell» and press Enter to see whether there is a message «#» returned back. If there is, it means that you have successfully accessed Android system by command on computer.
Step 3: Make /system folder readable and writable.
1. Type «mount» and press Enter to check /system folder permissions, and get the /system partition location.
/dev/block/bootdevice/by-name/system /system
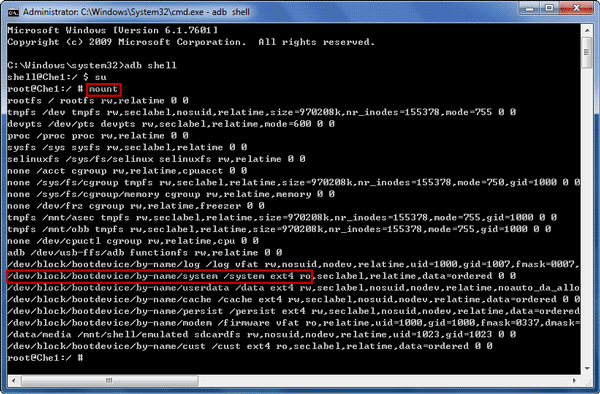
2. Mount /system folder readable and writable. In order to be sure, you can type «mount» again to check whether /system folder permissions has been changed.

Step 4: Find, copy the APK and library files to /system folder, and add permissions to them.
1. Copy APK to /system/app and add permissions.
command: cp xxxx.apk /system/app or mv xxxx. apk /system/app


2. Decompress APK and check whether there is a file *.so in lib/armeabi. If there are, copy them to /system/lib, just like copying APK to system/app. If not, directly turn to step 5.
adb push xxxx.so system/lib
3. Add permissions to these library files. chmod 644 xxxx.so
Step 5: Reboot Android phone when you confirm all of things have been setup.
Now try to run this APK on your android phone, and then check whether it cannot be uninstalled. If all is successful, it means that you have converted the user app to system app.
Tips: After converting user app to system app, you should remount /system permission as r/o. Otherwise, anyone could change app settings in /system, which would lead to damage to Android system.
Related Articles:

iSunshare is dedicated to providing the best service for Windows, Mac, Android users who are in demand for password recovery and data recovery.
Источник
Developing System Apps using an emulator
Deploying systems apps on your AOSP emulator
Hope you are able to build custom AOSP emulator as described in the below article :
OS Customization for XR Device
XR devices need OS customization to support the enterprise’s needs. Sharing my experience of building a custom android…
Now is the time to deploy applications as system apps to this customized or any existing emulator.
Android Emulator Setup to develop System applications
The Develop → Test → Debug cycle for an android system application is quite longer than the normal app development cycle. This article describes the emulator setup and a few handy scripts to facilitate a faster development cycle.
Step 1 — Setting up the emulator
If you are using Android Studio like me, the AVD manager of the android studio comes with plenty of preconfigured AVD options to create a virtual device. But most of them are targeted for general app development. we really need to pay attention while creating a virtual device for system apps development. You are free to select any device configuration that matches your requirement. But while selecting a system image for the virtual device, we need to select an image which DOES NOT include “Google APIs”. This is because, if you use images with “Google APIs” we will not be able to sign our system applications with the same key as Google API since it is not available to us. Whereas the plain AOSP images without Google APIs, we can obtain the platform keys from AOSP repository and we can use it to sign our system applications. The image highlighted in green is the right one for AOSP Oreo 8.1.

In case if you have an emulator with “Google API” and try to sign your system app with AOSP platform keys, be assured that it will NOT work.
Step 2 — The Applications Manifest
If you are intent to run your app as a system process, then it is important to include android:sharedUserId attribute in the AndroidManifest.xml
Once you add this attribute, please note that this application can only be installed as a system app. If you try to install this as a normal app, it will fail.
Step 3 — Writing to System partition of the emulator
In order to make an app as a system app, it needs to be installed in “/system/app/” folder. The system partition of the emulator is read-only and you may not be able to do an adb push directly. To make the system partition writable, we need to restart the emulator with “-writable-system” flag
Once the emulator is restarted in writable system mode, use the following snippet to sign your app with AOSP keys and deploy it to system
The above snippet will install your app as a system app and once the emulator reboots you can see your app installed as a system app.
To uninstall the app, we simply need to remove the Applications folder from “/system/app/”. A sample snippet is shown below
Step 4 — Confirming System app status
How do we verify whether our application is indeed running as a system application?
There are a couple of ways, one is that if you open the “App Info” of the application, there will not be any provision to “Uninstall” it since it is a system application. But the foolproof way is to add a debug log to print the Process’s uid once the application is running. Add this code snippet in your Activity’s code
If your application is running as a system process, then it would print
Источник


