- Android Padding vs Margin
- Margin
- Example
- Padding
- Example
- Lesson 2.2: How to use margins and paddings in Android layout?
- Step 1. Create a gap between layout elements.
- Step 2. Double margins
- Step 4. Same margin everywhere
- Step 5. Paddings = internal margins
- Step 6. Only for Right-to-Left languages: marginStart, marginEnd, paddingStart and paddingEnd
- Margin vs. Padding Attributes
- Margin and Padding with a View
- Margin → android:layout_margin
- Padding → android:padding
- Margin and Padding with Layout
- Margin
- Padding
- Мелочи разработки на Android для начинающих
- База данных
- Тестирование
- Локализация и ресурсы
Android Padding vs Margin
Android padding vs margin is a very frequently asked question. Most of the beginners miss understand it. So here is a little help from my side. The idea behind android margin and padding is very similar to CSS margin and padding. Let’s understand it with examples.
Margin
Margin is a way for a view to enforce some distance from others views. By specifying margin for a view, we say that keep this much distance from this view. Android has 5 kinds of margins.
- margin — keep distance on all the four sides
- marginLeft — keep distance from left side of the view
- marginRight — keep distance from right side of the view
- marginTop — keep distance from top of the view
- marginBottom — keep distance from bottom of the view
Example
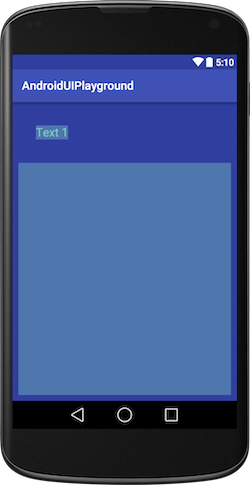
In the above example there is a LinearLayout(Parent of all views) which does not have any margin specified. But the textView has a margin of 20dp, and according to our earlier definition the text view is saying that keep 20dp distance from me in all the sides. That is why the textView has the 20dp space in all the directions. Then there is LinearLayout sibling of textView which says in left, right and bottom keep 10dp distance from me and hence there is space in all 3 sides.
Padding
Padding is a way to push the contents away from view’s inner boundary. When we specify the padding of a view, we say the content to keep this much distance from your inner boundary(left, right, top or bottom). Like margin, padding is also of 5 types.
- padding — keep distance from all the inner boundaries
- paddingLeft — keep distance from the left inner boundary
- paddingRight — keep distance from the right inner boundary
- paddingTop — keep distance from the top inner boundary
- paddingBottom — keep distance from the bottom inner boundary
Example

Above you can see example of all kinds of paddings applied to a textView. So at the end the difference between margin and padding is that margin keeps the other views away from a view and padding pushes its contents away from view’s own inner boundaries.
Источник
Lesson 2.2: How to use margins and paddings in Android layout?
There are two layout options that could lead to similar effects, but generally have different application: margins and paddings. Both define free space, but margins work outside an element boundaries and paddings inside an element.
Step 1. Create a gap between layout elements.
In LinearLayout that we created in the previous lesson TextViews were touching each other. Let’s move them away a bit. To achieve this in horizontal layout we could add right margin to first and second element or left margin to second and third element. Margin sizes are defined as other dimensions, preferably in density-independent points (dp).
This is a sample code with right margins (android:layout_marginRight):

Right margin reserve a space on the right side of an element, so the next element would be move more to right (Android Studio)
If we switch our LinearLayout to vertical instead of right or left margins we would need top or bottom ones. Top margins we have to add to second and third TextView, bottom to first or second.
This is a sample code with top margins (android:layout_marginTop):

Similar effect as with left and right margins. Due to layout_marginTop elements aren’t so close to each other (Android Studio)
This is not of big use, but margin dimensions don’t have to be integer values – they are float. You could define a margin like 20.5dp or 19.99dp.
Step 2. Double margins
If we have two layout elements next to each other and they have margins “towards” themselves (one left another right or one bottom another top) the gap between would be a sum of both margin values.
For instance the gap between following elements would equal 40dp.
Step 3. Move element from the edge of the screen
In the previous steps we were using margins to move away elements from each other. But if the element is next to screen borders, you could use margins to move it away from them too.
Let’s define marginTop and marginLeft for the first TextView. Now you can see that it’s not anymore touching screen edges.

Margins help us to move elements from the screen edges (Android Studio)
Step 4. Same margin everywhere
If we want to have the same margin for left, right, top and bottom we could use general attribute: android:layout_margin instead of for separated ones.
But if we want to differentiate just one margin, we have to specify all of them.
Step 4. Margins below 0 – weird, but possible
What happen when we define margins below zero? Element would shift from its standard position exactly in the same manner as with positive margin, but in opposite direction.
In our example we have red, green and finally blue colored TextViews. If we set negative margin for the last element, we could shift it over previous TextViews or put it between or before them.

The last layout element is not last anymore due to negative margin value (Android Studio)
This allows us to do some layout tricks, but also could leads to problems – some elements could unintentionally cover others.
Step 5. Paddings = internal margins
All what we have learn about margins is true for paddings. So they could be left, right, top, bottom, general, positive, negative and not only integer. But they work not outside element, but inside it. They move away content by defined value from edges of its container.
If we define paddings for the first TextView as 10dp, it would be much bigger as the text inside is moved by 10dp from each border.

Paddings define space between content inside layout element and edges of that element (Android Studio)
If we want to move all element from the left edge of screen instead of defining left margin for all of them we could define left padding for the root layout element, so in our case LinearLayout tag.
This is sample code for android:paddingLeft:

In TextView padding is shifting a text inside it, but in LinearLayout padding is shifting all layout elements (Android Studio)
If we define paddings below zero, layout element would become smaller as part of its content would be hidden, so it’s not very useful.
Step 6. Only for Right-to-Left languages: marginStart, marginEnd, paddingStart and paddingEnd
If we write and read from left side, before the text we have left margin or left padding. But if we read and write from right side (like in Arabic or Hebrew), we have right margin or right padding before text. And how to deal with it when our app is universal and support LTR and RTL languages? We could use marginStart and marginEnd as well as paddingStart and paddingEnd attributes. They work exactly in the same way as other margins and paddings, but set the space before or after the text .Be aware that those attributes were added in Android 4.2.
Summary: Margins and paddings help to arrange layout elements. Using them you could easily set gaps between elements, shift some elements and make more space around elements content.
Источник
Margin vs. Padding Attributes
There is always a confusion between the padding and margin attribute when you just start designing User interfaces. Be it web development or Android development, margin and padding is standard parameters to position and style User interface elements.
Both provides extra space/gap inside or outside the container. Then what’s the exact difference? Let’s get it cleared. In simple words, margin means to push outside, whereas padding means to push inside.
Now, lets understand what happens when we use these attributes for a View in Android.
Margin and Padding with a View
Let’s see how we can use these attributes with a View in android and how it affects the View’s position and styling.
Margin → android:layout_margin
When we say push outside, the view i.e the rectangle pushes its surrounding contents from itself by the dimension specified in the margin attribute. Here, the surrounding contents can be other Views. The following diagram will make it more clear.
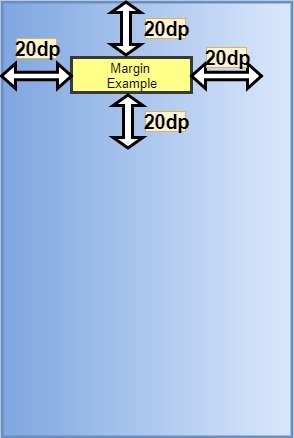
Here is how we secify this is our layout XML:
Hence, the other views will be separated from this view by at least 20dp.
We can also different margin values for all the sides, like:
Padding → android:padding
When we say push inside, the view i.e the rectangle pushes its contents from itself by the dimension specified in the padding attribute towards its center. Padding can be considered as margin but inside the View. The following diagram will make it more clear.
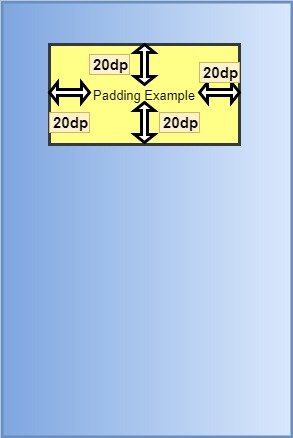
Here is how we secify this is our layout XML:
Hence, its content (here text) will be pushed inside of the rectangle by 20dp.
We can also different padding values for all the sides, like:
Margin and Padding with Layout
Now, lets understand what happens when we write these attributes for a Layout.
Margin
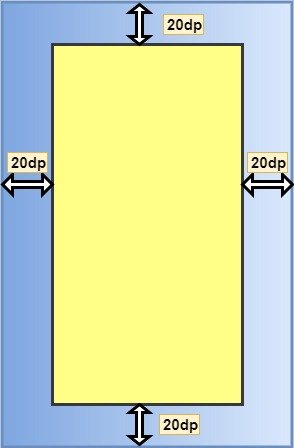
When we say push outside, the root layout i.e the rectangle pushes its surrounding contents from itself by the dimension specified in the margin attribute. Here, the surrounding content will be the screen of the mobile. Hence, the layout(rectangle) pushes itself from the screen of the mobile. The following diagram will make it more clear.
The syntax to apply margin to a layout is similar to that for a view.
Padding
When we say push inside, the root layout i.e the rectangle pushes its contents from itself by the dimension specified in the padding attribute. Here, its content will be the different views that it holds like TextView, ImageView etc. The following diagram will make it more clear.

Note: In Android, padding attribute applied to the parent(root layout) looks the same as margin attribute applied to the child(views inside the layout).
Источник
Мелочи разработки на Android для начинающих
В связи со стремительным развитием мобильных технологий, IT-компаниям все больше требуются разработчики мобильных приложений для своих продуктов. Наша компания не стала исключением. В моем распоряжении оказалось два падавана, которых надо было обучить премудростям разработки на Android (к слову сказать, парни были умные и способные, но практически без опыта). Было решено написать им небольшую памятку касательно основных аспектов разработки. Выкладываю ее на суд хабрапользователей.
Описания своих рассуждений выложу под спойлеры.
Во-первых, не пользуйтесь визуальным конструктором. Никогда. Исключение – совсем уж начинающий разработчик, который не знает основ xml разметки Android, и то, при условии, что он потом вручную пройдется по разметке и вычистит весь мусор.
Проблема заключается в том, что визуальный конструктор – это не Android, а отображаемый там View – это не все ваше приложение, поэтому при попытке выставить его правильно конструктор может использовать отступы вместо центрирования, LinearLayout вместо FrameLayout или вообще, просто излишнюю вложенность. Как-то раз наткнулся на такой кусок верстки (сокращу атрибуты для наглядности), никогда так не делайте:
А надо было всего две картинки нарисовать друг под другом.
Во-вторых, не используйте RelativeLayout где попало. Если вы хотите поставить View по порядку, то LinearLayout к вашим услугам. Если все ваши View строго позиционированы, то всегда можно прибегнуть к FrameLayout.
Встречаю практически повсеместно, но почему-то не все понимают, что разные типы View грузятся разное время. RelativeLayout самый тяжелый и долгий, FrameLayout один из самых легких (из элементов, которые могут содержать в себе дочерние View). И если для root-элемента Activity это никак не скажется, то для списков это будет заметное подтормаживание.
P.S. Это не призыв отказаться от RelativeLayout, в некоторых случаях без него действительно никак. Но только в некоторых. Не во всех!
В-третьих. Margin или padding? Если вы хотите сделать удобный кликабельный элемент, то padding и только он! Если вам необходим отступ, который будет у неактивного элемента, то тогда допускается использование margin.
В-четвертых. Не забывайте, xml ничуть не менее код, чем та часть которую вы пишите на Java. Поэтому следите за тем что бы дублирование xml разметки было сведено к минимуму, по возможности создавайте свои элементы управления, если они будут использованы в нескольких местах (да и если не в нескольких, то тоже лучше создать отдельно).
База данных
Тут будет только один пункт, касательно самой распространенной БД на Android – SQLite. Она медленная. Очень. Не пренебрегайте ее оптимизацией и асинхронной работой с ней.
Тестирование
Ни для кого не секрет, что хорошее приложение — протестированное приложение. Поэтому не следует пренебрегать такими вещами, как комплексное и модульное тестирование, рецензирование кода другим разработчиком. Стесняться тут нечего, хороший программист не тот, кто не допускает ошибок, а тот, кто их находит и учитывает в будущем.
Говоря о советах могу сказать, что лучше использовать интерфейсы для всего, что работает не только с внутренним устройством вашего приложения (например, адаптеры для работы с сетью, для работы с другим приложением, бд). Потом при тестировании себе «спасибо» скажете.
Локализация и ресурсы
Никогда не используйте захардкоденные строки. Используйте ресурсы (R.string.your_string). Даже если у вас нет и никогда не будет поддержки нескольких языков.
Во-первых, когда ваши строки выгружены в отдельный файл — с ними намного проще работать — и вам, и человеку, который будет проверять их на грамотность написания (да-да, за программистами есть такой грешок, что после написания тысяч строк кода родной язык начинает забываться, да и о банальных опечатках забывать нельзя).
Во-вторых, даже если вы считаете, что поддержки нескольких языков приложения никогда не будет — вы ошибаетесь. Если проект хоть что-то стоит, то его имеет смысл перевести хотя-бы на английский. Захардкоденные строки в этом случае потом вытащить крайне сложно.
Обратите внимание, насколько большое существует количество различных группировок ресурсов: по языку, по разрешению экрана, его ориентации и размеру, по стране и пр. Довольно большая часть этого, возможно, вам никогда не потребуется, но ознакомиться с ними надо. В будущем при проблемах отрисовки/расположения элементов на различных устройствах это сэкономит вам уйму времени.
Источник


