- Что такое Material Design и как делать анимацию в стиле Google
- Немного истории
- Что такое Material Design
- Анимация в Material Design
- Информативность
- Ориентированность
- Выразительность
- 1. Обозначить иерархию
- 2. Учить пользователя
- 3. Сделать вау-эффект
- Урок 6. Установка пользовательских анимаций в Material Design
- Содержание этого урока
- См. также
- Настройка реакции на касание
- Применение эффекта появления
- Настройка переходов
- Определение настраиваемых переходов
- Building Beautiful Transitions with Material Motion for Android
- 1. Introduction
- What is Material’s motion system for Android?
- What you’ll build
- What you’ll need
- How would you rate your level of experience building Android apps?
- 2. Set up your development environment
- Start up Android Studio
- Option 1: Clone the starter codelab app from GitHub
- Option 2: Download the starter codelab app zip file
- Load the starter code in Android Studio
- Verify project dependencies
- Run the starter app
- Optional: Slow down device animations
- 3. Get familiar with the sample app code
- navigation_graph.xml
- activity_main.xml
- MainActivity.kt
- 4. Add Container Transform transition from email list to email detail page
- email_item_layout.xml
- fragment_email.xml
- HomeFragment.kt
- EmailFragment.kt
- HomeFragment.kt
- HomeFragment.kt
- fragment_home.xml
- 5. Add Container Transform transition from FAB to compose email page
- ComposeFragment.kt
- MainActivity.kt
- 6. Add Shared Z-Axis transition from search icon to search view page
- MainActivity.kt
- SearchFragment.kt
- fragment_search.xml
- 7. Add Fade Through transition between mailbox pages
- MainActivity.kt
- HomeFragment.kt
- 8. Add Container Transform transition from email address chip to card view
- ComposeFragment.kt
- ComposeFragment.kt
- 9. All done
- Next steps
Что такое Material Design и как делать анимацию в стиле Google
Рассказываем о дизайн-парадигме Google — что такое Material Design, как он появился и чем полезен. Делимся с начинающими дизайнерами.


Немного истории
Сегодня мы привыкли к тому, что интерфейсы Google выглядят и работают примерно одинаково. Но так было не всегда. Еще десять лет назад приложения для Android, десктопная почта и мобильный веб были похожи друг на друга не больше, чем крот на пианино.
В 2011 году в Google решили, что с этим пора что-то делать, и действительно что-то сделали. А именно — унифицировали свои продукты, создали единый стиль для приложений Android Holo. Только вот они снова оказались разными.
В результате пользователи все так же терялись при переключении между мобильным и десктопным интерфейсами: выглядели они по-разному, управлялись тоже — проблема оставалась.
Что такое Material Design
К 2014 году проблему удалось решить. Именно тогда на конференции I/O Google представили свою новую дизайн-систему Material Design. Компания не просто представила гайдлайн по визуальному стилю, но и заявила о себе как о единой цифровой среде.
Что касается визуального стиля, Material Design примирил скевоморфизм с флэтом. Он не вернулся к реализму, но добавил в плоский дизайн его опыт взаимодействия с реальным миром — за счет знакомых тактильных характеристик и глубины.

Material Design базируется на тактильной реальности, вдохновлен изучением бумаги и чернил, технологически продвинут и открыт
для воображения и магии.
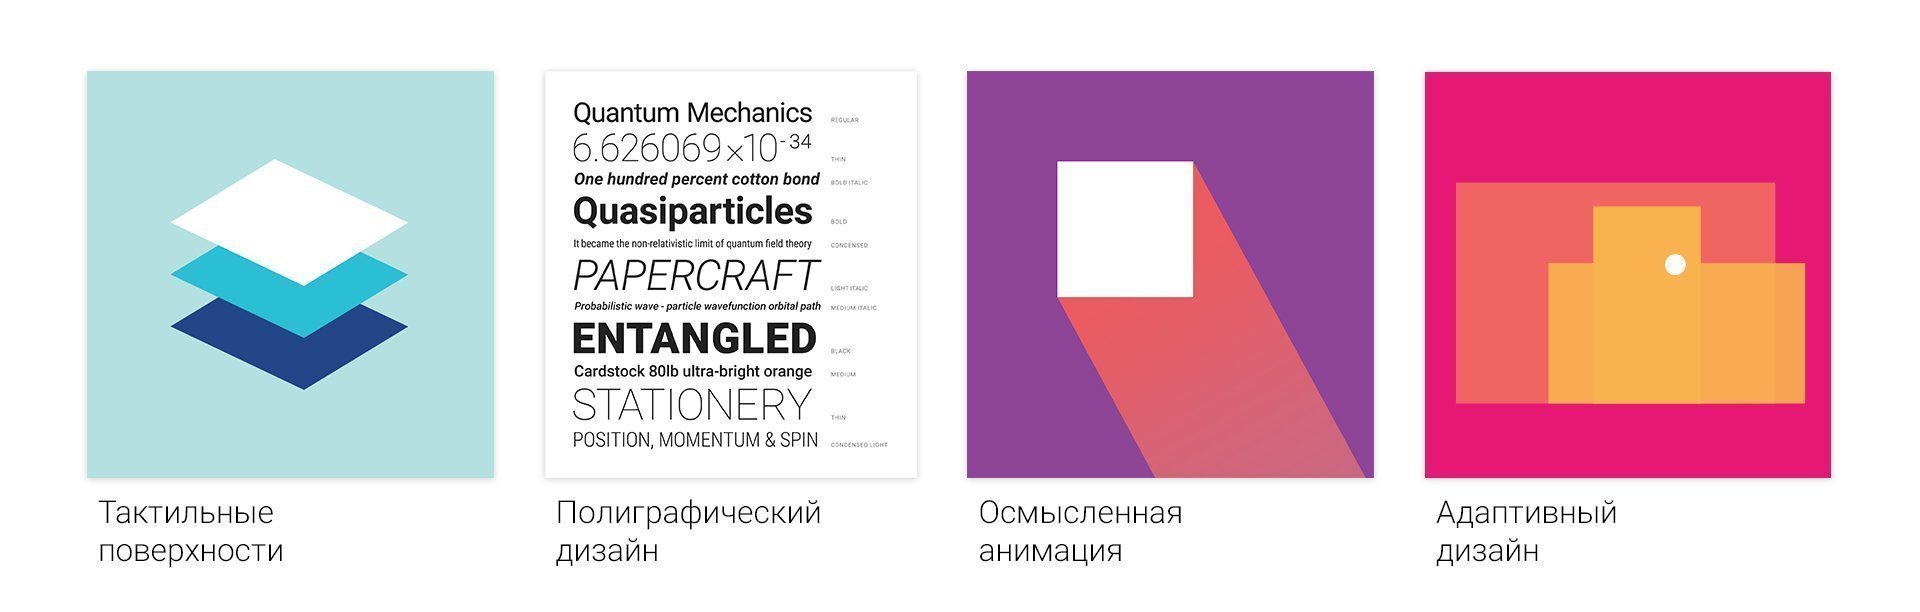
В основе Material Design лежат четыре принципа:
1. Тактильные поверхности
Все элементы интерфейса — это слои цифровой бумаги. Они располагаются на разной высоте и отбрасывают тени. Это помогает пользователям отличить главные элементы от второстепенных и делает интерфейс интуитивно понятным.
2. Полиграфический дизайн
Логично, что на цифровой бумаге нужно писать цифровыми чернилами. Все, что изображено и написано на слоях-элементах, подчиняется законам печатного дизайна. Так можно акцентировать внимание пользователя на нужном элементе и обозначить иерархию интерфейса.
3. Осознанная анимация
Все элементы, которые есть на экране, не могут просто так появляться и исчезать, — ведь в реальной жизни так не бывает. Объекты плавно переходят один в другой и подсказывают пользователю, как работает интерфейс.
4. Адаптивный дизайн
Все вышеперечисленное должно работать на любых устройствах.
Как видите, анимация — одна из основ Material Design. И хотя некоторые ее критикуют, поклонников все же больше. И вот почему.
Анимация в Material Design
В отличие от Apple, у которых анимация несет преимущественно эстетическую функцию, Google делает ставку на UX и функциональность. В их рекомендациях анимации уделено гораздо больше внимания, а на конференциях то и дело им посвящаются доклады.
Основная идея анимации в Material Design — сделать пользовательский интерфейс выразительным и простым в использовании. Для этого она должна отвечать трем принципам.
Информативность
Анимация показывает пространственные и иерархические связи между элементами: какие действия доступны пользователю и что произойдет, если он выполнит одно из них.
Ориентированность
Анимация фокусирует внимание на том, что важно, и не отвлекает от основного действия.

Выразительность
Анимация выражает характер, индивидуальность и стиль каждого продукта.
Таким образом, с помощью анимации можно:
1. Обозначить иерархию
Показать пользователю, как элементы связаны друг с другом.
2. Учить пользователя
Показать, как выполнять разные действия.
3. Сделать вау-эффект
Добавить привлекательности, чтобы пользователь снова захотел взаимодействовать с продуктом.
И это только верхушка айсберга. Google действительно заставил мир пересмотреть отношение к анимации и сделал ее полноценной частью UX-дизайна. Можно искать недостатки в рекомендациях Material Design, но, думаем, не стоит совсем игнорировать значение анимации сегодня.
А вот забавное замечание об одном из положений Material Design — о том, что все предметы, выходящие из экрана, должны ускоряться. Ведущий разработчик Джон Шлеммер считает, что неважно, где именно они остановятся.

Благодаря Material Design анимация сегодня — не просто эффектное дополнение дизайна, а полноценная его часть. Если вы все делаете правильно, движение оживляет ваш интерфейс и заставляет пользователей любить интерфейс. Научиться создавать крутые анимации можно на курсе «Анимация интерфейсов».

Пишет о digital с 2011 г. Руководитель и шеф-редактор контент-агентства Morze. Готовит коммерческие тексты для Skillbox.
Источник
Урок 6. Установка пользовательских анимаций в Material Design
Содержание этого урока
См. также
Благодаря анимациям в Material Design пользователи получают отклик на выполняемые действия. Кроме того, анимации обеспечивают зрительную связь при взаимодействии с приложением. Тема Material Design содержит ряд анимаций по умолчанию для кнопок и переходов, а в Android 5.0 (уровень API 21) и более поздних версиях можно настраивать эти анимации и создавать новые:
- реакция на касание;
- круговое появление;
- переходы;
- перемещение по кривой;
- изменение состояний представления.
Настройка реакции на касание
Реакция на касание в Material Design обеспечивает моментальное визуальное подтверждение взаимодействия пользователя с элементами интерфейса в точке касания. В стандартной анимации для реакции на нажатие кнопок используется новый класс RippleDrawable , обеспечивающий переход между разными состояниями с созданием эффекта ряби.
В большинстве случаев эту возможность следует применять в XML-файле представления, указав фон представления следующим образом:
- ?android:attr/selectableItemBackground для ограниченной области ряби;
- ?android:attr/selectableItemBackgroundBorderless для ряби, распространяемой за границы представления. При отрисовке она будет ограничиваться ближайшим родительским элементом представления со значением фона, отличным от null.
Примечание. selectableItemBackgroundBorderless — это новый атрибут, представленный в уровне API 21.
Также можно определить RippleDrawable в качестве XML-ресурса с помощью элемента ripple .
Можно назначить цвет для объектов RippleDrawable . Чтобы изменить стандартный цвет отклика на касание, воспользуйтесь атрибутом темы android:colorControlHighlight .
Дополнительные сведения представлены в справке по API для класса RippleDrawable .
Применение эффекта появления
Анимация эффекта появления обеспечивает зрительную связь с действиями пользователя, когда отображается или скрывается группа элементов интерфейса. С помощью метода ViewAnimationUtils.createCircularReveal() можно анимировать ограничивающий круг, чтобы отобразить или скрыть с экрана представление.
Как отобразить ранее скрытое представление с помощью этого эффекта:
Как скрыть ранее отображавшееся представление с помощью этого эффекта:
Настройка переходов
Переходы в приложениях Material Design обеспечивают зрительные связи между различными состояниями путем движения элементов и преобразований между общими элементами. Можно выбрать настраиваемые анимации для начальных и конечных переходов, а также для переходов общих элементов между операциями.
- Начальный переход определяет порядок появления на экране представлений в операции. Например, в начальном переходе explode представления появляются на экране извне и перемещаются к центру экрана.
- Конечный переход определяет порядок исчезновения с экрана представлений в операции. Например, в конечном переходе explodeпредставления исчезают с экрана в направлении из центра к краям.
- Переход общих элементов определяет порядок перехода между операциями представлений, используемых в обеих операциях. Например, если в двух операциях используется одно и то же изображение, но в разных позициях и с разными размерами, в случае применения перехода общего элемента changeImageTransform выполняется плавное перемещение и масштабирование изображения между этими операциями.
В Android 5.0 (уровень API 21) поддерживаются следующие начальные и конечные переходы:
- explode — перемещение представлений в центр экрана или из центра;
- slide — перемещение представлений к одному из краев экрана или от него;
- fade — отображение или скрытие представления на экране путем изменения его прозрачности.
Любой переход, являющийся наследованием класса Visibility , поддерживается как начальный или конечный переход. Дополнительные сведения представлены в справке по API для класса Transition .
В Android 5.0 (уровень API 21) также поддерживаются следующие переходы общих элементов:
- changeBounds — анимация изменений границ макетов целевых представлений;
- changeClipBounds — анимация изменений границ обрезки целевых представлений;
- changeTransform — анимация изменений параметров масштабирования и поворота целевых представлений;
- changeImageTransform — анимация изменений размеров и параметров масштабирования целевых изображений.
Если активировать переходы в приложении, то между начальной и конечной операциями активируется стандартный переход методом плавной замены.
![]()
Рисунок 2. Переход с одним общим элементом.
Определение настраиваемых переходов
Сначала необходимо активировать переходы содержимого окна с помощью атрибута android:windowContentTransitions при определении стиля, наследуемого из темы Material Design. В определении стиля можно указать начальный и конечный переходы, а также переходы общих элементов:
Источник
Building Beautiful Transitions with Material Motion for Android
1. Introduction
Material Design is a system for building bold and beautiful digital products. By uniting style, branding, interaction, and motion under a consistent set of principles and components, product teams can realize their greatest design potential.
Material Components (MDC) help developers implement Material Design. Created by a team of engineers and UX designers at Google, MDC features dozens of beautiful and functional UI components and is available for Android, iOS, web and Flutter.material.io/develop
What is Material’s motion system for Android?
The Material motion system for Android is a set of transition patterns within the MDC-Android library that can help users understand and navigate an app, as described in the Material Design guidelines.
The four main Material transition patterns are as follows:
- Container Transform: transitions between UI elements that include a container; creates a visible connection between two distinct UI elements by seamlessly transforming one element into another.
- Shared Axis: transitions between UI elements that have a spatial or navigational relationship; uses a shared transformation on the x, y, or z axis to reinforce the relationship between elements.
- Fade Through: transitions between UI elements that do not have a strong relationship to each other; uses a sequential fade out and fade in, with a scale of the incoming element.
- Fade: used for UI elements that enter or exit within the bounds of the screen.
The MDC-Android library offers transition classes for these patterns, built on top of both the AndroidX Transition library ( androidx.transition ) and the Android Transition Framework ( android.transition ):
AndroidX
- Available in the com.google.android.material.transition package
- Supports API Level 14+
- Supports Fragments and Views, but not Activities or Windows
- Contains backported bug fixes and consistent behavior across API Levels
Framework
- Available in the com.google.android.material.transition.platform package
- Supports API Level 21+
- Supports Fragments, Views, Activities, and Windows
- Bug fixes not backported and may have different behavior across API Levels
In this codelab you will be using the Material transitions built on top of the AndroidX library, meaning you will be mainly focused on Fragments and Views.
What you’ll build
This codelab will guide you through building some transitions into an example Android email app called Reply, using Kotlin, to demonstrate how you can use transitions from the MDC-Android library to customize the look and feel of your app.
The starter code for the Reply app will be provided, and you will incorporate the following Material transitions into the app, which can be seen in the completed codelab’s GIF below:
- Container Transform transition from email list to email detail page
- Container Transform transition from FAB to compose email page
- Shared Z-Axis transition from search icon to search view page
- Fade Through transition between mailbox pages
- Container Transform transition from email address chip to card view

In this codelab you’ll use transitions provided by the MDC-Android motion system. For further exploration into the MDC-Android theming and component systems, you can check out the Getting started guide.
What you’ll need
- Basic knowledge of Android development and Kotlin
- Android Studio (download it here if you don’t already have it)
- An Android emulator or device (available through Android Studio)
- The sample code (see next step)
How would you rate your level of experience building Android apps?
2. Set up your development environment
Start up Android Studio
When you open Android Studio, it should display a window titled «Welcome to Android Studio». However, if this is your first time launching Android Studio, go through the Android Studio Setup Wizard steps with the default values. This step can take several minutes to download and install the necessary files, so feel free to leave this running in the background while doing the next section.
Option 1: Clone the starter codelab app from GitHub
To clone this codelab from GitHub, run the following commands:
Option 2: Download the starter codelab app zip file
Download starter app
The starter app is located within the material-components-android-motion-codelab-develop directory.
Load the starter code in Android Studio
- Once the setup wizard finishes and the Welcome to Android Studio window is shown, click Open an existing Android Studio project.

- Navigate to the directory where you had installed the sample code and select the sample directory to open the project.
- Wait a moment for Android Studio to build and sync the project, as shown by activity indicators along the bottom of the Android Studio window.
If Android Studio prompts you to update the project’s Android Gradle Plugin version, you should ignore the prompt as the project may not have been tested with the latest Gradle versions and updating may introduce crashes or other compilation issues.
- At this point, Android Studio might raise some build errors because you are missing the Android SDK or build tools, such as the one shown below. Follow the instructions in Android Studio to install/update these and sync your project. If you are still running into issues, follow the guide on updating your tools with the SDK Manager.

Verify project dependencies
The project needs a dependency on the MDC-Android library. The sample code you downloaded should already have this dependency listed, but let’s take a look at the configuration to make sure.
Navigate to the app module’s build.gradle file and make sure that the dependencies block includes a dependency on MDC-Android:
Run the starter app
- Ensure that the build configuration to the left of the device choice is app .
- Press the green Run / Play button to build and run the app.

- In the Select Deployment Target window, if you already have an Android device listed in your available devices, skip to Step 8. Otherwise, click Create New Virtual Device.
- In the Select Hardware screen, select a phone device, such as Pixel 3, and then click Next.
- In the System Image screen, select a recent Android version, preferably the highest API level. If it is not installed, click the Download link that is shown and complete the download.
- Click Next.
- On the Android Virtual Device (AVD) screen, leave the settings as they are and click Finish.
- Select an Android device from the deployment target dialog.
- Click Ok.
- Android Studio builds the app, deploys it, and automatically opens it on the target device.
If you get an INSTALL_FAILED_INVALID_APK error when building, try doing a ‘Build‘ -> ‘Clean Project‘ in Android Studio.
If you were unable to add the dependency or run the app successfully, stop and troubleshoot your developer environment. See the Android Studio guide on building and running an app for more information.
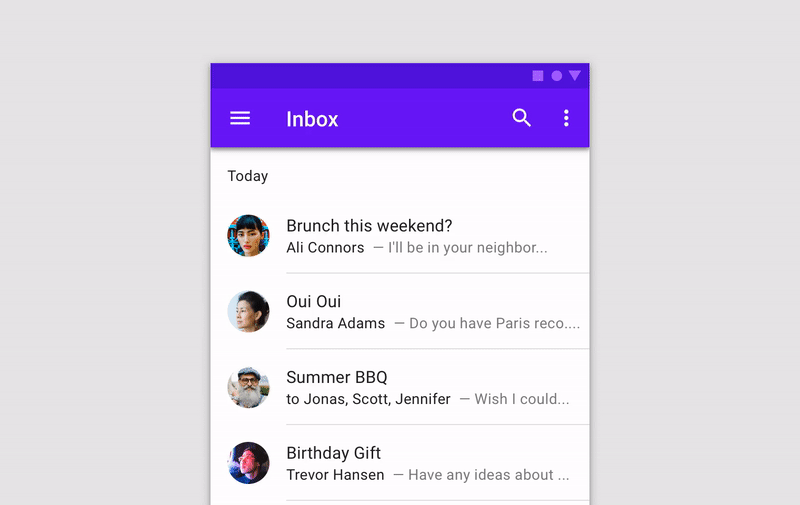
Success! The starter code for Reply’s home page should be running in your emulator. You should see the Inbox containing a list of emails.
Optional: Slow down device animations
Since this codelab involves quick, yet polished transitions, it can be useful to slow down the device’s animations in order to observe some of the finer details of the transitions as you are implementing. This can either be accomplished with adb shell commands or a Quick Settings Tile. Note that these methods of slowing down device animations will affect animations on the device outside of the Reply app as well.
Method 1: ADB Shell Commands
To slow down the device’s animations by a factor of 10x, you can run the following commands from the command line:
To reset the device’s animation speed to back to normal, run the following commands:
Method 2: Quick Settings Tile
Alternatively, to set up the Quick Settings Tile, first enable Developer Settings on your device if you haven’t done so previously:
- Open the device «Settings» app
- Scroll down to the bottom and click «About emulated device»
- Scroll down to the bottom and rapidly click «Build number» until Developer Settings are enabled
Next, do the following, still within the device «Settings» app, to enable the Quick Settings Tile:
- Click the search icon or search bar at the top of the screen
- Type «tiles» in the search field
- Click the «Quick settings developer tiles» row
- Click the «Window animation scale» switch
Finally, throughout the codelab, pull down the system notification shade from the top of the screen and use the  icon to toggle between slow and normal speed animations.
The above instructions for setting up the Quick Settings Tile may differ slightly or not be available depending on the device and API level.
3. Get familiar with the sample app code
Let’s take a look at the code. We’ve provided an app that uses the Jetpack Navigation component library to navigate between a few different Fragments, all within a single Activity, MainActivity:
- HomeFragment: displays a list of emails
- EmailFragment: displays a single, full email
- ComposeFragment: allows for the composition of a new email
- SearchFragment: displays a search view
To learn more about the related concepts used in this codelab, please check out the following guides and exercises:
navigation_graph.xml
First, to understand how the app’s navigation graph is set up, open up navigation_graph.xml in the app -> src -> main -> res -> navigation directory:
Take note of how all of the fragments mentioned above are present, with the default launch fragment set to the HomeFragment via app:startDestination=»@id/homeFragment» . This XML definition of the fragment destination graph, as well as the actions, informs the generated Kotlin navigation code that you will encounter when hooking up transitions.
activity_main.xml
Next, take a look at the activity_main.xml layout in the app -> src -> main -> res -> layout directory. You’ll see the NavHostFragment which is configured with the navigation graph from above:
This NavHostFragment fills the screen and handles all of the full screen fragment navigation changes in the app. The BottomAppBar and its anchored FloatingActionButton , also in activity_main.xml , are laid out on top of the current fragment displayed by the NavHostFragment , and therefore will be shown or hidden depending on the fragment destination by the provided sample app code.
Additionally, the BottomNavDrawerFragment in activity_main.xml is a bottom drawer that contains a menu for navigating between the different email mailboxes, which is conditionally shown via the BottomAppBar Reply logo button.
MainActivity.kt
Lastly, to see an example of a navigation action being used, open up MainActivity.kt in the app -> src -> main -> java -> com.materialstudies.reply.ui directory. Locate the navigateToSearch() function, which should look like this:
This shows how you can navigate to the search view page, without any custom transition. During this codelab, you will dive into Reply’s MainActivity and four main fragments to set up Material transitions that work in tandem with the various navigation actions throughout the app.
Now that you’re familiar with the starter code, let’s implement our first transition.
4. Add Container Transform transition from email list to email detail page
To begin, you will add a transition when clicking on an email. For this navigation change, the container transform pattern is well suited, as it’s designed for transitions between UI elements that include a container. This pattern creates a visible connection between two UI elements.
Before adding any code, try running the Reply app and clicking on an email. It should do a simple jump-cut, which means the screen is replaced with no transition:
A container transform in the MDC-Android library is called a MaterialContainerTransform . By default, this Transition subclass operates as a shared element transition, meaning the Android Transition system is able to pick up two views in different layouts when marked with a transitionName .
Begin by adding a transitionName attribute on the MaterialCardView in email_item_layout.xml as shown in the following snippet:
email_item_layout.xml
The transition name takes in a string resource with a parameter. You need to use the id of each email to ensure each transitionName in our EmailFragment is unique.
Reply’s minimum SDK level is 24, meaning we can directly use the android:transitionName attribute introduced in API level 21. If your app supports below API level 21, use the ViewCompat#setTransitionName method when setting your view’s transition name.
Now that you have your email list item’s transition name set, let’s do the same in the email details layout. In fragment_email.xml , set the transitionName of the MaterialCardView to the following string resource:
fragment_email.xml
Setting the «start» view ( MaterialCardView in email_item_layout.xml ) and «end» view ( MaterialCardView in fragment_email.xml ) transition names will help inform the Android Transition system of the two shared element views that are involved in this transition.
In HomeFragment.kt , replace the code in onEmailClicked with the below snippet to create the mapping from your start view (email list item) and end view (email details screen):
HomeFragment.kt
The key part of the above snippet is the FragmentNavigatorExtras . The Android Transition system will get the transition name set on the first parameter ( cardView ), and create a mapping between that transition name and the transition name string passed in as the second parameter ( emailCardDetailTransitionName ). This is how the system knows which views to find and provide to the MaterialContainerTransform instance as the «start» and «end» views to transform between.
Now that you have the plumbing configured, you can create a container transform. In the EmailFragment onCreate method, set sharedElementEnterTransition to a new instance of a MaterialContainerTransform (importing the com.google.android.material.transition version as opposed to the com.google.android.material.transition.platform version) by adding the following snippet:
EmailFragment.kt
There are a few things happening here that are noteworthy:
- For simplicity, only the sharedElementEnterTransition is being set, as opposed to the sharedElementReturnTransition . By default, the Android Transition system will automatically reverse the enter transition when navigating back, if no return transition is set.
- drawingViewId controls where in the view hierarchy the animating container will be placed. This allows you to show the transition below or above other elements in your UI. In Reply’s case, you’re running the container transform at the same level as your fragment container to ensure it’s drawn below the Bottom App Bar and Floating Action Button.
- scrimColor is a property on MaterialContainerTransform which controls the color of a translucent shade drawn behind the animating container. By default, this is set to 32% black. Here it’s set to transparent, meaning no scrim will be drawn. This is because in a later step you will add an exit transition to the list of emails that pairs nicely with the container transform.
- Lastly, we set the container colors of MaterialContainerTransform to colorSurface . When MaterialContainerTransform animates between two views, there are three «containers» it draws to the canvas: 1) a background container 2) a container for the start view and 3) a container for the end view. All three of these containers can be given a fill color and are set to transparent by default. Setting these background fill colors can be useful if your start or end view doesn’t itself draw a background, causing other elements to be seen beneath it during animation. Since all of the containers in this example should be set to colorSurface , we can use the setAllContainerColors helper method to ensure we don’t run into any visual issues.
Now try re-running the app.

Things are starting to look great! When you click on an email in the email list, a container transform should expand the list item into a full screen details page. However, notice how pressing back doesn’t collapse the email back into the list. Additionally, the email list disappears immediately at the beginning of the transition, showing the grey window background. So we’re not done yet.
Typically, this first issue of the collapse not working is because when the Android Transition system is trying to run your return transition, the list of emails hasn’t been inflated and populated into the RecyclerView yet. We need a way to wait until our HomeFragment lays out our list before we start our transitions.
The Android Transition system provides methods to do just that — postponeEnterTransition and startPostponedEnterTransition . If postponeEnterTransition is called, any entering transition to be run will be held until a closing call to startPostponedEnterTransition is called. This gives us the opportunity to «schedule» our transitions until after the RecyclerView has been populated with emails and the transition is able to find the mappings you configured.
To fix the return transition, add the following two lines to the onViewCreated method in HomeFragment.kt :
HomeFragment.kt
Try re-running the app. Pressing back after opening an email will collapse the email back into the list. Nice! Let’s keep improving the animation.
The issue of the email list disappearing is because when navigating to a new Fragment using the Navigation Component, the current Fragment is immediately removed and replaced with our new, incoming Fragment. To keep the email list visible even after being replaced, you can add an exit transition to HomeFragment .
MDC-Android provides two transitions to do this for you — Hold and MaterialElevationScale . The Hold transition simply keeps its target in its current position while MaterialElevationScale runs a subtle scale animation.
Add the below snippet to the HomeFragment onEmailClicked method to have the list of emails subtly scale out when exiting and back in when reentering:
HomeFragment.kt
A Fragment is reentering when it is coming back into view after the current Fragment is popped off the back stack. For HomeFragment , this happens when pressing back from EmailFragment . Here, this will cause our list of emails to subtly scale in when we return to the list.
Next, in order to ensure that the MaterialElevationScale transition is applied to the home screen as a whole, instead of to each of the individual views in the hierarchy, mark the RecyclerView in fragment_home.xml as a transition group.
fragment_home.xml
Reply’s minimum SDK level is 24, meaning we can directly use the android:transitionGroup attribute introduced in API level 21. If your app supports below API level 21, use the ViewGroupCompat#setTransitionGroup method when setting your view’s transition group.
At this stage, you should have a fully working container transform. Clicking on an email expands the list item into a details screen while receding the list of emails. Pressing back collapses the email details screen back into a list item while scaling up in the list of emails.

5. Add Container Transform transition from FAB to compose email page
Let’s continue with container transform and add a transition from the Floating Action Button to ComposeFragment , expanding the FAB to a new email to be written by the user. First, re-run the app and click on the FAB to see that there is no transition when launching the email compose screen.
To see the above jump-cut, make sure you click on the FAB while looking at the email list, after a fresh launch of the app. If you’ve previously opened an email during your current run of the app, then you may see a partial transition effect due to a stale exit or reenter transition. This is especially likely to happen if you’ve been using Android Studio’s Hot Reload to run the app, and it won’t be an issue once all the flows in this codelab are complete.
While we use the same transition class, the way we configure this instance will be different since our FAB lives in MainActivity and our ComposeFragment is placed inside our MainActivity navigation host container.
In ComposeFragment.kt , add the following snippet to the onViewCreated method, making sure to import the androidx.transition version of Slide .
ComposeFragment.kt
In addition to parameters used to configure our previous container transform, startView and endView are being set manually here. Instead of using transitionName attributes to let the Android Transition system know which views should be transformed, you can specify these manually when necessary.
Now, re-run the app. You should see the FAB transforming into the compose screen (see the GIF at the end of this step).
Similar to the previous step, you need to add a transition to HomeFragment to keep it from disappearing after being removed and replaced by ComposeFragment .
Copy the below snippet into the navigateToCompose method in MainActivity before the call NavController navigate .
MainActivity.kt
Note that the duration of our MaterialElevationScale is the same as the duration of MaterialContainerTransform . This ensures the HomeFragment is held for the same amount of time as it takes for the container transform to run and will disappear as soon as the container transform is finished.
That’s it for this step! You should have a transition from the FAB to compose screen that looks like the following:
6. Add Shared Z-Axis transition from search icon to search view page
In this step, we’ll add a transition from the search icon to the full screen search view. Since there is no persistent container involved in this navigation change, we can use a Shared Z-Axis transition to reinforce the spatial relationship between the two screens and indicate moving one level upward in the app’s hierarchy.
Before adding any additional code, try running the app and tapping the search icon at the bottom right corner of the screen. This should bring up the search view screen with no transition.

To begin, find the navigateToSearch method in MainActivity , and add the following code snippet before the NavController navigate method call to set up the current fragment’s exit and reenter MaterialSharedAxis Z-Axis transitions.
MainActivity.kt
Next, add the following code snippet to the onCreate method in SearchFragment , which configures its enter and return MaterialSharedAxis transitions.
SearchFragment.kt
It’s important to note here how these two fragments move together, with regards to the MaterialSharedAxis forward boolean constructor parameter. When the MainActivity current fragment is exiting, SearchFragment will be entering. This is why, in the MainActivity current fragment, the exit transition is forward and in SearchFragment the enter transition is also forward. This will ensure that both fragments are moving in the same direction when these transition pairs are running.
The opposite is true in the backwards direction. When SearchFragment is exiting, the MainActivity current fragment will be entering. For this reason, SearchFragment is configured to return in the backward direction and the MainActivity current fragment is configured to reenter in the backward direction.
Lastly, in order to ensure that the MaterialSharedAxis transition is applied to the search screen as a whole, instead of to each of the individual views in the hierarchy, mark the LinearLayout in fragment_search.xml as a transition group.
fragment_search.xml
Reply’s minimum SDK level is 24, meaning we can directly use the android:transitionGroup attribute introduced in API level 21. If your app supports below API level 21, use the ViewGroupCompat#setTransitionGroup method when setting your view’s transition group.
That’s it! Now try re-running the app and tapping on the search icon. The home and search view screens should simultaneously fade and scale along the Z-axis in depth, creating a seamless effect between the two screens.

7. Add Fade Through transition between mailbox pages
In this step, we’ll add a transition between different mailboxes. Since we don’t want to emphasize a spatial or hierarchical relationship, we’ll use a fade through to perform a simple «swap» between lists of emails.
Before adding any additional code, try running the app, tapping on the Reply logo in the Bottom App Bar, and switching mailboxes. The list of emails should change with no transition.

To begin, find the navigateToHome method in MainActivity , and add the following code snippet before the NavController navigate method call to set up the current fragment’s exit MaterialFadeThrough transition.
MainActivity.kt
Next, open HomeFragment . In onCreate , set the fragment’s enterTransition to a new instance of MaterialFadeThrough .
HomeFragment.kt
The above setup differs slightly from previous steps due to the way mailboxes work. A mailbox is simply a HomeFragment plus an argument that tells the fragment which list of emails to display. This, in addition to the fact that HomeFragment is set to singleTop=true in our navigation graph, means you always navigate forward to new mailboxes and don’t need to deal with return or reenter transitions (transitions that run when a fragment is popped). For this reason, all you need to worry about is setting the HomeFragment enter and exit transitions.
This is an example of an architectural scenario which affects the way transitions are configured. You will need to make similar considerations when adding transitions to your own apps!
Re-run the app. When you open the bottom navigation drawer and change mailboxes, the current list of emails should fade and scale out while the new list fades and scales in. Nice!

8. Add Container Transform transition from email address chip to card view
In this step, you’ll add a transition that transforms a chip into a popup card. A container transform is used here to help inform the user that the action taken in the popup will affect the chip from which the popup originated.
Before adding any code, run the Reply app, click on an email, click the «reply» FAB, and then try clicking on a recipient’s contact chip. The chip should disappear instantly and a card with email addresses for that contact should pop into view with no animations.
You’ll be working in ComposeFragment for this step. Already added in the ComposeFragment layout are recipient chips (visible by default) and a recipient card (invisible by default). A recipient chip and this card are the two views you will create a container transform between.
To begin, open ComposeFragment and find the expandChip method. This method is called when the provided chip is clicked. Add the following code snippet above the lines that swap the recipientCardView and chip visibility, which will trigger the container transform registered via beginDelayedTransition .
ComposeFragment.kt
An important part of the above transform’s configurations is the call to addTarget . By default, TransitionManager will run the supplied transition on all views which are changing. Setting a target will ensure the container transform only runs on the single, specified target view.
If you run the app now, the chip should transform into a card of email addresses for the recipient. Next, let’s configure the return transition to collapse the card back into the chip.
In the collapseChip method in ComposeFragment , add the below code snippet to collapse the card back into the chip.
ComposeFragment.kt
Re-run the app. Clicking the chip should expand the chip into a card while clicking the card will collapse the card back into the chip. Nice!
9. All done
Using less than 100 lines of Kotlin code and some basic XML markup, the MDC-Android library has helped you create beautiful transitions in an existing app that conforms to the Material Design guidelines, and also looks and behaves consistently across all Android devices.
The completed Reply Material motion system app is available by downloading the finished codelab, or by checking out the complete branch with git: git checkout complete .
To see all of the code changes from this codelab, take a look at this diff comparison for the complete branch.
Next steps
For more information on the Material motion system, be sure to check out the spec and full developer documentation, and try adding some Material transitions to your app!
Thanks for trying Material motion. We hope you enjoyed this codelab!
Источник


