- Android material style dialog
- Android Material Styles and Themes
- Material Themes
- Using Material Themes
- Theme.Material Output
- Theme.Material.Light Output
- Material Themes Custom Colors
- Material Dialog Themes
- Material Styles for Text
- Widget Materials Themes
- Material Themes Compatibility
- Using App Compact Material Themes
- About
- Material Style for dialogs in Android application
- STEP 1: Add libraries to the project
- STEP 2: Create dialog in application
- STEP 3: Add strings to the application
- STEP 4: Create style for Dialog and apply this style for the application
- Material Dialogs
- Table of Contents (Core)
- Table of Contents (Commons)
- Sample Project
- Gradle Dependency
- Repository
- Commons
- What’s New
- View Releases
- Basic Dialog
- Dismissing Dialogs
- Migration from AlertDialogs
- Displaying an Icon
- Stacked Action Buttons
- Neutral Action Button
- Callbacks
- List Dialogs
- Single Choice List Dialogs
- Coloring Radio Buttons
- Multi Choice List Dialogs
- Coloring Check Boxes
- Assigning IDs to List Item Views
- Custom List Dialogs
- Custom Views
- Later Access
- Typefaces
- Getting and Setting Action Buttons
- Theming
- Basics
- Colors
- Selectors
- Gravity
- Material Palette
- Global Theming
- Show, Cancel, and Dismiss Callbacks
- Input Dialogs
- Coloring the EditText
- Limiting Input Length
- Custom Invalidation
- Progress Dialogs
- Proguard
- Indeterminate Progress Dialogs
- Determinate (Seek Bar) Progress Dialogs
- Make an Indeterminate Dialog Horizontal
- Coloring the Progress Bar
- Custom Number and Progress Formats
- Tint Helper
- Color Chooser Dialogs
- Finding Visible Dialogs
- User Color Input
- Preference Dialogs
- File Selector Dialogs
- Folder Selector Dialogs
Android material style dialog
Android Material Styles and Themes
September 04, 2017
Android platform provides material styles and themes which follow material design guidelines. Material themes were introduced in Android 5.0 (API level 21).
Since material themes are available from API level 21 onwards, apps which use material themes should take care of backward compatibility so that apps using material themes will work on devices running older versions of android.
In this post, I’ll show how to use material styles and themes in your app and provide backward compatibility for material styles.
Material Themes
Android platform provides two material themes, one is dark and second one is light
There are several variants of the above material themes, listed below.
- Theme.Material.NoActionBar
- Theme.Material.NoActionBar.Fullscreen
- Theme.Material.NoActionBar.Overscan
- Theme.Material.NoActionBar.TranslucentDecor
- Theme.Material.Light.DarkActionBar
- Theme.Material.Light.NoActionBar.Fullscreen
- Theme.Material.Light.NoActionBar.Overscan
- Theme.Material.Light.NoActionBar.TranslucentDecor
Using Material Themes
You can apply material theme to an application or activity by setting theme attribute of application and activity elements in android manifest file. To apply themes to individual views, you can use theme attribute of the views. For more information about themes and styles, you can read Android styles and themes tutorial.
Theme.Material Output
Below is the screen shot of a layout with common UI components and Theme.Material.

Theme.Material.Light Output
Below is the screen shot of a layout with common UI components and Theme.Material.Light.

Material Themes Custom Colors
You can change the theme color for text color, status bar, action bar, navigation bar, window background and UI controls using textColorPrimary, colorPrimaryDark, colorPrimary, navigationBarColor, windowBackground and colorAccent properties respectively.

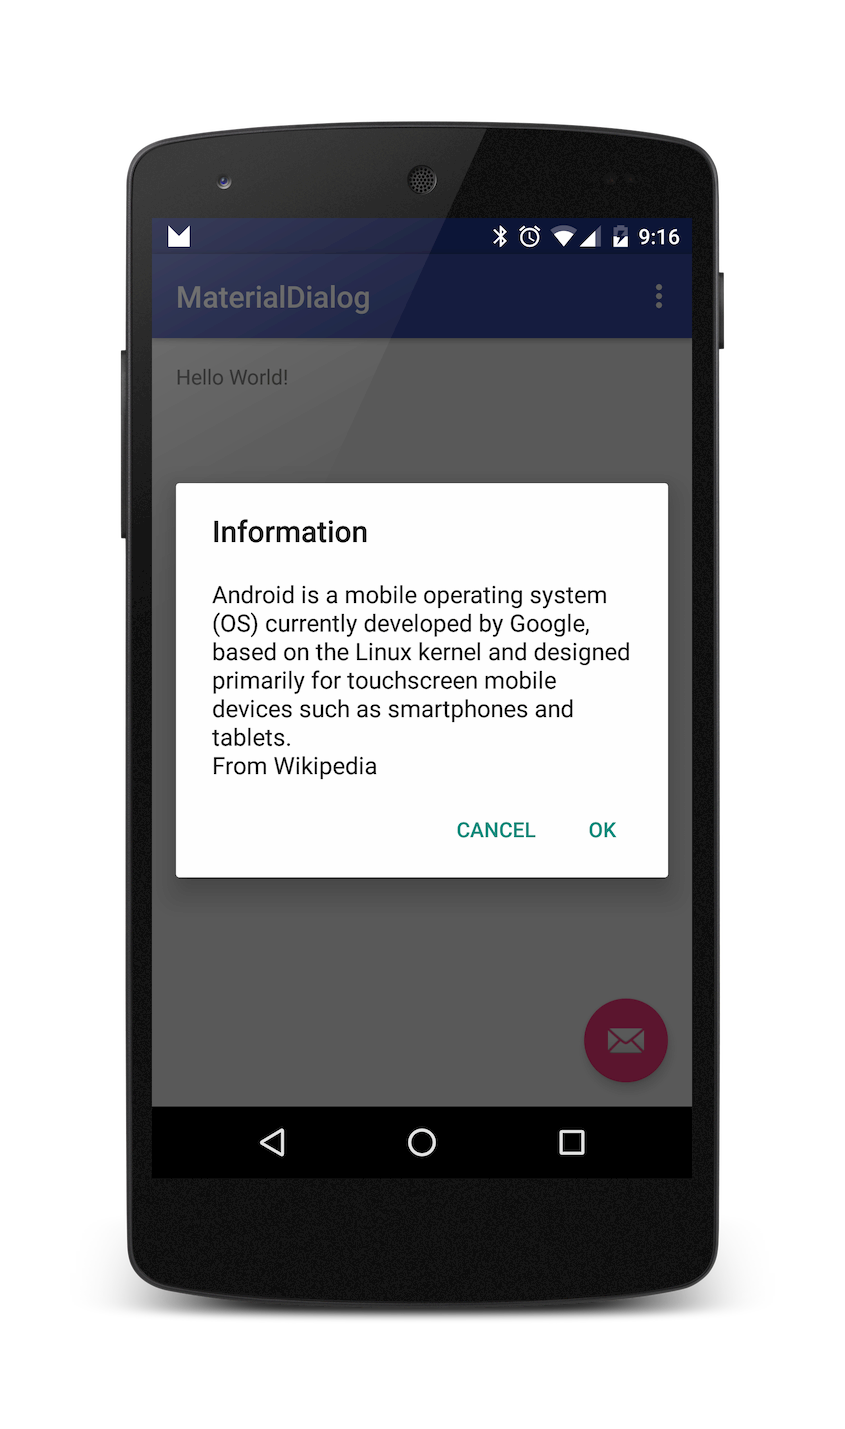
Material Dialog Themes
Material themes include themes for dialog and overlays. Below is screen shot of dialog window with ThemeOverlay_Material_Dark.

Below are the material dialog and overlay themes and variants of these themes are also available.
- Theme_Material_Dialog
- Theme_Material_Dialog_Presentation
- Theme_Material_Light_Dialog
- ThemeOverlay_Material_Dialog
- ThemeOverlay_Material_Light
- ThemeOverlay_Material_Dark
- ThemeOverlay_Material
If you want to change default dialog theme of the material theme applied to application, you can use alertDialogTheme and dialogTheme attribute as shown below.
Material Styles for Text
Below are some of the material text styles and screen shot shows applying the styles to TextView with textAppearance attribute.
- TextAppearance.Material.Body1
- TextAppearance.Material.Body2
- TextAppearance.Material.Inverse
- TextAppearance.Material.Small
- TextAppearance.Material.Medium
- TextAppearance.Material.Large
- TextAppearance.Material.Headline
- TextAppearance.Material.Title
- TextAppearance.Material.Display1
- TextAppearance.Material.Display2

Widget Materials Themes
As shown in the above screen shots, default material themes are applied to UI controls when application or activity themes is set to one of the material themes. You can change the color of the widgets as explained above.
If you want particular widgets on a screen to have a different look, you can use theme attribute to apply different themes to it or change specific styling attribute to get required look and feel.
Below screen shot shows two buttons using different styles, Widget.Material.Light.Button and Widget.Material.Button.Borderless.Colored.

Material Themes Compatibility
Since material themes were introduced in Android 5.0, you need to take care of compatibility issue so that application, which is using material themes, run on prior Android versions.
One way to take care of compatibility is to define separate styles for different versions of android and keep them in corresponding res/values folder. This approach is the right choice if you want material design for your app only when it runs on android 5.0 and later versions and non-material themes when it runs on versions prior to Android 5.0. For example, two versions of style file with the same custom theme name is defined and placed in res/values and res/values-21 folders. You can apply the custom theme to application in manifest. Android will pick the style based on its version on the device.
Custom style inheriting material theme that needs to be placed res/values-21 folder.
Custom style inheriting holo theme that needs to be saved in res/values folder.
Using App Compact Material Themes
If you want material themes in all the versions of android, you can use app compact material themes from support library. App compact material themes are material themes which are part of support library and can provide material design for apps running on older android versions.
To use app compact material themes, make sure that app compact library, for example com.android.support:appcompat-v7:26.0.1, is added to your project.
Some of the material themes in support library are Theme.AppCompat.Light, Theme.AppCompat, and Theme.AppCompat.DayNight.
To know app compact styles and themes see app compact styles.
About
Android app development tutorials and web app development tutorials with programming examples and code samples.
Источник
Material Style for dialogs in Android application
Today I’m talking about material style for dialogs in Android application.
STEP 1: Add libraries to the project
Firstly need to add libraries to gradle file for a project.
STEP 2: Create dialog in application
For creating dialog in application you can use AlertDialog component. The best way way is to use android.support.v7.app.AlertDialog .
Next snippet of code show how you can create a dialog:
In this example we don’t use click action for dialog, if you want do it you must change null to
This source code use resources from string file.
STEP 3: Add strings to the application
The best way is to use string resources instead of strings in source code. It’s better for supporting multiple languages. We need to open file strings.xml from res/values folder.
After these steps you can run the application and check dialog.
STEP 4: Create style for Dialog and apply this style for the application
We need to open file styles.xml from res/values folder and add style.
- colorAccent — color of buttons
- textColorPrimary — color of text
- background — color of background of dialog
You can set style just for dialog or for all dialogs in application.
- If you want to set style for dialog you can setup it during creating of AlertDialog.Builder . We need to change this line:
In this case AppCompatAlertDialogStyle it’s a name of style.
- If you want add some style for all dialogs in your application you can add your style to application style, as example:
Источник
Material Dialogs


Table of Contents (Core)
Table of Contents (Commons)
Sample Project
It’s also on Google Play:
Having the sample project installed is a good way to be notified of new releases. Although Watching this repository will allow GitHub to email you whenever I publish a release.
Gradle Dependency
Repository
Add this in your root build.gradle file (not your module build.gradle file):
The core module contains all the major classes of this library, including MaterialDialog and AlertDialogWrapper . You can create basic, list, single/multi choice, progress, input, etc. dialogs with core.
Commons
The commons module contains extensions to the library that not everyone may need. This includes the ColorChooserDialog , FolderChooserDialog , the Material Preference classes, and MaterialSimpleListAdapter / MaterialSimpleListItem .
It’s likely that new extensions will be added to commons later.
What’s New
See the project’s Releases page for a list of versions with their changelogs.
View Releases
If you Watch this repository, GitHub will send you an email every time I publish an update.
Basic Dialog
First of all, note that MaterialDialog extends DialogBase , which extends AlertDialog . While a very small number of the stock methods are purposely deprecated and don’t work, you have access to methods such as dismiss() , setTitle() , setIcon() , setCancelable() , etc. Alternatives are discussed below.
Here‘s a basic example that mimics the dialog you see on Google’s Material design guidelines (here: http://www.google.com/design/spec/components/dialogs.html#dialogs-usage). Note that you can always substitute literal strings and string resources for methods that take strings, the same goes for color resources (e.g. titleColor and titleColorRes ).
On Lollipop (API 21+) or if you use AppCompat, the Material dialog will automatically match the positiveColor (which is used on the positive action button) to the colorAccent attribute of your styles.xml theme.
If the content is long enough, it will become scrollable and a divider will be displayed above the action buttons.
Dismissing Dialogs
I‘ve had lots of issues asking how you dismiss a dialog. It works the same way that AlertDialog does, as both AlertDialog and MaterialDialog are an instance of android.app.Dialog (which is where dismiss() and show() come from). You cannot dismiss a dialog using it’s Builder . You can only dismiss a dialog using the dialog itself.
There’s many ways you can get an instance of MaterialDialog . The two major ways are through the show() and build() methods of MaterialDialog.Builder .
Through show() , which immediately shows the dialog and returns the visible dialog:
Through build() , which only builds the dialog but doesn’t show it until you say so:
Once the dialog is shown, you can dismiss it:
There are other various places where the MaterialDialog instance is given, such as in some callbacks that are discussed in future sections below.
Migration from AlertDialogs
If you’re migrating old dialogs you could use AlertDialogWrapper . You need change imports and replace AlertDialog.Builder with AlertDialogWrapper.Builder :
But it’s highly recommended to use original MaterialDialog API for new usages.
Displaying an Icon
MaterialDialog supports the display of an icon just like the stock AlertDialog; it will go to the left of the title.
You can limit the maximum size of the icon using the limitIconToDefaultSize() , maxIconSize(int size) , or maxIconSizeRes(int sizeRes) Builder methods.
Stacked Action Buttons
If you have multiple action buttons that together are too wide to fit on one line, the dialog will stack the buttons to be vertically oriented.
You can also force the dialog to stack its buttons with the forceStacking() method of the Builder .
Neutral Action Button
You can specify neutral text in addition to the positive and negative text. It will show the neutral action on the far left.
Callbacks
As of version 0.8.2.0, the callback() Builder method is deprecated in favor of the individual callback methods discussed below. Earlier versions will still require use of ButtonCallback .
To know when the user selects an action button, you set callbacks:
If you are listening for all three action buttons, you could just use onAny() . The which ( DialogAction ) parameter will tell you which button was pressed.
If autoDismiss is turned off, then you must manually dismiss the dialog in these callbacks. Auto dismiss is on by default.
List Dialogs
Creating a list dialog only requires passing in an array of strings. The callback ( itemsCallback ) is also very simple.
If autoDismiss is turned off, then you must manually dismiss the dialog in the callback. Auto dismiss is on by default. You can pass positiveText() or the other action buttons to the builder to force it to display the action buttons below your list, however this is only useful in some specific cases.
Single Choice List Dialogs
Single choice list dialogs are almost identical to regular list dialogs. The only difference is that you use itemsCallbackSingleChoice to set a callback rather than itemsCallback . That signals the dialog to display radio buttons next to list items.
If you want to preselect an item, pass an index 0 or greater in place of -1 in itemsCallbackSingleChoice() . Later, you can update the selected index using setSelectedIndex(int) on the MaterialDialog instance, if you’re not using a custom adapter.
If you do not set a positive action button using positiveText() , the dialog will automatically call the single choice callback when user presses the positive action button. The dialog will also dismiss itself, unless auto dismiss is turned off.
If you make a call to alwaysCallSingleChoiceCallback() , the single choice callback will be called every time the user selects an item.
Coloring Radio Buttons
Like action buttons and many other elements of the Material dialog, you can customize the color of a dialog‘s radio buttons. The Builder class contains a widgetColor() , widgetColorRes() , and widgetColorAttr() method. Their names and parameter annotations make them self explanatory. Note that by default, radio buttons will be colored with the color held in colorAccent (for AppCompat) or android:colorAccent (for the Material theme) in your Activity’s theme.
There’s also a global theming attribute as shown in the Global Theming section of this README: md_widget_color .
Multi Choice List Dialogs
Multiple choice list dialogs are almost identical to regular list dialogs. The only difference is that you use itemsCallbackMultiChoice to set a callback rather than itemsCallback . That signals the dialog to display check boxes next to list items, and the callback can return multiple selections.
If you want to preselect any items, pass an array of indices (resource or literal) in place of null in itemsCallbackMultiChoice() . Later, you can update the selected indices using setSelectedIndices(Integer[]) on the MaterialDialog instance, if you’re not using a custom adapter.
If you do not set a positive action button using positiveText() , the dialog will automatically call the multi choice callback when user presses the positive action button. The dialog will also dismiss itself, unless auto dismiss is turned off.
If you make a call to alwaysCallMultiChoiceCallback() , the multi choice callback will be called every time the user selects an item.
Coloring Check Boxes
Like action buttons and many other elements of the Material dialog, you can customize the color of a dialog‘s check boxes. The Builder class contains a widgetColor() , widgetColorRes() , and widgetColorAttr() method. Their names and parameter annotations make them self explanatory. Note that by default, check boxes will be colored with the color held in colorAccent (for AppCompat) or android:colorAccent (for the Material theme) in your Activity’s theme.
There’s also a global theming attribute as shown in the Global Theming section of this README: md_widget_color .
Assigning IDs to List Item Views
If you need to keep track of list items by ID rather than index, you can assign item IDs from an integer array:
You can also pass a literal integer array ( int[] ) in place of an array resource ID.
Custom List Dialogs
Like Android’s native dialogs, you can also pass in your own adapter via .adapter() to customize exactly how you want your list to work.
If you need access to the ListView , you can use the MaterialDialog instance:
Note that you don‘t need to be using a custom adapter in order to access the ListView , it’s there for single/multi choice dialogs, regular list dialogs, etc.
Custom Views
Custom views are very easy to implement.
If wrapInScrollView is true, then the library will place your custom view inside of a ScrollView for you. This allows users to scroll your custom view if necessary (small screens, long content, etc.). However, there are cases when you don‘t want that behavior. This mostly consists of cases when you’d have a ScrollView in your custom layout, including ListViews, RecyclerViews, WebViews, GridViews, etc. The sample project contains examples of using both true and false for this parameter.
Your custom view will automatically have padding put around it when wrapInScrollView is true. Otherwise you’re responsible for using padding values that look good with your content.
Later Access
If you need to access a View in the custom view after the dialog is built, you can use getCustomView() of MaterialDialog . This is especially useful if you pass a layout resource to the Builder , the dialog will handle the view inflation for you.
Typefaces
If you want to use custom fonts, you can make a call to typeface(String, String) when using the Builder . This will pull fonts from files in your project’s assets/fonts folder. For example, if you had Roboto.ttf and Roboto-Light.ttf in /src/main/assets/fonts , you would call typeface(«Roboto.ttf», «Roboto-Light.ttf») . This method will also handle recycling Typefaces via the TypefaceHelper which you can use in your own project to avoid duplicate allocations. The raw typeface(Typeface, Typeface) variation will not recycle typefaces, every call will allocate the Typeface again.
There’s a global theming attribute available to automatically apply fonts to every Material Dialog in your app, also.
Getting and Setting Action Buttons
If you want to get a reference to one of the dialog action buttons after the dialog is built and shown (e.g. to enable or disable buttons):
If you want to update the title of a dialog action button (you can pass a string resource ID in place of the literal string, too):
Theming
Before Lollipop, theming AlertDialogs was basically impossible without using reflection and custom drawables. Since KitKat, Android became more color neutral but AlertDialogs continued to use Holo Blue for the title and title divider. Lollipop has improved even more, with no colors in the dialog by default other than the action buttons. This library makes theming even easier.
Basics
By default, Material Dialogs will apply a light theme or dark theme based on the ?android:textColorPrimary attribute retrieved from the context creating the dialog. If the color is light (e.g. more white), it will guess the Activity is using a dark theme and it will use the dialog’s dark theme. Vice versa for the light theme. You can manually set the theme used from the Builder#theme() method:
Or you can use the global theming attribute, which is discussed in the section below. Global theming avoids having to constantly call theme setters for every dialog you show.
Colors
Pretty much every aspect of a dialog created with this library can be colored:
The names are self explanatory for the most part. The widgetColor method, discussed in a few other sections of this tutorial, applies to progress bars, check boxes, and radio buttons. Also note that each of these methods have 3 variations for setting a color directly, using color resources, and using color attributes.
Selectors
Selectors are drawables that change state when pressed or focused.
The first btnSelector line sets a selector drawable used for all action buttons. The second btnSelector line overwrites the drawable used only for the positive button. This results in the positive button having a different selector than the neutral and negative buttons. btnSelectorStacked sets a selector drawable used when the buttons become stacked, either because there’s not enough room to fit them all on one line, or because you used forceStacked(true) on the Builder . listSelector is used for list items, when you are NOT using a custom adapter.
An important note related to using custom action button selectors: make sure your selector drawable references inset drawables like the default ones do — this is important for correct action button padding.
Gravity
It‘s probably unlikely you’d want to change gravity of elements in a dialog, but it’s possible.
These are pretty self explanatory. titleGravity sets the gravity for the dialog title, contentGravity sets the gravity for the dialog content, btnStackedGravity sets the gravity for stacked action buttons, itemsGravity sets the gravity for list items (when you’re NOT using a custom adapter).
For, buttonsGravity refer to this:
With no positive button, the negative button takes it’s place except for with CENTER.
Material Palette
Global Theming
Most of the theming aspects discussed in the above section can be automatically applied to all dialogs you show from an Activity which has a theme containing any of these attributes:
The action button color is also derived from the android:colorAccent attribute of the Material theme, or colorAccent attribute of the AppCompat Material theme as seen in the sample project. Manually setting the color will override that behavior.
Show, Cancel, and Dismiss Callbacks
You can directly setup show/cancel/dismiss listeners from the Builder rather than on the resulting MaterialDialog instance.
Also note that the Builder has a cancelable() method that lets you disable dismissing the dialog when you tap outside the dialog window.
Input Dialogs
An input dialog is pretty self explanatory, it retrieves input from the user of your application with an input field (EditText). You can also display content above the EditText if you desire.
The input dialog will automatically handle focusing the EditText and displaying the keyboard to allow the user to immediately enter input. When the dialog is closed, the keyboard will be automatically dismissed.
Note that the dialog will force the positive action button to be visible, when it’s pressed the input is submitted to the callback.
Also Note that the call to inputType() is optional.
Coloring the EditText
Like action buttons and many other elements of the Material dialog, you can customize the color of a input dialog‘s EditText . The Builder class contains a widgetColor() , widgetColorRes() , and widgetColorAttr() method. Their names and parameter annotations make them self explanatory. Note that by default, EditTexts will be colored with the color held in colorAccent (for AppCompat) or android:colorAccent (for the Material theme) in your Activity’s theme.
There’s also a global theming attribute as shown in the Global Theming section of this README: md_widget_color .
Limiting Input Length
The code below will show a little indicator in the input dialog that tells the user how many characters they‘ve typed. If they type less than 2 characters, or more than 20, the dialog won’t allow the input to be submitted. It will also color the input field and character counter in error color passed for the third parameter.
If you pass 0 for the min length, there will be no min length. If you pass -1 for the max length, there will be no max length. If you don’t pass a third parameter at all, it will default to Material red.
*Note that inputRangeRes(int, int, int) takes a color resource ID for the third parameter, while inputRange(int, int, int) takes a literal color integer for the second parameter. You can use either one, or use the variation that doesn’t take a third parameter at all.
Custom Invalidation
The easiest way to invalidate (enable or disable the EditText based on whether you think the input is acceptable) input dialogs is to call alwaysCallInputCallback() from the Builder so that the callback is invoked every time the user changes their input. From there, you can constantly check what they‘ve typed. If you decide they shouldn’t be able to submit that, you can disable the submit button using this from within the callback:
Progress Dialogs
This library allows you to display progress dialogs with Material design that even use your app’s accent color to color the progress bars (if you use AppCompat to theme your app, or the Material theme on Lollipop).
Proguard
Normally, ObjectAnimator in the context it‘s used in this library (for custom progress drawables) would need special proguard rules so that certain elements aren’t removed when your app is built in release mode. Luckily, AAR packages are allowed to specify proguard rules that get included in apps that depend on them. So you do not need to worry about including any Proguard rules in order to ensure progress bars behave well.
Indeterminate Progress Dialogs
This will display the classic progress dialog with a spinning circle, see the sample project to see it in action:
Determinate (Seek Bar) Progress Dialogs
If a dialog is not indeterminate, it displays a horizontal progress bar that increases up until a max value. The comments in the code explain what this does.
See the sample project for this dialog in action, with the addition of threading.
Make an Indeterminate Dialog Horizontal
By default, indeterminate progress dialogs use a circular progress indicator. From the Builder , you can tell the dialog that it needs to use a horizontal indicator when displaying an indeterminate progress dialog:
Coloring the Progress Bar
Like action buttons and many other elements of the Material dialog, you can customize the color of a progress dialog‘s progress bar. The Builder class contains a widgetColor() , widgetColorRes() , and widgetColorAttr() method. Their names and parameter annotations make them self explanatory. Note that by default, progress bars will be colored with the color held in colorAccent (for AppCompat) or android:colorAccent (for the Material theme) in your Activity’s theme.
There’s also a global theming attribute as shown in the Global Theming section of this README: md_widget_color .
Custom Number and Progress Formats
Like the stock ProgressDialog , you can format the progress min/max numbers and the percentage indicator of determinate dialogs.
The values passed above are the default.
Tint Helper
You can use the MDTintHelper class to dynamically color check boxes, radio buttons, edit texts, and progress bars (to get around not being able to change styles.xml at runtime). It is used in the library to dynamically color UI elements to match your set widgetColor .
If you don’t want the dialog to automatically be dismissed when an action button is pressed or when the user selects a list item:
Color Chooser Dialogs
The Builder is used like this:
The Activity you show the dialog in must implement ColorCallback :
You can also specify custom colors to be displayed if you don’t want to use the built-in primary or accent color palettes (which consist of the entire Material Design Color Palette):
The first parameter for primary colors can also take an array resource ( R.array.colors ), which can be seen in the sample project. If you pass null for the second parameter, there will be no sub levels displayed for top level colors.
Finding Visible Dialogs
Since the ColorChooserDialog is a DialogFragment , it attaches to your Activity through its FragmentManager . ColorChooserDialog has a utility method called findVisible(AppCompatActivity, String) that will find a visible color chooser if any is visible:
User Color Input
By default, color chooser dialogs allow the user to input a custom color using RGB sliders or a Hexadecimal input field. This can be disabled if you don’t want users to be able to use it:
If you want the user to be able to input a custom color, but don’t want them to be able to change transparency (alpha):
Preference Dialogs
Android‘s EditTextPreference , ListPreference , and MultiSelectListPreference allow you to associate a preference activity’s settings with user input that’s received through typing or selection. Material Dialogs includes MaterialEditTextPreference , MaterialListPreference , and MaterialMultiSelectListPreference classes that can be used in your preferences XML to automatically use Material-themed dialogs. See the sample project for details.
By default, all of these preference classes will set their layout to R.layout.md_preference_custom . If you don’t want a default layout to be set, you can provide an attribute on the preferences in your XML:
File Selector Dialogs
The Builder is used like this:
The Activity you show the dialog in must implement FileCallback :
Folder Selector Dialogs
The Builder is used like this:
The Activity you show the dialog in must implement FolderCallback :
Источник


