- Adding Icons and Menu Items to an Android Toolbar
- Android Options Menu Icon – Adding Icon to Menu Item
- Material Menus — Material Component For Android
- Progress Indicators — Material Components For Android
- Progress indicators express an unspecified wait time or display the length of a process. Material design provides an…
- Sliders — Material Component For Android
- Sliders used to view and select a value or range from the given slider bar.They’re mainly used for adjusting settings…
- Android Chips — Material Component For Android
- Android Chips is one the component in Material Design library. A Material Chip is a component that can represent input…
- Types of menus
- Dropdown Menus
- Overflow menus
- Context menus
- Popup menus
- Adding icons on popup menus
- List popup window menus
- Exposed dropdown menus
- Non-editable variation
- Setting a default value
- Тайны кнопок в Android. Часть 3: Кнопки в главном меню
- Наша первая кнопка в меню
- Иконки для меню
- Подключение меню к Activity
- Создаем подменю
- Radio button’ы в меню
- Скрываем или показываем элементы меню
- Другие способы кастомизации меню
Adding Icons and Menu Items to an Android Toolbar
You now need to add some icons to the toolbar you added in the previous lesson. There’s also a thing called the Overflow Menu. This is for items that won’t fit on the toolbar. You’ll then typically see three dots. Press the dots and you see a sub menu appear. This sub menu is the Overflow Menu. Let’s see how to do that.
Items that go on your toolbars come from a separate XML file that is placed in a menu folder. You then attach the XML file to your toolbar using Java code.
First, we’ll need the menu folder.
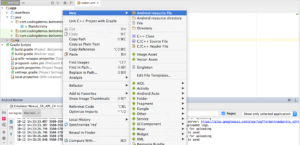
In the Explorer area on the left of Android Studio, right-click the res folder. From the menu that appears, select New > Android resource directory:
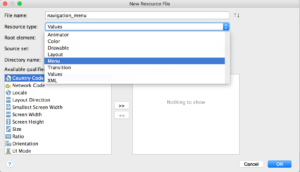
When you get the dialogue box up, select menu from the Resources type dropdown:
The Directory name box at the top will then change to menu:
Click OK to create a menu folder inside of your res directory:
Now right click your new menu folder. From the menu that appears, select New > Menu resource file:
When you get the New Resource File dialogue box up, type menu_items as the file name:
Click OK to create a new XML file in your menu folder:
The XML file will open up in Design view in your main coding area. It should look something like this: (Later versions of Android Studio will have a Cast Button item at the top.)
Have a look on the left, though, and notice the Palette and the Component Tree. You can drag items from the Palette onto either your Component Tree or directly onto your toolbar.
Drag a Menu Item from the Palette to your Component Tree or toolbar:
Your Component Tree will then look like this:
And your layout will look like this:
Notice that the layout is showing the three dots for the Overflow Menu, and a menu item with the default name of item.
With your new menu item selected, have a look at the properties area on the right:
We’ll need IDs for the menu items. Type favourites_page as the ID. For the title, click the Pick a Resource button to the right of the title area. Then select the favourites string resource you set up in the previous lesson:
Click OK and your layout will update with your new title:
The title will appear only if a menu item is pushed to the Overflow Menu. It is pushed to the Overflow Menu if there is not enough room on the toolbar. But only if you have specified this in the showAsAction property. Click inside of this property to see the following box appear in earlier versions of Android Studio:
In later versions, you need to click the little flag. You’ll then see the same dialog box but in a different design:
Select the one for ifRoom. This means that the item will appear on the toolbar if there is room for it, otherwise it will get pushed to the Overflow Menu. The never means that it will never appear on the toolbar but always on the Overflow Menu; always means it will always appear on the toolbar; withText means that the title you add will always be displayed. (The collpaseActionView item is used with something called an Action Layout. We won’t be using these.)
Your properties area should look like this, so far:
You’ll probably want an icon to appear for your toolbar items. Instead of designing one yourself, there are lots of inbuilt ones you can use. You add these to the drawable folder as a Vector asset. You’ll learn how to do that in the next lesson below.
Источник
Android Options Menu Icon – Adding Icon to Menu Item
Hi and welcome to another tutorial from Codingdemos, in this tutorial you will learn how to create android options menu icon. If you are new to the Android options menu, then I suggest you watch the tutorial that I did on the channel that shows you how to do it.
By the end of this article, we will have an app that looks like this. (Large preview)
In this tutorial we will be using the following:
- – Android studio version 2.3.3
– Android emulator Nexus 5X with API 24
– Minimum SDK API 16
1- Open up Android Studio and create a new project and give it a name, in our case we’ve named it (OptionsMenuIcon), choose API 16 as the minimum SDK, then choose a blank activity and click “Finish” and wait for Android Studio to build your project.
2- To be able to use a toolbar, we need to change the parent them. Open styles.xml file and change the parent theme from parent=»Theme.AppCompat.Light.DarkActionBar» to parent=»Theme.AppCompat.Light.NoActionBar»
3- Open activity_main.xml file and add the toolbar
4- Let’s create a menu file that will have the menu items, right click on res folder → New → Android resource file , give the file a name and select Menu from the Resource type dropdown list.
How to create menu folder and file in Android studio. (Large preview)
How to create a resource file in Android studio. (Large preview)
5- Next we need to look for icons that we can use them for an android menu item, thankfully android studio can help us to get those icons that we need. Click res → New → Vector Asset . Choose the icon that you want by clicking on the android icon, click “Next” button and then click “Finish”.
6- Now we can add android menu items with icons, we will have 4 menu items. 1 menu item will be the root while the other 3 menu items will be grouped under a single Menu .
7- Open MainActivity.java file to declare the toolbar and give the toolbar the ability to have those options menu show up.
8- Let’s create options menu by overriding onCreateOptionsMenu and inflating the menu file that we created earlier
9- To be able to respond to user action, we need to override onOptionsItemSelected , so that whenever they tap on any of those menu items we show an android toast message.
Compile and run the app; you will see android options menu appear in the Android toolbar with menu items. When you tap on any of those menu items an android toast message appears on the screen. The source code for options menu tutorial is available on Github
Источник
Material Menus — Material Component For Android

A menu displays a list of choices on a temporary surface. They appear when users interact with a button, action, or other control.
Before getting into details. Checkout my other post on material design,
Progress Indicators — Material Components For Android
Progress indicators express an unspecified wait time or display the length of a process. Material design provides an…
Sliders — Material Component For Android
Sliders used to view and select a value or range from the given slider bar.They’re mainly used for adjusting settings…
Android Chips — Material Component For Android
Android Chips is one the component in Material Design library. A Material Chip is a component that can represent input…
To work with material design, First we need to add material design dependency.
Types of menus
- Dropdown menus
- Exposed dropdown menus

Dropdown Menus
Dropdown menus display a list of options, triggered by an icon, button, or action. Their placement varies based on the element that opens them.
Based on the usage and design, dropdown menus are used in four different ways.
- Overflow menus
- Context menus
- Popup menus
- List popup window menus
Overflow menus

The menu which appears after tapping these 3 dots located in the action bar.
To create the overflow menu, First create a menu XML file.
Then, inflate the menu XML layout on onCreateOptionsMenu.
in your MainActivity.kt:
Context menus

The context menu that appears when a TextView is long pressed.
First, create Textview in your activity_main.xml layout,
In your code, inflate the context menu layout in onCreateContextMenu.
Also, you can override the onContextItemSelected to handle context menu item click.
Popup menus
The popup menu shows when a button is clicked.

Create a button in activity_main.xml,
With the click of the button, we need to create a PopupMenu() and inflate the menu layout into the popup menu.
Also, you can add click listener for the popup menu by setting setOnMenuItemClickListener into the popup menu.
Adding icons on popup menus
Currently, there is no public API to add icons on popup menus. The following workaround is for API 21+, and uses library-only APIs, and is not guaranteed to work in future versions.

create a menu layout with icon,
List popup window menus
We can show the list items in popup menu using the ListPopupWindow() .

In code, First create a listPopupWindow with list of menu items.
Then, show the list popup menu on by clicking of the button.
Exposed dropdown menus
Exposed dropdown menus display the currently selected menu item above the list of options. the exposed dropdown menus behavior same as a spinner. So, this will be the best alternative for the spinners.
The exposed dropdown menu is implemented through the TextInputLayout.

in code, set the arrayAdapter into autoCompleteTextView.
In the item layout ( list_item.xml):
To have an outlined variation of the exposed dropdown menu, set the style to @style/Widget.MaterialComponents.TextInputLayout.OutlinedBox.ExposedDropdownMenu:

Non-editable variation
Disable the user input in the AutoCompleteTextView to have a non editable variation of the menu by setting android:inputType=”none” on the AutoCompleteTextView.
Setting a default value
In order to have a pre-selected value displayed, you can call setText(CharSequence text, boolean filter) on the AutoCompleteTextView with the filter set to false.
Источник
Тайны кнопок в Android. Часть 3: Кнопки в главном меню
Главное меню — один из основных инструментов для взаимодействия пользователя с приложением. В Android 2.3.x и раньше оно было «спрятано» на аппаратной кнопке Menu, и разработчики рисовали меню кто как умел. Но начиная с Android 3.0 недоработка была исправлена, меню стало стандартным компонентом на Action Bar, и получило ряд новых возможностей. При этом процесс разработки меню практически не претерпел изменений. Меню в Android — это не просто набор кнопок, на которые можно вешать OnClickListener . В Android с меню можно сделать куда больше, чем кажется на первый взгляд.
В этой статье я расскажу, как сделать современное меню, как адаптировать его для разных размеров экрана, как делать переключатели типа radio button прямо в меню, а также как динамически управлять видимостью кнопок меню, скрывая те функции вашего приложения, которые не будут работать на том или ином смартфоне. По ходу статьи постараюсь дать максимально подробное описание тех или иных возможностей меню, а также дам ссылки на официальную документацию по теме.

Вот так по-разному может выглядеть меню одного и того же приложения.
Наша первая кнопка в меню
Меню в Android описываются в файлах ресурсов или формируются программным кодом. Рекомендуется первый вариант по целому ряду причин: скорость разработки, наглядность, простота сопровождения. Ресурсы меню располагаются в подкаталоге menu каталога ресурсов приложения res . Создаем каталог menu , затем создаем новый Android XML File :
Выбираем тип ресурса Menu , вводим имя файла. Так как в разных activity меню, скорее всего, будет разным, рекомендую привязывать имена файлов ресурсов меню к именам activity.
В открывшемся редакторе введем код первой кнопки нашего меню:
Давайте рассмотрим использованные атрибуты:
- android:id указываем, чтобы потом в коде отличать одни кнопки от других.
- android:orderInCategory указывает порядок нашей кнопки относительно других. Указывайте порядок с шагом в 10 или 100, это позволит в будущем добавлять новые элементы в любое место, не перестраивая порядок остальных.
- android:showAsAction — самый интересный параметр, поскольку именно он управляет поведением элементов меню в разных ситуациях. Он может принимать целый ряд значений:
- ifRoom — Показывать элемент в action bar, только если для него достаточно места. Если места недостаточно, элемент будет автоматически скрыт в дополнительное меню (то, которое показано тремя точками друг над другом). Это лучший способ кастомизации меню в зависимости от размера экрана устройства. На больших экранах планшетов action bar будет заполнен кнопками, а на небольших телефонах будут показаны самые важные кнопки, в то время как до остальных тоже можно добраться, но только через дополнительное меню. Имейте в виду, что дополнительное меню отображается в action bar только на тех смартфонах, на которых нет аппаратной кнопки меню.
- withText — Рядом с иконкой кнопки будет показан текст, заданный свойством android:title . Этот параметр можно указывать в комбинации с другими, разделяя параметры знаком |
- never — Кнопка никогда не будет видна на action bar, даже если для нее есть место. К такой кнопке всегда придется добираться через дополнительное меню.
- always — Всегда показывать кнопку в action bar. Данным параметром нельзя злоупотреблять, так как на маленьких телефонах кнопки могут начать заползать на другие элементы action bar, например на заголовок приложения. Определите для каждой activity максимум одну самую важную кнопку, без которой никак нельзя, и отметьте always только у нее. Остальные (а по возможности все) должны быть ifRoom .
- collapseActionView — позволяет сделать кнопку, открывающую или скрывающую дополнительный элемент View в action bar. Например, можно задать такой параметр иконке поиска, по ее клику показывать прямо в action bar поле для ввода поискового запроса.
- android:title — определяет заголовок кнопки меню. Он может отображаться рядом с иконкой в action bar или же как название элемента в дополнительном меню.
- android:icon — иконка кнопки.
Иконки для меню
Если вы разрабатываете приложение в стиле Holo, вы можете использовать готовый набор иконок от Google, который доступен всем для загрузки с официального сайта совершенно бесплатно.
Набор иконок представлен отдельно для темной и отдельно для светлой темы Holo, а также для разных размеров экранов. Если вы не можете позволить себе дизайнера в команде, этот набор просто незаменим.
Подключение меню к Activity
Загрузить меню из ресурса очень быстро. Открываем код Activity и перекрываем метод onCreateOptionsMenu :
Теперь меню отображается, но при нажатии на кнопку ничего не происходит. Повесить обработчик на кнопку можно кодом или прямо в XML-ресурсе, задав в свойстве android:onClick имя метода-обработчика. Чтобы сделать то же самое кодом, нужно в Activity перекрыть метод onOptionsItemSelected :
Создаем подменю
Подменю полезно, когда мы хотим уточнить способ выполнения действия, представленного в action bar. К примеру, у нас есть список покупок и кнопка «Сортировка». По нажатию кнопки нужно выяснить, по какому параметру пользователь хочет отсортировать элементы списка: по категории товара, по названию или по порядку добавления в список. Посмотрим код подменю для такого случая:
Здесь мы объявили еще один тег внутри тега . Подменю представляет собой группу все тех же тегов , что позволяет при необходимости сделать подменю в подменю и так далее.
Radio button’ы в меню
Мы только что сделали меню для выбора порядка сортировки покупок. Было бы здорово показывать, какой способ сортировки используется в текущий момент. Список может быть отсортирован только одним из трех возможных способов, что отлично соответствует идее radio button. Чтобы сделать из нашего подменю набор radio button, достаточно тегу указать свойство android:checkableBehavior=»single» . Возможные значения android:checkableBehavior :
- single — выбор только одного из доступных элементов, наш случай
- all — выбор любого количества доступных элементов, аналог check box
- none — элементы группы являются обычными элементами меню, это значение по умолчанию
Полученный код меню:
Если запустить приложение и попробовать выбрать один из способов сортировки, ничего не произойдет. В меню не показано, что какой-то элемент выбран. Это придется сделать вручную вызовом item.setChecked(true);
Скрываем или показываем элементы меню
Скрывать элементы меню полезно, если телефон временно или в принципе не может выполнить какой-либо функционал. Например, у нас есть кнопки для отправки списка покупок через соц. сети, но если интернет сейчас не подключен, то отправить список не получится. Чтобы не расстраивать пользователя сообщениями об ошибке, можно скрыть неработающие в данный момент кнопки. Давайте добавим кнопку «Поделиться»:
Теперь во время создания меню в методе onCreateOptionsMenu проверим доступность сети, найдем нашу кнопку и установим ей видимость:
Так мы подстраиваем меню в момент создания activity. Этого достаточно для тех функций, которые требуют наличия определенного аппаратного обеспечения в телефоне (камера и т.п.). Но интернет может включиться в любое время, даже после старта activity. Также иногда возникает желание перестроить меню после каких-то действий пользователя в приложении. Перестроить меню предельно просто. Вызываем метод invalidateOptionsMenu() нашей activity. Это приведет к повторному вызову метода onCreateOptionsMenu перед следующей отрисовкой меню. Обратите внимание, что метод invalidateOptionsMenu был добавлен в API 11, поэтому для совместимости с Android 2.x нужно использовать такой вызов:
Класс android.support.v4.app.ActivityCompat можно найти в Support Package.
Другие способы кастомизации меню
Как вы знаете, в Android можно задавать разные ресурсы для различных размеров/ориентации/плотности экрана и в зависимости от других особенностей устройств. Это касается любых типов ресурсов, в том числе и меню. По умолчанию ресурсы меню загружаются из каталога /res/menu. Но вы можете создать каталог, например, /res/menu-sw600dp, и таким образом задать особую компоновку меню для устройств с минимальным размером экрана 600 dp по горизонтали или вертикали (это как правило соответствует 7-ми дюймовым планшетам). На практике для меню обычно достаточно указания свойства android:showAsAction=»ifRoom» для элементов, так как в результате мы получаем максимально точную «подгонку» меню к тому устройству, на котором будет работать приложение. К тому же это позволяет сильно уменьшить объем кода ресурсов, ведь их в этом случае не нужно дублировать.
Если у вас остались вопросы по работе с главным меню, буду рад ответить в комментариях.
Источник


