- Android Push notification using FCM (Firebase Cloud Messaging)
- What is FCM ( Firebase Cloud Messaging) ?
- FCM (Firebase Cloud Messaging) Project setup on Firebase Console
- Add FCM (Firebase Cloud Messaging) to Android app
- Send your first notification message
- shaktisinh/android-push-notification-using-fcm
- android-push-notification-using-fcm — Android Push notification using FCM (Firebase Cloud Messaging)
- Techsuzu
- 2.2: Part 2 — Sending and Receiving SMS Messages
- Task 3. Receive SMS messages with a broadcast receiver
- 3.1 Add permission and create a broadcast receiver
- 3.2 Register the broadcast receiver
- 3.3 Implement the onReceive() method
- 3.4 Run the app and send a message
- Solution Code
- Coding challenge
- Complete Guide on Sending Push Notifications on Android — Using Firebase
- Setup Repository, ViewModel and View
Android Push notification using FCM (Firebase Cloud Messaging)


What is FCM ( Firebase Cloud Messaging) ?
Simply we can say FCM ( Firebase Cloud Messaging) is a new version of GCM ( Google Cloud Messaging).
It is a cross-platform messaging solution that lets you reliably deliver messages at no cost. Using FCM, you can send notification messages to drive user re-engagement and retention.
FCM (Firebase Cloud Messaging) Project setup on Firebase Console
Go to Firebase Console and create a new project

One popup will appear. Provide your app name (Project name) and country and click on CREATE PROJECT button

To implement Firebase to your Android app, click on Add Firebase to your Android app

Now enter your project package name and click on ADD APP to register your app

Download google-services.json file and click on CONTINUE button

Now click on FINISH button and complete your project setup on Firebase Console
Add FCM (Firebase Cloud Messaging) to Android app
Copy google-services.json file, go to your Android Project and paste it in app folder.

Go to project level (root level) build.gradle file and add the following code into dependencies
Now go to app level build.gradle file and add the following lines
Sync your project

Now create MyFirebaseInstanceIDService.java class
Now create MyFirebaseMessagingService.java class
Give the INTERNET permission and define both above services into AndroidManifest.xml
Now run your application and check your logcat and you can find TOKEN
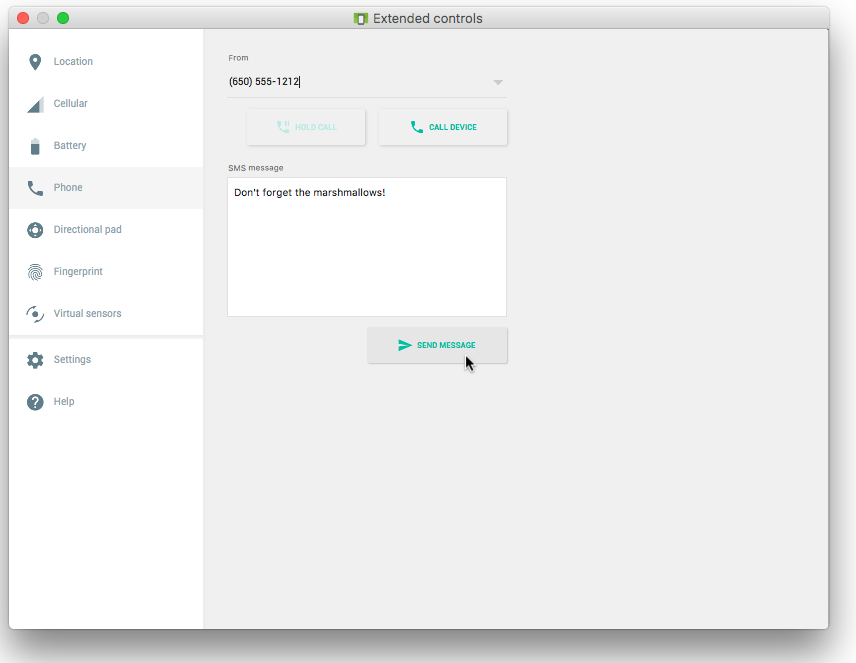
Send your first notification message
Go to Firebase Console and click on your project (e.g. FCMDemo)
Now click on Notifications

Now click on SEND YOUR FIRST MESSAGE button

Type your message, select your app and click on SEND MESSAGE button and you will get your first notification on your device.

shaktisinh/android-push-notification-using-fcm
android-push-notification-using-fcm — Android Push notification using FCM (Firebase Cloud Messaging)
If you like this article please like this and subscribe it. If you have any doubt feel free to ask on comment. Follow me on twitter. Your appreciation means lot to me. Thank you.
Techsuzu
App development | Web development | WordPress development |…
Источник
2.2: Part 2 — Sending and Receiving SMS Messages
Contents:
Task 3. Receive SMS messages with a broadcast receiver
To receive SMS messages, use the onReceive() method of the BroadcastReceiver class. The Android framework sends out system broadcasts of events such as receiving an SMS message, containing intents that are meant to be received using a BroadcastReceiver. You need to add the RECEIVE_SMS permission to your app’s AndroidManifest.xml file.
3.1 Add permission and create a broadcast receiver
To add RECEIVE_SMS permission and create a broadcast receiver, follow these steps:
Open the AndroidManifest.xml file and add the android.permission.RECEIVE_SMS permission below the other permission for SMS use:
Receiving an SMS message is permission-protected. Your app can’t receive SMS messages without the RECEIVE_SMS permission line in AndroidManifest.xml.
Name the class «MySmsReceiver» and make sure «Exported» and «Enabled» are checked.
The «Exported» option allows your app to respond to outside broadcasts, while «Enabled» allows it to be instantiated by the system.
3.2 Register the broadcast receiver
In order to receive any broadcasts, you must register for specific broadcast intents. In the Intent documentation, under «Standard Broadcast Actions», you can find some of the common broadcast intents sent by the system. In this app, you use the android.provider.Telephony.SMS_RECEIVED intent.
Add the following inside the tags to register your receiver:
3.3 Implement the onReceive() method
Once the BroadcastReceiver intercepts a broadcast for which it is registered ( SMS_RECEIVED ), the intent is delivered to the receiver’s onReceive() method, along with the context in which the receiver is running.
- Open MySmsReceiver and add under the class declaration a string constant TAG for log messages and a string constant pdu_type for identifying PDUs in a bundle:
- Delete the default implementation inside the supplied onReceive() method.
In the blank onReceive() method:
Add the @TargetAPI annotation for the method, because it performs a different action depending on the build version.
Retrieve a map of extended data from the intent to a bundle .
Define the msgs array and strMessage string.
Get the format for the message from the bundle .
As you enter SmsMessage[] , Android Studio automatically imports android.telephony.SmsMessage .
Initialize the msgs array, and use its length in the for loop:
Use createFromPdu(byte[] pdu, String format) to fill the msgs array for Android version 6.0 (Marshmallow) and newer versions. For earlier versions of Android, use the deprecated signature createFromPdu(byte[] pdu).
Build the strMessage to show in a toast message:
Get the originating address using the getOriginatingAddress() method.
Get the message body using the getMessageBody() method.
Add an ending character for an end-of-line.
The complete onReceive() method is shown below:
3.4 Run the app and send a message
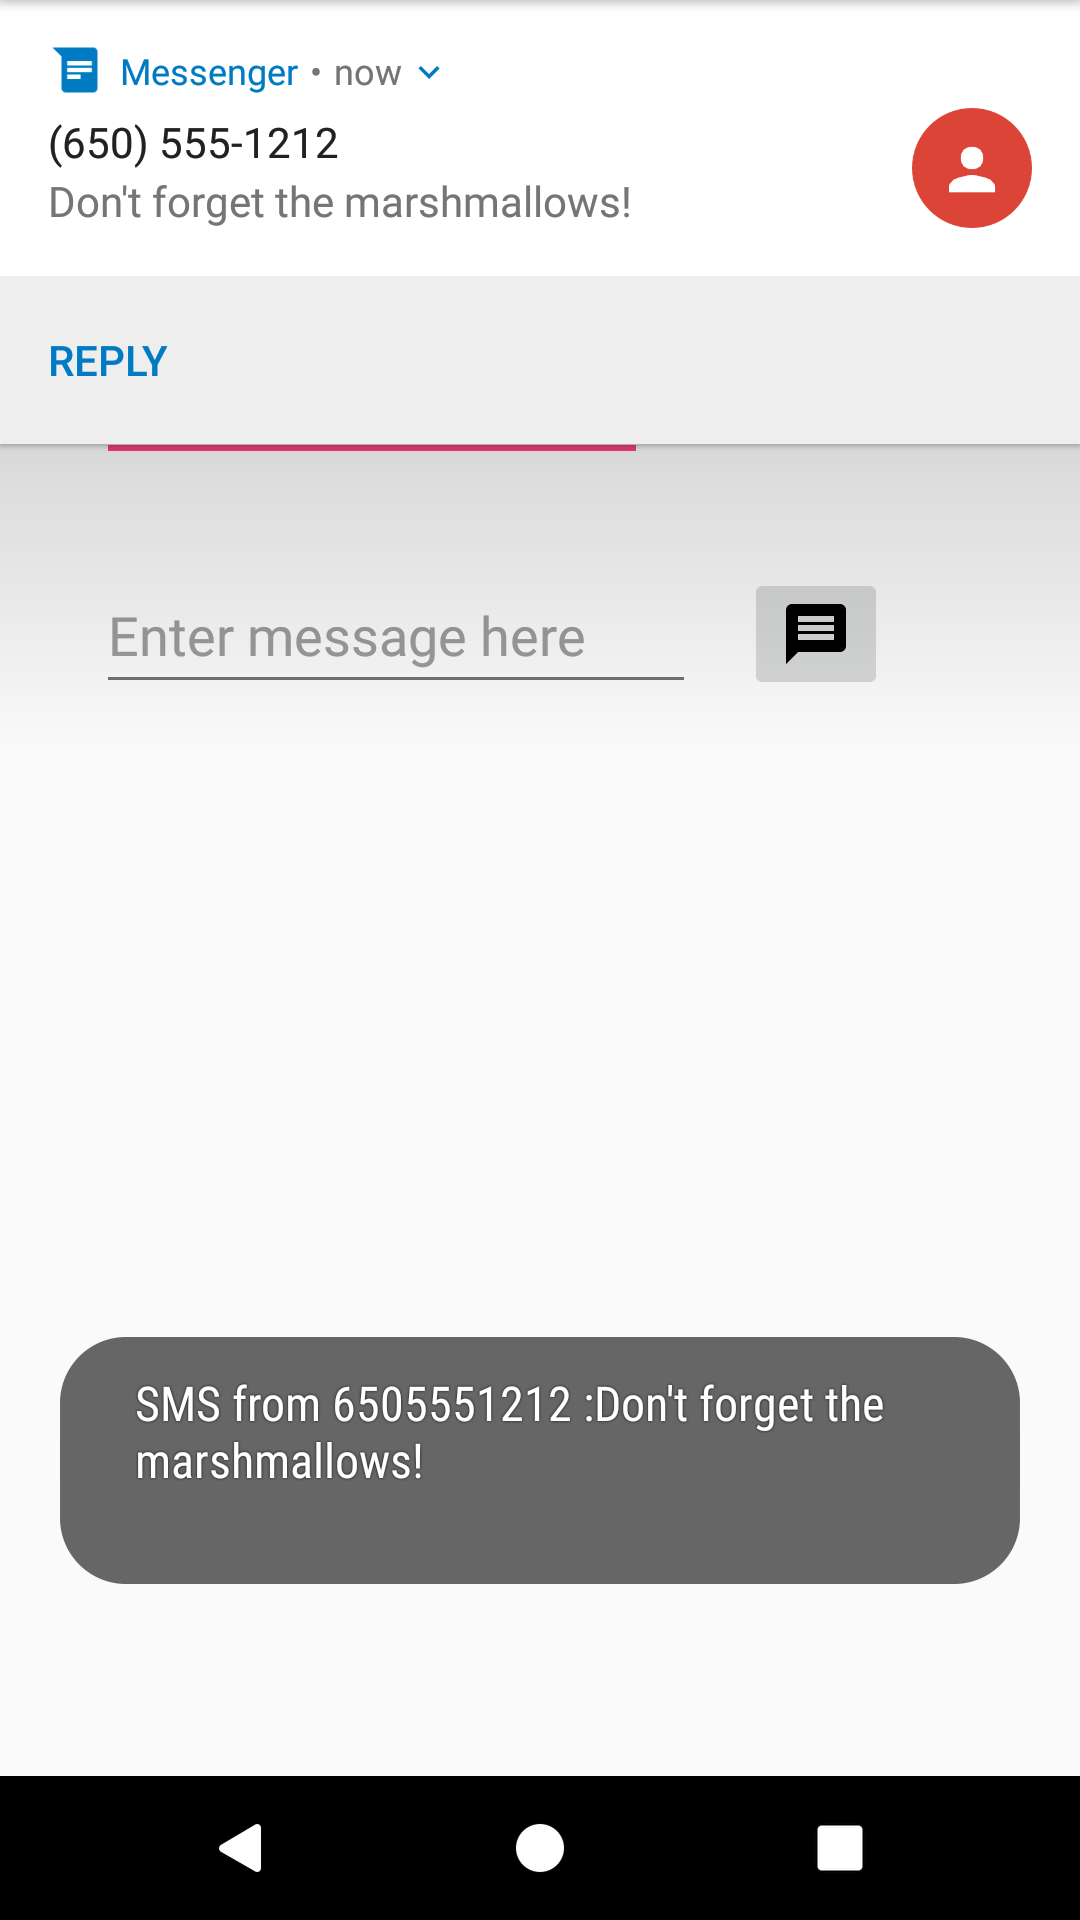
Run the app on a device. If possible, have someone send you an SMS message from a different device.
You can also receive an SMS text message when testing on an emulator. Follow these steps:
- Run the app on an emulator.
Click the … (More) icon at the bottom of the emulator’s toolbar on the right side, as shown in the figure below:

Solution Code
Android Studio project: SmsMessaging
Coding challenge
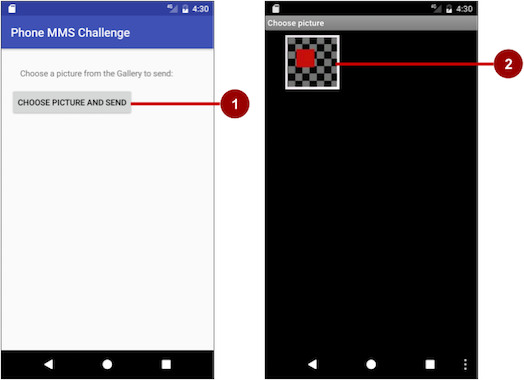
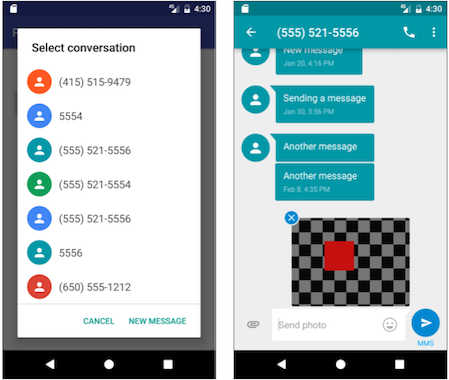
Challenge: Create a simple app with one button, Choose Picture and Send, that enables the user to select an image from the Gallery and send it as a Multimedia Messaging Service (MMS) message. After tapping the button, a choice of apps may appear, including the Messenger app. The user can select the Messenger app, and select an existing conversation or create a new conversation, and then send the image as a message.
The following are hints:
- To access and share an image from the Gallery, you need the following permission in the AndroidManifest.xml file:
- To enable the above permission, follow the model shown previously in this chapter to check for the READ_EXTERNAL_STORAGE permission, and request permission if necessary.
- Use the following intent for picking an image:
- Override the onActivityResult method to retrieve the intent result, and use getData() to get the Uri of the image in the result:
- Set the image’s Uri, and use an intent with ACTION_SEND , putExtra() , and setType() :
- Android Studio emulators can’t pass MMS messages to and from each other. You must test this app on real Android devices.
- For more information about sending multimedia messages, see Sending MMS with Android.
Android Studio project: MMSChallenge
Источник
Complete Guide on Sending Push Notifications on Android — Using Firebase

Holla! 👋, I will explain how to send push notifications on android using Firebase Cloud Messaging .
Push notifications are messages that pop up on a users device. A user can see these notifications without having to be on the app. This is important for users retention.
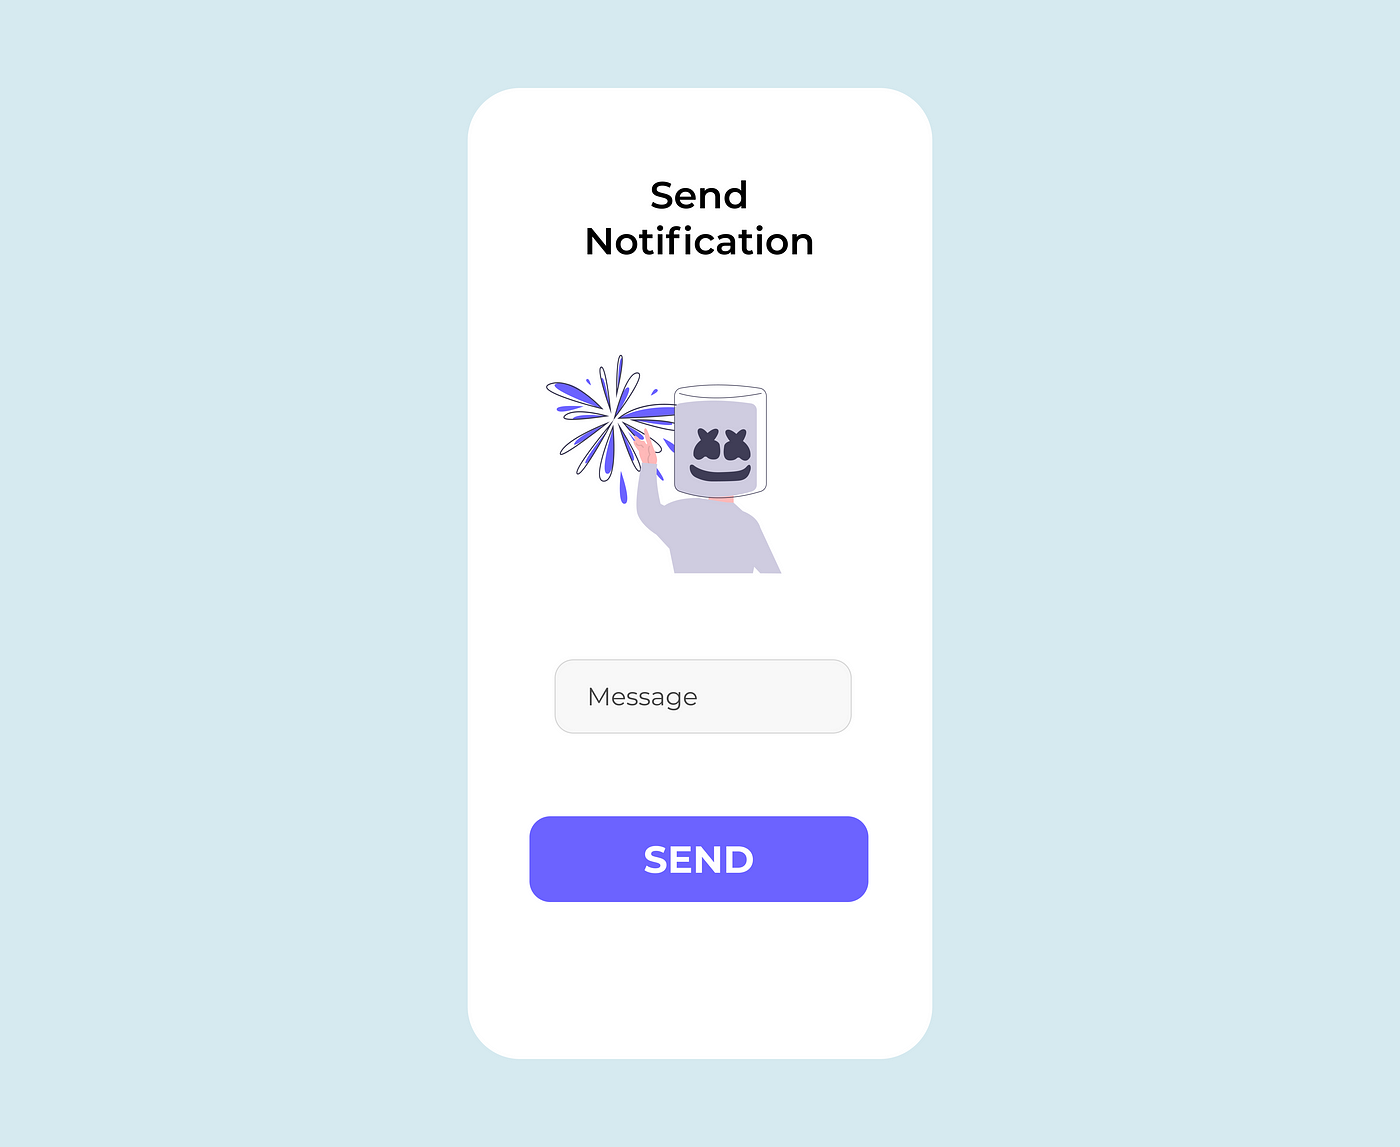
WHAT WE ARE BUILDING
We are simply going to build an app that lets a user input a message and send a push notification to that user containing that message. Simple! 😄
This is how the final app will look like

OnClick of that button
- Push Notification is sent to the user which contains the message you inputted

- Firebase (Cloud Messaging)
- Kotlin (For Android)
- NodeJS (Backend)
- Android Studio IDE
- Set up android studio
- Set up firebase project
- Add dependencies
- Set up Hilt And Retrofit
- Set Up Firebase Cloud Messaging
- Build view
- Setup Repository ViewModel and View
- Set up our backend with NodeJS
Alright, lets see each of them, one by one
SET UP ANDROID STUDIO
- First download android studio and install.
- Create A New Project — Choose Empty Activity
- Name your project anything, I named mine Firebase Notification Android
- Click Finish
We are using MVVM architectural pattern for this project
- Create 7 new packages name them — di , firebase , helper , model , view , viewmodel , network
- Move MainActivity to the view package
SETUP FIREBASE PROJECT
- Go to https://console.firebase.google.com/
- Sign in and click on Add Project
- Enter the name of your project — Name it anything,
- Click Continue
- On the Google Analytics page, Click Continue
- Choose a Google Account — Select Default Account For Firebase
- Click Create Project
- You will see — “ Your new project is ready ”
- Click Continue
Congrats, you have successfully created a firebase project. Now, lets link the project with our android app
Connecting Firebase With Android
- On your console home page click on the Android Logo

- Android Package Name — Go to your Manifest.xml , copy the package and paste it there, it should be something like this — com.name.firebasenotificationandroid
- App Nickname — Put anything there
- Debug Signing Certificate — Go to Android Studio , Click on gradle — Tasks — Android — signingReport — Copy the SHA-1 key and paste

- Click on Register App
- Download google-services.json and paste in you project folder app directory

- Add all the necessary firebase dependencies
- Sync project and you are done 👏
This app makes use of coroutines, hilt, retrofit, cloud messaging etc.
- Open your build.gradle(app) file and add them
Open build.gradle(project) add hilt class path
- Create 2 new class under di package name them — AppModule and MyApplication
- AppModule — This class is used to perform injection to types such as interfaces and classes from external libraries which we do not own e.g Retrofit.
- MyApplication — This class extends Application class. This will generate all the needed hilt codes and serve as a dependency container. It should look like this.
- Finally, go to your Manifest.xml file, in the application tag add android:name=”.di.MyApplication”
- Under helper package, create a class called EndPoints
EndPoints — A class where our base url and all api calls endpoint resides
- Under model package, create a class name AuthResponse
AuthResponse — A class that models the response gotten from the server so we can take proper action
- Under the network package, create an interface called ApiService and 2 new classes, name them — ApiDataSource , BaseDataSource
ApiService — An interface where we will make a Post Request to our server to save a user’s name and notification token.
ApiDataSource- A class that exposes the ApiService so that we can use it in our repository
We are done with retrofit and hilt.
SET UP FIREBASE CLOUD MESSAGING
- Under firebase package, create a new class — MyFirebaseMessagingService — This class extends FirebaseMessagingService that handles messages, recieving notifications in foreground, receiving data payload, sending up stream messages
- Under helper create an object — Utility
Utility — A utility class with a function that builds our notification — Handling stuffs such as — action when a user taps on the notification, customizing look of notification e.t.c
- Open Manifest.xlm , before the closing application tag, add this
- Add a default notification icon,color and channel, add to manifest.xml within the application tag
That should be all for configuring cloud messaging
Open main_activity.xml and use this code
Okay, now we have our not so beautiful view and everything set up, now lets set up our repository and viewmodel.
Setup Repository, ViewModel and View
- Open viewmodel package, create 2 new classes — MainRepo and MainViewModel
MainRepo — This class serves as a source of data for our viewModel to consume.
MainViewModel — This class communicates with the repository, the result from the api call is then returned as a LiveData (Lifecycle aware) which is then observed by our view (MainActivity)
Here’s what this class does
- Get the views through ViewBinding
- Initialize the views
- Listen to click even on the button
- Communicate with viewModel to register the user
- Observe the data from the viewModel and display appropriate messages
SET UP NODEJS BACKEND
- Go to your firebase console, click settings icon -> Project settings

- Switch to Service Account tab, Click Generate new private key
- Confirm and download it
- Now create a folder in your pc, navigate to that folder with your terminal
- npm init and fill in all required details. This will create a package.json file
- npm i firebase-adminon your terminal to install firebase dependency
- Also npm i express and npm i bodyparser
- Create a config file
Okay, we are done. Take a deep breath! 😫
This is a link to the complete project, please check it out
Источник


