- «android_expand» «android_meta» & fsck
- Залезаем во внутреннее хранилище Android M
- Expand Android Internal Storage to SD Card Safely with Simple Steps
- Internal Storage on Android
- Why Do Android Expand Internal Storage to SD Card?
- Android Expand Internal Storage to SD Card Safely
- Android meta android expand
- суббота, 17 сентября 2016 г.
- Android M. SD-карта, как внутренняя память (Adopted Storage). Как прочитать на ПК?
- Залезаем во внутреннее хранилище Android M
- Способ первый, простой: adb push/pull
- Способ второй, интересный: ручное монтирование зашифрованных разделов
- Android Explorations
- Decrypting Android M adopted storage
- Adopting an USB drive
- Inspecting the drive
- Decrypting the drive
- Storage manager commands
«android_expand» «android_meta» & fsck
Как бы проверить файловую систему внешней карты планшетника?


с чего ты решил, что один из этих разделов (/dev/sda2 ?) внешняя карта планшетника вопрос отдельный.
по теме: если скучно и мало геморроя по жизни, то вперде!
подсознание: выключаешь планшет, вынимаешь карту, делаешь бекап файлов (да ладно, зачем? разве что-то может поломаться), подключаешь её к компьютеру, fsck. // ага, только потом не говори, что тебя не предупреждали и надо было файлы бекапить
с чего ты решил, что один из этих разделов (/dev/sda2 ?) внешняя карта планшетника вопрос отдельный.
после подключения карты к ПК появились /dev/sda /dev/sda1 /dev/sda2
Залезаем во внутреннее хранилище Android M
android_expand — которая /dev/sd2 — это зашифрованнный раздел, использует технологию adopted-storage, позволяющую «расширить» системный раздел. Чтоб его примонтировать под linux, нужен ключ шифрования, который надо на андроиде прочитать под root-ом из /data/misc/vold/expand_PARTUUID.key, где PARTUUID — это UUID шифрованного раздела в нижнем регистре без разделителей.
Можно еще поискать про сабдж в Яндексе или Гугле «android_expand» partition а также android adopted storage
Источник
Expand Android Internal Storage to SD Card Safely with Simple Steps
Suffering from Android phone storage full problem? AOMEI Partition Assistant Professional will partition Micro SD card to increase Android internal storage to SD card safely without deleting apps.

By Lucas  / Last Updated February 26, 2020
Internal Storage on Android
For Android smartphone, internal memory storage is a technical term to talk about RAM (Random Access Memory), which is the storage space on your device that can be used for installing applications and their associated data. Larger the internal memory storage, faster your Android phone will be. On the other aspect, external storage is also well known words, which refers to the storage space that the user can access for music, pictures, downloads, etc. The external storage is not necessarily a physically standalone device. The space you can access the files on your Android phone also named external storage.
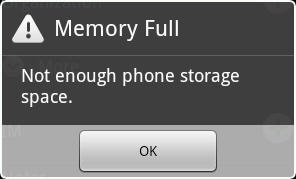
In general, you probably suffer from the Android internal storage full problem or low phone memory error sometimes. Thus, you may intend to expand internal storage to SD card for Android phone. Why do you do that?
Why Do Android Expand Internal Storage to SD Card?
There are some reasons for expand internal storage to fix insufficient storage memory warning:
Removing unnecessary apps and games cannot fix the android internal storage full problem fundamentally.
Increase internal storage on Android phone using SD card will allow you install more applications and games on that device.
Combining SD card and Android internal storage makes the smartphone run smoothly.
A vast majority of Android devices have a SD card slot, expanding internal storage to SD card is more practical.
The SD card capacity is just right, not too small and not too large.
How to increase internal storage of Android phone to SD card with these adequate causes?
Android Expand Internal Storage to SD Card Safely
To increase internal storage for your Android phone, you must partition SD card into two parts (a FAT32 partition for phone storage, an EXT3 partition for internal memory), then insert your SD card to your Android phone, and move apps to your SD card to increase space for internal storage. Preparations:
Make sure your Android phone has been rooted.
Ensure your Android phone has a SD card slot.
A new Micro SD card.
Disk partitioning software, like AOMEI Partition Assistant Professional, allows you to partition SD card perfectly in Windows 7/8/10.
Partition SD Card
1. Please download the latest version of AOMEI Partition Assistant Professional, open the main interface after installation. At that moment, your Micro SD card should be inserted to computer.
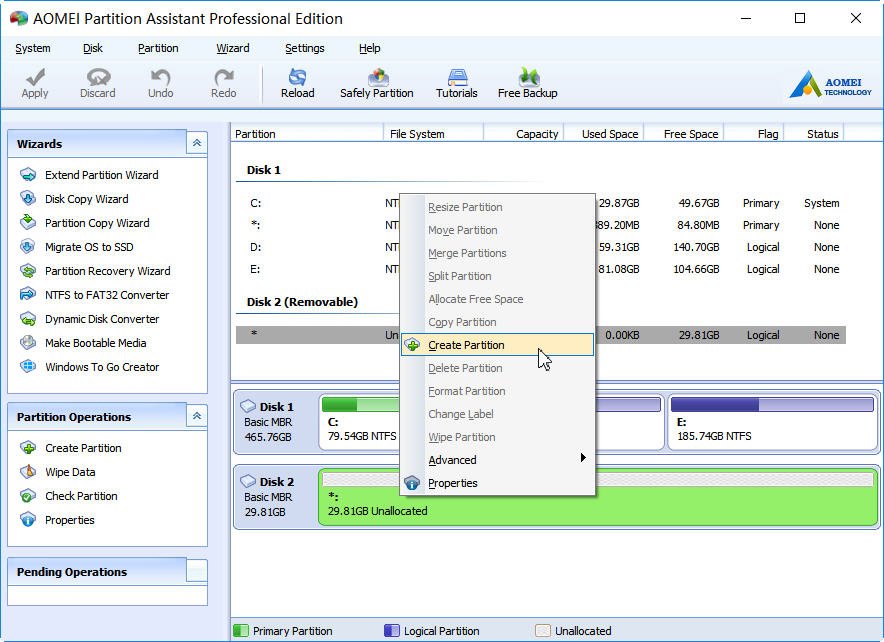
2. Right click the Micro SD card, select Create Partition.
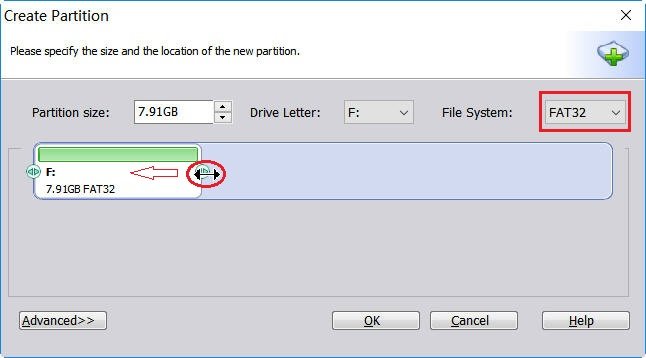
3. Select FAT32 as file system for the first partition on Micro SD card, slide the mouse pointer to resize partition.
4. Click Apply.

5. Pitch on the unallocated space, select Create Partitionon its drop down menu.
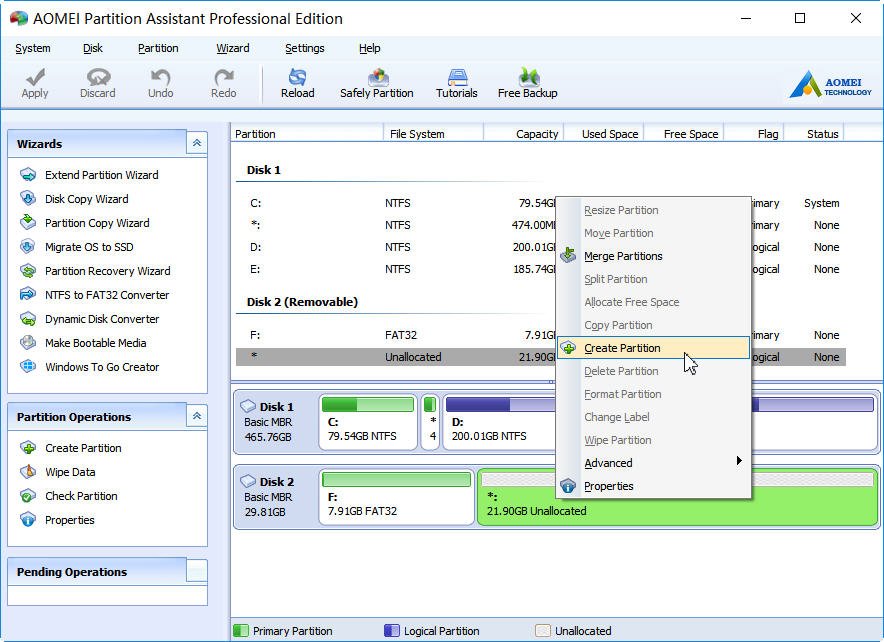
6. Choose EXT3 file system for the second partition on Micro SD card.
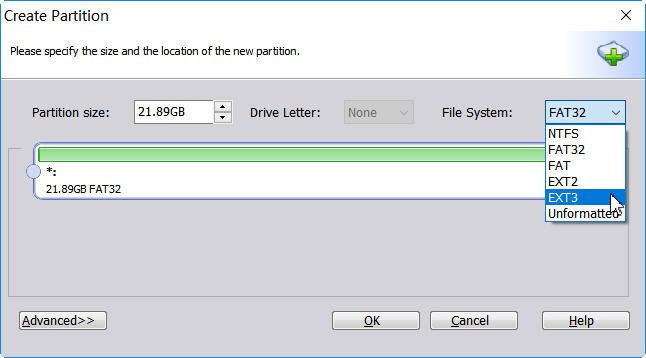
7. Click Apply to create EXT3 partition for internal storage.
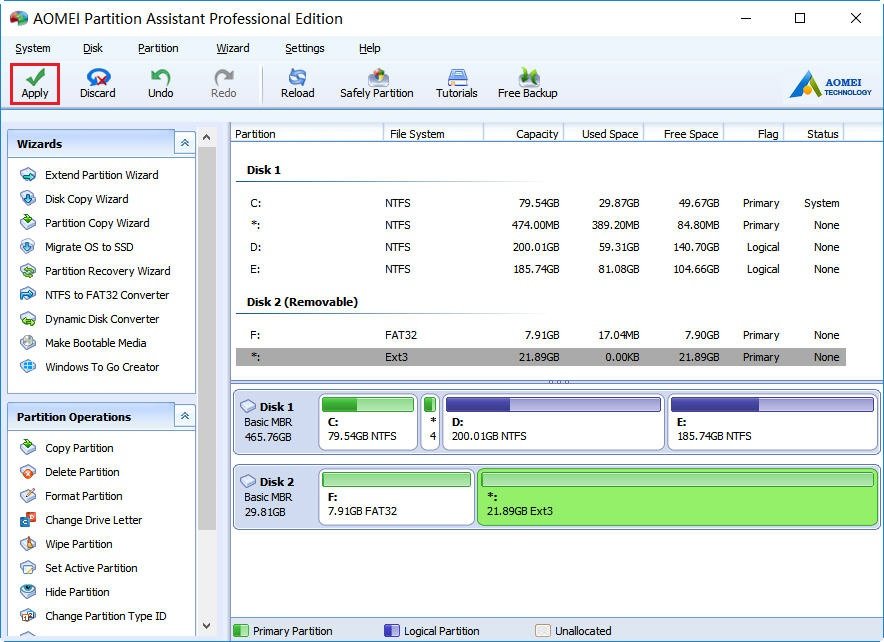
After that, you could insert the partitioned Micro SD card to your Android handset, move apps to SD card, then you will find your Android expand internal storage to SD card has been success. Besides, this software has the ability to format SD card, free up space on Android phones, restore SD card to full capacity, etc. Well, you can enjoy the basic functions provided by AOMEI Partition Assistant Standard.
Источник
Android meta android expand
Decker’s Blog · Об IT и не только .
суббота, 17 сентября 2016 г.
Android M. SD-карта, как внутренняя память (Adopted Storage). Как прочитать на ПК?

В этом небольшом посте (все равно не спится) я постараюсь рассмотреть довольно интересную тему о том как можно получить доступ к данным находящимся на SD-карте, которая была использована как внутренняя память (adopted storage) на устройстве с Android 6.0 Masrhmallow на ПК без подключения к самому смартфону. Например, в случае когда он был поврежден или утерян. На самом деле это не представляет особенных сложностей, при соблюдении ряда условий: вы должны предварительно сохранить ключ шифрования с устройства (сделать это можно, если у вас есть root-права или установлено кастомное recovery, например, TWRP с поддержкой расшифровки раздела userdata), также, у вас под рукой должен быть ПК с Linux и желательно с кардридером.
Чтобы пост был максимально полезным все положения / инструкции и т.п. которые вы в нем увидите я, естественно, буду проверять вместе с вами на практике. Поэтому приступим. Итак, у меня имеется Alcatel Idol 3 4.7″ 6039Y с Android M, Samsung’овская microSD на 16 Gb и ноутбук Acer Aspire ES 11 с установленной на нем Ubuntu 16.04 (в более ранних версиях ОС заставить работать штатный кардридер мне, к сожалению, не удалось).
Вставляем microSD в телефон и форматируем ее как внутреннюю память и перемещаем на нее данные приложений:


Теперь мы должны получить root-доступ к телефону, чтобы скопировать с него ключ шифрования, либо установить кастомный recovery, например, TWRP. Я воспользуюсь именно вторым вариантом, тем более что TWRP 3.0.2-0 для этого аппарата я недавно пересобрал из исходников (взять бинарник можно тут, ну а для тех кто желает собрать TWRP для Idol 3 6039Y самостоятельно, дерево я выложил тут). Для прошивки TWRP в аппарат я использовал свой Sahara & Firehose Test (будущий Alcatel Flasher), как и что нужно делать для прошивки указано в посте, посвященном этому ПО, поэтому останавливаться отдельно на вопросах прошивки я не буду.
Загружаемся в TWRP и монтируем раздел Data в меню Mount. После чего подключаем аппарат к ПК и с помощью adb shell заходим в консоль. Где сначала с помощью команды ls /data/misc/vold определяем имя файла содержащего наш 16-байтный AES ключ, а потом с помощью hexdump, либо скопировав файл на ПК достаем сам ключ:

Таким образом наш 16-байтный AES ключ выглядит следующим образом:
Теперь можно достать флешку из телефона и переместиться за ПК с Linux. В моем случае это будет несколько проще, т.к. ноутбук с Ubuntu находится в одной сети с ПК с которого я пишу, поэтому я просто вставлю флешку в него, запущу x11vnc сервер на ноутбуке и VNC Viewer на том ПК с которого я пишу эту статью:

Как мы видим вставленная microSD представляет собой устройство /dev/mmcblk1 на котором есть два раздела (!) — FAT32 (/dev/mmcblk1p1) с именем android_meta и зашифрованный aes-cbc-essiv:sha256 ext4 раздел (/dev/mmcblk1p2) с именем android_expand.
Источник
Залезаем во внутреннее хранилище Android M
В Android 6.0 ввели функцию, позволяющую отформатировать карту памяти так, чтобы она являлась не отдельным хранилищем, а придатком ко внутренней памяти. Это позволяет избежать путаницы с двумя хранилищами данных, особенно при ручной установке некоторых не всегда честно купленных крупных приложений, поставляемых по частям. Однако есть один нюанс: при этом всём нам наглухо блокируют доступ к карте напрямую. Хочешь что-то передать на устройство — используй MTP со всеми вытекающими, вроде скорости передачи файлов, сравнимой с прогулочным шагом контуженной черепахи. Карту теперь не только к ПК через кабель напрямую нельзя подключить: её и из выключенного телефона через кардридер просто так не смонтируешь, ведь она отформатирована в нечто неизвестное ни науке, ни нашим компьютерам.
Но ведь правила созданы для того, чтобы их нарушать? Давайте попробуем обойти это бессовестное ограничение.
Способ первый, простой: adb push/pull
Рекомендуется для ежедневного использования. Судя по всему, даже не требует рут. Всё, что понадобится — это ADB. Те, кто в курсе, могут пролистать до второго способа.
С передачей всё просто: первый аргумент — откуда, второй аргумент — куда. /sdcard — то место, куда на Андроиде монтируется доступное пользователю хранилище, т.е. корневой каталог штатного файлового менеджера почти любого девайса на Андроиде.
Основной плюс — двухсторонний обмен данными на вполне удовлетворительной скорости (если сравнивать с MTP). Также ко всей этой красоте прилагается симпатичный счетчик прогресса в процентах, который, к сожалению, отсюда не видно. Полагаю, что к графическому файловому менеджеру тоже можно как-то приделать нечто похожее, но на практике с такими плагинами сталкиваться не приходилось. Возможно, Android всё-таки не зря нас к карте не подпускает, ну да ладно, кто ж его спрашивает?
Способ второй, интересный: ручное монтирование зашифрованных разделов
На этот раз нам понадобятся root-доступ к смартфону и ПК с системой на базе Linux.
Для начала вытянем карту из девайса, подключим к ПК и сразу же посмотрим на её содержимое.
Отлично, хотя бы таблица разделов имеется.
Невооружённым взглядом видно, что филейная часть — это второй раздел с неопознанной файловой системой. Первый раздел прекрасно монтируется в fat32 и не менее прекрасно пуст, поэтому про него можно забыть, т.к. я не знаю, что на нём хранится у здоровых людей.
Вторая часть зловещего плана — ключ. Да-да, данные зашифрованы: не просто ж так parted не смог обнаружить на целевом разделе ФС. С ключом всё почти так же просто: хранится он на нашем Android-девайсе в двоичном файлике по адресу /data/misc/vold/expand_PARTUUID.key, где PARTUUID — это UUID шифрованного раздела в нижнем регистре без разделителей. Рут нам понадобится как раз для того, чтобы добраться до этого файла через нечитаемый для всех, кроме рута, каталог /data/misc/vold.
Готово. 128 бит заветной информации.
Заключительная часть Мерлезонского балета — подключение раздела. Сделаем это стандартным линуксовским dm-crypt, который, собственно, и самим Андроидом используется.
К сожалению, я не знаю, какой именно метод шифрования используется Андроидом, поэтому понадеюсь на пресвятой дефолт, оставив —cipher неуказанным.
На меня не ругаются, это хорошо. Монтируем.
Кажется, получилось. Неопознанные UID-ы напоминают нам о том, что карточка не с нашего ПК и лучше бы нам здесь особо ничего не ворошить.
Если поковыряться по каталогам, можно увидеть данные приложений, хранящихся на карте памяти, а также непосредственно содержимое SD-карты, которое нам подсовывали в первом способе по адресу /sdcard. Его мы можем найти в каталоге /mnt/media/0.
Источник
Android Explorations
Decrypting Android M adopted storage
- Get link
- Other Apps
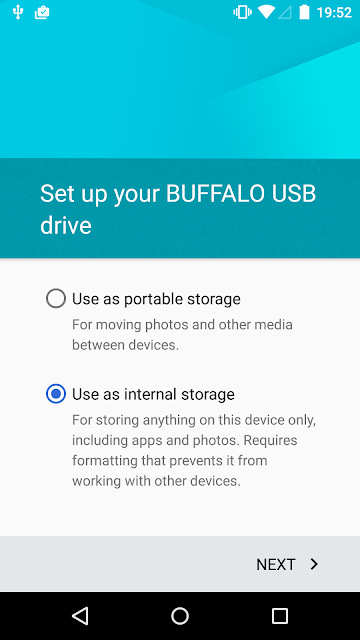
Adopting an USB drive
In order to enable adoptable storage for devices connected via USB you need to execute the following command in the Android shell (presumably, this is not needed if your device has an internal SD card slot; however there are no such devices that run Android M at present):
Now, if you connect a USB drive to the device’s micro USB slot (you can also use an USB OTG cable), Android will give you an option to set it up as ‘internal’ storage, which requires reformatting and encryption. ‘Portable’ storage is formatted using VFAT, as before.
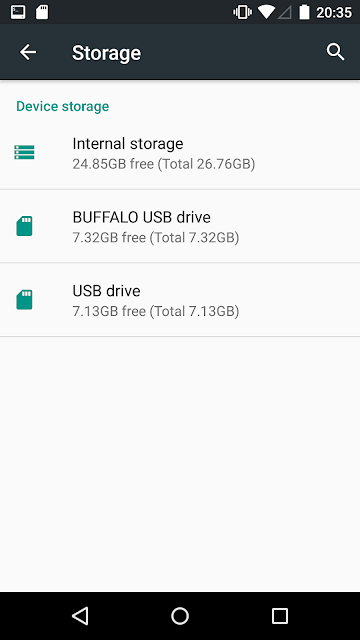
After the drive is formatted, it shows up under Device storage in the Storage screen of system Settings. You can now migrate media and application data to the newly added drive, but it appears that there is no option in the system UI that allows you to move applications (APKs).
Adopted devices are mounted via Linux’s device-mapper under /mnt/expand/ as can be seen below, and can be directly accessed only by system apps.
You can safely eject an adopted drive by tapping on it in the Storage screen, and the choosing Eject from the overflow menu. Android will show a persistent notification that prompts you to reinsert the device once it’s removed. Alternatively, you also can ‘forget’ the drive, which removes it from the system, and should presumably delete the associated encryption key (which doesn’t seem to be the case in the current preview build).

Inspecting the drive
Once you’ve ejected the drive, you can connect it to any Linux box in order to inspect it. Somewhat surprisingly, the drive will be automatically mounted on most modern Linux distributions, which suggests that there is at least one readable partition. If you look at the partition table with fdisk or a similar tool, you may see something like this:
As you can see, there is a tiny android_meta partition, but the bulk of the device has been assigned to the android_expand partition. Unfortunately, the full source code of Android M is not available, so we cannot be sure how exactly this partition table is created, or what the contents of each partition is. However, we know that most of Android’s storage management functionality is implemented in the vold system daemon, so we check if there is any mention of android_expand inside vold with the following command:
Here expand_%s.key suspiciously looks like a key filename template, and we already know that adopted drives are encrypted, so our next step is to look for any similar files in the device’s /data partition (you’ll need a custom recovery or root access for this). Unsurprisingly, there is a matching file in /data/misc/vold which looks like this:
Decrypting the drive
That’s exactly 16 bytes, enough for a 128-bit key. As we know, Android’s FDE implementation uses an AES 128-bit key, so it’s a good bet that adoptable storage uses a similar (or identical) implementation. Looking at the start and end of our android_expand partition doesn’t reveal any readable info, nor is it similar to Android’s crypto footer, or LUKS’s header. Therefore, we need to guess the encryption mode and/or any related parameters. Looking once again at Android’s FDE implementation (which is based on the dm-crypt target of Linux’s device-mapper), we see that the encryption mode used is aes-cbc-essiv:sha256 . After consulting dm-crypt’s mapping table reference, we see that the remaining parameters we need are the IV offset and the starting offset of encrypted data. Since the IV offset is usually zero, and most probably the entire android_expand partition (offset 0) is encrypted, the command we need to map the encrypted partition becomes the following:
It completes with error, so we can now try to mount the mapped device, again guessing that the file system is most probably ext4 (or you can inspect the mapped device and find the superblock first, if you want to be extra diligent).
Storage manager commands
Back in Android, you can use the sm command (probably short for ‘storage manager’) we showed in the first section to list disks and volumes as shown below:
If you have root access, you can also partition, format, mount, unmount and forget disks/volumes. The full list of supported commands is shown in the following listing.
Most features are also available from the system UI, but sm allows you to customize the ratio of the android_meta and android_expand partitions, as well as to create ‘mixed’ volumes.
Источник


