- Migrating to Android Studio
- In this document
- See also
- Migration Overview
- Migration Prerequisites
- Importing Projects to Android Studio
- Validating imported projects
- Migrating to AndroidX / Переход на AndroidX
- Перевод Flutter приложения на AndroidX в автоматическом режиме с помощью Android Studio
- Migrating to AndroidX: tips, tricks, and guidance
- Take advantage of the latest Jetpack has to offer.
- Why migrate?
- Preparing to migrate
- Migrate
- Step 1: Update to Support Library version 28
- Step 2: Enable Jetifier
- Step 3. Update dependencies
- Step 4: Update your source code
- Those pesky exceptions
- Version configuration files
- ProGuard and build scripts
- Get the latest stable version
- More help and resources
- Final thoughts
Migrating to Android Studio
In this document
See also
Migrating from Eclipse ADT to Android Studio requires adapting to a new project structure, build system, and IDE functionality. To simplify the migration process, Android Studio provides an import tool so you can quickly transition your Eclipse ADT workspaces and Ant build scripts to Android Studio projects and Gradle-based build files.
This document provides an overview of the migration process and walks you through a sample import procedure. For more information about Android Studio features and the Gradle-based build system, see Android Studio Overview and Configuring Gradle Builds.
Migration Overview
Migrating from Eclipse to Android Studio requires that you change the structure of your development projects, move to a new build system, and use a new user interface. Here are some of the key changes you should be aware of as you prepare to migrate to Android Studio:
- Project files
Android Studio uses a different project structure. Each Eclipse ADT project is called a module in Android Studio. Each instance of Android Studio contains a project with one or more app modules. For more information see, Project Structure.
Manifest settings
Several elements in the AndroidManifest.xml file are now properties in the defaultConfig and productFlavors blocks in the build.gradle file. These elements are still valid manifest entries and may appear in manifests from older projects, imported projects, dependencies, and libraries. For more information see, Manifest Settings.
Dependencies
Library dependencies are handled differently in Android Studio, using Gradle dependency declarations and Maven dependencies for well-known local source and binary libraries with Maven coordinates. For more information see, Dependencies
Test code
With Eclipse ADT, test code is written in separate projects and integrated through the element in your manifest file. Android Studio provides a AndroidTest folder within your project so you can easily add and maintain your test code within the same project view. JUnit tests can also be configured to run locally to reduce testing cycles.
Gradle-based build system
In place of XML-based Ant build files, Android Studio supports Gradle build files, which use the Gradle Domain Specific Language (DSL) for ease of extensibility and customization. The Android Studio build system also supports build variants, which are combinations of productFlavor and buildTypes , to customize your build outputs.
User interface
Android Studio provides an intuitive interface and menu options based on the IntelliJ IDEA IDE. To become familiar with the IDE basics, such as navigation, code completion, and keyboard shortcuts, see IntelliJ IDEA Quick Start Guide.
Developer tools versioning
Android Studio updates independently of the Gradle-based build system so different build settings can be applied across different versions of command line, Android Studio, and continuous integration builds. For more information, see Configuring Gradle Builds.
Migration Prerequisites
Before migrating your Eclipse ADT app to Android Studio, review the following steps to make sure your project is ready for conversion, and verify you have the tool configuration you need in Android Studio:
- In Eclipse ADT:
- Make sure the Eclipse ADT root directory contains the AndroidManifest.xml file. Also, the root directory must contain either the .project and .classpath files from Eclipse or the res/ and src/ directories.
- Build your project to ensure your latest workspace and project updates are saved and included in the import.
- Comment out any references to Eclipse ADT workspace library files in the project.properties or .classpath files for import. You can add these references in the build.gradle file after the import. For more information, see Configuring Gradle Builds.
- It may be useful to record your workspace directory, path variables, and any actual path maps that could be used to specify any unresolved relative paths, path variables, and linked resource references. Android Studio allows you to manually specify any unresolved paths during the import process.
- In Android Studio:
- Make a note of any third-party Eclipse ADT plugins in use and check for equivalent features in Android Studio or search for a compatible plugin in the IntelliJ Android Studio Plugins repository. Use the File > Settings > Plugins menu option to manage plugins in Android Studio. Android Studio does not migrate any third-party Eclipse ADT plugins.
- If you plan to run Android Studio behind a firewall, be sure to set the proxy settings for Android Studio and the SDK Manager. Android Studio requires an internet connection for Setup Wizard synchronization, 3rd-party library access, access to remote repositories, Gradle initialization and synchronization, and Android Studio version updates. For more information, see Proxy Settings.
- Use the File > Settings > System Settings menu option to verify the current version and, if necessary, update Android Studio to the latest version from the stable channel. To install Android Studio, please visit the Android Studio download page.
Importing Projects to Android Studio
Android Studio provides a function for importing Eclipse ADT projects, which creates a new Android Studio project and app modules based on your current Eclipse ADT workspace and projects. No changes are made to your Eclipse project files. The Eclipse ADT workspace becomes a new Android Studio project, and each Eclipse ADT project within the workspace becomes a new Android Studio module. Each instance of Android Studio contains a project with one or more app modules.
After selecting an Eclipse ADT project to import, Android Studio creates the Android Studio project structure and app modules, generates the new Gradle-based build files and settings, and configures the required dependencies. The import options also allow you to enter your workspace directory and any actual path maps to handle any unresolved relative paths, path variables, and linked resource references.
Depending on the structure of your Eclipse ADT development project, you should select specific files for importing:
- For workspaces with multiple projects, select the project folder for each Eclipse ADT project individually to import the projects into the same Android Studio project. Android Studio combines the Eclipse ADT projects into a single Android Studio project with different app modules for each imported project.
- For Eclipse ADT projects with separate test projects, select the test project folder for import. Android Studio imports the test project and then follows the dependency chain to import the source project and any project dependencies.
- If Eclipse ADT projects share dependencies within the same workspace, import each project individually into Android Studio. Android Studio maintains the shared dependencies across the newly created modules as part of the import process.
To import a project to Android Studio:
- Start Android Studio and close any open Android Studio projects.
- From the Android Studio menu select File > New > Import Project.
Alternatively, from the Welcome screen, select Import project (Eclipse ADT, Gradle, etc.).
Select the Eclipse ADT project folder with the AndroidManifest.xml file and click Ok.

Select the destination folder and click Next.

Select the import options and click Finish.
The import process prompts to migrate any library and project dependencies to Android Studio, and add the dependency declarations to the build.gradle file. The import process also replaces any well-known source libraries, binary libraries, and JAR files that have known Maven coordinates with Maven dependencies, so you no longer need to maintain these dependencies manually. The import options also allow you to enter your workspace directory and any actual path maps to handle any unresolved relative paths, path variables, and linked resource references.

Android Studio imports the app and displays the project import summary. Review the summary for details about the project restructuring and the import process.

After importing the project from Eclipse ADT to the new Android Studio project and module structure, each app module folder in Android Studio contains the complete source set for that module, including the src/main and src/androidTest directories, resources, build file, and Android manifest. Before starting app development, you should resolve any issues shown in the project import summary to make sure the project re-structuring and import process completed properly.
Validating imported projects
After completing the import process, use the Android Studio Build and Run menu options to build your project and verify the output. If your project is not building properly, check the following settings:
- Use the Android SDK button in Android Studio to launch the SDK Manager and verify the installed versions of SDK tools, build tools, and platform match the settings for your Eclipse ADT project. Android Studio inherits the SDK Manager and JDK settings from your imported Eclipse project.
- Use the File > Project Structure menu option to verify additional Android Studio settings:
- Under SDK Location verify Android Studio has access to the correct SDK and JDK locations and versions.
- Under Project verify the Gradle version, Android Plugin version, and related repositories.
- Under Modules verify the app and module settings, such as signing configuration and library dependencies.
- If your project depends on another project, make sure that dependency is defined properly in the build.gradle file in the app module folder.
- The Android Support Library has reached the end of its life. 28.0 was the last release of the Android Support namespace and the namespace is no longer maintained. So, if you want bug fixes or new features that would have previously gone into the Support Library, you need to migrate to AndroidX.
- Better package management. With AndroidX, you get standardized and independent versioning, as well as better standardized naming and more frequent releases.
- Other libraries have migrated to use the AndroidX namespace libraries, including Google Play services, Firebase, Butterknife, Mockito 2, and SQLDelight among others.
- All new Jetpack libraries will be released in AndroidX namespace. So, for example, to take advantage of Jetpack Compose or CameraX, you need to migrate to the AndroidX namespace.
- back up your project. If you’re using source control tools, it is still recommended that you make a backup, because migration will change many of the files in your project.
- create a new branch on which to make the migration changes.
- if possible, suspend or minimize development (at least don’t try to do refactoring or pull in new features) during the migration, as this will help reduce the number of merge conflicts that could happen.
- the third-party code you’re using is not compatible with AndroidX. In this case, a stack trace similar to the one below will show you that it’s trying to pull in the old version of the Support Library:
- if you have a project that’s partially migrated, you might get a duplicate class error, where it’s trying to pull in the same code from both the Support Library and AndroidX. The stack trace will show you something like this:
- Android Studio
- manual update
- Bash script
If there still are unexpected issues when building and running your project in Android Studio after you have checked these settings, consider modifying the Eclipse ADT project and re-starting the import process. Importing an Eclipse ADT project to Android Studio creates a new Android Studio project and does not impact the existing Eclipse ADT project.
To get started using Android Studio, review the Android Studio features and Gradle-based build system to become familiar with the new project and module structure, flexible build settings, and other advanced Android development capabilities. For a comparison of Eclipse ADT and Android Studio features and usage, see Transitioning to Android Studio from Eclipse. For specific Android Studio how-to documentation, see the pages in the Workflow section.
Источник
Migrating to AndroidX / Переход на AndroidX
Если вы столкнулись с тем что новые пакеты Flutter требуют поддержки AndroidX, например geolocator ^5.0.0, то для их использования придется совершить этот переход.
Показанием к переходу может быть то, что вы установили новую версию пакета, и во время запуска или работы Flutter приложения случился его сбой, после которого оно закрылось.
Источник https://flutter.dev/docs/development/packages-and-plugins/androidx-compatibility, здесь описано два подхода по переходу к AndroidX:
1. Автоматическими средствами IDE Android Studio (рекомендуемый способ) — рассмотрим его ниже;
2. Ручной (не рекомендуется).
Так же по ссылке есть дополнительная информация и рекомендации.
Источник по переходу к AndroidX в Android Studio и другая информация. https://developer.android.com/jetpack/androidx/migrate
Перевод Flutter приложения на AndroidX в автоматическом режиме с помощью Android Studio
Необходима версия Android Studio 3.2 или более новая.
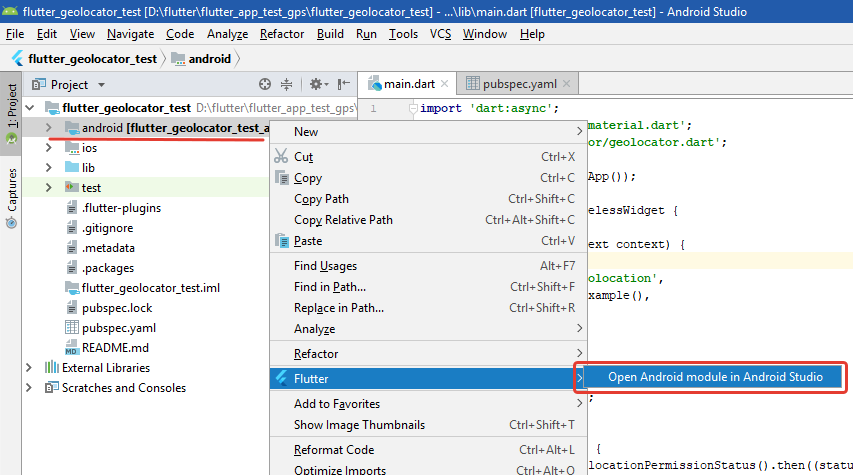
Нужно открыть Android проект внутри Flutter проекта.
На скриншоте ниже — директория android во Flutter проекте.
Если вы работаете в Android Studio с Flutter проектом, то можете это сделать — нажатием правой кнопки на директорию android и в контекстном меню выбрать: Flutter > Open Android module in Android Studio.
Откроем в новом окне (New Window), чтобы потом вернуться к нашему Flutter проекту.

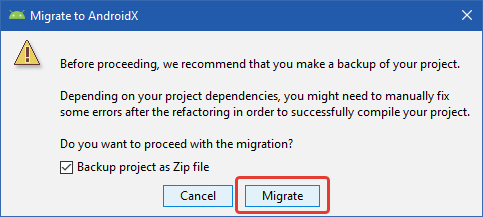
После того как откроется новое окно, Android Studio произведет все процессы по инициализации проекта, в основном контекстном меню выбираем Refactor > Migrate to AndroidX.
Для восстановления, в случае если вам не подойдет AndroidX, IDE предлагает сделать резервную копию изменяемых файлов. Нажимаем Migrate.
IDE проверяет какие ссылки должны быть изменены, соглашаемся и нажимаем Do Refactor.

Ждем пока IDE завершит все процессы.
Можно проверить что изменился файл android/gradle.properties, в нем должны появится строки:
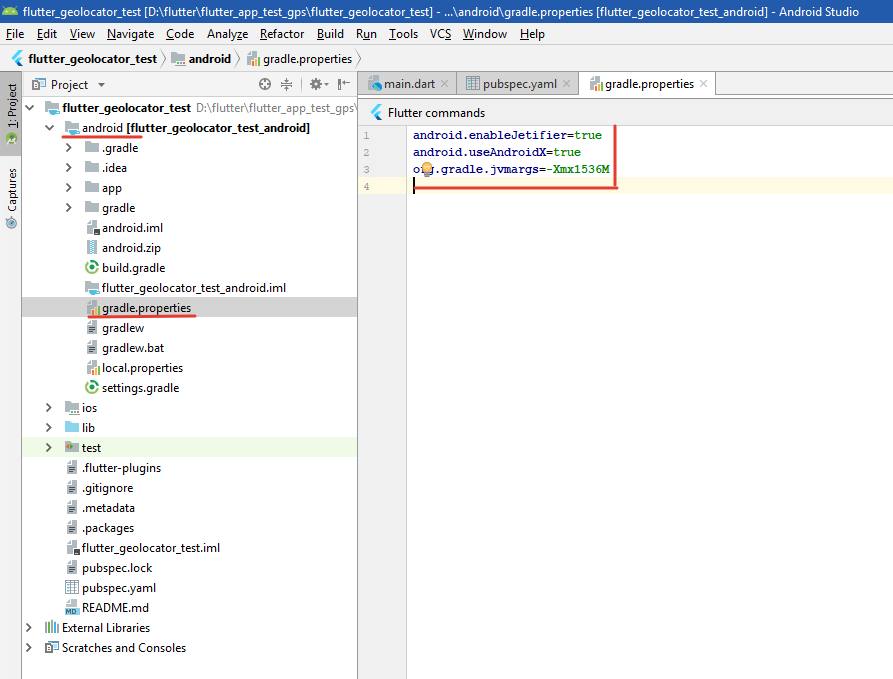
При переходе к AndroidX может измениться версия gradle, что приведет к долгой сборке вашего приложения. Но такая задержка разовая — в это время происходит загрузка нужной версии gradle из интернета.
Все готово, теперь можно запустить сборку Flutter приложения!
Источник
Migrating to AndroidX: tips, tricks, and guidance
Take advantage of the latest Jetpack has to offer.
Jetpack is a set of libraries, tools, and guidance to help you write high-quality apps more easily. Jetpack makes coding easier through best practices, limiting boilerplate code, and simplifying complex tasks. All with the goal of enabling you to focus on the code that you really care about.
AndroidX is the package name for all the libraries within Jetpack. Think of AndroidX as the open-source project used to develop, test, version, and release Jetpack libraries.
Back at I/O 2018, we announced that Support Library would be refactored into the AndroidX namespace, which was completed with Support Library 28 and the announcement of AndroidX 1.0.
Why migrate?
The time is right now to migrate from using the Android Support Library to AndroidX. There are four reasons behind this:
Preparing to migrate
Before you start to migrate to AndroidX you should:
Migrate
Throughout the migration steps focus on addressing errors, getting your app to compile, and passing all tests.
Step 1: Update to Support Library version 28
Migrating directly to AndroidX from an older version of the Support Library, say 26 or 27, isn’t recommended: not only would you need to address the namespace changes, you would also need to address the API changes between the older version and AndroidX.
It is, therefore, recommended that you update to version 28, address all of the API changes, and ensure your app compiles with version 28.
Support Library version 28 and AndroidX 1.0 are binary equivalent, meaning that only the package name changes between those two versions: all the APIs are the same. This means that you should have very little to fix when migrating from 28 to AndroidX.
Step 2: Enable Jetifier
Jetifier helps migrate third-party dependencies to use AndroidX. Jetifier will change the byte code of those dependencies to make them compatible with projects using AndroidX. However, Jetifier won’t change your source code or migrate your generated code.
To enable Jetifier in your app, add the following to your gradle.properties files:
Now, when code auto-completion import libraries, you’ll import the AndroidX version of that library instead of the old Support Library version.
Step 3. Update dependencies
Before starting the migration, you should update each third-party library — such as Butterknife, Glide, Mockito 2, and SqlDelight — to the most recent version of the library. Not doing so could result in unexplained compilation errors.
If you’re using a code generation library, Jetifier won’t modify these. So you will need to check that the code generation library is compatible with AndroidX.
If you consider skipping steps 2 and 3 here are some of the errors you could encounter:
Step 4: Update your source code
You have 3 options to update your source code to use AndroidX:
If you use Android Studio 3.2 stable or above, you can update your source code using the Migrate to AndroidX option on the Refactor menu. This is the recommended way as Android Studio can examine your source code to make correct decisions when refactoring.
If you don’t use Android Studio or employ a more sophisticated app architecture that the Migrate to AndroidX option doesn’t cover, you should instead leverage the class mapping csv file to implement a find and replace bash script. This script should find all source code instances of the android.support classes and then replace them with their AndroidX equivalent.
More concretely, the script should take the CSV file that provides the class mapping and then run a grep command followed by a sed command to replace the package names. However, because this is a brute force approach to migration, this basic find and replace may not sufficiently or correctly complete the migration.
Additionally, the update can also be done manually.
If you decide to take the manual approach, visit the Migrate to AndroidX page, where you can find an artifact mapping that details the Support Library packages and their corresponding class mapping is AndroidX. You can also download the CSV file from this page.
And that’s it, you should now have a project that compiles and uses AndroidX.
Those pesky exceptions
While the tools and processes we’ve discussed here should guide most apps smoothly through the migration, we’ve found that there are some cases where you may need to make changes manually.
Version configuration files
You will need to manually reapply variables that define library versions. To illustrate, your build.gradle file might look like this prior to migration:
Then, after running the migration tool you end up with this:
DrawerLayout and RecyclerView are using the AndroidX packages, but the version numbers are now inline. Also, the versions variable numbers have not been changed. So you’ll need to do a manual update to this:
ProGuard and build scripts
The migration tool doesn’t automate updates to ProGuard and any associated built scripts. So, if you’re using these and have package names in them, you’ll need to edit these manually.
Get the latest stable version
The migration tool pulls in the most recent release of the AndroidX libraries. As a result, you may end up with an alpha version of some libraries rather than the stable version. For example, the support library version before migration might be:
And after migration, you would be using the alpha version of the corresponding AndroidX library:
So, if you prefer to use the stable version of the library, you’ll need to manually update the version:
More help and resources
You can find more information about this process, the tools, and issues you may encounter on the developer.android.com Migrating to AndroidX page. The page includes an overview of the AndroidX project, a migration guide, and the mapping table of the old Support Library to the new stable and alpha AndroidX versions with the CSV files you need to script your migration.
Elsewhere, there is also an article detailing the migration to AndroidX in the Plaid example project.
And finally, there is an issue tracker where you see the migration tool issues that the team is working on. You can, of course, report any issues you find with the migration tool here using the button at the top left of the page.
Final thoughts
If you haven’t upgraded to AndroidX, this is a great time to do so and take advantage of the streamlined development that the Jetpack libraries offer your apps. By following the guidance in this article you should find that, in most cases, migration is a straightforward and easy thing to do.
Do you have thoughts on AndroidX? Let us know in the comments below or tweet using #AndroidStudio and we’ll reply from @AndroidDev, where we regularly share news and tips on how to be successful on Android.
Источник


