- Formatting Code Analysis Rule with Android Lint (part 1/2)
- For Kotlin and Java at once
- Motivation
- What is the best tool for this problem
- Why Java is still important at all
- How to write custom lint rules
- Android SDK Quick Tip: Formatting Resource Strings
- Step 0: Getting Started
- Step 1: Creating the String Resources
- Step 2: Why Use Format Strings?
- Step 3: Creating Format Strings
- Step 4: Supplying Format Strings with Numeric Parameters
- Step 5: Supplying Format Strings with Multiple Parameters
- Bonus: Format String Parameter Order is Flexible and Locale-Friendly
- Conclusion
- Different Ways to Format Code in Android Studio
- Method 1: By using a shortcut key for formatting a code in any file in Android Studio
- Method 2: Formatting a code from MenuBar
- Method 3: By using different shortcut keys for formatting our code
- Ярлык форматирования кода в Android Studio
- ОТВЕТЫ
- Ответ 1
- Альтернативный метод
- Использование MenuBar
- Ответ 2
- Ответ 3
- Ответ 4
- Ответ 5
- Ответ 6
- Ответ 7
- Ответ 8
- Ответ 9
- Ответ 10
- Ответ 11
- Ответ 12
- Ответ 13
- Ответ 14
- Ответ 15
- Ответ 16
- Ответ 17
- Ответ 18
- Ответ 19
- Ответ 20
- Ответ 21
- Ответ 22
- Ответ 23
Formatting Code Analysis Rule with Android Lint (part 1/2)
For Kotlin and Java at once


In this first part of the article, primarily, I want to show that it’s worth the time to write a custom code analysis rule to enforce code conventions. Secondly, I want to demonstrate that in addition to Checkstyle and ktlint, Android Lint should also be considered when creating a formatting-related code analysis rule, despite that not being its basic purpose. I’ll explain its main advantage in my case against the other tools, and describe the inner workings that provide this benefit. For inspiration, I’ll also show the steps I took to make my formatting rule work with Android Lint.
Motivation
I get frustrated when I get formatting-related comments on my merge requests or when I have to add such comments to others’. Sometimes, we have to change branches in order to fix a single formatting error in our MR, which is quite demotivating. That’s why I started thinking about ways we could automate fixing this minor (yet important) problem, so we could focus on more complex issues during code reviews.
We use several lint tools, such as ktlint or Checkstyle, for enforcing global formatting conventions (variable order, line length, etc.), but these don’t include certain company-wide rules by default. For those cases, the above-mentioned tools support adding custom rules as well. I decided to write one for the most common formatting mistakes we make:
We always require double line breaks before and after “block statements”, which can be if, switch ( when in Kotlin), for, try, or while blocks, unless they are exactly at the beginning or the end of a method or another block. We believe this makes our code more readable, that’s why we always leave a comment during code review if someone violates this rule (and if we happen to notice it).
What is the best tool for this problem
We can say that ktlint for Kotlin and Checkstyle for Java are the main formatting code analysis tools, but now I’ll pick another tool yet: Android Lint (not only for Android projects), because it also supports writing custom rules that can be applied to Kotlin and Java at the same time. It seems a more logical choice, because we use both languages in our Android projects, and I wanted neither to write the same rule twice nor maintain them concurrently. Not to mention the integration of the rule, which would also need to be done two times.
Why Java is still important at all
As an Android developer, I have to write code in both Java and Kotlin. However, we can say that it’s not worth the time to focus on Java anymore, because as Kotlin is coming up, we use it more and more instead of Java in our codebase. On the other hand, I believe the transition isn’t happening that quickly in big projects already in production. So, as we want to see nicely formatted code in Java as well, it’s important to have this rule for both languages.
How to write custom lint rules
There are many tutorials and articles about writing custom code analysis rules, so I won’t detail it too much in this post. But if you’re interested, here are a couple of links I can recommend for the different tools: To Checkstyle, the official doc, to ktlint and Android Lint, Niklas Baudy’s great medium articles.
Источник
Android SDK Quick Tip: Formatting Resource Strings
This quick tip shows you how to create and use string resources as format strings. You will achieve this by creating and configuring the appropriate string resources in XML and using them programmatically to supply the various typed parameters.
Step 0: Getting Started
Begin by creating an Android project. If you’d like to just follow along, you can find a sample project with code for formatting strings.
Step 1: Creating the String Resources
String resources are often stored within the /res/values/strings.xml file of the resource hierarchy. Any strings you add to the strings.xml file will be accessible within your application. The following is a sample strings.xml file:
This string resource file defines two strings. One for the application name and another called hello. Remember that if your string resource has complex character codes, you may need to quote the entire string. You can add format string resources much as you do regular string resources.
Step 2: Why Use Format Strings?
Format strings are a convenient way to build up one string that has variable content. This is best illustrated by example. In homage to the popular video game Oregon Trail, let’s look at an infamous message players inevitably saw while dragging their family across the Midwest:
«You shot > pounds of meat!»
The number of pounds of game meat changes based upon how the player shoots. There are a number of ways (both good and bad) that developers might approach this problem. A developer might:
- Avoid the problem entirely and create a generic string, shying away from the specifics: «You shot something!»
- Create two string resources (e.g. «You shot » and » pounds of meat!») and sandwich them together around a number programmatically.
- Brew their own solution, doing some black magic with string search and replace methods (e.g. «You shot ##PUT_NUM## pounds of meat!» and the String replace() method).
- Ask themselves if format strings work in Android resource files and read this tutorial.
We didn’t make these approaches up. We’ve seen them all. Only two of these approaches are reasonable: the first and the last.
Sometimes, coming up with a generic string is the right answer—it’s simple and straightforward. Generally, this is the best approach when the information being relayed can be made generic without the application losing something. Other times, you need to communicate important and specific information to the user. In Oregon Trail, if you shot 2 pounds of meat, then you’d keep hunting (or starve), whereas, if you shot 1234 pounds of game, your wagon was maxed out anyway, so you’d likely choose to mosey along down the trail (with a full belly).
You might ask why the sandwich approach isn’t so great. First, using two strings clutters your resource files and makes them difficult to maintain. Secondly, when you go to internationalize your application, you may find that those two strings are no longer appropriate—it can get very complex if your string has more than one parameter, too. Brewing your own solution means introducing more code to maintain and assuming that you can do string manipulation better than the stock Java libraries can.
Better to use the standard methods for formatting strings and create a single string resource with parameters.
Step 3: Creating Format Strings
Format strings can have one parameter or many. Each parameter is numbered and typed. The parameter number is specified using % followed by the number of the parameter, which corresponds to the order in which the parameter values will be supplied programmatically. For example, the first parameter would be %1, the second %2, etc. The second item each parameter has is a type (think C-style printf()), specified by a $ and a letter specifying that type.
For example, a string would be $s; a number might be $d. Therefore, our string resource could be crafted as:
Step 4: Supplying Format Strings with Numeric Parameters
Now that you’ve created a proper format string, you can load it, format it, and display it to users. The following code loads the string resource, supplies the single numeric parameter and generates the completed string:
Step 5: Supplying Format Strings with Multiple Parameters
Let’s try another example. This time we’ll create two more format string resources, each with two parameters. In Oregon Trail, the player’s family often got sick and sometimes died. The two messages players often saw went something like this:
» > has >!»
and
» > has killed >!»
Creating the two format string resources is fairly straightforward:
The following code loads the string resources, supplies the parameters, and generates the completed strings:


Bonus: Format String Parameter Order is Flexible and Locale-Friendly
You may have noticed in the last step that the parameters were swapped in the second string (strDisease2Msg). This is a little annoying, no? Luckily, there’s absolutely no reason format string contents must dictate the order of the parameters. Instead, simply number the parameters in the format string resource in the order that you want to supply them. For example, if you always want to supply the character name, followed by the disease name, then define your format string like this:
Therefore, your code would then look like this:
That makes it much easier on the developer. Also, in terms of string translation, many of the string parameters get jumbled up in different languages anyway.
Conclusion
In this quick tip you learned how to use format strings as Android string resources. Format strings allow for flexible and maintainable application assets.
Источник
Different Ways to Format Code in Android Studio
Code formatting is very important when you are building an Android application. This will help you to organize your code properly and to maintain your code to make it easily readable. Below is a list of purposes of having a standard coding format.
Purposes of Having Coding Standards
- A coding standard gives a uniform appearance to the codes written by different engineers.
- It improves the readability, and maintainability of the code, and it reduces complexity also.
- It helps in code reuse and helps to detect errors easily.
- It promotes sound programming practices and increases the efficiency of the programmers.
In this article, we will take a look at different ways to format the code in Android Studio. We are going to discuss three different methods with the help of which we can format the code in our Android Studio.
- Method 1: By using a shortcut key for formatting a code in any file in Android Studio
- Method 2: Formatting a code from MenuBar
- Method 3: By using different shortcut keys for formatting our code
Method 1: By using a shortcut key for formatting a code in any file in Android Studio
In this method, we simply have to navigate to the file in which we have to format our code. After opening the file we have to simply press the shortcut key as Ctrl+Alt+L to reformat the code in your file. With this key, the code in your file will be rearranged according to the code standards. You can get to see below image 1 in which our code is not formatted properly and after pressing this shortcut key our code will be formatted as shown in the second image.
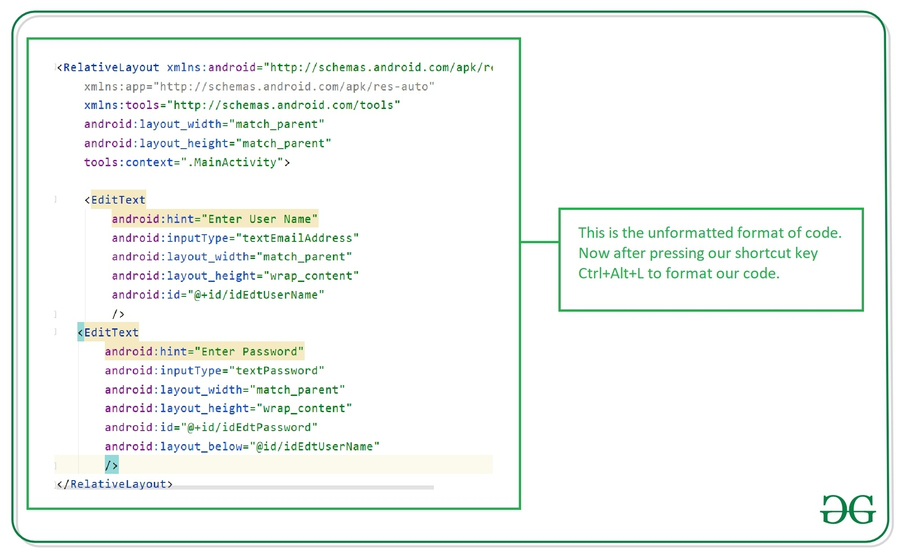
Unformatted code which we have written.

Formatted code which we get after pressing Ctrl+Alt+L
Shortcut keys for different Operating Systems
| Windows | Ctrl+Alt+L |
| Mac OS | Option+Cmd+L |
| Linux | Ctrl+Shift+Alt+L |
Method 2: Formatting a code from MenuBar
In this method, we will rearrange our code from the Menu Bar. To format our code navigate to the file in which we have to format our code and inside that file. Navigate to the top bar and click on the Code option and inside that option click on Reformat code option which is shown in the below screenshot.
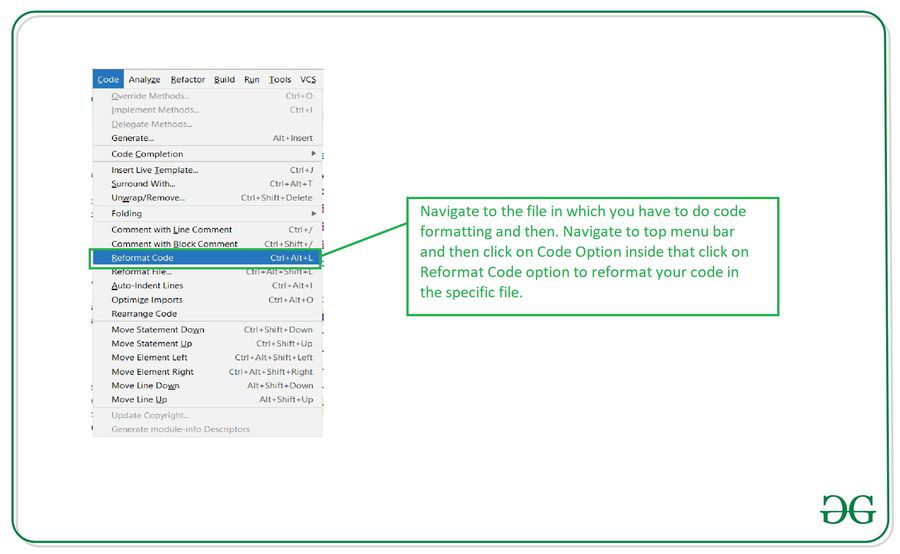
After clicking on this option your code will be formatted as shown in the above screenshot
Note: This method will be similar for all the operating systems
Method 3: By using different shortcut keys for formatting our code
Navigate to the file in which we have to format our code and then click on the shortcut key as Ctrl+Shift+Alt+L after clicking this key you will get to see the below dialog on your screen. Select the formatting options and your code will be formatted and rearranged according to selected options. The options present inside this dialog box is explained below.

After selecting the option on this dialog make sure to run it to format your code
Источник
Ярлык форматирования кода в Android Studio
Я начал разрабатывать с Android Studio. В Eclipse я использовал Ctrl + Shift + F , но в Android Studio это не работает. Это будет по-другому.
Как я могу перейти к любому методу в файле .java ? Я использовал Ctrl + O в Eclipse.
Это доступно? Какой ярлык для форматирования кода?
ОТВЕТЫ
Ответ 1
Windows: Ctrl + Alt + L
Linux: Ctrl + Shift + Alt + L
macOS: Option + Command + L
Поскольку Рохит столкнулся с проблемой в Ubuntu с помощью ярлыка кода формата, это связано с тем, что клавиша Ctrl + Alt + L используется для блокировки экрана в Ubuntu.
Я обнаружил, что Ubuntu сначала обрабатывает это сочетание клавиш. Поэтому вам следует привязать сочетание клавиш Ctrl + Alt + L к чему-то другому, чтобы оно не конфликтовало с Ubuntu.
Перейдите в «Инструменты системы» → «Настройки системы» → «Клавиатура» → вкладка «Ярлыки» → «Система» → «Экран блокировки».
Выберите строку New Accelerator. затем нажмите любую специальную клавишу с помощью клавиши Alpha (например, Shift + L ). Вы должны были успешно изменить сочетание клавиш.
Проверьте, работает ли сочетание клавиш в Android Studio.
Альтернативный метод
Ctrl + Alt + Shift + L (to show a dialog)
Вы также можете использовать ярлыки Eclipse.
- Windows и Linux: перейдите в меню Файл → Настройки → Карта ключей
- .macOS: перейдите в меню «Настройки» → «Таблица ключей» и выберите «Eclipse» в раскрывающемся меню.
Использование MenuBar
- Выберите код, который вы хотите переформатировать
Нажмите Код в строке меню и выберите «Переформатировать код», как показано на рисунке ниже:

В Android Studio 3.5 существует проблема с перестройкой кода XML, это также меняет представление, поэтому сначала нужно использовать эти настройки.
Настройки → Редактор → Стиль кода → XML-> Установить из → Предопределенный стиль> Android.
Ответ 2
Вы также можете использовать сочетания клавиш Eclipse: просто перейдите в меню «Настройки» → «Таблица клавиш» и выберите «Eclipse» в раскрывающемся меню.
Фактический путь: меню Файл → Настройки → Карта ключей (в настройках IDE)
Ответ 3
Проверьте клавиатурные команды, приведенные в документации по Android Studio Tips & Trick:

Ответ 4
Просто выберите код и
в Windows do Ctrl + Alt + L
в Linux do Ctrl + Windows Key + Alt + L
на Mac do CMD + Alt + L
Ответ 5
Для форматирования кода в Android Studio в Linux вы можете вместо этого использовать Ctrl + Alt + Super + L . Вы можете использовать это и избежать необходимости менять ярлык системы. (Клавиша Super является клавишей Windows, кроме клавиши Alt ).
Ответ 6
Для форматирования кода в Android Studio:
Ctrl + Alt + L (Windows/Linux)
Option + Cmd + L (Mac)
Пользователь также может использовать сочетания клавиш Eclipse: просто зайдите в меню «Настройки» → «Настройки» → «Карта клавиш» и выберите «Eclipse» (или любой другой) из выпадающего меню.
Ответ 7
Вам придется применить все ярлыки Eclipse с Android Studio, прежде чем использовать все эти ярлыки.
Теперь вы можете использовать все ярлыки Eclipse в Android Studio.
Сделайте несколько снимков здесь.


Ответ 8
Проверьте это. Также вы можете изменить его в соответствии с вашими предпочтениями.


Ответ 9
Просто чтобы добавить к @user2340612 ответ для переключения раскладок клавиш в Eclipse, путь для Android Studio 1.0.1:
Файл меню → Настройки → Таблица ключей (в разделе «Редактор») → Карты клавиш = Затмение
Ответ 10
Для автоматического форматирования файлов Java/XML в Android Studio используйте следующие команды:
Поскольку вы ищете одну точку для своей работы, как это сделал Eclipse, в Android Studio нет такой встроенной функциональности, но она дает вам возможность делать это с помощью макроса. Следуй этим шагам:
В Android Studio откройте любой из ваших файлов исходного кода.
Нажмите Ctrl + Alt + O Это используется для поиска/оптимизации неиспользуемого импорта.
Если диалоговое окно открыто, выберите «Больше не показывать» и нажмите «Выполнить».
Выберите «Правка»> «Макросы»> «Начать запись макросов».
Нажмите Ctrl + Alt + O .
Нажмите Ctrl + Alt + L . Это форматирует ваш код. ( Shift + Ctrl + Alt + L для Ubuntu).
Нажмите Ctrl + S . Это сохраняет ваш файл;)
Перейдите в «Правка»> «Макросы»> «Остановить запись макроса».
Сохраните этот созданный макрос с именем, например: «Автоформатирование».
Boom, теперь вы успешно создали свой макрос. Теперь просто добавьте/назначьте ему ярлык:
Поиск в левой панели для Keymap.
В правой панели щелкните в строке поиска и введите имя сохраненного макроса («Автоформатирование».)
Двойной клик на вашем предмете. Там может быть два, не имеет значения, какой из них вы нажимаете.
Нажмите Добавить сочетание клавиш.
Установите сочетание клавиш на Ctrl + S .
Наконец, подтвердите переопределение Ctrl + S в качестве нового макроса.
Ответ 11
Ctrl + Alt + L может противоречить ярлыку блокировки экрана в Ubuntu. В этом случае вы можете изменить комбинацию клавиш для кода переформатирования следующим образом:
Файл- > Настройки- > Настройки IDE- > Клавиатура
Найдите код реформата и измените сочетание клавиш.
Ответ 12
Действительно, я пошел в этот поток из-за моего экрана блокировки Ubuntu после этого ярлыка Ctrl + Alt + L . Поэтому, если у вас есть такая же проблема, просто перейдите в Настройки — Клавиатура — Ярлыки — Система и измените ярлык по умолчанию для экрана блокировки.
Ответ 13
Для тех, кто интересуется проблемой выравнивания внутри скобки, JetBrains имеет это как в их отслеживании проблем.
Ответ 14
Я думаю, ясно, что для форматирования кода в Android Studio используются следующие комбинации клавиш:
Однако мы забыли ответить о прыжке в метод. Хорошо пойти в любую декларацию/реализацию там три способа:
CTRL + B или CTRL + CLICK (Win/Linux)
CMD + B или CMD + CLICK (Mac)
Эти команды показывают список всех классов/интерфейсов, которые реализуют выбранный класс/интерфейс. По переменным он имеет тот же эффект, что и в декларации Goto.
Эти ярлыки войдут в объявление класса AnyClass.
Кроме того, есть ярлык для Goto Super Class. Это откроет родительский знак текущего символа. В значительной степени противоположность реализации Goto. Для переопределенных методов он откроет родительскую реализацию.
Ответ 15
Ярлык, который работал у меня,
SHIFT + ALT + CMD + L
Вы можете оптимизировать импорт для удаления тех, которые вы не используете, и автоматически импортировать новые классы.


Ответ 16
- В Windows выполните Ctrl + Alt + L
- В Linux do Ctrl + Shift + Alt + L для открытия диалогового окна, а затем переформатирования.
- В Mac do CMD + Alt + L
Примечание. Здесь много ответов для Linux — это просто Ctrl + Alt + L что неправильно. В Linux выполнение Ctrl + Alt + L блокирует систему.
Ответ 17
Это Ctrl + Alt + L для Windows. Полный список сочетаний клавиш см. В руководстве пользователя: https://developer.android.com/studio/intro/keyboard-shortcuts.html
Ответ 18
Если вы используете плагин Dart, перейдите в Android Studio, меню Файл → Настройки. И найдите «переформатировать код с помощью», нажмите «Переформатировать код с помощью dartfmt» в главном меню:

Нажмите «Добавить сочетание клавиш». Затем нажмите Ctrl + Alt + L и ярлык должен сработать (Если Ctrl + Alt + L перевести компьютер в спящий режим/режим ожидания, измените ярлык в настройках системы на что-то другое. В противном случае оба сочетания будут сталкиваться).
Ответ 19
В дополнение к автоматическому форматированию, которое описывают другие ответы, еще одна хитрость заключается в выделении текста, который вы хотите сделать отступом, а затем нажмите
- Tab увеличить отступ или
- Shift + Tab , чтобы уменьшить отступ.

Проверьте документы по сочетанию клавиш для получения дополнительной информации.
Ответ 20
Иногда даже я нажимаю Ctrl + Alt + L, который не работает в XML, поэтому нашел способ заставить его работать.
Зайдите в Настройки → Редактор → Стиль кода → Выбрать по умолчанию → ОК.
Для справки смотрите скриншот:

Ответ 21
У меня был опыт использования Ctrl + Alt + L в Windows, что этот ярлык вообще не работал, потому что он был зарезервирован другим программным обеспечением, работающим в фоновом режиме; что я понял позже.
Я решил упомянуть эту проблему, так как думал, что она может быть полезной., ,
Ответ 22
Лучший ключ, где вы можете найти все команды в Eclipse, это Ctrl + Shift + L .
Нажав эту кнопку, вы можете получить все команды в Eclipse.
Одним из важных является Ctrl + Shift + O для импорта и отмены бесполезного импорта.
Ответ 23
Вы можете использовать следующий ярлык для форматирования кода: Ctrl + Alt + L
Источник


