- How to Repartition Android Internal Memory for Better App Management?
- Why want Android to repartition internal memory?
- Before repartitioning internal memory of Android device
- How to repartition Android internal memory?
- Verdict
- How To: Re-partition Your Android Tablet Or Smartphone? (All Options Included: Change Size, FS Type, Etc…)
- Why Re-Partition?
- Requirements
- Partitioning Steps
- Explaining The Steps
- Important Things To Note:
- Moving Your ‘Non-Movable’ Android Apps to an SD Card
- Guide Index:
- Part 1 – Downloading Android’s ‘ADB’
- Part 2 – Setting Up Your Phone Or Tablet
- Part 3 – Moving Apps On Android 4 & Earlier
- Part 4 – Running The Tweak On The Device Itself
- Part 5 – Moving Apps On Android 5.0 & Beyond
- Rob Williams
How to Repartition Android Internal Memory for Better App Management?
Need to repartition internal memory storage in Android device? Refer to this post to learn how to achieve the goal.

By Lucas  / Last Updated June 16, 2021
Why want Android to repartition internal memory?
“Hello, all. How can I repartition my Android device so that the storage for my phone internal usage (like applications or internal memory) can be increased in lieu of decreasing the User available memory? I have 740MB internal memory and 2GB user available space. How can I repartition to move some phone storage or the user available space to internal memory? I have extra SD card so I don’t require the 2GB in the phone storage. Please help.”
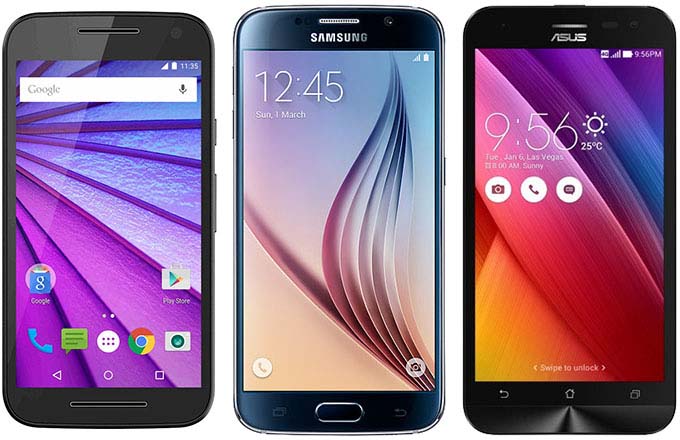
As we know, low internal memory on Android phone or tablet will cause new applications cannot be installed and old programs not functional problem. Many Android smartphones have small internal memory, the entry level phones in particular. For example, Lenovo S820 and S920 have only 1GB RAM. The RAM in Galaxy Note and S2 is 2GB. The operating system takes up some internal memory so there is few memory left for applications and personal data. After a period of time, the low space in internal memory notification will appear. As a result, the intent is to partition your internal memory is for better app management as well as Android internal memory increasing.
Before repartitioning internal memory of Android device
Obviously, move applications to external SD card can solve this trouble to some extent. However, the same issue will come back soon in the near future. What’s worse, some software don’t support to installed on SD card. Therefore, you have to adjust the memory. To repartition Android internal memory, your Android device has to meet some requirements and you have to prepare some necessary tools.
в–Є The Android device (phone/tablet) has to be rooted before.
в–Є An SD card larger than 2GB. If your current SD card has redundant free space, then just partition it. If not, it is necessary to buy another SD card.
в–Є A Windows PC with AOMEI Partition Assistant Professional installed.
в–Є A memory card reader that you can attach your SD card to.
в–Є Download Link2SD from Google Play and install it on the Android device. You can also download a root checker program to check if your phone is rooted or not.
Note: The SD card will be formatted during this process. Please back up important data if necessary. You can copy these files on SD card to any other folder of Windows in File Explorer or you can backup SD card with free backup software.
How to repartition Android internal memory?
1. Attach the SD card of your Android device to the memory card reader and plug the reader into your PC. Make sure it can be detected by your PC. Install and run AOMEI Partition Assistant.В
PS.: You can download the demo version of AOMEI Partition Assistant Professional to have a try!
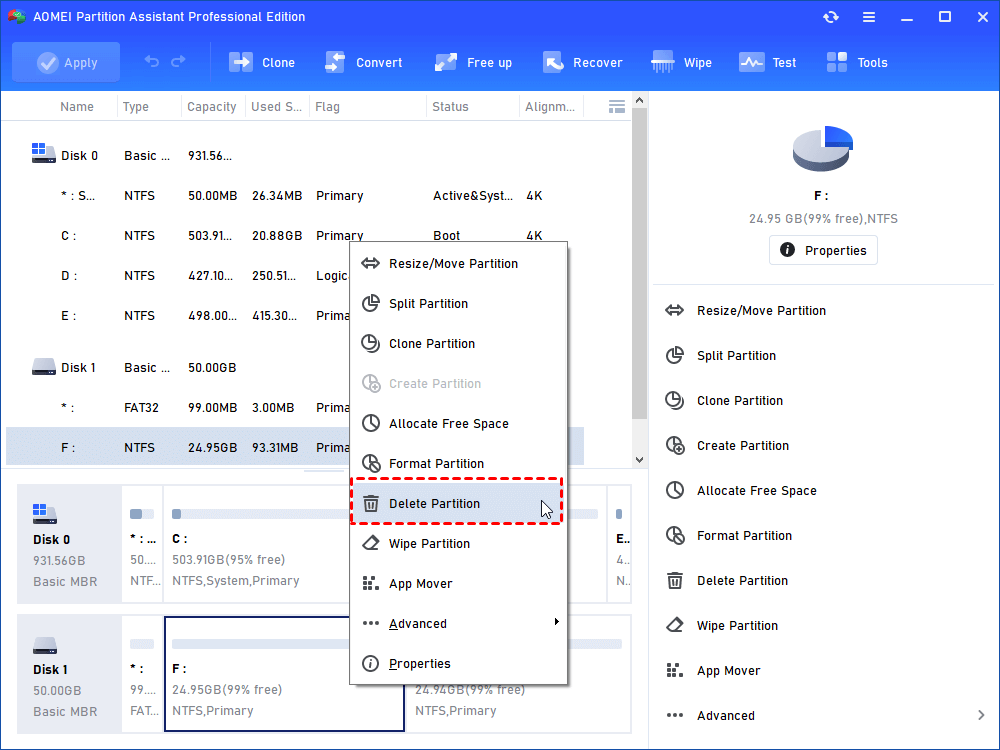
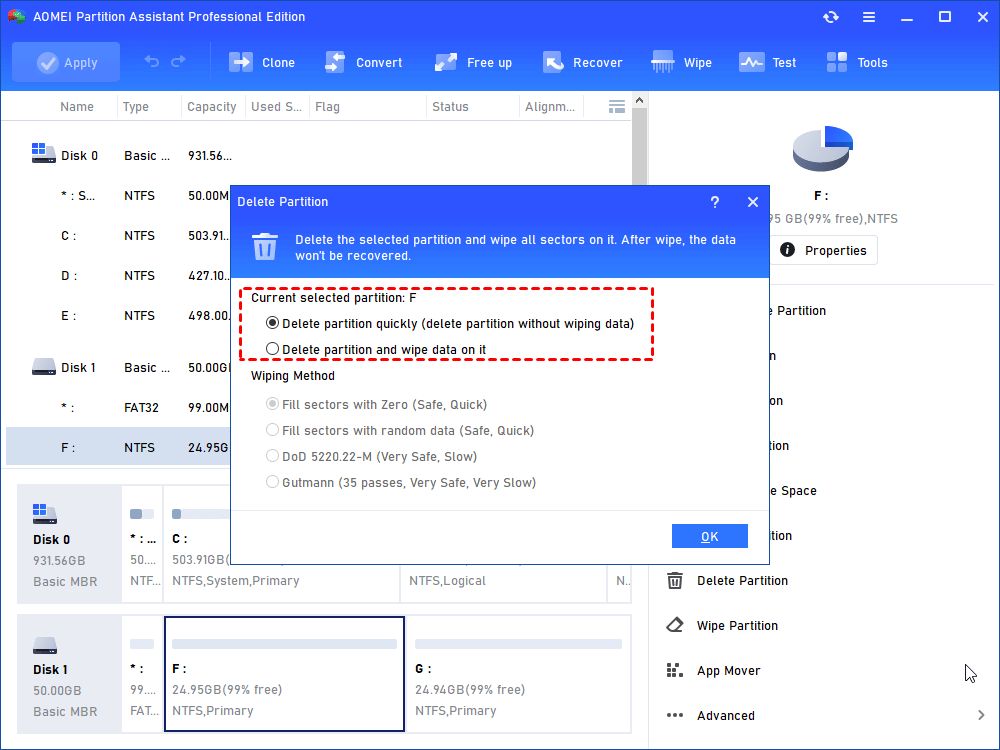
2. At the main interface of the software, you can see your SD card is marked as a removable disk. Right-click the partition and select “Delete Partition” to remove the partition. Complete the deletion and remember to click “Apply” to execute the operation.
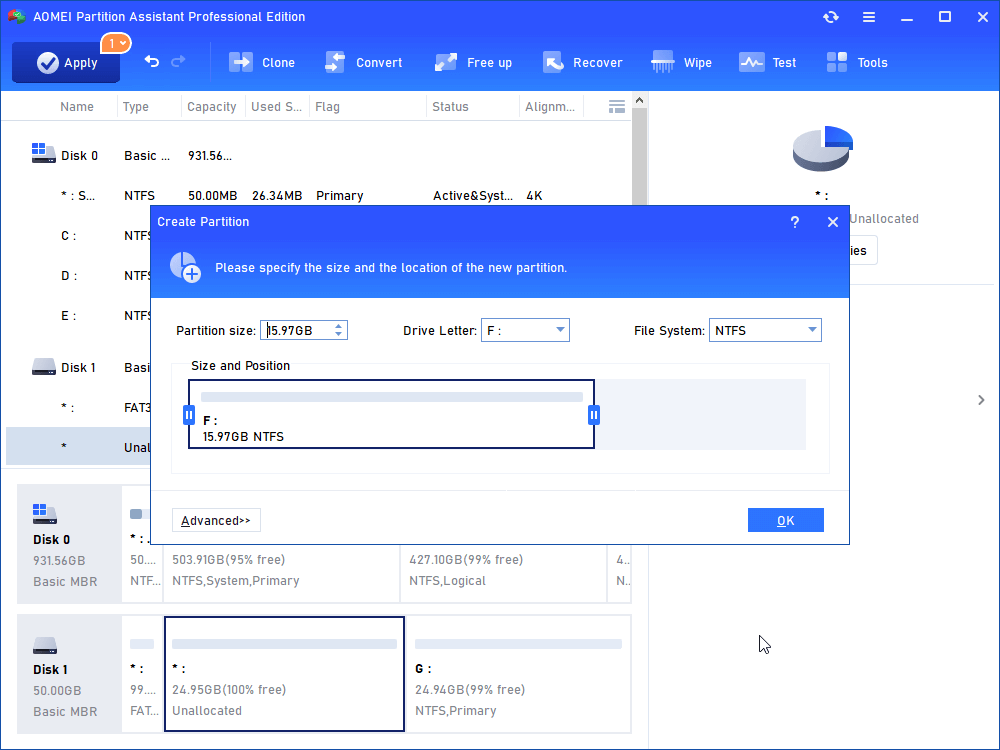
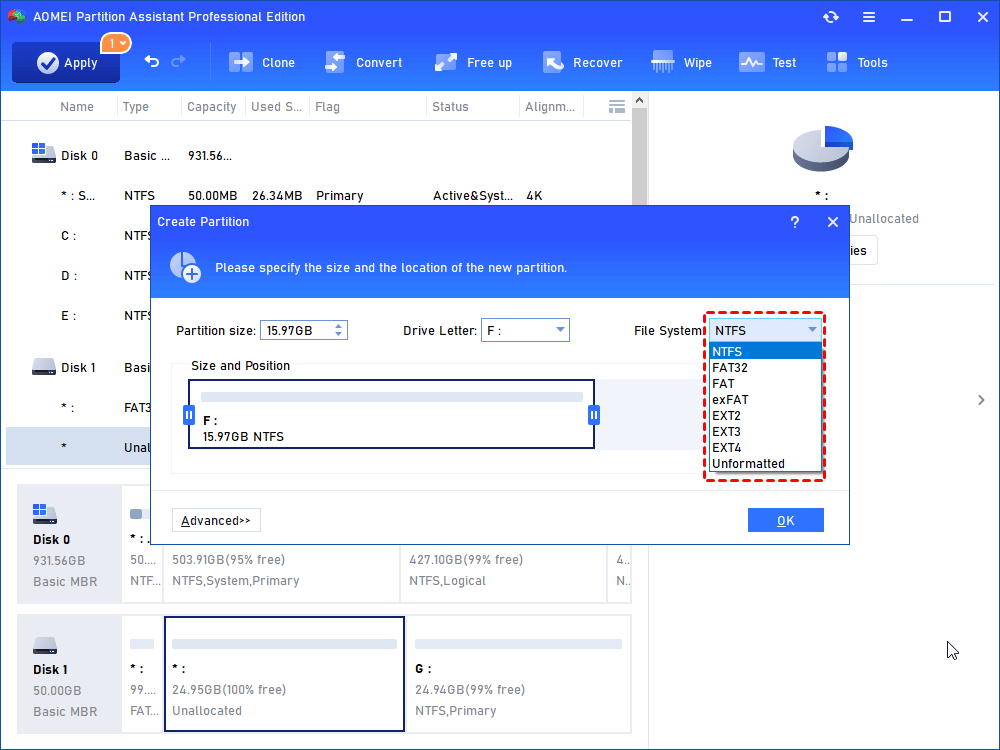
3. Now your SD card shows as unallocated space. Right click the space and select “Create Partition”.
4. In the pop-up window, specify the partition size, drive letter, and file system. Be sure you have some space for the next partition. Select FAT32 if the SD card is larger than 4GB. Select FAT if it is less than 4GB.
5. Click “Apply”, otherwise, you cannot continue.
6. Create another partition with the left unallocated space. Repeat the above steps to create a new partition.
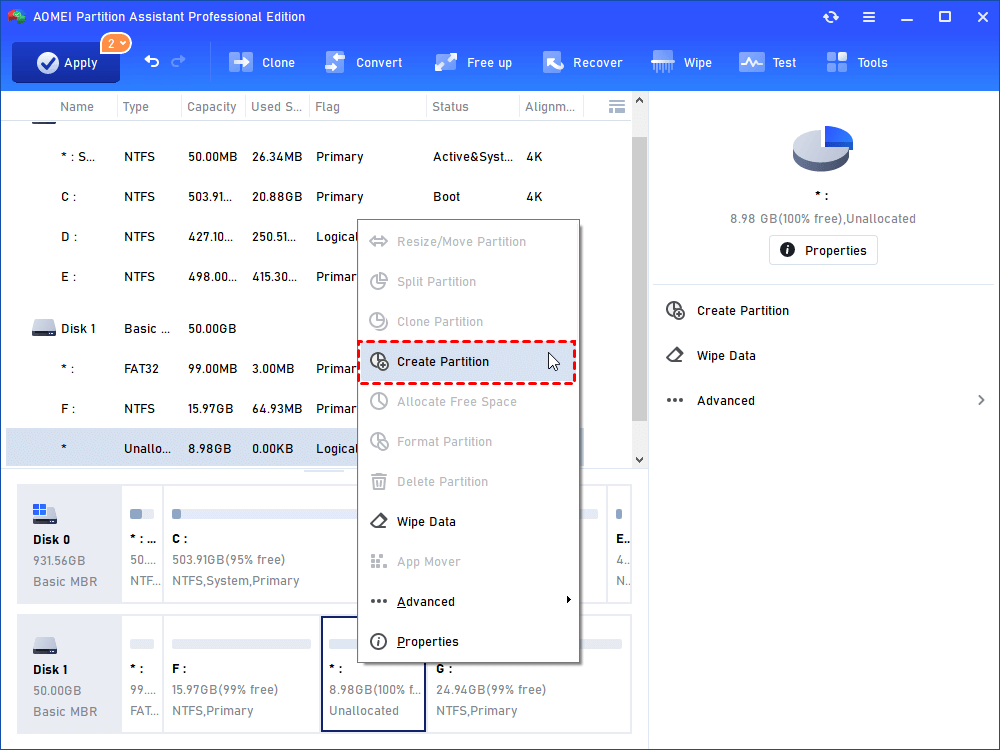
7. Select EXT2 or EXT3 this time in the pop-up window.
8. Then click “Apply” again.
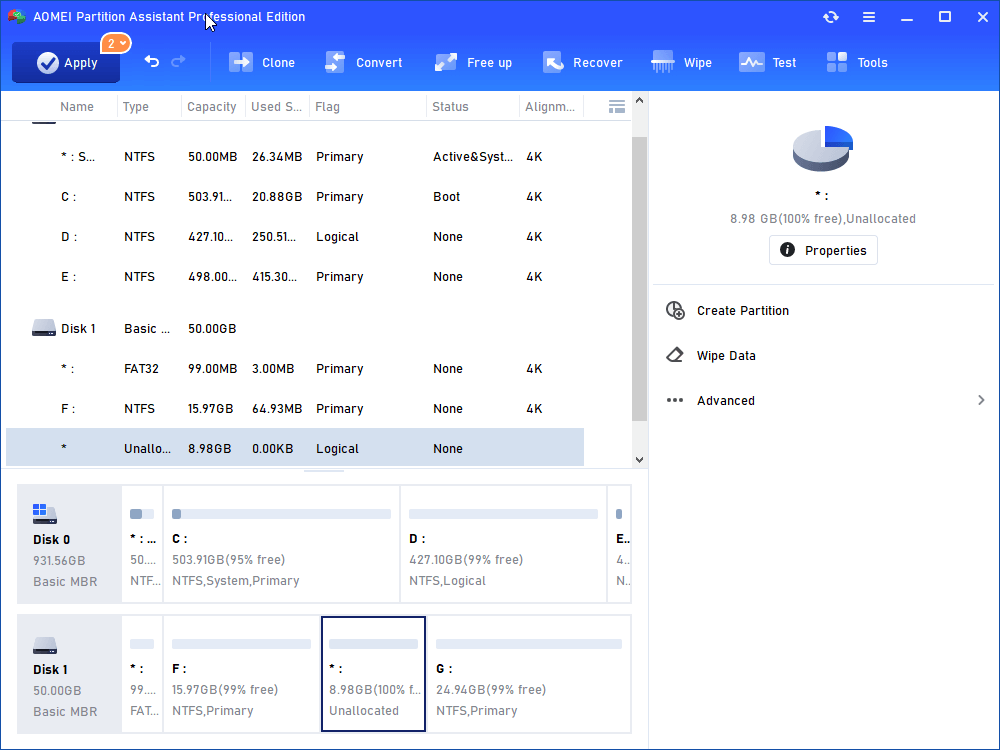
Tips: Windows will recognize only the first partition (primary or logical) so the second partition will not have a drive letter. Also, you cannot view this partition in Windows Explorer.
9. Copy or restore previous files to SD card and insert it back to the Android device. Start the Link2SD to move some applications to the SD card and also you’ll find the internal memory is increased.
Verdict
How do you repartition internal memory in Android device? To my knowledge, this is a workable method to increase Android internal memory storage. AOMEI Partition Assistant can also format SD ard for 3DS. When you cannot format large capacity removable device to FAT32, you can refer to format 128GB SD card for Android for more information.
Источник
How To: Re-partition Your Android Tablet Or Smartphone? (All Options Included: Change Size, FS Type, Etc…)
A general and inclusive walk-through on how to re-partition an Android device: create, delete or resize partitions, change file system types, labels and more… The guide before you consists of 2 parts: The first – a general explanation regarding the partitioning process and the tools needed. The second part – a live example of how
The guide before you consists of 2 parts:
- The first – a general explanation regarding the partitioning process and the tools needed.
- The second part – a live example of how it’s done on a real device (physical, as opposed to virtual) with genuine screenshots.
Note: as much as I’d like to, I do not currently possess the resources to grant readers technical support. The guide itself, in the vast majority of cases should be sufficient help. For any individual issue please refer to online forums which are meant for that purpose.
Why Re-Partition?
If you’re here out of curiosity or any other reason than necessity, you may wonder: “why would anyone want to repartition a smartphone / tablet?”.
To answer, each person probably has their own reason, a couple of such I can think of are:
- In the case of an upgrade, when there’s not enough space on one partition but others has aplenty.
- When you don’t have enough space to install more apps – since your data partition is full – so you want to resize that partition.
Of course, some cases can be resolved via a more simple solution, however, if you want to deal with the problem directly and not just bypassing it – repartition is perhaps the best way to go.
On the same note though, I must warn anybody who tries repartitioning his/her Android device.
Requirements
– ADB (Android Debug Bridge) installed – the reason we use ADB is it gives us a wider range of options in comparison to other software, such as Odin for instance, which only has limited set of features when it comes to repartitioning.
– Partitioning tool – you may already have one installed on your device by default (I’ll explain later where to look for it), but just in case you haven’t here’s one for ARM 32-bit:
Note, if you’re unsure about the architecture type of your device, you may try look for it online or use Android system info apps like this one.
– CLI (Command Line Interface) familiarity – the guide revolves around executing various commands in order to go through the partitioning process. There’s no GUI (Graphical User Interface) software that can achieve the same results at the moment.
– Backup (Optional) – I recommend you backup everything prior to making any changes.
Partitioning Steps
In order to re-partition your device, basically, these are the steps you’ll need to make:
1. Connect your device to your PC.
2. Open up a command shell, on Windows you’d probably use CMD / PowerShell, on Mac / Linux – Terminal.
2-a. Reboot into recovery mode. (Optional, depends on the partition you plan to modify)
3. Use ADB to connect to your device.
4. Launch a partitioning software.
5. Start partitioning.
6. Reinstall any required system file in case you’ve deleted those and afterwards you may exit the shell and reboot your device.
Explaining The Steps
1. We use another machine, in this case our PC, in order to re-partition Android, because we want to have access to our Android system just in case something goes wrong during the partitioning, and also, since Android system cannot be run and resized at the same time.
2. This step is rather self explanatory. We must use a flexible tool that will assist us re-partitioning.
2-a. If you wish to modify any partition other than the recovery partition, I recommend booting into recovery mode in order to do so.
Being inside recovery mode wouldn’t interfere with the process as you may delete the system partition and its files. Furthermore, it might become handy in case you’ll need to reinstall Android system.
3. ADB is an official Android developers tool and it also happens to be the most suitable tool for the job at the moment.
To make sure ADB recognizes your device, issue:
If you’re device is recognized you’ll see output similar to this:

Check that ADB recognizes your device
To connect to your device you issue both:
adb root
adb shell
You should see a new command line host-name with a “#” sign next to it which indicates you’re connected as root user.
Note, you may need to navigate the command line shell into adb directory prior to issuing the commands.
4. In this step we launch the partitioning program we’re going to use by typing the name of the program and the right path to the block where our partitions lie (some devices may have more than one block).
Type fdisk /PATH/TO/DEVICE/BLOCK or parted /PATH/TO/DEVICE/BLOCK.
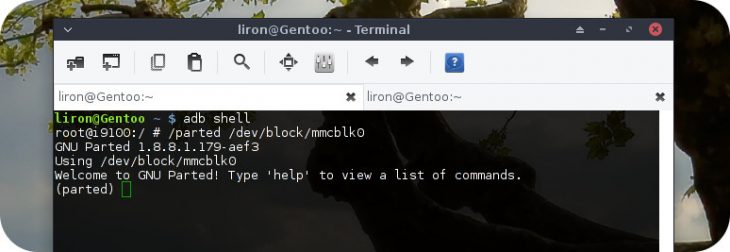
In case you get an output similar to the following in return: /sbin/sh: parted: not found then it means parted tool is probably not installed.
Look for partitioning tools inside /sbin directory (or /system/bin if it’s mounted), and use what you find in there.
If you don’t have any partitioning tool pre-installed on your device, you may use the one mentioned in the ‘Requirements’ section if your device is of similar architecture, otherwise, google for a suitable one online.
To install the partitioning tool on your device, first exit the device shell (type exit, press enter), then issue the following (extract the file in case it is compressed prior to doing so):
adb push /LOCATION/OF/PARTITIONING-TOOL /DESTINATION/OF/PARTITIONING-TOOL
This will install the partitioning tool on your device where it’ll remain until you reboot (upon reboot, Android automatically deletes unfamiliar files).
If Android complains you don’t have writing permissions to push the program into it, execute:
adb shell mount -o remount,rw /
This should remount the file system root directory with read & write permissions.
5. Step 5 may seem the shortest of all the above steps but it’s actually the longest and most important one.
Since this step depends on what you’re actually intending to do with your device – it doesn’t say much, it is an open step, open for your decisions that is.
By typing the help command of your partitioning tool you’ll get a list of the options available to you. For example, these are a few of the options you’ll see in parted:
- rm NUMBER – will delete a partition
- mkpart – will create a partition
- unit UNIT – will set unit type, for example “unit b” will set parted to use bytes, “unit gb” for Giga bytes, etc… (Tip: use bytes for maximum accuracy).
- name NUMBER NAME – lets you name the partition (upon making any changes, don’t forget to name the partitions properly).
- q – quit parted.
Important Things To Note:
- fdisk executes your commands only when changes are saved whereas Parted executes them instantly.
- fdisk may not fully support GPT partition table, thus in case yours is GPT, it’s recommended to use Parted instead.
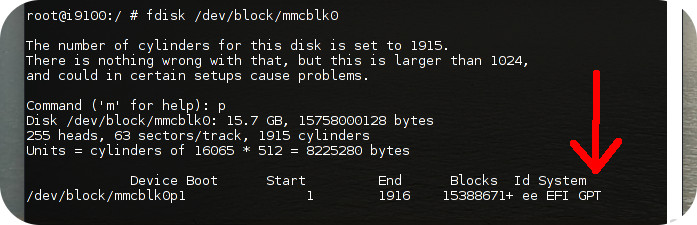
fdisk indicates a GPT table
6. When you’re done partitioning, reinstall required system files by using the recovery mode options available on the device, and only then exit the shell and reboot. Otherwise, you may not be able to boot at all. 🙁
Check out page #2 for a step by step example.
Источник
Moving Your ‘Non-Movable’ Android Apps to an SD Card


Have an Android device that’s quickly running out of space due to limited internal memory? Have a large collection of apps that refuse to move over to your SD card? If either of these is true, then you need to know about a simple tweak that can be done to forcibly move over many apps to your SD card – sometimes without rooting.
A nice feature many Android devices offer is a microSD slot, and nicer still is the fact that the Android OS allows you to move many apps over to external storage to help free up space on the main device. For those with devices that offer lots of storage, this perk might not matter much, but for those with older or budget devices, it could be the only way that additional apps can be installed.
Take, for example, the HTC Legend I used to use, which offered a mere 160MB of storage space, or Sony’s Xperia Ray, which boosted that to a still-insulting 300MB. Sure, these devices weren’t expensive when new, but storage that limited is downright ridiculous. It’s no wonder, then, why so many users seek out ways to move apps to their SD card.
If you’re an Android user who’s moved apps before, chances are good that you’re well aware of the limitations. Some apps are deemed as too important by their developer, and thus can’t be moved via normal methods. Many apps that ship with the device can’t be moved either.
Ultimately, it’s up to the app’s developer to allow or disallow its move permissions, and even with the tweaks mentioned on this page (with the exception of using root), the apps still may not be movable afterwards. Your best bet would be to then email the developer and ask why, or go the way of rooting your phone so that you can force it. It shouldn’t be so complicated, but it is.
Guide Index:
It needs to be stressed that even if an app (or game) can be moved, there are potential risks for going through with it. Here are some general guidelines of what not to move:
Apps That Shouldn’t Ever Be Moved
- Widgets: If you want to use a certain widget, don’t move the app that provides it.
- System Tools: Important tools might not operate well or at all on external storage.
- Important Apps: If you can’t afford a certain app becoming unavailable, don’t move it.
Consider that to be your first and final warning!
Things to bear in mind: Some apps may remain unmovable after these tweaks are applied, which is common of apps that come preinstalled on the device. In this instance, the best fix is to root the phone and either delete the app from the system’s ROM with Titanium Backup, or force the app to me moved with Link2SD. Either one of these options is required for Android 5.0 and later. It’s also important to note that even after certain apps are moved, some data is likely required to remain on the internal storage. Don’t consider these tweaks to be miracle solutions.
With that all covered, let’s get right to it.
Part 1 – Downloading Android’s ‘ADB’
NOTE! If you’re interested in running this tweak right on the device itself, rather than a computer, please refer to the fourth section, “Running The Tweak On The Device Itself“, as it can be a major time-saver.
The first step to running this tweak on a computer is downloading Android’s ADB tool. That acronym stands for “Android Debugging Bridge”, a protocol that allows users to interface with their phone as if they were accessing a command prompt on the device itself.
There are three options for acquiring ADB and its related files.
The easiest method is to download it from our servers:
Once the archive is downloaded, extract it to a location of your choice, and then move onto Part 2. Alternatively, you can procure the correct files via these other means:
For Linux users, ADB can often be installed via a distro repository. In Ubuntu, for example, ‘sudo apt-get install android-tools-adb‘ will install it in a flash. For other distros, a simple Google search should help. In some cases, adding a third-party software source might be required. If ADB can’t be installed through a repo, move on to the next method.
For those who would rather download the tool on their own, it can be grabbed here. You’ll have the option to download a developer suite called Android Studio, or the standalone SDK tools. You’ll want to go with the second option, as it’s a much smaller download and doesn’t need to be installed. Unfortunately, Java is required regardless of which route you take.
In Windows, the “android” file in the “tools” folder can be double-clicked. In OS X and Linux, a terminal needs to be opened that the “android” file can be dragged and dropped into. That will enter the exact path into the terminal, at which point you can hit enter and the SDK manager will load. In all OSes, it’ll look like what’s seen below. From here, the SDK Platform-tools can be checked and installed (I’d recommend clicking “Deselect All” and selecting only the platform tools.)
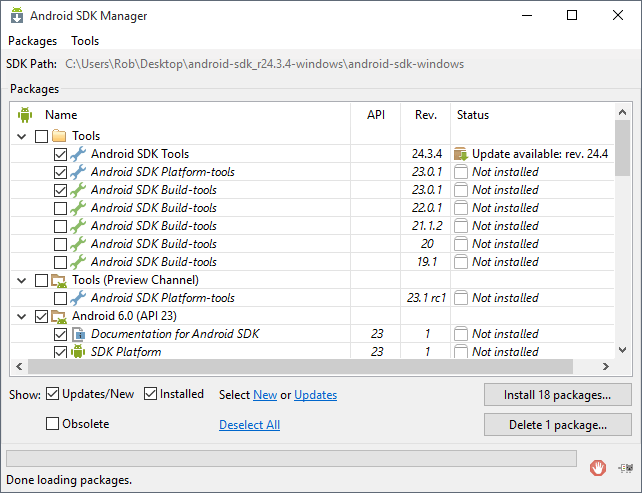
Once the platform tools are installed, ADB will be found in a folder called “platform-tools” somewhere on the machine. As seen in the above screenshot, the install folder can be wherever the folder was extracted to. You are free to move the folder somewhere else before running the ‘android’ application.
Part 2 – Setting Up Your Phone Or Tablet
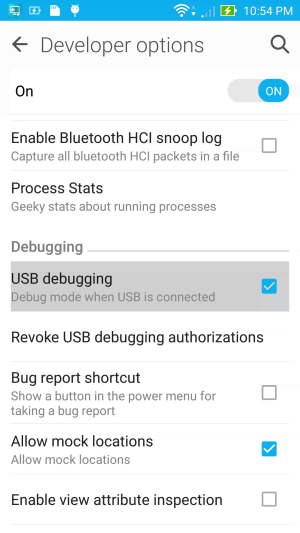
What needs to be configured on a device can vary, but often, enabling the “USB debugging” option in the developer menu is enough. If this menu isn’t present in the main menu of the system settings screen, you’ll need to go to the “About phone” or “About tablet” section and look for “Build number”. Sometimes, this is located right inside this menu; other times it can be nestled inside another (eg: “Software Information”). Tap the build number seven times, and the developer options menu will be unlocked.
If enabling USB debugging alone isn’t enough, you’ll want to fish around for other USB-related options. One thing worth checking is whether or not the phone is set to “MTP” mode. Having this option disabled shouldn’t matter, but on some devices, it could.

If running Windows: before connecting the device to the computer, you’ll want to make sure that its official drivers are installed. Note that whether or not you’re able to access the device’s storage from within the computer when it’s connected is unrelated to interacting with it through ADB. Almost always, you’ll need to go out of your way to install a driver. Starting here is a good idea. If the official driver doesn’t help, or you can’t find one, you may wish to try installing Intel’s ADB driver, meant to be used in conjunction with Intel USB ports.
If that fails, I’d recommend heading to Google and searching for your exact device along with “official driver” or “ADB” (eg: “Sony Xperia Ray official driver”.) Otherwise, you’ll be forced to run the tweak on the device itself (so scroll down to part 4!)
Part 3 – Moving Apps On Android 4 & Earlier
With the software and device prepped, it’s time to connect the Android device to the computer, load up a command prompt or terminal, and head to the ‘platform-tools’ folder. If you’re on Linux and installed ADB through your distro’s repository, chances are good that you can simply open a terminal and be set (running the ‘adb’ command, without quotes, will verify that). For everyone else, there are a few ways to go about this.
The most common method is to manually type in the commands that will bring you to that folder; eg: in Windows: ‘cd C:\Users\Username\Downloads\platform-tools‘. Alternatively, you can:
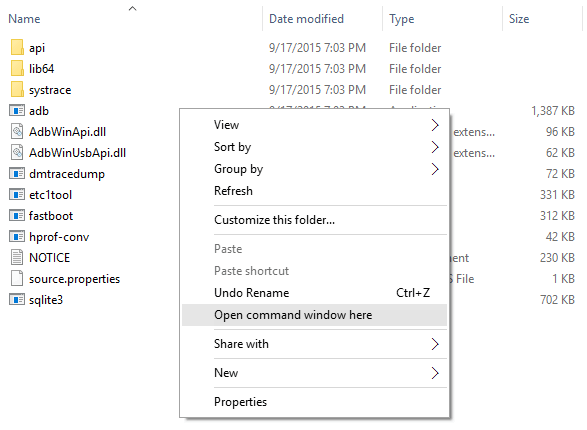
In Windows: Open the ‘platform-tools’ folder, and while holding Shift, right-click an area inside the folder and choose “Open command window here”. An example can be seen below:
In OS X: Open System Preferences and then go to the Keyboard section. From here, click on the Shortcuts tab, and then Services to the left. In the list to the right, scroll down and enable the “New Tab At Folder” option. Right-click the ‘platform-tools’ folder afterwards and choose “New Tab At Folder”. Here’s an example.
In Linux: Open the ‘platform-tools’ folder and right-click an area inside to see if it offers you the ability to open a terminal right there. If it doesn’t, open a terminal manually and move to the folder (eg: ‘cd Downloads/android-sdk-linux/platform-tools’). Here’s an example.
Once a command prompt or terminal is opened and you’re in the right location, the first thing to do is see if the computer can see the device. Typing in ‘adb devices’ can take care of that. Be sure to uninstall Android emulators (eg: Bluestacks) before attempting this tweak, and make sure no other Android devices are plugged in. Just one device should be present, as seen in the example below.
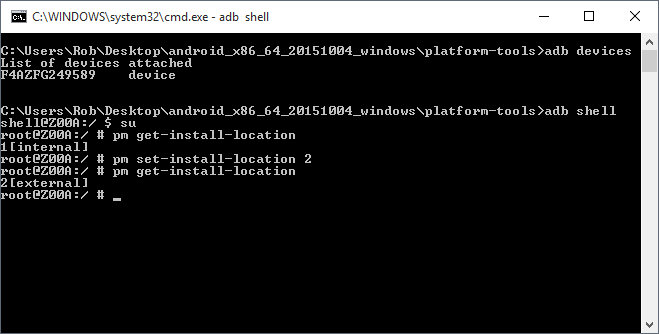
A random string of numbers and “device” following it means that the computer can interact with it just fine. If it says “unauthorized”, it means that you’ll need to keep the phone unlocked and grant permission for the access (it’s an automatic pop-up). Running ‘adb devices’ again should properly show the device.
The basic commands are:
Pre-Android 4:
adb shell pm getInstallLocation (To see what it’s set to.)
adb shell pm setInstallLocation 2 (To set it to external storage.)
adb shell pm getInstallLocation (To verify that the tweak worked.)
(0 = Auto; 1 = Internal Phone Storage; 2 = microSD External Storage
Android 4 and newer:
adb shell pm get-install-location (To see what it’s set to.)
adb shell pm set-install-location 2 (To set it to external storage.)
adb shell pm get-install-location (To verify that the tweak worked.)
(0 = Auto; 1 = Internal Phone Storage; 2 = microSD External Storage
Note: As seen in the above screenshot, an alternative method is to type ‘adb shell’ first, which essentially logs you into the device. Then the commands can be run without ‘adb shell’ at the start. The ‘su’ command seen in the same screenshot is only necessary if the device is rooted (and that should only matter for Android 5+.)
Note: In Mac OS X and Linux, each command might need to be prefaced with a dot and a backslash ( ./ ). The exception would be if you installed ADB through a repository in Linux. Here are example shots from Mac OS X and Linux.
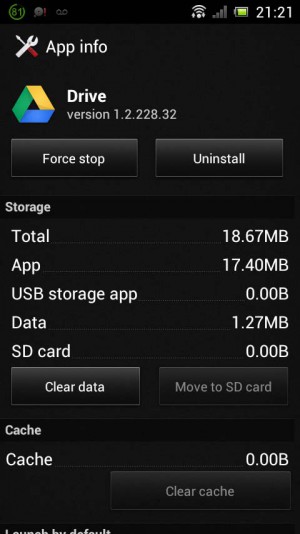
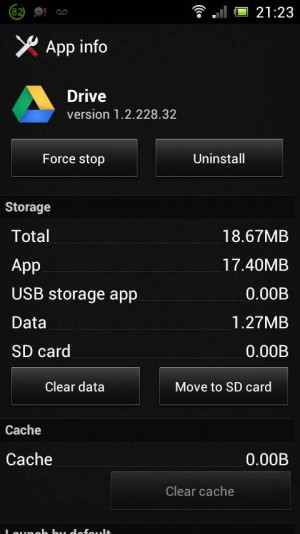
Once the storage location is set to “2”, you can check through the apps that were unmovable and see if the situation has changed. Below is an example of an app that was unmovable before the tweak, and movable afterwards.
Figuring out which apps can or can’t be moved is the most tedious part of using Android, but fortunately, apps exist to make the chore a lot easier to deal with. One solution I’ve used is an app called “App 2 SD“, as it’s both free and intuitive.
If you compare these two screenshots, the tweak was extremely effective in this particular case. If you’re not so lucky, and you’re still desperate for space, you should consider rooting your device and either using Link2SD to force the apps to move, or use Titanium Backup to delete the apps you’ll never use from the system ROM. The latter is something you’ll want to be careful with, but the former is something I talk about in part 5.
Part 4 – Running The Tweak On The Device Itself
Tweaking the “Move to SD” option on the device itself can save a lot of time versus doing it on a computer, though it can still be a little tedious. The first step is to hope that you have sufficient free space for a terminal emulator, and if so, the second step is to go to the Play Store and download one. I don’t have a particular preference, but this one has served me well. Note: This method of tweaking requires the device to be rooted.
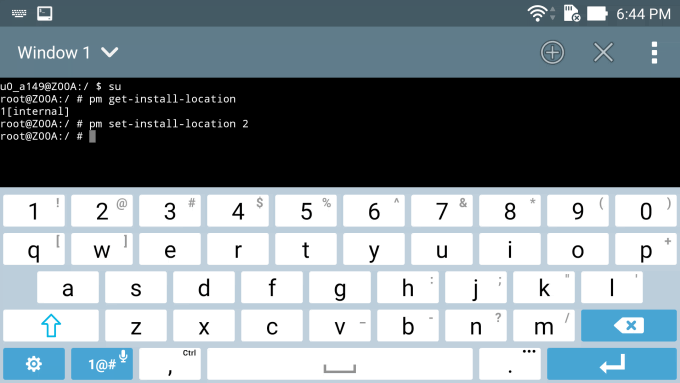
After opening, the commands can be run right away. Because we’re already inside of the shell, ‘adb shell’ does not need to preface the rest of the commands. So ‘adb shell pm get-install-location’ will simply become ‘pm get-install-location‘. If for some reason the commands do not work and the device is rooted, enter ‘su’ (making sure to grant permission on the device), and then proceed with the commands.
In the emulator I used, typing the commands out proved to be a real chore. ‘su’ wants to become ‘sure’, as one example. If you’re stuck, and the application wants to keep changing what you’re trying to write, type in a comma right before a space, delete it, and then hit space to continue with the next part.
If the command set just fine, you can refer to the latter half of part 3.
Part 5 – Moving Apps On Android 5.0 & Beyond
For the most part, the “Move to SD” mechanic on Android 4 and earlier is good. It’s a bit of a chore to tweak, but it can at least be pulled off without having to root the phone. We’re not so lucky when it comes to Android 5+. After all of the comments I’ve seen up to this point, I think it’s safe to say that this tweak will not work on Lollipop (and probably Marshmallow) unless the device is rooted.
If that’s not bad enough, even more has to be done if we’re to take proper advantage of Link2SD, the app that will allow us to move apps to external storage through sheer force.
By default, Android will format external storage as FAT or exFAT, which is fine for regular storage, but poor for applications. This boils down to the lack of support for the permissions system Android uses. That means that in order to take advantage of Link2SD’s move ability without running into issues, your microSD card will need to be split into two partitions; one for regular storage, and the other for Android app storage.
Important: You don’t have to go through the hassle of repartitioning, but it could cause issues with certain apps that rely on being able to read and write permissions. Your mileage will vary if you decide to take this route.
To take care of the partitioning, I’d recommend using an open-source tool for the PC called GParted. It can be downloaded here, and can either be burned to a CD, or copied to a flash drive (instructions are found at the link). If you have a USB flash drive of at least 4GB, and the data can be backed-up, I’d recommend downloading the ISO and copying it over to the drive using Rufus.
After making absolute sure that the data on your microSD card is backed up, unmount it through Android’s “Storage” section. You can then plug the card into your computer (via an adapter or card reader), and open up GParted. You’ll see a screen like this (make sure that the proper drive is selected in the top-right drop-down menu):
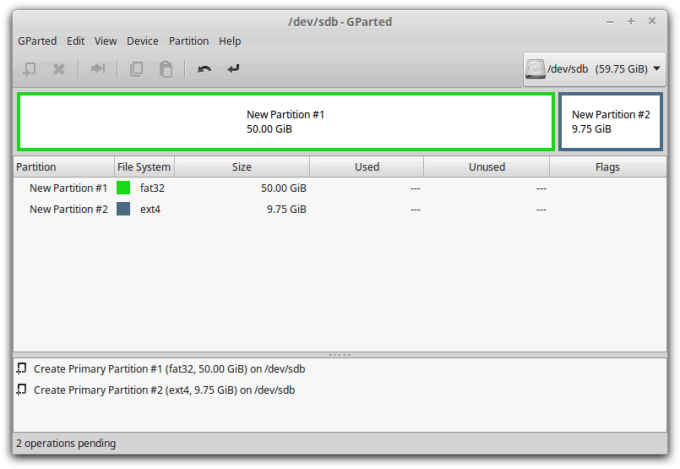
There should just be one partition, and if it happens to be “fat32”, you’re in luck: you’ll just need to shrink that partition in order to make room for the new one. If it’s exFAT, the partition will have to be destroyed, as GParted doesn’t support the file system due to licensing issues. My card was formatted in Android to exFAT, so what I did was delete all of the partitions, and then create a FAT32 partition for storage that uses about 80% of the card’s available space, and then created an “ext4” partition using the remaining space. After configuring the partition layout to your liking, you can apply the changes, and then eject the card.
Note: exFAT will be required if files greater than 4GB will need to be stored. To pull this trick off, you’ll need to find a partitioner (in Windows, likely), that can handle both exFAT and ext for both reading and writing.
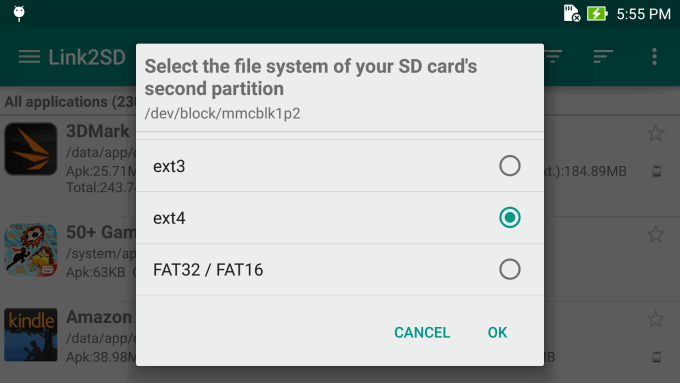
After that’s all dealt with, the card can be returned to the mobile device, and the device can be booted back up. Once Link2SD is opened, it’ll automatically detect the partition setup, and then ask you what file system you made the partition that will store the app data. In my case, I used ext4.
With that configured, we can get to moving some apps to the SD card. As with the tweak with Android 4 and earlier, there are cases when 100% of an app’s data cannot be moved; but most will be. This is the case with Grand Theft Auto Vice City, which I am using for this example. Originally, the entire 1.4GB game is stored on the phone, but after moving, most of the data is moved while 10MB remains on the device itself.
This leads me to another important point: Link2SD’s free version can move just the app itself. If you’re looking to move a massive application that has additional data, such as this one, the paid version will be needed. Fortunately, it costs about $2, which I consider well worth it for the amount of future headache it will save you.
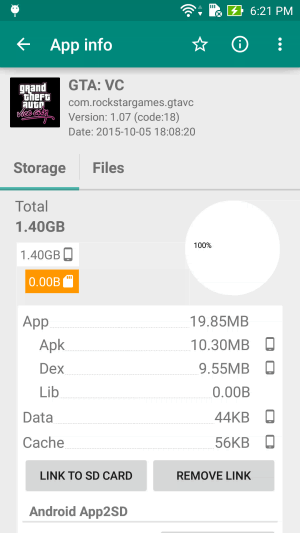
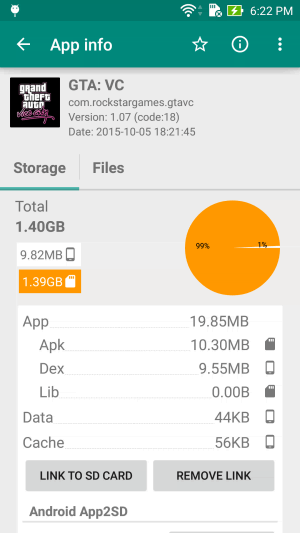
Once an app is moved to the SD card, Link2SD’s main program list will reflect it. One thing I found interesting in testing is that while GTA Vice City was unmovable before Link2SD got involved, the unusable “Move to SD card” button became “Move to device storage” after the tweak. Why this is notable is that it proves that Android could allow the app to move over using the same tweak we use in Android 4 and earlier.
Oh well… at least there are other options!
This article was originally published on December 21, 2011, and was updated in September 2013, and October 2015.

Support our efforts! With ad revenue at an all-time low for written websites, we’re relying more than ever on reader support to help us continue putting so much effort into this type of content. You can support us by becoming a Patron, or by using our Amazon shopping affiliate links listed through our articles. Thanks for your support!

Rob Williams
Rob founded Techgage in 2005 to be an ‘Advocate of the consumer’, focusing on fair reviews and keeping people apprised of news in the tech world. Catering to both enthusiasts and businesses alike; from desktop gaming to professional workstations, and all the supporting software.
Источник


