- MVVM with Kotlin Coroutines and Retrofit [Example]
- Suspend Function
- Launch and Async
- Coroutine Scope
- Coroutines in your Android Project
- Making it work with Retrofit?
- Declaring our interface.
- Building Retrofit Service
- ViewModel with Coroutines
- Coroutines and LiveData
- Exception Handling in Kotlin Coroutines
- Kotlin Coroutines With Retrofit Example
- Required Dependencies
- Организация простой архитектуры в андроид-приложении со связкой ViewModel+LiveData, Retrofit+Coroutines
- Настройка проекта
- Зависимости
- Манифест
- Настройка ретрофита
- Api интерфейс
- ViewModel
- Ивенты
- How Using Retrofit with Kotlin Coroutines in Android (MVVM)
- What is Coroutines
- What problems do coroutines solve?
- RxJava VS Coroutines
- Role of Suspend and Resume
- Main-safety with coroutines
- + — — — — — — — — — — — — — — — — — -+ | Dispatchers.Main | + — — — — — — — — — — — — — — — — — -+ | Main thread on Android, interact | | with the UI and perform light | | work | + — — — — — — — — — — — — — — — — — -+ | — Calling suspend functions | | — Call UI functions | | — Updating LiveData | + — — — — — — — — — — — — — — — — — -+
- + — — — — — — — — — — — — — — — — — -+ | Dispatchers.IO | + — — — — — — — — — — — — — — — — — -+ | Optimized for disk and network IO | | off the main thread | + — — — — — — — — — — — — — — — — — -+ | — Database* | | — Reading/writing files | | — Networking** | + — — — — — — — — — — — — — — — — — -+
- + — — — — — — — — — — — — — — — — — -+ | Dispatchers.Default | + — — — — — — — — — — — — — — — — — -+ | Optimized for CPU intensive work | | off the main thread | + — — — — — — — — — — — — — — — — — -+ | — Sorting a list | | — Parsing JSON | | — DiffUtils | + — — — — — — — — — — — — — — — — — -+
- References for before get start the Project
- Retrofit на Android с Kotlin
- 0. Установка
- 1. Добавление зависимостей
- 2. Создание классов данных
- Классы данных в Котлине
- 3. Создание API-интерфейса
- Синглтоны и сопутствующие объекты в Котлине
- 4. Создание репозитория
- Строковые шаблоны в Котлине
- 5. Делаем запрос и получаем ответ API при помощи RxJava
- Полезные ссылки:
- Заключение
MVVM with Kotlin Coroutines and Retrofit [Example]


Coroutines are a neat new feature of the Kotlin language that allow us to write asynchronous code in a more idiomatic way. — This also means you can write asynchronous code the same way you would normally write synchronous code in your project.
Already, I have explained about MVVM in detail in my another post. Please check that for better understanding of MVVM. in this post, I am focusing on coroutines and retrofit working together.
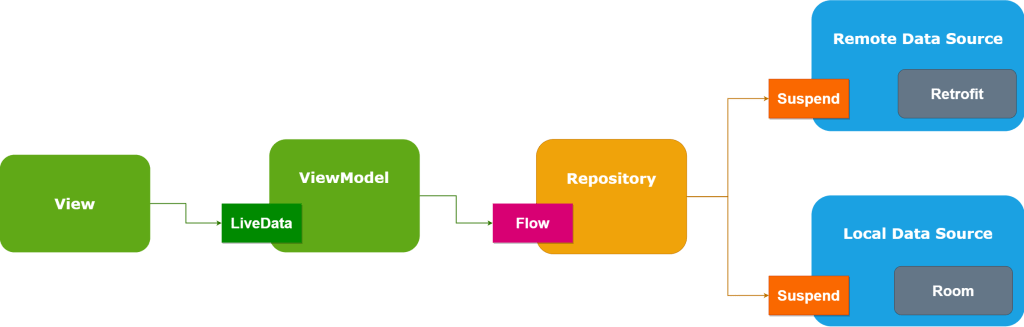
The flow diagram for the coroutines with retrofit in viewModel.
Coroutines are helpful in two main problems,
- A long-running task that can block the main thread
- Main safety allows you to ensure that any suspend function can be called from the main thread
According to the Kotlin docs it is stated that coroutines are a lightweight alternative to threads.
“Coroutines provide a way to avoid blocking a thread and replace it with a cheaper and more controllable operation”
Before we begin I would like to briefly address the concept and the commonly used functions in Coroutine.
Coroutines build upon regular functions by adding two new operations. In addition to invoke (or call) and return, coroutines add suspend and resume.
- suspend — pause the execution of the current coroutine, saving all local variables
- resume — continue a suspended coroutine from the place it was paused
Suspend Function
A suspending function is just a regular Kotlin function with an additional suspend modifier which indicates that the function can suspend the execution of a coroutine.
You can only call suspend functions from other suspend functions, or by using a coroutine builder like launch to start a new coroutine.
We use call back functions when we get response from our Async task. Suspend and resume work together to replace callbacks.
To understand suspend functions, we should also know about provided dispatchers by Kotlin.
To specify where the coroutines should run, Kotlin provides three dispatchers that you can use:
- Dispatchers.Main — Use this dispatcher to run a coroutine on the main Android thread. This should be used only for interacting with the UI and performing quick work. Examples include calling suspend functions, running Android UI framework operations, and updating LiveData objects.
- Dispatchers.IO — This dispatcher is optimized to perform disk or network I/O outside of the main thread. Examples include using the Room component, reading from or writing to files, and running any network operations.
- Dispatchers.Default — This dispatcher is optimized to perform CPU-intensive work outside of the main thread. Example use cases include sorting a list and parsing JSON.
Lets, see this with an example -> We are calling our api through coroutines. So, we use Dispatchers.IO.
When we call getAllMovies() suspend method, then it suspends our coroutine. The coroutine on the main thread will be resumed with the result as soon as the withContext block is complete.
Note: Using suspend doesn’t tell Kotlin to run a function on a background thread. It’s normal for suspend functions to operate on the main thread.
Launch and Async
launch and async are the most commonly used Coroutine builder.
launch – Launches new coroutine without blocking current thread and returns a reference to the coroutine as a Job . The coroutine is canceled when the resulting job is cancelled .
async – Creates new coroutine and returns its future result as an implementation of Deferred . The running coroutine is canceled when the resulting object is cancelled .
Take a look at this piece of code as an example.
From the example, the difference between launch and async is that async can return the future result which has a type of Deferred , and we can call await() function to the Deferred variable to get the result of the Coroutine while launch only executes the code in the block without returning the result.
Coroutine Scope
Coroutine Scope defines a scope for coroutines. Every coroutine builder (like launch, async, etc) is an extension on CoroutineScope. When the scope dies, the Coroutines inside will be out of the picture too. Fortunately, the Android lifecycle-viewmodel-ktx provides a really easy way to get a Coroutine Scope in the ViewModel. I will show you how to do so later.
Coroutines in your Android Project
To begin add the following library to your build.gradle file dependencies:
Note : You’ll also need to be on kotlin version 1.3 or better.
Making it work with Retrofit?
Retrofit is a type-safe HTTP client for Android and Java.
Starting from Retrofit 2.6.0 you no longer require the Call Adapter as Retrofit now includes built-in support for Kotlin suspend modifier on functions.
In order to begin, let’s add the retrofit dependencies into our app level build.gradle file:
Declaring our interface.
For this example I am using https://howtodoandroid.com/movielist.json api to get list of movies.
Observe the below snippet for our interface:
You may notice that instead of Call , we now have a function with the suspend modifier defined in our interface function.
According to Retrofit documentation this function will, behind the scenes behave as a normal Call.enqueue operation.
Also we wrap our response in a Response object to get metadata about our request response e.g. information like response code.
We no longer have to await() anymore as this is handled automatically! As with all networking on Android its done on the background. And this is a very clean way of doing so!
Building Retrofit Service
Our Retrofit instance will look like the following code snippet:
ViewModel with Coroutines
A CoroutineScope keeps track of all coroutines it creates. Therefore, if you cancel a scope, you cancel all coroutines it created. This is particularly important if you’re running coroutines in a ViewModel.
If your ViewModel is getting destroyed, all the asynchronous work that it might be doing must be stopped. Otherwise, you’ll waste resources and potentially leaking memory. If you consider that certain asynchronous work should persist after ViewModel destruction, it is because it should be done in a lower layer of your app’s architecture.
Add a CoroutineScope to your ViewModel by creating a new scope with a SupervisorJob that you cancel in onCleared() method. The coroutines created with that scope will live as long as the ViewModel is being used.
Coroutines and LiveData
LiveData is an observable value holder for UI and we are expected to be able to access the value from the main thread. With the release of livedata-2.1.0-alpha1, google provided the interoperability between LiveData and Coroutines.
Exception Handling in Kotlin Coroutines
If you consider the above example, you can see we are wrapping our code inside a try-catch exception. But, when we are working with coroutines we can handle an exception using a global coroutine exception handler called CoroutineExceptionHandler.
To use it, first, we create an exception handler in our ViewModel,
and then we attach the handler to the ViewModelScope.
So, our code looks like,
Kotlin Coroutines With Retrofit Example
Now, lets see the example of list movies using kotlin coroutines and retrofit.
Required Dependencies
Here are the things you need to add to your build.gradle
First, setup the retrofit service.
Next step is to setup the repository.
Setup the ViewModel,
Finally, in our MainActivity setup the viewmodel and call the getAllMovies() method of the viewModel.

Thanks for reading. checkout this example in GITHUB.
Источник
Организация простой архитектуры в андроид-приложении со связкой ViewModel+LiveData, Retrofit+Coroutines
Без долгих вступлений расскажу, как можно быстро и просто организовать удобную архитекруту вашего приложения. Материал будет полезен тем, кто не очень хорошо знаком с mvvm-паттерном и котлиновскими корутинами.
Итак, у нас стоит простая задача: получить и обработать сетевой запрос, вывести результат во вью.
Наши действия: из активити (фрагмента) вызываем нужный метод ViewModel -> ViewModel обращается к ретрофитовской ручке, выполняя запрос через корутины -> ответ сетится в лайвдату в виде ивента -> в активити получая ивент передаём данные во вью.
Настройка проекта
Зависимости
Манифест
Настройка ретрофита
Создаем котлиновский объект NetworkService. Это будет наш сетевой клиент — синглтон
UPD синглтон используем для простоты понимания. В комментариях указали, что правильнее использовать инверсию контроля, но это отдельная тема
Api интерфейс
Используем замоканные запросы к фэйковому сервису.
Приостановим веселье, здесь начинается магия корутин.
Помечаем наши функции ключевым словом suspend fun . .
Ретрофит научился работать с котлиновскими suspend функциями с версии 2.6.0, теперь он напрямую выполняет сетевой запрос и возвращает объект с данными:
ResponseWrapper — это простой класс-обертка для наших сетевых запросов:
ViewModel
Создаем абстрактный класс BaseViewModel, от которого будут наследоваться все наши ViewModel. Здесь остановимся подробнее:
Ивенты
Крутое решение от Гугла — оборачивать дата классы в класс-обертку Event, в котором у нас может быть несколько состояний, как правило это LOADING, SUCCESS и ERROR.
Вот как это работает. Во время сетевого запроса мы создаем ивент со статусом LOADING. Ждем ответа от сервера и потом оборачиваем данные ивентом и отправляем его с заданным статусом дальше. Во вью проверяем тип ивента и в зависимости от состояния устанавливаем разные состояния для вью. Примерно на такой-же философии строится архитектурный паттерн MVI
Источник
How Using Retrofit with Kotlin Coroutines in Android (MVVM)

Jul 20, 2020 · 7 min read

What is Coroutines
Essentially, coroutines are light-weight threads. It lets us write asynchronous, non-blocking code in a sequential way.
What problems do coroutines solve?
On Android, coroutines are a great solution to two problems:
- Long running tasks are tasks that take too long to block the main thread.
- Main-safety allows you to ensure that any suspend function can be called from the main thread.
RxJava VS Coroutines
- Coroutines is more efficient than RxJava as it uses less resources to execute the same task while also being faster in doing so. RxJava uses greater amounts of memory and requires more CPU time, which translates into higher battery consumption and possible UI interruptions for the user.
- RxJava is a pretty heavy library with quite large variety of ready-to-use operators.
- If the app needs to be simple and easily read by less experienced coders, use Coroutines
- If the app needs high levels of data manipulation between fetching and emitting, use RxJava
Role of Suspend and Resume
Coroutines build upon regular functions by adding two new operations. In addition to invoke (or call) and return, coroutines add suspend and resume.
- suspend — pause the execution of the current coroutine, saving all local variables
- resume — continue a suspended coroutine from the place it was paused
This functionality is added by Kotlin by the suspend keyword on the function. You can only call suspend functions from other suspend functions, or by using a coroutine builder like launch to start a new coroutine.
Suspend and resume work together to replace callbacks.
Main-safety with coroutines
Using s u spend doesn’t tell Kotlin to run a function on a background thread.
Using Dispatchers for which thread runs the coroutine
+ — — — — — — — — — — — — — — — — — -+
| Dispatchers.Main |
+ — — — — — — — — — — — — — — — — — -+
| Main thread on Android, interact |
| with the UI and perform light |
| work |
+ — — — — — — — — — — — — — — — — — -+
| — Calling suspend functions |
| — Call UI functions |
| — Updating LiveData |
+ — — — — — — — — — — — — — — — — — -+
+ — — — — — — — — — — — — — — — — — -+
| Dispatchers.IO |
+ — — — — — — — — — — — — — — — — — -+
| Optimized for disk and network IO |
| off the main thread |
+ — — — — — — — — — — — — — — — — — -+
| — Database* |
| — Reading/writing files |
| — Networking** |
+ — — — — — — — — — — — — — — — — — -+
+ — — — — — — — — — — — — — — — — — -+
| Dispatchers.Default |
+ — — — — — — — — — — — — — — — — — -+
| Optimized for CPU intensive work |
| off the main thread |
+ — — — — — — — — — — — — — — — — — -+
| — Sorting a list |
| — Parsing JSON |
| — DiffUtils |
+ — — — — — — — — — — — — — — — — — -+
References for before get start the Project
Источник
Retrofit на Android с Kotlin

Одним из самых захватывающих объявлений на Google I/O в этом году стала официальная поддержка Kotlin для разработки под Android.
Котлин на самом деле не новый язык, ему уже >5 лет и он довольно зрелый. Здесь вы можете получить более подробную информацию о языке
Я планирую поделиться некоторыми «практиками» использования Kotlin в разработке Android.
Retrofit — очень популярная библиотека для работы с сетью, и она широко используется в сообществе разработчиков. Даже Google использует его в своих образцах кода.
В этой статье я расскажу о том, как использовать REST API в ваших приложениях с помощью Retrofit + Kotlin + RxJava. Мы будем использовать API Github для получения списка разработчиков Java в Омске, Россия. Также, я затрону некоторые особенности языка программирования и расскажу о том, как мы можем применять их к тому, что мы, разработчики Android, делаем ежедневно — вызывать API.
0. Установка
В Android Studio 3.0 (Preview) теперь есть встроенная поддержка Kotlin, без ручной установки плагинов. Отсюда можно установить preview-версию.
1. Добавление зависимостей
Чтобы использовать Retrofit, вам нужно добавить зависимости в файл build.gradle:
RxJava2 поможет сделать наши вызовы реактивными.
GSON-конвертер будет обрабатывать десериализацию и сериализацию тел запроса и ответа.
RxAndroid поможет нам с привязкой RxJava2 к Android.
2. Создание классов данных
Как правило, следующим шагом является создание классов данных, которые являются POJO (Plain Old Java Objects) и которые будут представлять ответы на вызовы API.
С API Github пользователи будут представлены как объекты.
Как это будет выглядеть на Kotlin:
Классы данных в Котлине
Классы данных в Kotlin — это классы, специально разработанные для хранения данных.
Компилятор Kotlin автоматически помогает нам реализовать методы equals (), hashCode () и toString () в классе, что делает код еще короче, потому что нам не нужно это делать самостоятельно.
Мы можем переопределить реализацию по умолчанию любого из этих методов путем определения метода.
Отличной особенностью является то, что мы можем создавать результаты поиска в одном файле Kotlin — скажем, SearchResponse.kt. Наш окончательный класс ответа на поиск будет содержать все связанные классы данных и выглядеть следующим образом:
SearchResponse.kt
3. Создание API-интерфейса
Следующим шагом, который мы обычно делаем в Java, является создание интерфейса API, который мы будем использовать для создания запросов и получения ответов.
Как правило, в Java я хотел бы создать удобный «фабричный» класс, который создает службу API, когда это необходимо, и я бы сделал что-то вроде этого:
GithubApiService.java
Чтобы использовать этот интерфейс, мы делаем следующие вызовы:
Чтобы повторить тоже самое в Котлине, у нас будет эквивалентный интерфейс GithubApiService.kt, который будет выглядеть так:
GithubApiService.kt
Использование этого интерфейса и фабричного класса будет выглядеть так:
Обратите внимание, что нам не нужно было использовать «имя» сопутствующего объекта для ссылки на метод, мы использовали только имя класса.
Синглтоны и сопутствующие объекты в Котлине
Чтобы понять, какие сопутствующие объекты в Котлине есть, мы должны сначала понять, какие объявления объектов находятся в Котлине. Объявление объекта в Котлине — это способ, которым одиночный элемент создается в Котлине.
Синглтоны в Котлине так же просты, как объявление объекта и присвоение ему имени. Например:
Использование указанного выше объявления объекта:
Благодаря этому мы смогли создать поставщика, который предоставит нам экземпляр репозитория (который поможет нам подключиться к API Github через GithubApiService).
Объявление объекта инициализируется при первом доступе — так же, как работает Singleton.
Однако, объекты-компаньоны — это тип объявления объекта, который соответствует ключевому слову companion. Объекты Companion можно сравнить с статическими методами или полями на Java. Фактически, если вы ссылаетесь на объект-компаньон с Java, он будет выглядеть как статический метод или поле.
Сопутствующий объект — это то, что используется в версии GithubApiService.kt Kotlin выше.
4. Создание репозитория
Поскольку мы стараемся как можно больше абстрагировать наши процессы, мы можем создать простой репозиторий, который обрабатывает вызов GithubApiService и строит строку запроса.
Строка запроса, соответствующая нашей спецификации для этого демонстрационного приложения (для поиска разработчиков Java в Омске) с использованием API Github, — это местоположение: Omsk + language: Java, поэтому мы создадим метод в репозитории, который позволит нам построить эту строку, передавая местоположение и язык в качестве параметров.
Наш поисковый репозиторий будет выглядеть так:
Строковые шаблоны в Котлине
В блоке вышеприведенного кода мы использовали функцию Kotlin, называемую «String templates», чтобы построить нашу строку запроса. Строковые шаблоны начинаются со знака доллара — $ и значение переменной, следующей за ней, конкатенируется с остальной частью строки. Это аналогичная функция для строковой интерполяции в groovy.
5. Делаем запрос и получаем ответ API при помощи RxJava
Теперь, когда мы настроили наши классы ответов, наш интерфейс репозитория, теперь мы можем сделать запрос и получить ответ API с помощью RxJava. Этот шаг похож на то, как мы будем делать это на Java. В коде Kotlin это выглядит так:
Мы сделали наш запрос и получили ответ. Теперь можем делать с ним все, что захотим.
Полезные ссылки:
Заключение
Таким образом, в этом посте мы рассмотрели некоторые интересные возможности/свойства языка Kotlin и способы их применения при использовании Retrofit + RxJava для сетевых вызовов.
- Классы данных
- Объявления объектов
- Сопутствующие объекты
- Строковые шаблоны
- Взаимодействие с Java
Источник


