- Урок 28. Navigation. Вложенный граф. Global Action. Deep Link.
- Навигация
- Global Action
- Deep Link
- Navigating with Deep Links
- Deep thoughts on deep links… with Navigation component
- Introduction
- Donut Deep Linking
- Implicit
- Explicit
- Summary
- For More Information
- An easy way to use deep link in Navigation Component on a Big Project
Урок 28. Navigation. Вложенный граф. Global Action. Deep Link.
В этом уроке рассмотрим вложенный граф, global action и deep link.
Полный список уроков курса:
Вложенный граф — это граф, который может быть создан внутри другого графа.
Для этого надо выделить все destination, который вы хотите переместить во вложенный граф, нажать правой кнопкой и выбрать Move to Nested Graph > New Graph

Созданный граф может уехать в другой конец экрана. Надеюсь это будет исправлено, а пока используем удобную кнопку для настройки зума, чтобы найти наш новый граф и вернуть его на место.
Вложенный граф — это обычный destination в основном графе. Так же, как фрагмент или Activity. И у этого destination есть параметры.
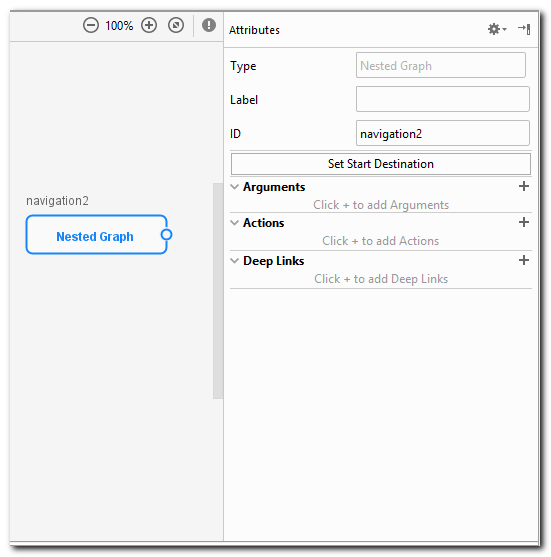
Все здесь нам уже знакомо.
Двойным кликом можно открыть граф

Вернуться обратно в основной граф можно нажав на Root в левой панели:

Я не нашел, как в дизайнере трансформировать вложенный граф обратно в фрагменты в основном графе. Проще всего это сделать руками через XML.
Так выглядит граф с вложенным графом
Т.е. вложенный граф — это тег navigation внутри основного navigation тега.
Удаляем этот вложенный тег и фрагменты оказываются обратно в основном графе.
Навигация
Допустим, мы создали вложенный граф с фрагментами fragment2 и fragment3. А в основном графе остался fragment1.
Теперь, находясь в fragment1 мы не можем сделать так:
Будет ошибка: navigation destination ru.startandroid.navigation:id/fragment2 is unknown to this NavController.
Так происходит, потому что fragment1 находится в основном графе. И когда мы из fragment1 пытаемся куда то перейти, то контроллер пытается найти цель (fragment2) в этом же графе, но там ее нет. Зато там есть вложенный граф с Вот его и надо открывать:
В результате контроллер найдет destination c увидит, что это граф, и откроет его стартовый destination, т.е. fragment2.
Т.е. из внешнего графа нельзя вызвать destination вложенного графа. А вот наоборот — можно.
Добавим, например, fragment4
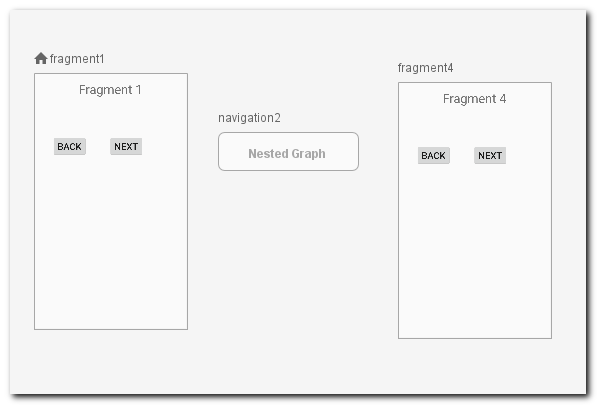
Из любого destination во вложенном графе мы можем перейти к fragment4 обычным путем:
В этом случае контроллер сначала будет искать цель (fragment4) в текущем графе (navigation2), а если не найдет, то продолжит поиски в родительском графе и там уже найдет.
Внутри вложенных графов также можно создавать вложенные графы .
Global Action
Обычно у Action есть destination-источник, откуда этот action может быть вызван, и destination-назначение, куда этот action ведет. Но можно сделать global action, у которого нет источника. И любой destination сможет вызвать этот action. Это удобно, если один и тот же destination вызывается из разных мест, но при этом используются одни и те же параметры.
global action создается так:

Он имеет те же атрибуты, что и обычный action
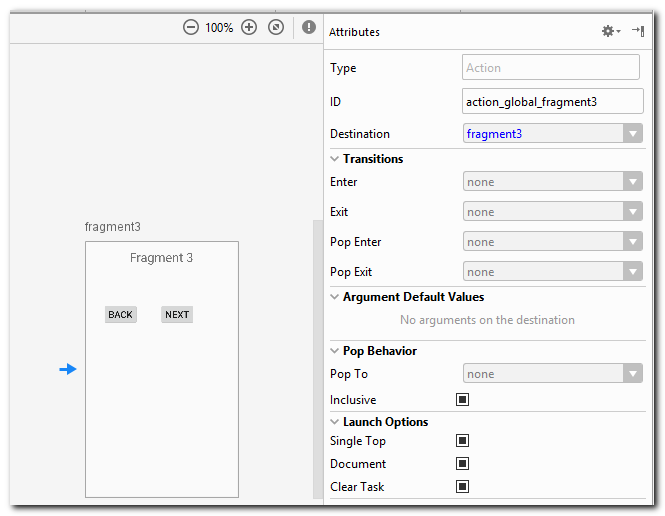
Вызывается он тоже, как обычный action
Deep Link
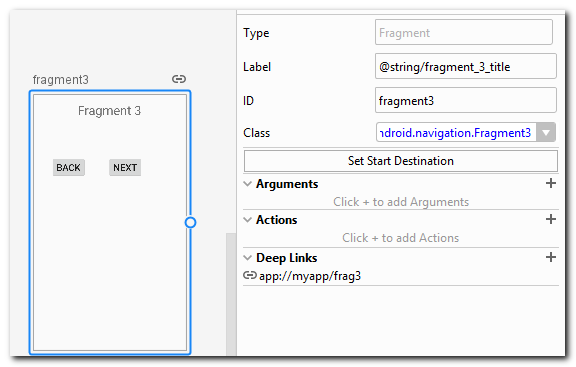
Deep Link предназначен для открытия приложения сразу на определенном экране. С помощью Navigation Component мы можем присваивать такие ссылки необходимым destination.
Например для fragment3, мы присвоим ссылку: app://myapp/frag3
Далее, если у вас студия версии 3.2, то в манифесте в тег Activity, необходимо добавить тег nav-graph
И студия сама настроит Intent Filter.
Если же у вас студия более старой версии, то необходимо вручную настроить Intent Filter под этот deep link.
Проверить ссылку можно с помощью adb команды:
adb shell am start -a android.intent.action.VIEW -d «app://myapp/frag3»
При вызове этой команды будет открыто приложение, а в нем сразу fragment3.
В deep link ссылке можно использовать параметры. Например, если для фрагмента задана такая ссылка:
то после вызова ссылки
мы в открывшемся фрагменте можем получить id из аргументов.
Символ .* позволяет заменить часть ссылки
Т.е. если ссылка задана следующим образом:
то фрагмент будет открыт при вызове ссылки:
Присоединяйтесь к нам в Telegram:
— в канале StartAndroid публикуются ссылки на новые статьи с сайта startandroid.ru и интересные материалы с хабра, medium.com и т.п.
— в чатах решаем возникающие вопросы и проблемы по различным темам: Android, Kotlin, RxJava, Dagger, Тестирование
— ну и если просто хочется поговорить с коллегами по разработке, то есть чат Флудильня
— новый чат Performance для обсуждения проблем производительности и для ваших пожеланий по содержанию курса по этой теме
Источник
Navigating with Deep Links
Deep thoughts on deep links… with Navigation component

This is the fourth in a series of articles about the Navigation component API and tool. These articles are based on content that is also explained in video form, as part of the MAD Skills series, so feel free to consume this material in whichever way you prefer (though the code tends to be easier to copy from text than from a video, which is why we offer this version as well).
If you prefer your content in video form, here it is:
Introduction
This episode is on Deep Links, the facility provided by Navigation component for helping the user get to deeper parts of your application from UI outside the application.
Sometimes you want to make it easy for the user to get to a specific part inside the flow of your application, without having to click-click-click from the start screen to get there. For example, maybe you want to surface ongoing conversations in a chat app, or the user’s cart in a shopping application. You can use deep links to do this, surfacing these links outside of the application, in shortcuts and notifications, that allow the user to click from those other locations and get to those deeper parts of your app.
Navigation component simplifies creating these deep links. To show how they work, we’re going to take another look at the Donut Tracker app that I used in previous episodes. The finished code for the app is on GitHub; feel free to download and open it up in Android Studio to follow along.
Since the code is done, I’ll walk you through the steps I went through to make it all work.
Donut Deep Linking
In Donut Tracker, there are a couple of actions that are useful to get to quickly. For example, if I have a really good donut in the wild, I’d like to be able to add that information into the list without having to launch the app first and then click on the FloatingActionButton to bring up the data-entry dialog. Also, if I’ve just added or edited information about a donut, I’d like to post a notification so that I can quickly get back to editing that recent entry.
I added deep links for both of these actions: one for adding a new donut and another for returning to an ongoing edit. The “add” action uses an “implicit” deep link. Implicit is what we call a link that takes you to a static location inside your hierarchy, one that does not change over time. In my app, the implicit deep link will always take you to the form that allows you to add a new donut to the list.
The “continue editing” action uses an “explicit” deep link. Explicit is what we call a link that takes you to dynamic content inside your application.
Implicit
Let’s start with an implicit deep link to add a new donut.
First, I needed to create the deep link, which I did in the navigation editor. Clicking on the dialog destination shows the properties of that destination on the right:
I clicked on the + next to Deep Links. This brought up a dialog in which I entered a URI (Universal Resource Identifier). In this case, I wanted a URI that is specific to the app (not a general web address that might be picked up by the browser app), so I used “myapp” as an identifier that is specific to our app:
Next, I edited the application manifest to inform the application that I wanted a shortcut for the deep link:
In that meta-data block, I told the activity that there is information about the deep link in the navigation graph. I also referenced a new file in the xml resource directory with information about an app shortcut for this activity.
I then created the xml folder and a new shortcuts.xml file in that new directory. In the shortcuts file, I entered information about the app shortcut, including the URI we saw above:
The important part here is that data item, which uses the same URI string as I entered into the deep link dialog in the navigation tool earlier. This is the connecting glue which causes navigation to happen from the app shortcut to the dialog destination.
And that’s all I needed for an implicit deep link: I told it the destination to navigate to, created the shortcut to do that navigation, and I was done. If you run the app, you can see the shortcut by long-pressing on the app icon. Clicking that shortcut will take you to the form to create a new donut item.
That was implicit deep links. Now let’s create an explicit deep link, which will be created dynamically based on the state of the app.
Explicit
If you’re like me, then donuts are really important to you. When I’m entering information about a new donut find, I probably want to take my time with it. So I’ll start the entry with some information, but I may want to come back later and enter more when I’ve really had a chance to appreciate the experience.
This can be done with notifications: when I enter information about a donut, the app creates a notification that makes it easier to get back to that ongoing entry. There’s not a lot of code necessary to do this; I just needed to create a notification with a PendingIntent to get to the right place in the application.
Most of this happens in DonutEntryDialogFragment , in the onClick() listener for the Done button. We’ve seen this click listener code in a previous episode; this is where we add new or updated data to the ViewModel. I just needed to add an extra step here to create the notification. The parts in bold are the code I had to add to deal with the notification.
First, the code creates arg with the donut id to use. This will be used to tell the destination dialog which donut to retrieve that the user will continue editing.
The code then creates pendingIntent for the deep link using an API in NavigationController . The destination is set to be this dialog fragment. The call also sets the argument which holds the ID and create the intent.
Then the code calls Notifer.postNotification() , a utility class/method I created for handling the details of creating and posting the notification.
First, the code creates the notification builder. Note that it needed a channelId to construct the builder, which is created as necessary in the init() function of Notifier (see the code for those details; it’s standard stuff).
I then supplied the necessary data for the notification, set the intent , and built it. Before posting, existing notifications are canceled (I only wanted to be able to edit the latest donut).
Finally, the new notification is posted and… it’s done. Now every new editing operation (whether for a new donut or an existing donut) will surface a notification that the user can click on to get back to that editing action.
Summary
In this episode, I created both an implicit deep link , which takes the user to a static location in the app where they can enter information about a new donut, and an explicit deep link, which allows the user to continue editing an existing donut where they left off.
This Donut Tracker app is getting better and better. Not as good as a donut, of course… but then nothing is.
That’s it for this time. Go grab a donut — you’ve earned it.
For More Information
For more details on Navigation component, check out the guide Get started with the Navigation component on developer.android.com.
To see the finished Donut Tracker app (which contains the code outlined above, but also the code covered in future episodes), check out the GitHub sample.
Finally, to see other content in the MAD Skills series, check out the video playlist in the Android Developers channel on YouTube.
Источник
An easy way to use deep link in Navigation Component on a Big Project
I will demonstrate how to use deep link in Navigation Component on a big project and show some problems you might found during the implementation.
 Designing Navigation on Android is now easier than ever before with the Jetpack Navigation Component. This library allows you to implement navigation without the headache of complex navigation, which makes it easier to scale your navigation implementation in large projects.
Navigation Component Benefits
1. Automates fragment transactions, this can make our code cleaner.
2. Handles back stack
2. Simplified deep linking
3. Safe Args allows you to pass data between screens easily and type-safe
4. Handles transition animations
5. We can handle Drawer and Bottom Navigation easier
6. Centralizes and visualizes navigation
In this article, I will show you my experience and some problems you might found when you use Jetpack Navigation Component in a big project.
Don’t reuse fragments in many navigation graphs.
In a big project, you can’t avoid reusing a fragment in many Navigation graphs, but you might end up with this error:
Deep-link is the hero!
You can’t predict the future requirements of the business, but you can prepare for future change, deep-link in navigation component can make a complicated flow much simpler.
At the beginning of the project, you may have a significantly complicated flow, However, one day the requirements change, and now the app needs to use just a small flow from the significant flow. We could easily copy some part of the flow into the new flow, but we would have duplicate code.
The solution is to make the flow smaller using the nested graph as I mentioned before and use the deep link for navigations.
Global Action
Global action is one way to access your navigation graphs from everywhere even from a nested graph just like a deep link, however they can’t be accessed from another application. «,»contentType»:»application/vnd.trix.horizontal-rule.html»>’ data-trix-content-type=»application/vnd.trix.horizontal-rule.html» data-trix-attributes=’<"bold":true>‘ > Creating deep links
Here is a shopping cart project which has a product listing, shopping cart, payment, history, and more, and the project is also modularized by feature and uses Single Activity Architecture. I am assuming you already know how to set up and create basic navigation graphs. If you don’t, you can learn by following Google’s code lab.
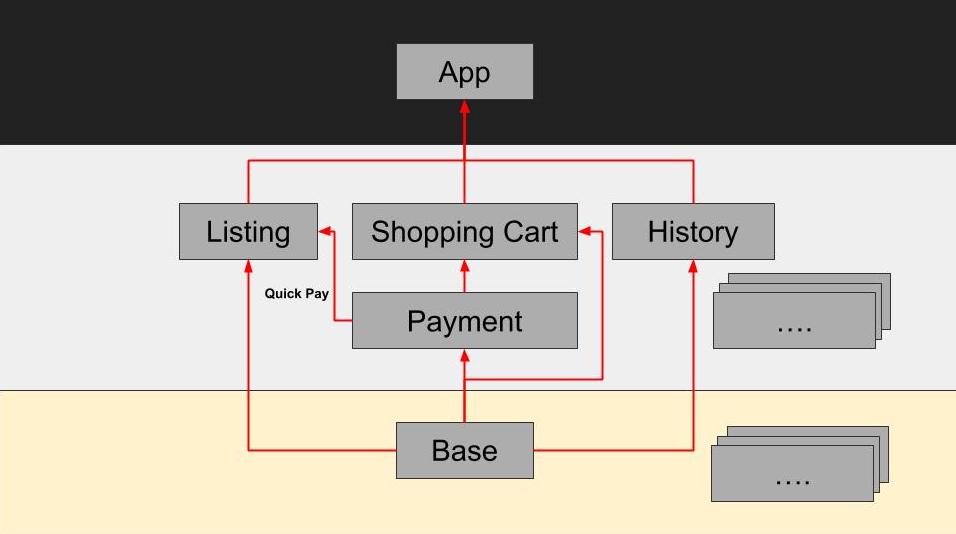 Shopping Cart Project’s Architecture When you create a navigation graph, I recommend creating one deep link for one flow where you can access the flow from anywhere in the project. Then, use the deep link for navigating between pages in your app, as you might need deep links in the future.
Create a Listing graph
For example, the listing page can search by car, watch, and both.
Источник


