- Получаем интернет по USB с компьютера на Android
- Share Your Windows Internet With Your Android Phone VIA USB Cable
- Android tethering
- Contents
- Wi-Fi access point
- USB tethering
- Using systemd-networkd with udev
- USB tethering with AziLink
- Tools needed
- Configuring the phone connection in Arch Linux
- Procedure
- USB tethering with EasyTether
- Tethering via Bluetooth
- Tethering with SOCKS proxy
- Tools needed
- Instructions
- Tetherbot
- Proxoid
Получаем интернет по USB с компьютера на Android
Тут есть два способа:
- Встроенный USB Tether (у аппаратов с Sence и может быть каких еще
- USB Tether реализуемый сторонним софтом.
В данной статье я буду рассматривать второй способ, так как он более универсален.
И так, нам нужна программа Wired Tether, скачать которую можно, нажав на QR код, или же считав его с телефона:  (268 КБ)
После нажатия на экран в программе Wired Tether, в Windows появляется новое сетевое соединение с коммуникатором, и полученными по DHCP настройками: 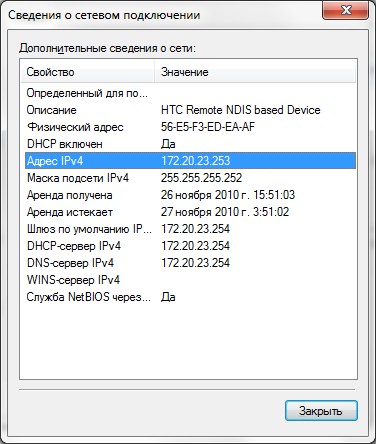
У меня к примеру, сеть коммуникатора — Android USB, а соединение с интернетом для общего доступа — Internet. В дальнейшем я буду использовать эти обозначения.
Отключаем соединение Internet, в свойствах подключения делаем его доступным для Android USB: 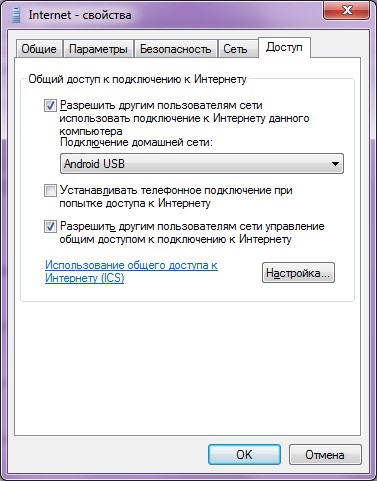
Идем в настройки Android USB и меняем его IP и маску на 172.20.23.253 / 255.255.255.252, а остальное делаем пустыми: 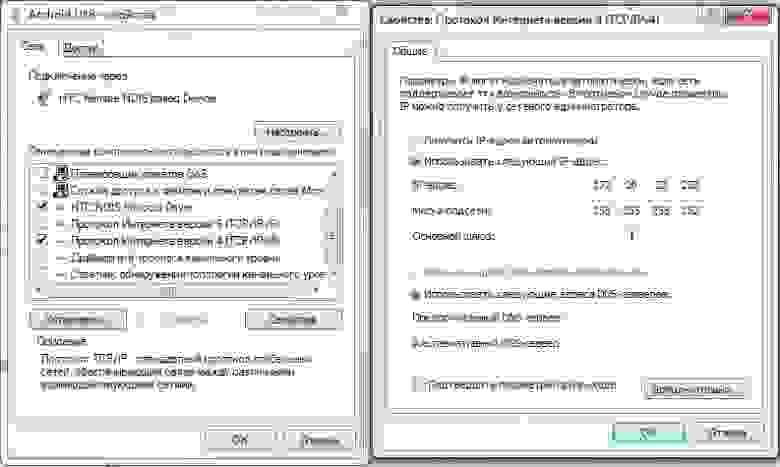
Цель ручного изменения IP адреса — это убрать шлюз по умолчанию.
Пробуем Ping коммуникатор (он под ip — 172.20.23.254)
C:\Users\MainNika>ping 172.20.23.254
Обмен пакетами с 172.20.23.254 по с 32 байтами данных:
Ответ от 172.20.23.254: число байт=32 время
Для удобства работы со скриптами, возьмем программу GScript Lite: (56.4 КБ)
Создаем в программе GScript Lite новый скрипт, с пишем туда:
ifconfig rmnet0 down
ifconfig usb0 up
route add default gw 172.20.23.253 dev usb0
setprop net.dns1 8.8.8.8
8.8.8.8 — это DNS сервер от google. Я люблю его использовать, поэтому использую его и тут. Использовать можно любой DNS сервер, который вы желаете.
Настройка закончена, можно тестировать:
- Подключаем USB
- Включаем программу Wired Tether, включаем соединение
- Включаем GScript Lite, выполняем созданный нами скрипт
- .
- PROFIT!
Ну и чтобы убедиться, зайдем на 2ip.ru:
Чтобы отключить, достаточно перезапустить мобильное подключение.
Все. Теперь можно вдоволь полазить в маркете, Скачать оттуда гору полезного и не только софта.
upd: Тем, кто не может совладать с настройкой роутинга на Windows, могу посоветовать WinRoute от Kerio. Через него тоже работает, и вся настройка его заключается в указании сети, подключенной к интернету. Скриншот
upd2: Переписал статью, стало универсально и без проблем. Спасибо «Corwin» за указание ошибки в скрипте, приводящей к «invalid argument»
Источник
Share Your Windows Internet With Your Android Phone VIA USB Cable
How To Share Your Windows Internet With Your Android Phone VIA USB Cable:- Wondering whether it’s possible to browse through the Internet without WiFi or Mobile data? Yes, it is possible. If your PC has an Internet connection, you can share it with your Android device just by using a USB port and USB cable. Sounds cool? Read on then, this post is for you.
STEP 1
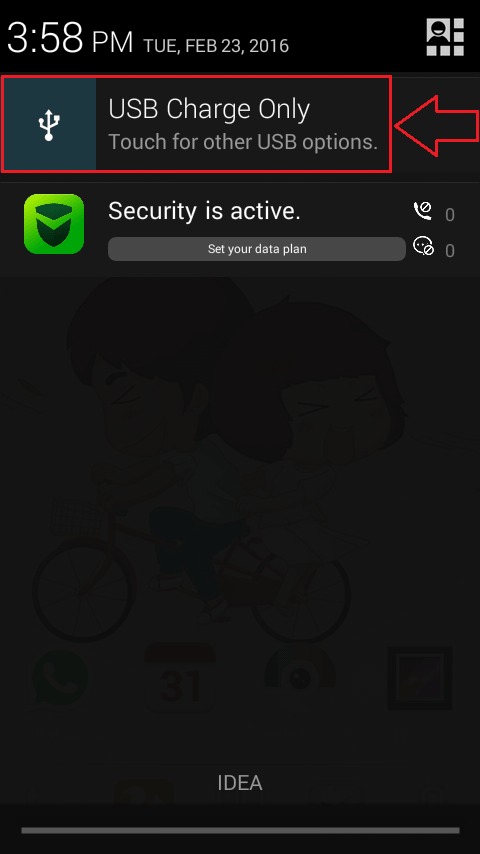
- First of all, connect your Android phone with your PC via the USB port. Your phone will be connected automatically in the USB Charge Only mode. Simply click on the notification as shown in the screenshot. This will open up other options for USB computer connection.
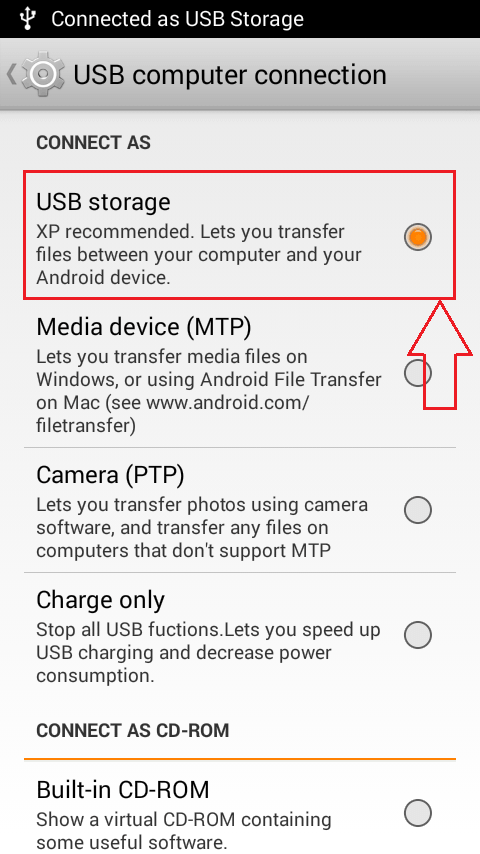
STEP 2
- Find the section named CONNECT AS under USB computer connection. Now check the radio button corresponding to USB storage option as shown in the screenshot.
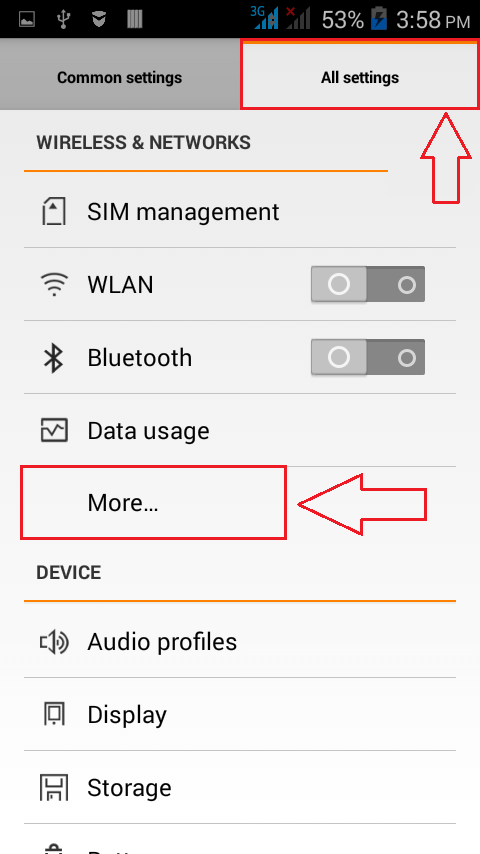
STEP 3
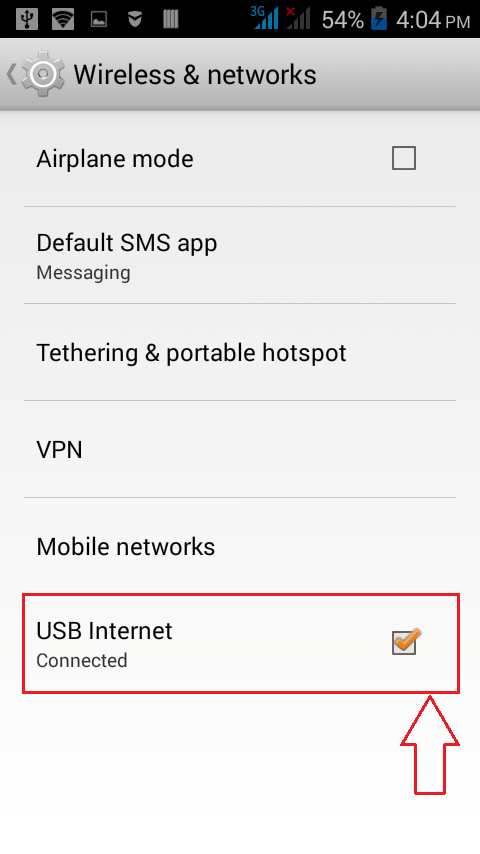
- Once you are done, launch the Settings screen in your Android phone. As next, click on the More option under the section WIRELESS & NETWORKS as shown.
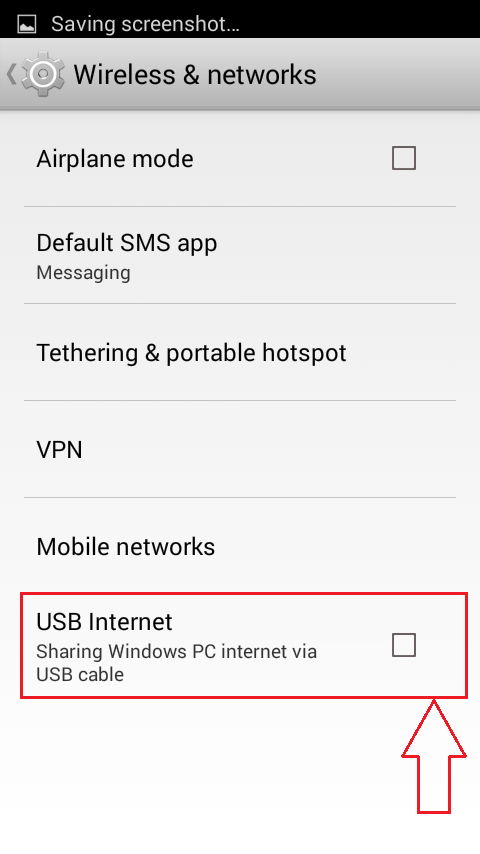
STEP 4
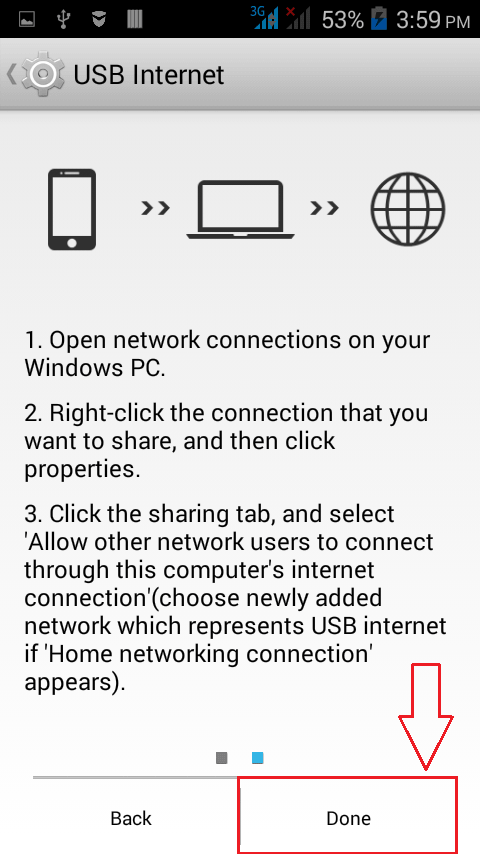
- Now find the option named USB Internet under the Wireless & networks section and click on it.
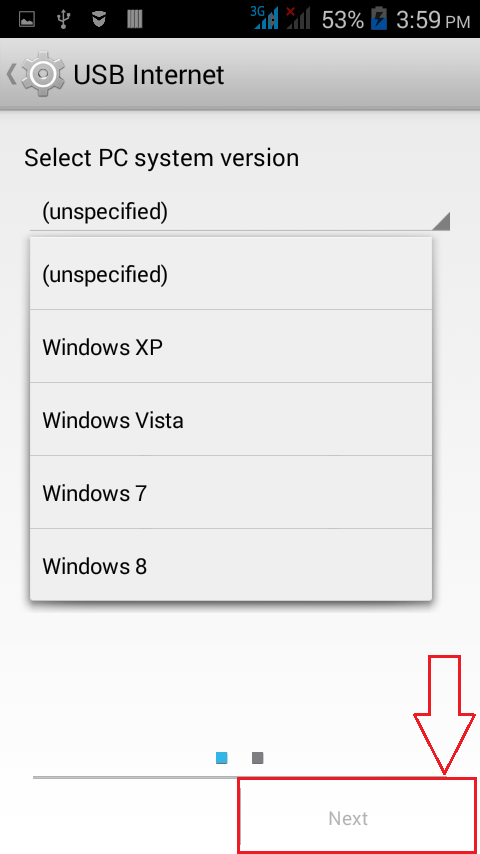
STEP 5
- Select your PC system version from the drop down menu. Once you are done, click on the Next button at the bottom of the screen.
STEP 6
- Now you need to open up the Network center in your PC as shown in the screenshot. Locate and right click on the network that you want to share with your Android device via USB cable. From the options that gets expanded out, click on Status option or Properties option.
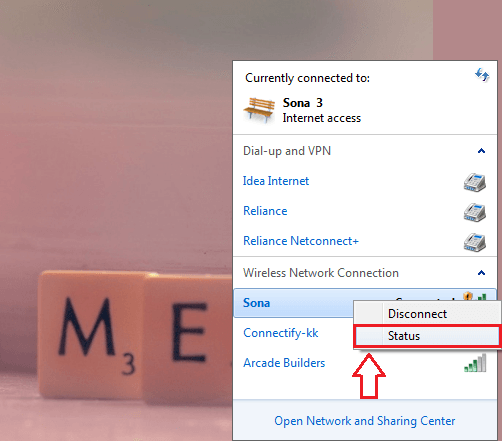
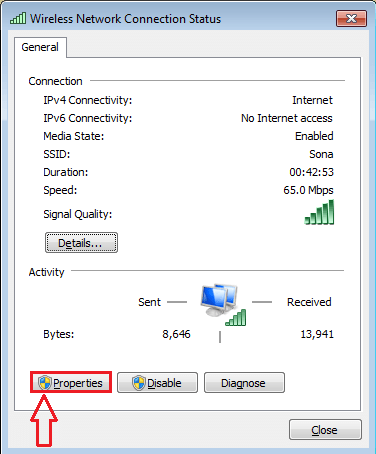
STEP 7
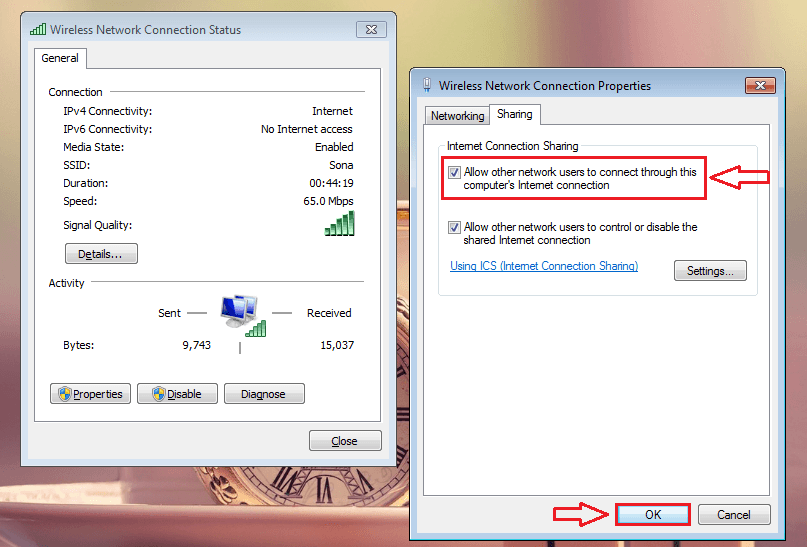
- A new window named Wireless Network Connection Status opens up. You need to locate and click on the button named Properties.
STEP 8
- When the Wireless Network Connection Properties window opens up, click on the Sharing tab and check the checkbox that says Allow other network users to connect through this computer’s Internet connection. Once you are done, simply click on the OK button.
STEP 9
- Now let’s get back to your Android phone from where we left off. Just click on the Done button at the bottom of your phone screen.
STEP 10
- There you are! Your phone is now equipped to browse through the Internet using your PC’s Internet connection.
Try out this trick today itself. Just turn off your WiFi or Mobile data and access any web page via USB cable to amuse your friends. Hope you found the article useful.

Someone who is in love with writing and technical tricks & tips.
Источник
Android tethering
Tethering is a way to have internet access on your PC through your smartphone using its network connection. USB tethering and Wi-Fi access point tethering are natively supported since Android 2.2 «Froyo».
Contents
Wi-Fi access point
Using an Android phone as a Wi-Fi access point (to a 3G/4G mobile internet connection) is available for devices running Android 2.2 «Froyo» or newer.
Enable it via one of the following:
- Settings > Wireless & networks > Internet tethering > Wi-Fi access point
- Settings > More. > Tethering & mobile hotspot > Mobile Wi-Fi hotspot
USB tethering
USB tethering is available since Android 2.2 «Froyo».
- Connect the phone to your computer via USB (the USB connection mode — Phone Portal, Memory Card or Charge only — is not important, but please note that you will not be able to change the USB mode during tethering)
- Enable the tethering option from your phone. This is usually done from one of:
- Settings -> Wireless & networks -> Internet tethering (or Tethering & portable hotspot, for more recent versions)
- Settings -> More. -> Tethering & mobile hotspot -> USB tethering
- Install the usb_modeswitch package. See Mobile broadband modem#Mode switching for more information.
- Follow Network configuration.
- If you are using a cellular data plan and you have recently entered a new billing period, you may need to restart your phone.
Using systemd-networkd with udev
 This article or section needs expansion.
Using systemd-networkd you can automatically adjust the networking to use the phone as the gateway when plugged in.
You may have to adjust the idVendor attribute depending on your phone. You can check using udevadm:
Then create the corresponding systemd-networkd file:
USB tethering with AziLink
AziLink is an application that allows USB tethering for Android-based phones, without requiring root access. It is very useful for Android older than version 2.2, when there was no stock USB tethering feature implemented. It also does not require changes to your browser, and all network traffic is transparently handled (except ICMP pings). It may be somewhat CPU intensive on the phone at high usage rates (a 500 kBytes/sec data transfer rate may take more than 50% of phone CPU).
Tools needed
For Arch, you need to install the openvpn package. You will also need to install the android-tools package for the adb tool and android-udev which sets up the correct /usr/lib/udev/rules.d/51-android.rules file for your device to be recognized. On the phone, you need the azilink.apk (azilink homepage). The android application acts as a NAT, adb forwards the ports to your phone, and your openvnp setup will connect to it.
Configuring the phone connection in Arch Linux
So that you do not have to run adb as root, we are going to grant your user permissions to your usb device. Make sure you have turned on USB debugging on the phone (usually in Settings -> Applications -> Development -> USB debugging) so that it will be shown as a device, and that it is plugged in to your computer via the USB cable. You should see it with you run the lsusb command. Original azi link instructions are here
The device should be listed. Example output for the Acer Liquid phone:
Then, create the following file, replacing ciri by your own Linux user name, and 0502 by the vendor ID of your own phone:
As root run the udevadm control —reload command to make the change effective. To make sure the change took effect, run adb devices and it should say device instead of unauthorized . Another way to make it take effect is to reboot. Another test is to run adb shell to get to your phones unix prompt.
Procedure
Run the AziLink application in the phone and select About at the bottom to receive instructions, which basically are:
- You will have to enable USB debugging on the phone if it was not already enabled (usually in Settings -> Applications -> Development -> USB debugging).
- Connect the phone with the USB cable to the PC.
- Run AziLink and make sure that the Service active option at the top is checked.
- Run the following commands in your Linux PC:
azilink.ovpn source from here
You may need to manually update the contents of resolv.conf to
If you are running NetworkManager, you may need to stop it before running OpenVPN.
USB tethering with EasyTether
Get the easytether linux client software. The commands to set it up and run it are as follows.
Make sure you have the EasyTether android app installed on your phone for it to connect to. Note: The Lite app disables some connections and you must have the paid app for full functionality. For this reason, using the AziLink setup is recommended instead.
Tethering via Bluetooth
Android (from at least 4.0 onwards, possibly earlier) can provide a Bluetooth personal-area network (PAN) in access point mode.
NetworkManager can perform this action and handle the network initialisation itself; consult its documentation for more details.
Alternatively: pair and ensure you can connect your computer and Android device, as described on Bluetooth, then, substituting the address of the device (here given as AA_BB_CC_DD_EE_FF ), do:
This will create a network interface bnep0 . Finally, configure a network connection on this interface; Android offers DHCP by default.
Tethering with SOCKS proxy
With this method tethering is achieved by port forwarding from the phone to the PC. This is suitable only for browsing. For Firefox, you should set network.proxy.socks_remote_dns to true in about:config ( address bar )
Tools needed
- The android-tools and android-udev packages
- USB connection cable from your phone to PC
- Either Tetherbot or Proxoid
Instructions
Tetherbot
Tetherbot is an experimental SOCKS proxy and Port Bouncer that should allow you to connect your laptop to the internet using the internet connection (EDGE, 3G or Wifi) of your T-Mobile G1 Cellphone. It is discontinued and its website is down, but still can be accessed from Wayback Machine[1] where its APK can also be downloaded from.
In order to do SOCKS proxy via Tetherbot to connect your browser to the Internet, do:
- For your phone, open the application Tetherbot and press the Start Socks button
- Start your SOCKS proxy by running:
- Now go to your web browser’s proxy settings, set a manual proxy configuration with the proxy host address localhost and port 1080 , leaving the rest blank.
Proxoid
Follow the instructions demonstrated in the following link.
Источник


