- Kotlin Android – Start Another Activity – Example
- Kotlin Android – Start Another Activity
- Example – Start Another Activity in Kotlin Android
- activity_another.kt
- Conclusion
- Используем Kotlin в своем Android-проекте
- Подготовка
- 1. Установка плагинов Kotlin
- 2. Создание Activity на Kotlin
- 3. Использование Kotlin
- 4. Использование расширения Android Kotlin
- 5. Конвертация Java в Kotlin
- Видеоверсия урока
- Заключение
- Урок 5. Kotlin. Добавление второго экрана в android-приложение. Передача данных через Intent
- Вы узнаете
- Создаем новое активити
- Изучите файл манифеста
- Создаем макет для нового активити
- Добавьте TextView для заголовка
- Introduction to Android Activities with Kotlin
- Version
- Getting Started
- Activity Lifecycle
- Configuring an Activity
- Starting an Activity
- Creating an Activity
- Stopping an Activity
- Registering Broadcast Receivers
- Persisting State
- Persisting Data Between Launches
- Configuration Changes
- Handling Configuration Changes
- Where To Go From Here?
Kotlin Android – Start Another Activity – Example
Kotlin Android – Start Another Activity
When the Android Application we are developing has multiple Activities, we should be able to start another Activity from the current Activity. Meaning navigate between activities.
In this tutorial, we will learn how to start an Activity from current Activity, with an example Android Application.

Starting an activity could be triggered programmatically when an event occurs. Some of such events are
- Clicking a Button or any other View
- Downloading a file is completed
- Clicking on an item in the Drawer
? ? Your browser does not support the video tag.
To start new (another) Android Activity from an Activity, follow these steps.
- In the current Activity, create an Intent with current Activity’s context and Next Activity Class passed as arguments. val intent = Intent(this, AnotherActivity::class.java)
- Call startActivity() method with intent passed as argument. Android OS does start the activity mentioned in the intent. startActivity(intent)
Example – Start Another Activity in Kotlin Android
- IDE Used : Android Studio
- Run : Android Application is run on an Android Device running Android 7.0.
In this example, we shall open new activity on button click from current activity. Consider that there are two activities in the Android Application : 1. MainActivity 2. AnotherActivity
AndroidManifest.xml containing these two activities is
AndroidManifest.xml
- MainActivity is the launcher Activity. This activity is displayed when you open this Android Application.
activity_main.xml
MainActivity.kt
activity_another.kt
AnotherActivity.kt
Run this Android Application. Click on “START ANOTHER ACTIVITY” button. The application navigates to Another Activity. The flow of navigation would be as shown in the following video.
? ? Your browser does not support the video tag.
Conclusion
In this Kotlin Android Tutorial – Kotlin Android Start Another Activity, we have learnt to start a new activity on button click. Infact the same code snippet could be used in any event handler just like button setOnClickListener.
Источник
Используем Kotlin в своем Android-проекте
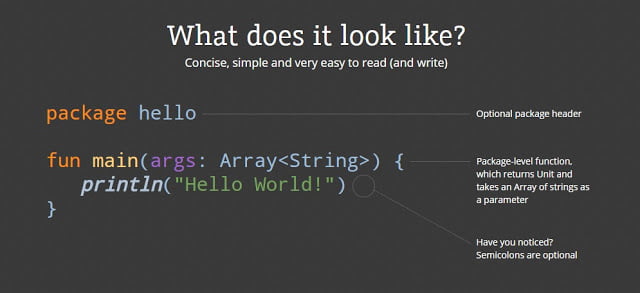
Kotlin — язык программирования с открытым исходным кодом от компании JetBrains, становится все более популярным среди Java-разработчиков. Совместимый с Java, он предлагает более богатый опыт разработки за счет своей современности, выразительности и лаконичности.
Если вы следите за альтернативными языками программирования для разработки под Android, Вы должны попробовать Kotlin. Он может быть использован вместе с Java в ваших Android-проектах.
В этом уроке я покажу вам как использовать Kotlin и плагины Kotlin в Android Studio.
Подготовка
Чтобы следовать вместе со мной, вы должны иметь:
— последняя версия Android Studio
— базовое понимания синтаксиса Kotlin
1. Установка плагинов Kotlin
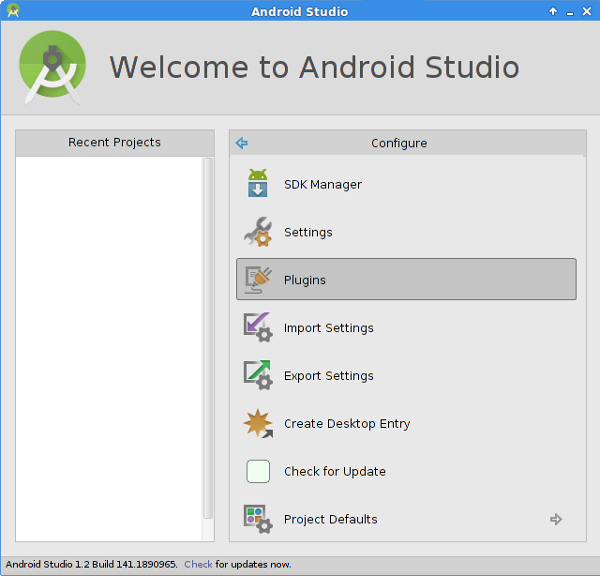
В Android Studio выбираем Configure > Plugins.
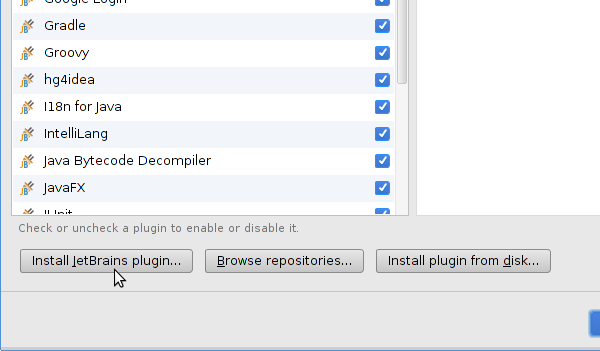
На следующем экране нажимаем на кнопку Install JetBrains plugin… внизу.
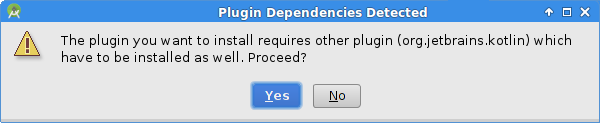
Выбираем Kotlin Extensions For Android из списка и нажмите Install Plugin справа.
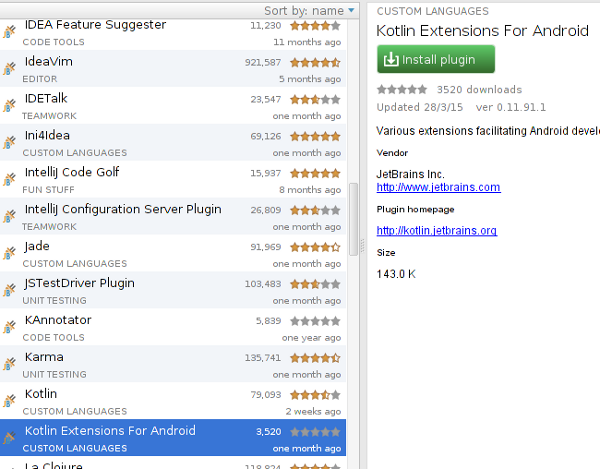
Так как плагин зависит от плагина Kotlin, студия справшивает можно ли установить его. Нажмите Yes для начала установки.
После завершения установки, перезапустите Android Studio для активации плагинов.
2. Создание Activity на Kotlin
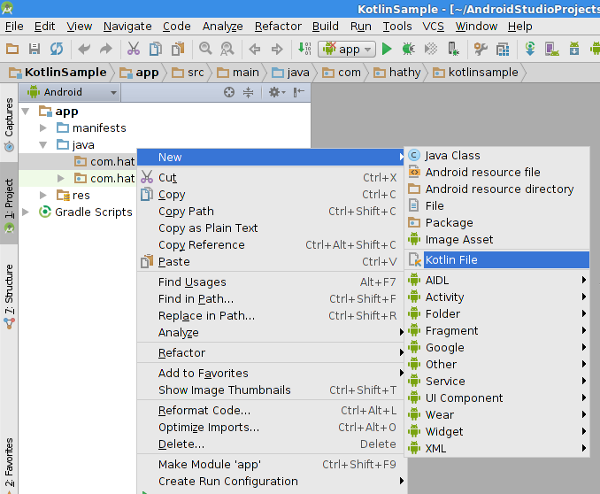
В Android Studio нажмите правой кнопкой мыши на имени вашего пакета и выберите New > Kotlin File.
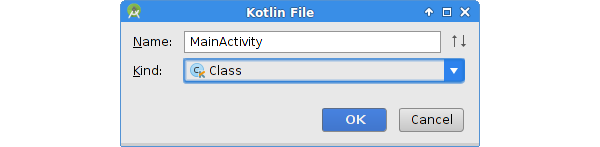
В диалоговом окне, введите имя новой Activity и выберите Class из выпадающего списка. Я назвал свой класс MainActivity.
После того, как класс был создан, вы увидите предупреждение о том, чтобы вы настроили модуль приложения для поддержки Kotlin.
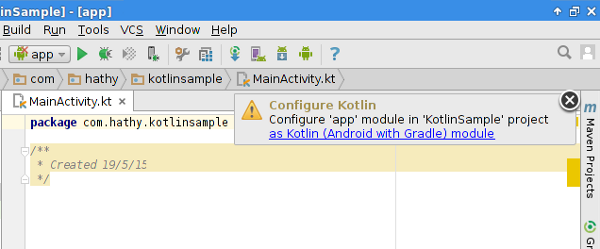
В алерте нажмте на ссылку и во всплывающем окне нажмите OK для выбора значений по умолчанию.
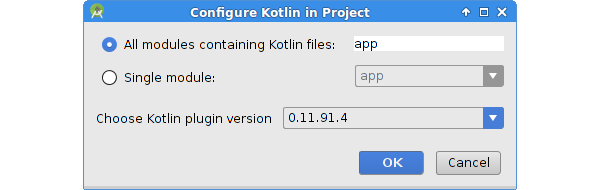
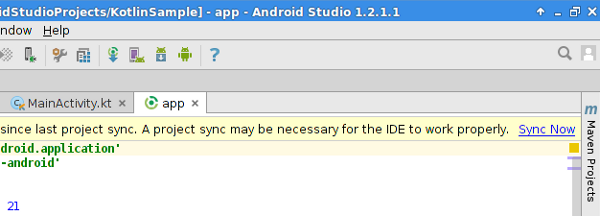
Для настройки поддержки Kotlin в вашем проекте, плагин Kotlin сделает некоторые изменения в файле build.gradle. Примените изменения настроек нажатием на кнопку Sync Now сверху.
На этом шаге настройка проекта завершена. Вернитесь к вашему Kotlin-классу для начала кодинга.
3. Использование Kotlin
Для упрощения примера я покажу как создал Activity с одним единственным TextView, отображающим строку.
Убедитесь, что ваш класс является подклассом Activity и переопределен метод onCreate. Ваш класс должен выглядеть так:
Создайте экземпляр класса TextView как локальную переменную с помощью ключевого слова val:
Вызовите метод setText у TextView для установки текста и установите его как layout с помощью метода setContentView.
Также как и Activity на Java, вам нужно объявить вашу Kotlin-Activity в AndroidManifest.xml. Вот так выглядит объявление Activity в манифесте:
Теперь вы можете скомпилировать и запустить приложение на вашем Android-устройстве или эмуляторе. Хотя компилятор Kotlin немного медленнее, чем Java, вы вряд ли ощутите особую разницу во время сборки вашего проекта.
4. Использование расширения Android Kotlin
Для того, чтобы использовать плагин в вашем приложении добавьте в файл build.gradle зависимость org.jetbrains.kotlin:kotlin-android-extensions как указано ниже. Не забудьте также нажать кнопку Sync Now:
С помощью этого расширения вы можете забыть про findViewById. Плагин все сделает за вас. Плагин сканирует XML-файл вашего лейаута, и по id виджетов создает в вашей Activity переменные такого же типа и с именем совпадающим с id виджета. Небольшой пример:
У нас есть TextView с id myMessage. Создайте Kotlin-активити и переопределите метод onCreate:
Вызовите метод setContentView и передайте id вашего лейаута:
Вместо вызова findViewById вы можете импортировать ваш TextView и использовать его как обычную переменную:
Если вы хотите импортировать все виджеты, вместо myMessage нужно написать *:
Теперь вы можете использовать TextView в вашей Activity:
5. Конвертация Java в Kotlin
Вы можете использовать плагин Kotlin, для преобразования Java-классов классы Kotlin. Чтобы попробовать эту функцию , создайте новый Java-класс со следующей реализации. Это простая активити, которая селадывает два числа.
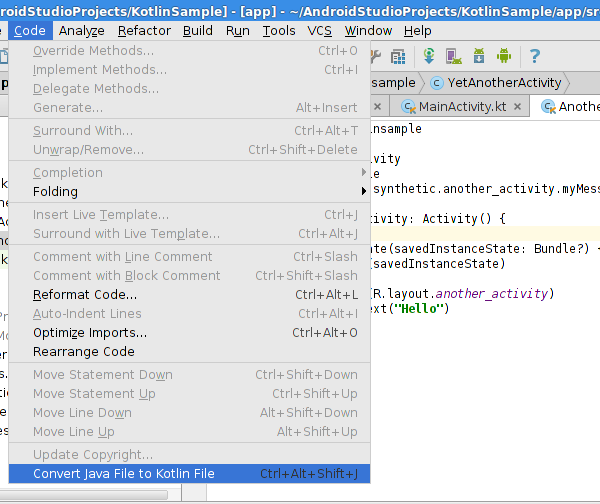
Преобразуйте Java-класс в класс Kotlin, нажатием Control+Alt+Shift+J, или с помощью меню, выбрав Code > Convert Java File to Kotlin File.
После конвертации ваш класс будет выглядеть так:
Также вы можете заметить, что расширение файла поменялось с .java на .kt.
Видеоверсия урока
Заключение
В этом уроке мы научились использовать Kotlin в ваших Andoid-проектах. Java и Kotlin могут использоваться вместе в одном проекте. Если вы только изучаете Kotlin, то лучше использовать его постепенно.
Источник
Урок 5. Kotlin. Добавление второго экрана в android-приложение. Передача данных через Intent
Продолжаем курс по обучению основам разработки мобильных приложений в Android Studio на языке Kotlin.
В этом уроке создадим второй экран в приложении, и настроим взаимодействие между экранами с передачей данных.
Предыдущий урок, в котором мы обрабатывали нажатия кнопок, здесь
Продолжаем разработку приложения на языке Kotlin, которое мы делали на прошлом уроке. Исходный код можно скачать на странице прошлого урока.
Пока что наше приложение имеет только один экран. В этом уроке мы добавим второе активити, которое будет отображать экран с данными, полученными на основе данных с первого экрана. При нажатии кнопки Random будет отображаться окно со случайным числом от нуля до текущего значения счетчика.
Вы узнаете
- Как запустить новое активити с помощью интента
- Как передать данные во второе активити через интент
- Как получить данные, переданные через интент во втором активити
Создаем новое активити

- Раскройте пакет с именем com.example.android.myfirstapp по пути apps >java >com.example.android.myfirstapp.
- Правым кликом выберите команду File >New >Activity >Empty Activity.
- В окне настроек нового активити установите для него имя SecondActivity. Убедитесь, что в поле Source Language установлен Kotlin.
Также проверьте им пакета, оно должно соответствовать вашему приложению. Если вы не выделили имя пакета в меню при вызове команды добавления нового активити, установите в это поле android.example.com.myfirstapp.
4. Нажмите Finish. Android Studio создаст файл на языке Kotlin и файл макета на языке XML для нового активити.
5. Дождитесь синхронизации gradle в Android Studio.Gradle это система сборки, которая используется в Android Studio для компиляции и постройки приложения. Вы будете видеть сообщения от gradle о прогрессе сборки приложения внизу экрана.
Изучите файл манифеста

Каждое активити должно быть определено в файле манифеста. Вы можете добавить новое активити в приложение не через меню добавления активити, но тогда вам нужно будет вручную прописать его в манифесте.
Изучите файл Kotlin нового активити
- Откройте файл SecondActivity.kt.
- Обратите внимание на метод onCreate(). Постмотрите на вызов setContentView(). Этот метод указывает файл макета activity_second.xml как разметку нового активити.
В этом активити мы добавим метод отображения случайного числа. Но сначала нам нужно определить поле в макете для его отображения.
Создаем макет для нового активити
Экран нового активити будет отображать заголовок и случайный номер. На вкладке дизайн редактора макетов можно увидеть, как будет выглядеть экран:

Добавьте TextView для заголовка

- Откройте файл activity_second.xml. Вы увидите пустой ConstraintLayout. Это макет по умолчанию для шаблона Empty Activity.
- Добавьте TextView из палитры компонентов. Этот TextView будет использовано для отображения заголовка вверху экрана.
- Ограничение верхнего края TextView установим по верхней границе окна, левый край по левой стороне, а правый край по правой стороне экрана. Нижний край не ограничиваем.
- Установите значение ширину match_parent, а высоту wrap_content, поэтому высота изменится в соответствии с высотой содержимого.
- Установите идентификатор @+id/textview_label.
- Установите верхний, левый и правый отступ 24dp. Левый и правый отступы могут также иметь значение «start» и «end» для поддержки локализации языков с написанием справа налево.
- Установите значение параметра цвета текста @color/colorPrimaryDark и размер текста 24sp.
- Поместите текст в TextView «Это случайное число между 0 и %1d.» Спецификатор %1dбудет заменен числом в процессе работы приложения.
- Поместите текст в ресурсы с именем random_heading.

Это код XML для TextView, которое отображает заголовок:
Источник
Introduction to Android Activities with Kotlin
Learn about one of the most important concepts within Android apps with this introduction to Android activities tutorial, using Kotlin!

Version
- Kotlin 1.3, Android 4.4, Android Studio 3

Update Note: This tutorial has been updated to Kotlin 1.3 and Android Studio 3.3 by Steve Smith. The previous update was made by Joe Howard and the original tutorial was written by Namrata Bandekar.
Note: The sample code for this tutorial has been updated to be compatible with Android Studio 3.3.2 or later.
When you make an Android app, it’s likely that the first thing you’ll do is plot and plan how you’ll take over the world. Just kidding. Actually, the first thing you do is create an Activity. Activities are where all the action happens, because they are the screens that allow the user to interact with your app.
In short, activities are one of the basic building blocks of an Android application.
In this Introduction to Android Activities Tutorial, you’ll dive into how to work with activities. You’ll create a to-do list app named Forget Me Not and along the way learn:
- The process for creating, starting and stopping an activity, and how to handle navigation between activities.
- The various stages in the lifecycle of an activity and how to handle each stage gracefully.
- The way to manage configuration changes and persist data within your activity.
In addition, you’ll use the Kotlin programming language and Android Studio 3.3. You’ll need to use Kotlin 1.3.21 or later and Android Studio 3.3.2 or later.
This tutorial assumes you’re familiar with the basics of Android development. If you’re completely new to Kotlin, XML or Android Studio, you should take a look at the Beginning Android Development Series and Kotlin For Android: An Introduction before you start.
Getting Started
Download the starter project using the Download materials button at the top or bottom of the tutorial. Open Android Studio 3.3.2 or later, and choose Open an existing Android Studio project. Then select the project you just extracted.

Your subject and new best friend for the rest of the tutorial is Forget Me Not, which is a simple app that lets you add and delete tasks from a list. It also displays the current date and time so you’re always on top of your game!
Run the project as it is now and you’ll see a very basic screen:

At this point, there isn’t much you can do. Your to-do list is empty and the “ADD A TASK” button does nothing when you tap it. Your mission is to liven up this screen by making the to-do list modifiable.
Activity Lifecycle
Before firing up your fingers, indulge yourself in a bit of theory.
As mentioned earlier, activities are the foundations upon which you build screens for your app. They encompass multiple components the user can interact with, and it’s likely that your app will have multiple activities to handle the various screens you create.
Having all these activities doing different things makes it sound like developing an Android app is a complicated undertaking.
Fortunately, Android handles this with specific callback methods that initiate code only when it’s needed. This system is known as the activity lifecycle.
Handling the various lifecycle stages of your activities is crucial to creating a robust and reliable app. The lifecycle of an activity is best illustrated as a step pyramid of different stages linked by the core callback methods:
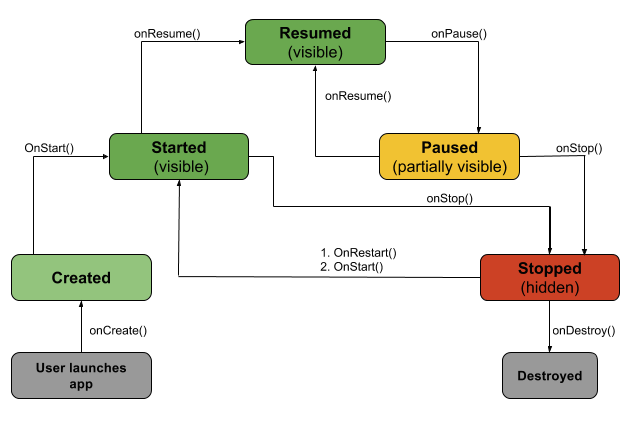
Following the diagram above, you can picture the lifecycle in action as it courses through your code. Take a closer look at each of the callbacks:
- onCreate(): Called by the OS when the activity is first created. This is where you initialize any UI elements or data objects. You also have the savedInstanceState of the activity that contains its previously saved state, and you can use it to recreate that state.
- onStart(): Just before presenting the user with an activity, this method is called. It’s always followed by onResume() . In here, you generally should start UI animations, audio based content or anything else that requires the activity’s contents to be on screen.
- onResume(): As an activity enters the foreground, this method is called. Here you have a good place to restart animations, update UI elements, restart camera previews, resume audio/video playback or initialize any components that you release during onPause() .
- onPause(): This method is called before sliding into the background. Here you should stop any visuals or audio associated with the activity such as UI animations, music playback or the camera. This method is followed by onResume() if the activity returns to the foreground or by onStop() if it becomes hidden.
- onStop(): This method is called right after onPause() , when the activity is no longer visible to the user, and it’s a good place to save data that you want to commit to the disk. It’s followed by either onRestart() , if this activity is coming back to the foreground, or onDestroy() if it’s being released from memory.
- onRestart(): Called after stopping an activity, but just before starting it again. It’s always followed by onStart() .
- onDestroy(): This is the final callback you’ll receive from the OS before the activity is destroyed. You can trigger an activity’s desctruction by calling finish() , or it can be triggered by the system when the system needs to recoup memory. If your activity includes any background threads or other long-running resources, destruction could lead to a memory leak if they’re not released, so you need to remember to stop these processes here as well.
Note: You do not call any of the above callback methods directly in your own code (other than superclass invocations) — you only override them as needed in your activity subclasses. They are called by the OS when a user opens, hides or exits the activity.
So many methods to remember! In the next section, you’ll see some of these lifecycle methods in action, and then it’ll be a lot easier to remember what everything does.
Configuring an Activity
Keeping the activity lifecycle in mind, take a look at an activity in the sample project. Open MainActivity.kt, and you’ll see that the class with its onCreate() override looks like this:
Here’s a play-by-play of what’s happening above:
- You initialize the activity’s properties, which include an empty mutable list of tasks and an adapter initialized using by lazy .
- You call onCreate() on the superclass — remember that this is (usually) the first thing you should do in a callback method. There are some advanced cases in which you may call code prior to calling the superclass.
- You set the content view of your activity with the corresponding layout file resource.
- Here you set up the adapter for taskListView . The reference to taskListView is initialized using Kotlin Android Extensions, on which you can find more info here. This replaces findViewById() calls and the need for other view-binding libraries.
- You add an empty OnItemClickListener() to the ListView to capture the user’s taps on individual list entries. The listener is a Kotlin lambda.
- An empty on-click method for the “ADD A TASK” button, designated by the activity_main.xml layout.
- A private function that initializes the adapter for the list view. Here you are using the Kotlin = syntax for a single-expression function.
Note: To learn more about ListViews and Adapters , refer to the Android Developer docs.
For larger data sets than you would encounter in this example, a RecyclerView and RecyclerView.ViewHolder would be recommended. See the RecyclerView docs for more information.
Your implementation follows the theory in the previous section — you’re doing the layout, adapter and click listener initialization for your activity during creation.
Starting an Activity
In its current state, the app is a fairly useless lump of ones and zeros because you can’t add anything to the to-do list. You have the power to change that, and that’s exactly what you’ll do next.
In the MainActivity.kt file you have open, add a property to the top of the class:
You’ll use this immutable value to reference your request to add new tasks later on.
Then add this import statement at the top of the file:
And add the following implementation for addTaskClicked() :
When the user taps the “ADD A TASK” button, the Android OS calls addTaskClicked() . Here you create an Intent to launch the TaskDescriptionActivity from MainActivity .
Note: There will be a compile error since you have yet to define TaskDescriptionActivity .
You can start an activity with either startActivity() or startActivityForResult() . They are similar except that startActivityForResult() will result in onActivityResult() being called once the TaskDescriptionActivity finishes. You’ll implement this callback later so you can know if there is a new task to add to your list or not.
But first, you need a way to enter new tasks in Forget Me Not — you’ll do so by creating the TaskDescriptionActivity .
Note: Intents are used to start activities and pass data between them. For more information, check out the Android: Intents Tutorial
Creating an Activity
Android Studio makes it very easy to create an activity. Just right-click on the package where you want to add the activity — in this case, the package is com.raywenderlich.android.forgetmenot. Then navigate to New\Activity, and choose Empty Activity, which is a basic template for an activity:

On the next screen, enter TaskDescriptionActivity as the Activity Name and Android Studio will automatically fill the other fields based on that.

Click Finish and put your hands in the air to celebrate. You’ve just created your first activity!
Android Studio will automatically generate the corresponding resources needed to create the activity. These are:
- Class: The class file is named TaskDescriptionActivity.kt. This is where you implement the activity’s behavior. This class must subclass the Activity class or an existing subclass of it, such as AppCompatActivity.
- Layout: The layout file is located under res/layout/ and named activity_task_description.xml. It defines the placement of different UI elements on the screen when the activity is created.
The layout file created from the Empty Activity template in Android Studio 3.0 and above defaults to using a ConstraintLayout for the root view group. For more information on ConstraintLayout, please see the android developer docs here.
In addition to this, you will see a new addition to your app’s AndroidManifest.xml file:
The activity element declares the activity. Android apps have a strong sense of order, so all available activities must be declared in the manifest to ensure the app only has control of activities declared here. You don’t want your app to accidentally use the wrong activity, or even worse, have it use activities that are used by other apps without explicit permission.
There are several attributes that you can include in this element to define properties for the activity, such as a label or icon, or a theme to style the activity’s UI.
android:name is the only required attribute. It specifies the activity’s class name relative to the app package (hence the period at the beginning).
Now build and run the app. When you tap on ADD A TASK, you’re presented with your newly generated activity!

Looking good, except for the fact that it’s lacking substance. Now for a quick remedy to that!
In your newly generated TaskDescriptionActivity, paste the following into your class file, overwriting anything else except the class declaration and its brackets.
Note: You can quickly fix any missing imports that Android Studio complains about by placing your cursor on the item and pressing option+return on Mac or Alt+Enter on PC.
Here, you’ve accomplished the following:
- Used the Kotlin companion object for the class to define attributes common across the class, similar to static members in Java.
- Overriden the onCreate() lifecycle method to set the content view for the activity from the layout file.
- Added an empty click handler that will be used to finish the activity.
Jump over to your associated layout in res/layout/activity_task_description.xml and replace everything with the following:
Here you change the layout so there is a TextView prompting for a task description, an EditText for the user to input the description, and a Done button to save the new task.
Run the app again, tap ADD A TASK and your new screen will look a lot more interesting.

Stopping an Activity
Just as important as starting an activity with all the right methods is properly stopping it.
In TaskDescriptionActivity.kt, add these imports, including one for Kotlin Android Extensions:
Then add the following to doneClicked() , which is called when the Done button is tapped in this activity:
You can see a few things are happening here:
- You retrieve the task description from the descriptionText EditText , where Kotlin Android Extensions has again been used to get references to view fields.
- You create a result Intent to pass back to MainActivity if the task description retrieved in step one is not empty. Then you bundle the task description with the intent and set the activity result to RESULT_OK , indicating that the user successfully entered a task.
- If the user has not entered a task description, you set the activity result to RESULT_CANCELED .
- Here you close the activity.
Once you call finish() in step four, the callback onActivityResult() will be called in MainActivity — in turn, you need to add the task to the to-do list.
Add the following method to MainActivity.kt, right after onCreate() :
Let’s take this step-by-step:
- You check the requestCode to ensure the activity result is indeed for your add task request you started with TaskDescriptionActivity .
- You make sure the resultCode is RESULT_OK — the standard activity result for a successful operation.
- Here you extract the task description from the result intent and, after a null check with the let function, add it to your list.
- Finally, you call notifyDataSetChanged() on your list adapter. In turn, it notifies the ListView about changes in your data model so it can trigger a refresh of its view.
Build and run the project to see it in action. After the app starts, tap ADD A TASK. This will bring up a new screen that lets you enter a task. Now add a description and tap Done. The screen will close and the new task will be on your list:

Registering Broadcast Receivers
Every to-do list needs to have a good grasp on date and time, so a time display should be the next thing you add to your app. Open MainActivity.kt and add the following after the existing property declarations at the top:
Then add a companion object near the top of MainActivity :
And initialize the tickReceiver by adding the following to the bottom of MainActivity :
Here, you create a BroadcastReceiver that sets the date and time on the screen if it receives a time change broadcast from the system. You use getCurrentTimeStamp() , which is a utility method in your activity, to format the current date and time.
Note: If you’re not familiar with BroadcastReceivers , you should refer to the Android Developer documentation.
Next add the following methods to MainActivity underneath onCreate()
Here you do a few things:
- You call onResume() on the superclass.
- You update the date and time TextView with the current time stamp, because the broadcast receiver is not currently registered.
- You then register the broadcast receiver in onResume() . This ensures it will receive the broadcasts for ACTION_TIME_TICK. These are sent every minute after the time changes.
- In onPause() , you first call onPause() on the superclass.
- You then unregister the broadcast receiver in onPause() , so the activity no longer receives the time change broadcasts while paused. This cuts down unnecessary system overhead.
Build and run the app. Now you should now see the current date and time at the top of the screen. Even if you navigate to the add task screen and come back, the time still gets updated.

Persisting State
Every to-do list is good at remembering what you need to do, except for your friend Forget Me Not. Unfortunately, the app is quite forgetful at the moment. See it for yourself.
Open the app and follow these steps.
- Tap ADD A TASK.
- Enter “Replace regular with decaf in the breakroom” as the task description and tap Done. You’ll see your new task in the list.
- Close the app from the recent apps.
- Open the app again.
You can see that it forgot about your evil plans.
Persisting Data Between Launches
Open MainActivity.kt, and add the following properties to the top of the class:
And add the following underneath the rest of your activity lifecycle methods.
Here you build a comma separated string with all the task descriptions in your list, and then you save the string to SharedPreferences in the onStop() callback. As mentioned earlier, onStop() is a good place to save data that you want to persist across app uses.
Next add the following to onCreate() below the existing initialization code:
Here you read the saved list from the SharedPreferences and initialize taskList by converting the retrieved comma separated string to a typed array.
Note: You used SharedPreferences since you were only saving primitive data types. For more complex data you can use a variety of storage options available on Android.
Now, build and run the app. Add a task, close and reopen the app. Do you see a difference? You are now able to retain tasks in your list!

Configuration Changes
You need the ability to delete entries from Forget Me Not.
Still in MainActivity.kt, at the bottom of the class add:
In a nutshell, you’re creating and showing an alert dialog when you select a task from the list. Here is the step-by-step explanation:
- You create an AlertDialog.Builder which facilitates the creation of an AlertDialog .
- You set the alert dialog title.
- You set the alert dialog message to be the description of the selected task. Then you also implement the PositiveButton to remove the item from the list and refresh it, and the NegativeButton to dismiss the dialog.
- You create the alert dialog.
- You display the alert dialog to the user.
Update the OnItemClickListener of the taskListView in onCreate() :
Your app won’t compile though until you define some strings. It’s good practice to keep text you want in your app separate from the code. The reason is so that you can easily change it, which is especially useful for text that you use in multiple places. It’s also handy for those times you need to translate your app into another language.
To configure the strings, open res/values/strings.xml and within the resources element add:
Build and run the app. Tap on one of the tasks. You’ll see an alert dialog with options to CANCEL or DELETE the task from the list:

Now try rotating the device. (Make sure you have rotation in the device settings set to auto-rotate.)
As soon as you rotate the device, the alert dialog is dismissed. This makes for an unreliable, undesirable user experience — users don’t like it when things just vanish from their screen without reason.
Handling Configuration Changes
Configuration changes, such as rotation, keyboard visibility and so on, cause an activity to shut down and restart. You can find the full list of system events that cause an activity to be recreated here.
There are a couple of ways you can handle a configuration change.
One way is as follows. In AndroidManifest.xml, find the start tag:
And change it to:
Here, you declare that your MainActivity will handle any configuration changes that arise from a change in orientation or screen size. This simple line prevents a restart of your activity by the system, and it passes the work to MainActivity .
You can then handle these configuration changes by implementing onConfigurationChanged() . In MainActivity.kt, add the following method after onStop() :
Here you’re just calling the superclass’s onConfigurationChanged() method since you’re not updating or resetting any elements based on screen rotation or size.
onConfigurationChanged() is passed a Configuration object that contains the updated device configuration.
By reading fields in this newConfig , you can determine the new configuration and make appropriate changes to update the resources used in your interface.
Now, build and run the app and rotate the device again. This time, the dialog stays in place until you dismiss it.

An alternative way to handle configuration changes is to retain a stateful object that’s carried forward to the recreated instance of your activity. You can accomplish this by implementing the onSaveInstanceState() callback.
When you do this, the system saves your activity’s state in a Bundle , and you can restore it when you implement the corresponding onRestoreInstanceState() callback. However, the Bundle is not designed to hold large data sets such as bitmaps, and it can only store data that is serializable.
The downside of the stateful object solution is that serializing and deserializing the data during a configuration change can come at a high cost. It can consume a lot of memory and slow down the activity restart process.
In such instances, retaining a Fragment is currently the most preferable way to handle a configuration change. You can learn more about fragments and how to use them to retain information when your activity is restarted in our Android Fragments Tutorial.
Where To Go From Here?
Congratulations! You have just learned the basics of using activities in Android and now have an excellent understanding of the ever-important activity lifecycle.
You covered quite a few concepts, including:
- How to create an activity
- How to stop an activity
- How to persist data when an activity stops
- How to work around a configuration change

You can download the completed project using the Download materials button at the top or bottom of the tutorial. If you’re still hungry for more, check out Google’s documentation.
I hope you enjoyed this introduction to Android activities tutorial, and if you have any questions, comments, or awesome modifications to this project app please join the forum discussion and comment below!
Источник


