- How to Fix “SDK location not found” in Android Studio?
- When switching from one IDE to another (Like from Eclipse to Android Studio)
- No Location Found Find My Friends? Here Are the Reasons and Solutions!
- What Does No Location Found Mean on Find My Friends
- Why Does Find My Friends Say No Location Found
- How to Fix No Location Found Find My Friends
- Extra Tips: How to Fake Location on Find My Friends
- Conclusion
- Get Current location using FusedLocationProviderClient in Android
- Местоположение SDK не найдено. Определите местоположение с помощью sdk.dir в файле local.properties или с помощью переменной среды ANDROID_HOME
How to Fix “SDK location not found” in Android Studio?
Google developed Android SDK which is a Software Development Kit developed by Google for the Android platform. You can create Android apps using Android SDK, and you don’t need to be an expert to use it. Android SDK and Android Studio come bundled together, with Google’s official integrated development environment (IDE) for the Android operating system.
In this article, we see how to fix an error that is related to the main Android building component of Android Studio that is the Android SDK. The most common error related to Android SDK is “SDK location not found“. This message pops up stating that the location of Android SDK was not detected when the path of SDK is assigned incorrectly. There can also be other reasons for this error message as well and we will see ways to get rid of this error.
When switching from one IDE to another (Like from Eclipse to Android Studio)
Method 1
In this case, follow the below steps:
Method 2
In case the above procedure doesn’t work then add the ANDROID_HOME variable in “Environment Variables” as C:\Users\Username\AppData\Local\Android\Sdk.
Method 3
In case it does not work even then, then you need to change the directory path on Project Structure as well.
- Close the current project and you’ll see a pop-up with a dialog which will then proceed to Configure option.
- Configure -> Project Defaults -> Project Structure -> SDKs on left column -> Android SDK Home Path -> give the exact path as you did on local.properties and select Valid Target.
Method 4
A settings.gradle file might be missing from the project. Make sure that the file exists from the project you are importing. If not add the settings.gradle file with the following:
Save the file and put it in the top-level folder in your project.
Источник
No Location Found Find My Friends? Here Are the Reasons and Solutions!
My Find My Friends application having issues. I’m cannot locate my friends FIND MY location after he closes the application. He can see my location clearly after I close my app. For me, it states ‘no location found.’ How can I solve this?
Apple released a handy app named “Find My Friends” for iPhone users to connect with friends. Being a location based app, it allows users to efficiently locate friends and family from any Apple device (iPhone, iPad, or Apple watch). But if you encounter issues concerning no location found on find my friends, this article will answer all the queries.
Since the latest iOS 13 acquitted in 2019, the “Find My Friends app” got combined with the “Find My iPhone app.” Now due to the iOS 14 release, merge of these both applications called “Find My.”
The new Find My application has a theme of grey background compiled with a green circle and in the center, a blue-tinted location circle. It automatically doesn’t place on the phone’s home screen. So, free the stress about find my friends no location found as you got your solution.
What Does No Location Found Mean on Find My Friends
If the Find My Friends app continuously showing no location found, there is definitely some issue appearing. It’s probably because the location service is not working appropriately. The application runs depending upon GPS as well as the phone’s location service. In that contrast, if any issue occurs, the app might address a few tweaks.
Besides, if the phone’s internal operation has any problem, the GPS and location tracking system may not work sufficiently. A simple error or severe concern can necessarily cause something terribly wrong. Therefore, the app won’t be able to track any location of your friends or family.
Why Does Find My Friends Say No Location Found
Many of you may think that your friend may block you from the phone or disable the location for you concerning – ‘Why does find my friends say no location found?’ However, this is not the case. It can be their phone is switched off, or probably your device has some serious issue. There can also be few more possibilities of this indication, such as
- Your friend needs to correct the date and time on the device.
- Both phones are not connected to Wi-Fi or cellular.
- Presumably, the person turned on the ‘Hide My Location.’
- Or, the person has not sign-in to Find My Friends.
How to Fix No Location Found Find My Friends
The message “no location found on find my friends” in the app will appear if the person is out of network coverage. Or he/she turned off GPS, or possibly the person’s phone ran out of battery. Whatever the reason be, here are some of the resolutions you can opt for. Make sure you follow the below steps to ensure your app works flawlessly.
1. Confirm the GPS is on and working
Turning off GPS saves battery life. Hence, many people turn off GPS when they don’t require it. However, Find My Friends can still track the location using cell data even if GPS is off. But the data isn’t always exact or reliable. Meanwhile, it’ll indicate ‘location not available’ if you’re anyhow out of coverage. So, make sure to open “Settings” > “Privacy” > “Location Services” > turn it on.

2. Restart & login back on the app
When you notice any problem regarding “no location found on find my friends” try to restart the application and log in instantly. It is the simplest fixing solution for almost every app issue. But logging in to the app is a must to enable the tracking feature.
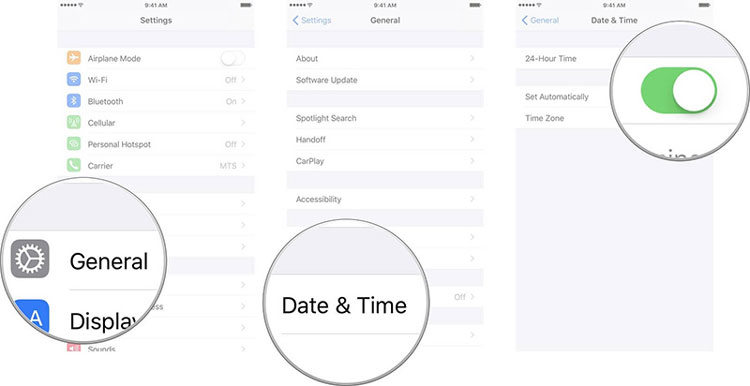
3. Check & correct the date and time
You know even the slightest inaccuracy on date and time on your device can obstruct Find My Friends from operating well. Invariably set your phone to automatic date & time configuration from the network. So the app can work accurately again.
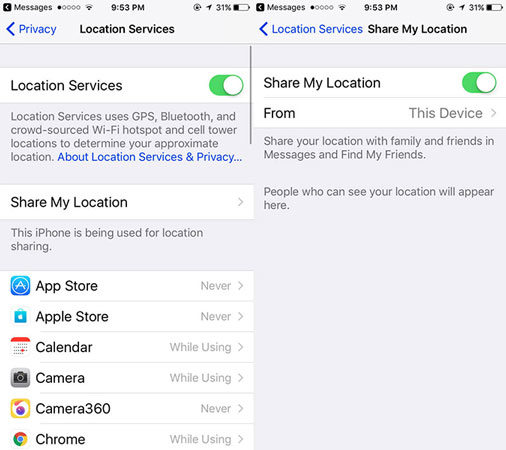
3. Turn on “Share my location”
No location found find my friends can also occur if Share My Location is disabled. And hence, make sure to check this feature and turn it on. For this, simply go to “Settings” > “iCloud Setting” > Location Services” > “Share My Location”. Turn it on now.
Extra Tips: How to Fake Location on Find My Friends
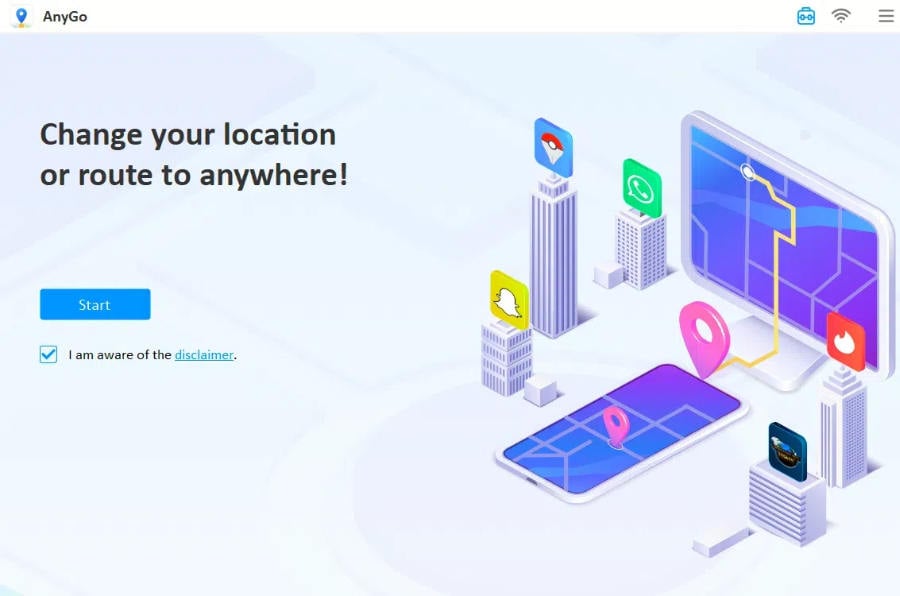
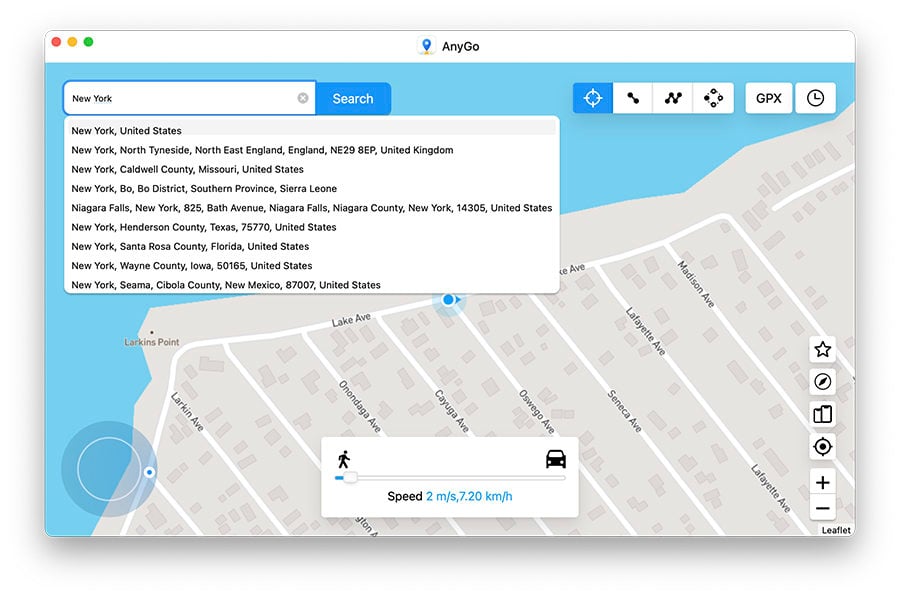
Don’t you wish to show your native location to anyone? Simple, use iToolab AnyGo which is a great spoofer tool works like a miracle for iOS devices. You can show your friends or family a fake location as your LIVE location without letting them know anything. As is called spoofer, you can simulate a fake GPS route with super ease by importing a GPX file. Or teleport. And guess what? Nobody will ever identify or realize that you are not using your original location at all.
Now, how can you use iToolab AnyGo? Follow these manageable steps below.
Step 1: Connect your iPhone or iPad with the PC. Click on the “Start” option displaying in the main window of the application.
Step 2: You will start seeing your current location on the map appearing on the following page. Hit on the icon named “Centre On” to receive the current position; in case the display location is incorrect.
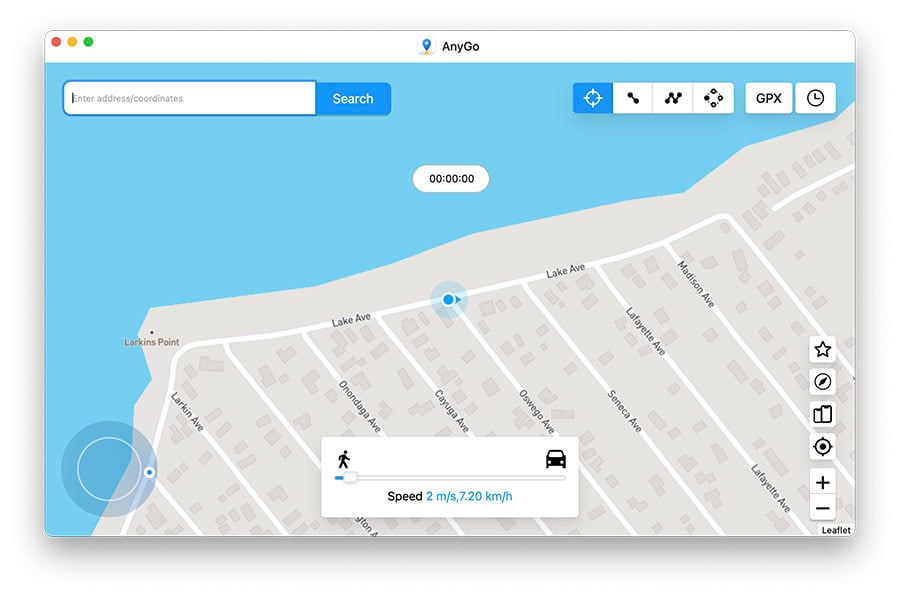
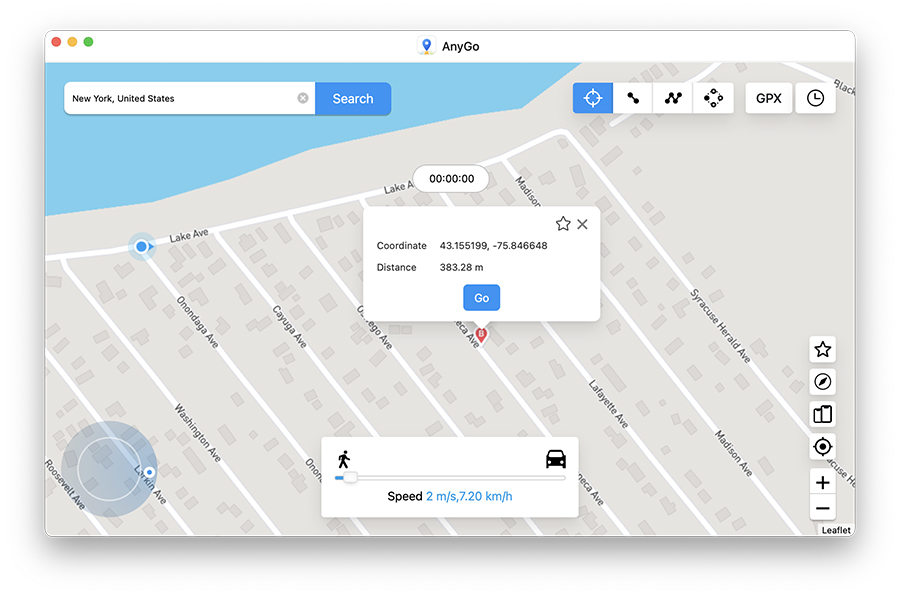
Step 3: In the upper-right corner of the screen, you will see “Teleport,” tap the symbol. Next, enter the location you will like to teleport to and then click “search.”
Step 4: Lastly, the system automatically will register the current preferred location. Hit on the “Go” option to teleport.
Conclusion
Find My Friends is a relatively safe and easy iOS app for tracking and locating the location of each other. Through a strong account password, you can secure your online privacy. However, you can accept or remove people from your list, assuming you don’t want to continue them to locate your location anymore. Or you can use fake location apps for emergency usage. It’s safe to attempt. We hope we could help you solving your all queries like ‘what does no location found mean on find my friends’ nicely.
Источник
Get Current location using FusedLocationProviderClient in Android
Sep 4, 2018 · 4 min read
Hello to coders,
Previously we have taught you how you get current location using GPS/Network Provider. Then android has revealed FusedLocationProviderClient under GoogleApi. FusedLocationProviderClient is for interacting with the location using fused location provider.
( NOTE : To use this feature, GPS must be turned on your device. For manually ask the user to turn on GPS, please check next article)
So let’s get started for the tutorial for getting the current location.
First, add a dependency for location by play services:
Then define FusedLocationProviderClient:
Add permission in manifest.xml
Now ask for runtime permission for above android 6 OS devices
N o w, request for permission if not granted and get the result on onRequestPermissionsResult overridden method, check highlighted code below:
Here, when you allow using permission for an app, it will return to onRequestPermissionsResult method. And again get the last location and print location on textview.
Above code will work if an app has already granted the location permission
Here you can notice, why we put a condition that if(location!=null) before getting latitude-longitude. The location object may be null in the following situations:
- Location is turned off in the device settings. The result could be null even if the last location was previously retrieved because disabling location also clears the cache.
- The device never recorded its location, which could be the case of a new device or a device that has been restored to factory settings.
- Google Play services on the device have restarted, and there is no active Fused Location Provider client that has requested location after the services restarted. To avoid this situation you can create a new client and request location updates yourself.
Now if in case we can’t getting location then we have an option for request location updates. Location updates will give you continuous location at any specific time interval as per your request. Let’s move on location updates.
Here we definitely get the current location using this location updates. And once we get the location, we can also remove location continuous updates else you will get multiple locations updates. This will help you when you want to move the marker on the map as current location changes.
Now you can find some methods of location request like setPriority(), setInterval() and setFastestInterval().
- setPriority: The priority of the request is a strong hint to the LocationClient for which location sources to use. For example, PRIORITY_HIGH_ACCURACY is more likely to use GPS, and is more likely to use WIFI & Cell tower positioning, but it also depends on many other factors (such as which sources are available) and is implementation dependent.
- setInterval: Set the desired interval for active location updates, in milliseconds. The location client will actively try to obtain location updates for your application at this interval, so it has a direct influence on the amount of power used by your application. Choose your interval wisely.
- setFastestInterval: Explicitly set the fastest interval for location updates, in milliseconds. This controls the fastest rate at which your application will receive location updates, which might be faster than setInterval(long) in some situations (for example, if other applications are triggering location updates). This allows your application to passively acquire locations at a rate faster than it actively acquires locations, saving power.
Источник
Местоположение SDK не найдено. Определите местоположение с помощью sdk.dir в файле local.properties или с помощью переменной среды ANDROID_HOME

Недавно я попытался импортировать образцы игр для Android, которые я загрузил с веб-сайта разработчиков Google. После импорта их в Android Studio я получаю следующую ошибку:
Ошибка: местоположение SDK не найдено. Определите местоположение с помощью в файле local.properties или с помощью переменной среды .
Что это? Я хочу запустить примеры программ из Android Studio.
- 4 Проверьте эту ссылку xinyustudio.wordpress.com/2014/07/02/…
- sdk.dir установлен, но по-прежнему не может работать
- для будущих посетителей, пожалуйста, проверьте этот ответ stackoverflow.com/a/56089502/7854303
1 2 Далее
Пожалуйста, выполните следующие шаги, которые мне подходят:
- Перейдите в свой собственный проект, затем перейдите в каталог Android. Создайте файл со следующим именем:
- Откройте файл и вставьте путь к Android SDK, как показано ниже:
Для пользователей Windows:
Замените UserName на имя пользователя вашего компьютера. Также убедитесь, что это папка sdk или Sdk. В моем случае имя пользователя моего компьютера — Захид так путь выглядит так:
Для пользователей Mac:
Где USERNAME — ваше имя пользователя OSX.
Для пользователей Linux (Ubuntu):
Где USERNAME — ваше имя пользователя linux (пути Linux чувствительны к регистру: убедитесь, что регистр в совпадает)
Если это не сработает, добавьте переменную ANDROID_HOME в «Переменные среды» как

- Я работаю с открытым резюме. Что мне делать, чтобы добавить NDK?
- Это помогло. Собственно на это решение намекает сама формулировка ошибки. Я использую IntelliJ на Mac, и в структуре проекта у меня правильный путь к SDK. Тогда зачем мне это нужно в local.properties?
В проекте может отсутствовать файл . Убедитесь, что файл существует из импортируемого проекта. Если нет, добавьте файл со следующим:
Сохраните файл и поместите его в папку верхнего уровня вашего проекта.
- 16 Как узнать, отсутствует ли мой проект ? Где обычно хранится этот файл? Где набрать ? Что именно делает / генерирует? Не могли бы вы добавить подробности к своему ответу?
- 1 @TotZam хранится в корне вашего проекта
- 2 Нашел. Спасибо. Для справки в будущем, где мне запустить ? Я новичок в Android и пытаюсь сориентироваться.
- 2 Вы не запускаете , если используете Android Studio, что позволяет Android Studio добавить модуль проекта, чтобы вы могли запустить его без дополнительной настройки. После добавления строки в вы заметите, что кнопка становится активной после того, как gradle завершит сборку и загрузку пакетов.
- 1 Введите имя папки проекта вместо «приложение», если оно другое. Оно работает.
Я знаю, что этот ответ запоздал, но надеюсь, что это поможет другим.
Ответ прост. Вам нужно просто скопировать файл в папку, где хранится проект, и он будет работать как шарм. Но помните, он должен быть помещен в корневую папку, где хранится проект.
- 3 Но я должен каждый раз копировать? Это похоже на взлом, чем на правильный подход
- Это наиболее простое решение этой проблемы, поскольку вам не нужно ничего менять в проекте. Есть также другое решение, в котором вам нужно изменить код, но я думаю, что для такой проблемы нельзя позволить себе тратить много времени.
- 2 Это работает, но разве Intelij не должен генерировать это автоматически? спасибо!
- 4 У меня это не работает. Файл присутствует, но у меня все еще есть ошибка
- 1 просто откройте папку android студией android, когда студия android откроет папку android, local.properties будет создан автоматически.
Пожалуйста, следуйте приведенным ниже пунктам, это работает для меня:
- Перейдите на свой
- Создайте файл
- Открыть файл
Вставьте путь к Android SDK в зависимости от операционной системы:
4.b Linux или MacOS
Замените своим именем пользователя
- 1 Слишком поздно комментировать, но я хочу знать, как это сделать в MacOS?
- в MacOS вам нужно выполнить ту же процедуру, только вам нужно найти путь к файлу Android SDK и вставить его файл local.properties . вот и все
Эта проблема возникает при попытке импортировать проект Android Studio из ../app/build.gradle файл.
Импортируйте проект, выбрав ../build.gradle файл, расположенный в корневом каталоге вашего проекта.
Проверьте в файле local.properties
правильно напишите этот формат, а также проверьте / slas, используя для пути
- Я редактировал local.properties с помощью этого sdk.dir = C: \ Users \ sameer \ Android \ adt-bundle-windows-x86-20140702 \ sdk, любая ошибка в этом
- ага после того, как C поставил \ . Свае с этим надеюсь сделано. sdk.dir = C \: \ Users \ sameer \ Android \ adt-bundle-windows-x86-20140702 \ sdk
- Это хорошо работает с eclipse. Просто создайте файл local.properties в загруженном проекте и вставьте sdk.dir. В моем случае это было: «sdk.dir = C \: \ adt-bundle-windows-x86_64-20140321 \ sdk»
- если кто сталкивается Вы не приняли лицензионные соглашения . ошибка после вышеуказанного шага см. здесь stackoverflow.com/a/41078173/1778834
- Я установил android на свои windows 10 m / c, но нет такой папки sdk.dir = C \: \ Users \ USERNAME \ AppData \ Local \ Android?
Вот способ решения проблемы, когда вы нажимаете «Запустить приложение» (зеленая стрелка) и получаете следующее в Изменить конфигурацию диалог:
В Android Studio выполните:
- В меню выберите .
- В диалоговом окне настроек перейдите на .
- Посмотрите наверху для Расположение Android SDK, и нажмите кнопку
- Нажмите Далее, Далее, Готово, чтобы принять значения по умолчанию.
Похоже, что это сохраняет местоположение SDK — даже если ничего не изменилось — во внутреннем хранилище. Я проверил папки и , но не увидел, что Studio сделала для изменения файла конфигурации, но теперь я могу запустить приложение.
Подводя итог предыдущим исправлениям — обычно они подходят для репозитория без проблем со сборкой:
local.properties файл копируется Studio в корневую папку.
Путь в local.properties файл имеет правильный путь к Android SDK — в моем случае это (обратите внимание, что этот путь имеет другой формат — Studio должна написать этот файл для вас на основе поля ввода текста в диалоговом окне настроек Android SDK)
settings.gradle файл присутствует в репо — и ссылается на папку приложения (обычно: приложение)
- 4 Это единственное, что мне помогло. Шаги №3 и №4 очень важны
- 1 Это сработало для меня, используя IntelliJ с установленной поддержкой Android.
Я столкнулся с той же проблемой, но сообщение об ошибке немного другое.
Местоположение SDK не найдено. Определите местоположение с помощью переменной среды ANDROID_SDK_ROOT или установив путь sdk.dir в локальном файле свойств вашего проекта как «xxx»
MAC и ReactNative
Добавить
Найдите свое местоположение Android SDK
Добавьте в него путь sdk
Обычно это работает, но если вы работаете в команде с другими членами команды, то другое.
ИЛИ
Установить переменную
- Отредактируйте свой или или .
Добавить путь к SDK:
В качестве альтернативы вы также можете добавить свой путь использовать несколько полезных команд.
Если у вас есть эта проблема, когда вы загружаете проект, поддерживающий реакцию, вам просто нужно открыть проект Android с помощью Android Studio. Все необходимое будет создано автоматически.
- Откройте Android Studio
- Файл -> Открыть
- Выберите папку в папке вашего проекта response-native.
- Подождите, пока AndroidStudio завершит настройку
- Теперь вы можете закрыть Android Studio
Если вы установили средство запуска командной строки AndroidStudio:
- Запустите это в своей корневой папке для реакции
- Подождите, пока AndroidStudio завершит настройку
- Теперь вы можете закрыть Android Studio
- этот ответ так недооценен. Я приходил сюда дважды, и оба раза это решило. большое спасибо.
Если вы уже скачали Android SDK, но его не нашли.
Проблема может заключаться в том, что файл должен находиться в том же каталоге, что и материал для , чтобы его можно было найти при создании и запуске adb.
Для моего проекта, ориентированного на реакцию, с использованием мне нужно было поместить файл в папку .
Поскольку я разархивировал SDK для загрузки, я просто использую этот путь в файле со строкой, подобной этой:
Я решил эту проблему, создав ANDROID_HOME переменная окружения в windows.
Перезапуск Android Studio должна построить проект!
- У меня уже был ANDROID_SDK, который указывает на тот же каталог, поэтому для меня это было
Если вы пытаетесь запустить образец кода Google Android, попробуйте импортировать весь репозиторий вместо отдельного образца.
Вот соответствующий раздел из instructions.html, включенный в образец кода Google Calendar API.
- Импортировать проект calendar-android-sample
- Выберите «Импортировать проект . » или «Файл»> «Импортировать проект . ».
- Выберите [someDirectory] /google-api-java-client-samples/build.gradle и нажмите OK.
- Примечание: это не сработает, если вы попытаетесь импортировать [someDirectory] /google-api-java-client-samples/calendar-android-sample/build.gradle.
- Выберите «Использовать локальное распределение Gradle» с «Домой Gradle» в [someDirectory] /gradle-2.2.1 и нажмите OK.
У этой ошибки нет единой причины.
- может отсутствовать или содержание в нем может быть неправильным.
- может отсутствовать или путь к sdk записан неправильно.
- 1 какой контент должен быть в файле settings.gradle?
- @cabanni settings.gradle просто включает модуль в ваше приложение. По умолчанию это будет модуль app. Надеюсь, это поможет/
Просто удалите папку .idea и снова импортируйте проект. У меня это сработало.
создайте файл local.properties в корневом каталоге вашего проекта со следующим содержимым
- Перейдите в свой проект React-native -> Android
Создайте файл local.properties
вставьте путь к Android SDK, как показано ниже
Замените USERNAME своим именем пользователя
Теперь запустите реагирующий run-android в своем терминале
Иногда в проекте может отсутствовать файл settings.gradle. Убедитесь, что файл существует из импортируемого проекта. Если нет, добавьте файл settings.gradle со следующим:
Сохраните файл и поместите его в папку верхнего уровня вашего проекта.
поместите эти две строки в свой файл .bashrc и запустите
Для linux я сделал это. (Для первой строчки)
лучший и самый простой способ — создать новый проект Android, переместите папку «app» из нерабочего проекта в новый и добавьте необходимые зависимости в градиент вашего нового проекта, и все будет работать отлично)
- Это устранило проблему как на Mac High Serria, так и на Windows 10. Отличный и эффективный ответ.
Если ничего не помогает, скопируйте файл в корень каталога проекта. Просто.
Для пользователей Mac / Linux
Вам нужно добавить к своему пути, добавьте следующее в свой файл
Переменные среды в bash_profile или bashrc?
Разница между .bashrc и .bash_profile
Это решение действительно работает для меня .. перейдите на этот компьютер -> свойства -> расширенные настройки системы -> переменные среды -> затем в системной переменной создайте новую переменную с именем ANDROID_SDK_ROOT и ценность C: \ Users <ИМЯ ПОЛЬЗОВАТЕЛЯ (замените его на свое имя пользователя>\ AppData \ Local \ Android \ Sdk
и убедитесь, что включен ли настоящий мобильный Android с использованием отладки по USB. (очень важный)
затем закройте cmd и перезапустите, он должен работать.
В моем случае мне пришлось закрыть Project и снова открыть. Работало нормально. Нравится
Закрыть проект

И снова Открыть проект снова

- После добавления пути sdk.dir, а также в
/ .bashrc ничего не получилось. Но потом я закрыл и снова открыл, и это сработало. Спасибо!
Нашел для меня рабочее решение. Без добавления local.properties и настройки переменной ANDROID_HOME. Похоже на ошибку в Android Studio и Intellij IDEA. Вам просто нужно попросить IDE «сбросить» путь к Android SDK. «Местоположение SDK не найдено» в Android Studio, несмотря на то, что переменная среды установлена правильно
Я получил эту ошибку после свежего клонирования репозитория. Я ожидал, что local.properties будет сгенерирован автоматически, но этого не произошло. Я смог сгенерировать его, повторно импортировав проект Gradle.
- Это помогло. После запуска «Re-import Gradle Project» на консоль были выведены следующие 2 ошибки, которые помогли мне обнаружить проблему: Обнаружена недопустимая конфигурация Gradle JDK, Проект JDK не указан. Итак, все начало работать после того, как я исправил путь JDK в настройках.
- После того, как путь JDK был исправлен, мне также пришлось перезапустить среду IDE с опцией «Файл> Недействительный кеш / перезапуск . ».
Любой, кто использует Jenkins, может пригодиться
Вам нужно определить имя глобальной переменной со значением пути к android sdk.
Я думал, что ваш файл setting.gradle отсутствует. Скопируйте этот файл в другой проект и вставьте свой проект. Думаю, это сработает.
в файле setting.gradle,
вот и все. Хорошего дня.
Для меня проблема заключалась в том, что я не создавал никаких виртуальных устройств после новой установки студии Android. Итак, expo продолжала неопределенно жаловаться на местоположение SDK, в то время как основной проблемой были отсутствующие виртуальные устройства. Надеюсь, это поможет кому-то в будущем, я искал пару часов.
PS: здесь вы можете узнать, как создать его https://developer.android.com/studio/run/managing-avds
Проверьте, 1. В настройках модуля, правильное ли расположение SDK. 2. Если да, проверьте файл local.properties (не тот, который находится внутри модуля приложения, а тот, который размещен вне модуля приложения, на родительском уровне). Если его нет, добавьте его со строками ниже внутри.
Я только что столкнулся с проблемой, когда клонировал свое репо из Github и запустил . Я подтверждаю, что в моем файле .bashrc есть ANDROID_HOME.
Итак, я импортировал проект в Android Studio. Заметил, что расширение моего файла settings.gradle — , . Когда я закончил импорт, я запустил и не получил никаких проблем.
и это сработало, я просто вставил его в папку проекта и снаружи.
В переменной среды я также использовал ссылку sdk выше и имя в качестве имени пути. Закройте все, снова откройте и Cabom все заработало
Источник


