- Why Does My Phone Say No Service and How to Fix
- Part 1. Why Does My Phone Say No Service
- Part 2. How to Fix Android/Samsung Phone No Service
- Way 1. Restart Your Device
- Way 2. Turn On and Off Flight Mode or Airplane Mode
- Way 3. Change the Network Mode to Auto
- Way 4. Select Network Operator Manually
- Way 5. Make Sure SIM Card Placed Correctly
- Way 6. Dial Service Mode
- Way 7. Restore the Null IMEI
- Way 8. Using Your Phone in Safe Mode
- Way 9. Change SIM Card
- Way 10. Fix Android Emergency Calls Only and No Service Due to Android System
- Conclusion
- Fix: Android Emergency Calls Only and No Service
- Solution 1: Manually select the carrier
- Solution 2: Change the network mode to GSM Only
- Solution 3: Use the Ariza Patch (requires root)
- Solution 4: Soft Restart
- Solution 5: Reinsert SIM Card
- Solution 6: Toggle Airplane Mode
- Solution 7: Prevent Fixed Dialing
- Solution 8: Perform Factory Reset
- Solution 9: Verify IMEI
- Solution 10: Reset Network Settings
- Solution 11: Clear Cache Partition
- Solution 12: Run SIM Card Test
- Solution 13: Check for Faulty SIM Card
- Solution 14: Remove SD Card
- Solution 15: Check for Updates
Why Does My Phone Say No Service and How to Fix
by Sophie Green Updated on 2020-02-19 / Update for Fix Android
If your Android device has stopped receiving network signals and it has made you wonder «why does my phone say no service», the following guide will be of great use to you. It teaches you why your phone gets no network coverage and how you can go about fixing the issue on any of your Android or Samsung device.
The issue could be caused due to many things and the post explains those causes as well, so you know what has been culprit on your device preventing you from making and receiving calls on your device.
Part 1. Why Does My Phone Say No Service
«My phone says no service», this issue can appear due to several reasons. It is not easy to pinpoint the source but most often it is caused by displaced SIM cards or due to a bug on your Android device. However, sometimes the reasons are pretty serious, this issue can be caused by a null or void IMEI number that your network provider is just failing to recognize or in general, it is a software issue. But whatever the reason is, it can be fixed pretty easily. So, you try to pinpoint the root of the cause but it is very difficult for a regular user. But without wasting your time, you can try the following solutions one by one. Find out which one of the solutions sticks.
It really depends on the situation, but the following section covers fixes for each of the things that could potentially be causing the issue.
Part 2. How to Fix Android/Samsung Phone No Service
Now that you know the potential culprits, this section should teach you how you can get rid of those and start receiving network signals on your Android based device. All the methods given below are easy to follow and you should be done in no time.
Way 1. Restart Your Device
The first thing you will probably want to do to fix the phone no service issue is to reboot your device. Rebooting the device resets many of the temporary files and settings and it often helps fix network related issues on your device.

Simply press the Power button for a few seconds on your device and choose the Reboot option to reboot your device. When the phone powers up, check if you now receive network signals.
Way 2. Turn On and Off Flight Mode or Airplane Mode
Toggling the Airplane mode also helps fix the issue as it tries to re-establish a connection with your network provider. This method has worked for many of the users and it should work for you, too. There is no harm in giving it a try.
Launch the Settings app on your Android device and tap on the first option that says Wi-Fi & internet. On the following screen, turn the toggle for the Airplane mode option to the ON position. Wait for a minute and then turn the toggle back to the OFF position.
You will no longer have to say «my phone says no service» as your issue should likely be fixed now.
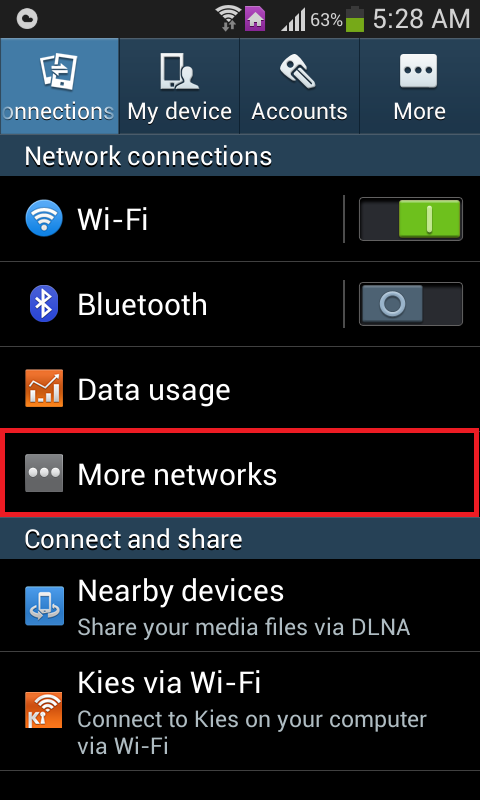
Way 3. Change the Network Mode to Auto
Sometimes changing the network mode to automatic helps resolve the issue as your phone then automatically looks and joins the preferred network rather than you select a network provider for your phone.
On your phone, head to Settings > Wi-Fi & internet > SIM & network > SIM 1 > Network operators and turn on the Choose automatically option. Your phone will find and join the relevant network provider automatically.
Way 4. Select Network Operator Manually
If setting the network mode to the automatic position did not work for you, you may want to change the option to the manual mode. This way you can select a preferred network for your device and the following is how you do it.
Head to Settings > Wi-Fi & internet > SIM & network > SIM 1 > Network operators and disable the Choose automatically option. Then, select a network from the list and your phone will join the selected network.
Way 5. Make Sure SIM Card Placed Correctly
It may be the case that you have incorrectly inserted the SIM card into your phone. If the SIM card is not placed properly, your phone will not be able to read it and as a result you will not receive network signals on the device.
Way 6. Dial Service Mode
Service mode is one of the pre-installed modes your device comes with and you can use it to get various types of information about your network Not very frequently but sometimes the cellular radio ends up getting disabled. Unfortunately, it is not something that you can enable from the Settings. It requires a specific procedure which is detailed below.
Step 1: Open the dialer of your mobile.
Step 2: Type «*#*#4636#*#*» and call that number.
Step 3: You will enter «Service Mode».
Step 4: Now, locate and select the option called «Phone Information» or «Device Information».
Step 5: Now, choose to do a «Run Ping test».
Step 6: After that, check the radio data. You will find it at the bottom of the screen and enable it if it is disabled.
Step 7: Lastly, restart the device.
Hopefully, your Android or Samsung smartphone will start to look for networks after the restart.
Way 7. Restore the Null IMEI
Sadly, there is a possibility that the IMEI number of your device in unrecognizable by the network provider, resulting in this issue. So, you need to check if the IMEI number of your device has gotten corrupted or nulled.
If the issue was caused by it then you need to restore the IMEI number immediately.
Step 1: Open the dialer of your mobile phone and type *#06#. Doing this will show you the IMEI number of your device. If the result shows null, then it is confirmed that the IMEI number of your device has been corrupted. Now, you must take the necessary steps.
Step 2: In order to fix the issue, dial *#*#197328640#*#*. As an alternative option, you can also dial*#197328640#. Dialing these number will provide you access to the «Command Mode».
Step 3: Choose «Common» on your device.
Step 4: Choose the first option, which is «Field Test Mode or FTM». If this mode is turned on then you have to turn it off. After turning off this more, tap on the «menu» button and you will find that the IMEI number has been restored.
Step 5: Now, in order to turn off «FTM», tap option 2.
Step 6: If your device comes with a removable battery then remove it. If not then, just remove the SIM card from the tray.
Step 7: Wait for more than 2 minutes and insert the battery but not the SIM card.
Step 8: Dial*#197328640# from the device again.
Step 9: Now, navigate to the «Debug Screen Menu» and choose «Phone Control».
Step 10: Now, you must tap on «Nas Control» and then tap on «RRC».
Step 11: This final step requires you to tap on «RRC Revision» and tap on «Released».
After completing these steps you need to insert the SIM card and restart the device.
Way 8. Using Your Phone in Safe Mode
If you think a recently installed app is causing the no network issue on your device, you may try rebooting your device into safe mode to see if that is actually the case. Safe mode will only load the necessary resources leaving all other app resources aside.
To reboot your phone into safe mode, press and hold down the Power button. Tap and hold on the Power off option and hit OK when a prompt appears on your screen. You will reboot into the safe mode on your device.
Way 9. Change SIM Card
The error could occur due to the SIM Card. We have talked about the poor placement of the Card but it could also be damaged due to unforeseen reasons.
So, take out the SIM Card and check it thoroughly. If it looks damaged, then take it to your network provider and they will replace the card immediately.
Way 10. Fix Android Emergency Calls Only and No Service Due to Android System
If you have not had any luck with any of the methods given above, the issue could likely be in the core system of your Android device. And if that is the case, you will need to use a dedicated software to repair the core system of your device.
Meet ReiBoot for Android, a software that specializes in fixing the core operating system of your device. Once the core system is fixed, all other issues should be fixed as well as everything, at one level, depends on the operating system of the device.

Step 1: Enable USB debugging from Settings > Developer options on your device and connect your device to your computer. Download and launch the software and click on Repair Android System.
Step 2: Click on Repair Now on the screen that follows.
Step 3: Put in your device info in the given fields and click on Next.
Step 4: Wait for the software to download a file for your device. Click on Repair Now to begin repairing your device. Hit Continue in the prompt that appears on your screen.
Step 5: Step 5. Wait while the software repairs your device. Your device should now be repaired
Conclusion
So, if you are wondering «why does my Android phone say no service», then worry no more. All these solutions are very effective in order to fix the no service problem. Just read the procedure from the article and execute them properly. If the phone is still not budging then use the final ReiBoot for Android solution, it could definitely be a software related issue.
Updated on 2020-02-19 / Update for Fix Android
Источник
Fix: Android Emergency Calls Only and No Service
The “Emergency calls only” and/or “No service” issues are one of the more common issues that Android users often face. This problem is network-based and inhibits the user from being able to successfully use any network-based functionalities of an Android device, and not being able to use a Smartphone to make calls, send texts and connect to mobile data networks certainly is a major letdown.
While this issue is most commonly found to affect Samsung Galaxy Smartphones, it does not shy away from all the other makes and models of Smartphones out there. An Android device can be forced to display an “Emergency calls only” or “No service” error by one of three things – poor signal strength, some kink or problem in the device’s software, or faulty hardware.
As long as the cause of this issue is not faulty hardware such as a defective SIM card or flawed SIM card reading equipment in the device, there are quite a few things that a person can do to try and fix it.
The following are the three most effective solutions that can be used to get rid of the “Emergency calls only” and/or “No service” issue:
Solution 1: Manually select the carrier
Manually selecting a Smartphone’s carrier can, in many cases, allow the device to connect to its carrier successfully.
1. Go to Settings.
2. Navigate to the Network settings for the device.
3. Tap on Mobile networks.
4. Press Network operators.
5. Allow the device to search for networks. If the device does not automatically start searching for networks, tap on Search networks.
6. Select the device’s carrier from the list of available networks.
Solution 2: Change the network mode to GSM Only
If an Android device cannot connect to its carrier because of a signal problem, changing its network mode to GSM only can do the trick as 2G signals are much stronger and have much more penetrating power as compared to 3G or 4G signals. Weak signals have also been known to trigger the Failed to Send SMS error with Android phones.
1. Go to Settings.
2. Find the way to the device’s network settings.
3. Tap on Mobile networks.
4. Tap on Network mode.
5. No matter what mode the device is on, select GSM only.
Solution 3: Use the Ariza Patch (requires root)
The Ariza patch is an Android system patch designed to fix kinks in an Android device’s baseband (modem). Applying the Ariza patch to an Android Smartphone suffering from “Emergency calls only” and/or “No service” issues has significant chances of fixing the device, especially in the case of Samsung Smartphones. Before proceeding, make sure that you root your phone.
1. Make sure that the device has root access.
2. Install Busybox on the device.
3. Download the APK file for the Ariza patch from here.
4. Go to Settings > Security and make sure that the installation of applications from unknown sources has been allowed.
5. Install the Ariza patch.
6. Open the Ariza patch.
7. Tap on V[0,5] patch uygula.
Wait for a few minutes, and once the patch has been applied to the device, reboot it.
Solution 4: Soft Restart
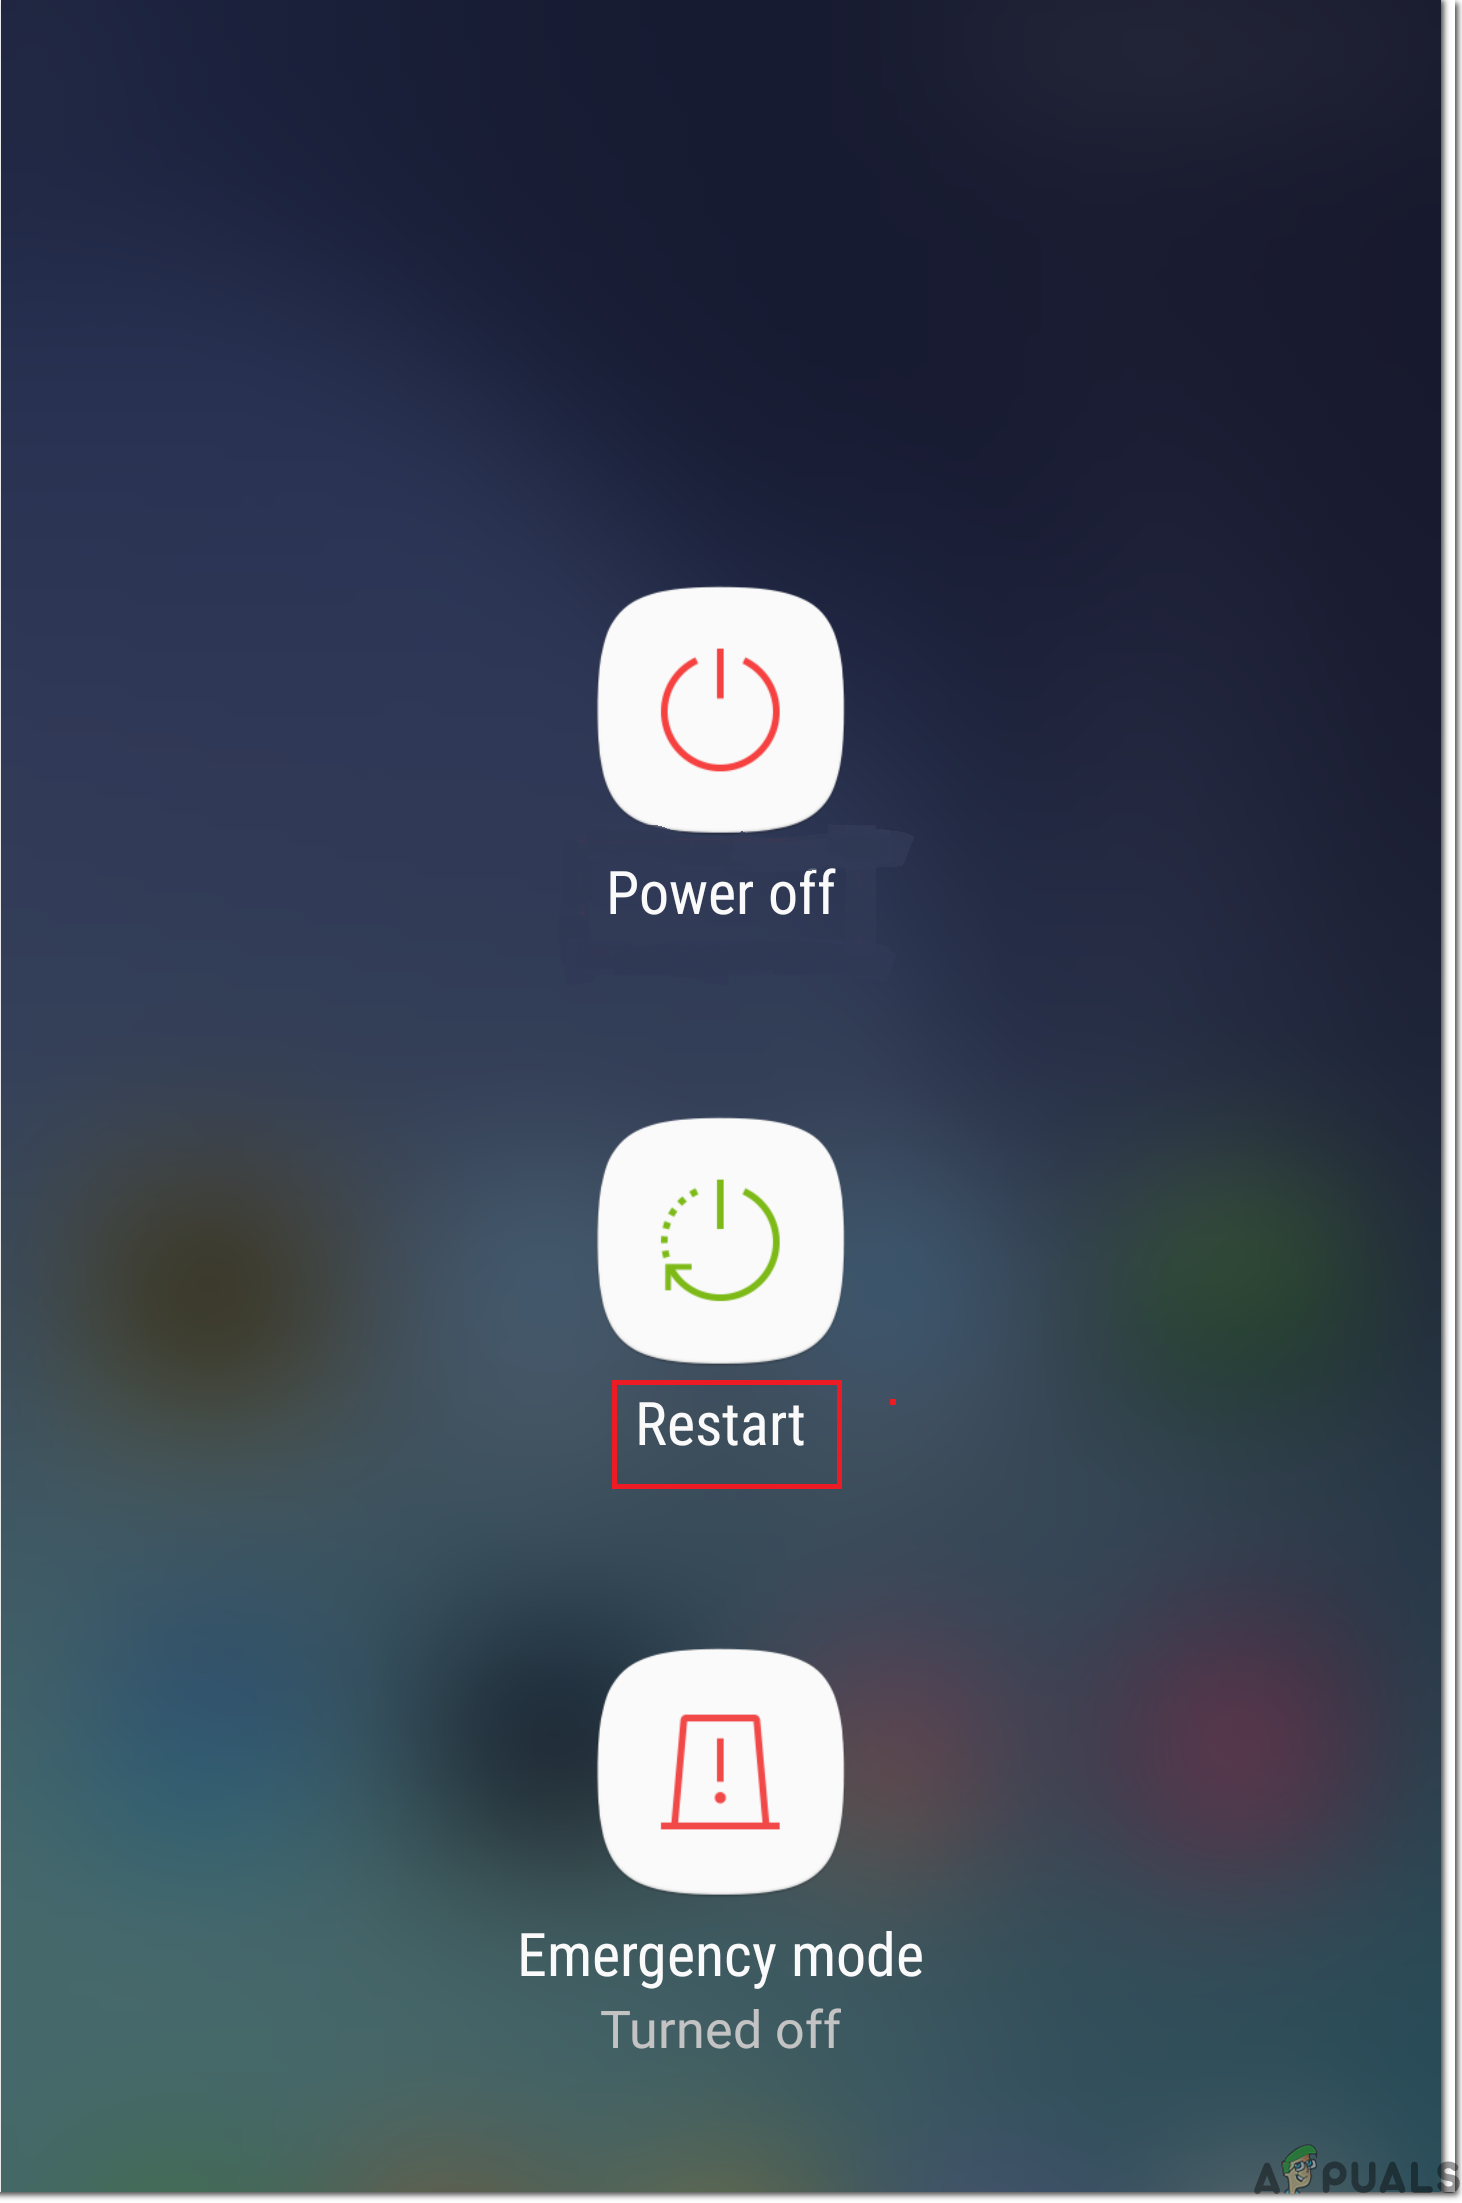
In some situations, the phone might’ve acquired a glitch due to which it is unable to properly register the SIM card installed inside the mobile phone. Therefore, it is always a good idea to perform a restart to ensure that the glitch is removed. For that:
- Press and hold the power button on the phone until the reboot menu appears.
- When the menu appears, click on the “Restart” option to restart your mobile device.
 Restart Phone
 - After the restart is completed, check to see if the issue persists.
 Restart Phone
Solution 5: Reinsert SIM Card
In some cases, the SIM card might’ve slightly been displaced from its normal position inside of the SIM tray. When this happens, the easiest fix is to just turn off your device from the reboot menu and take out the SIM tray. After that, remove the SIM card from the SIM Tray and make sure to blow air onto the SIM card and inside the SIM Tray slot to get rid of any residue or Dust Particles. After this, make sure to accurately place the SIM card on the SIM Tray and then check to see if doing so fixes the issue.
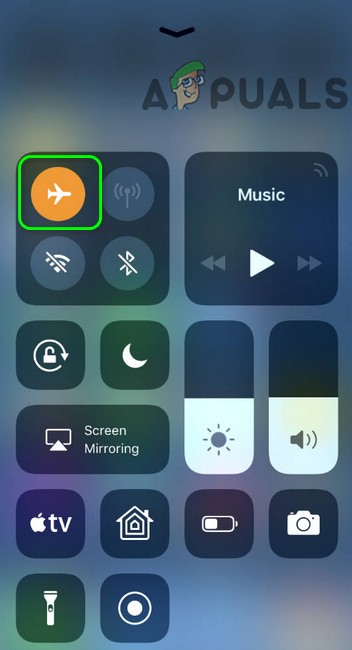
Solution 6: Toggle Airplane Mode
In certain situations, the SIM card might be bugged inside the phone due to which the phone is unable to properly register it on the mobile network. Therefore, in this step, we will be toggling the airplane mode to sort of reinitializing this process and get the SIM working as normal. In order to do this, follow the steps below.
- Unlock your device and navigate to the home screen.
- Drag down the notifications panel and click on the “Airplane Mode” icon to put the device in Airplane mode. Enable the Airplane Mode
- Once in the airplane mode, let the device be for at least 30 seconds.
- Turn the airplane mode off and check to see if the phone registers it on the network and if the error message still persists.
 Enable the Airplane Mode
Solution 7: Prevent Fixed Dialing
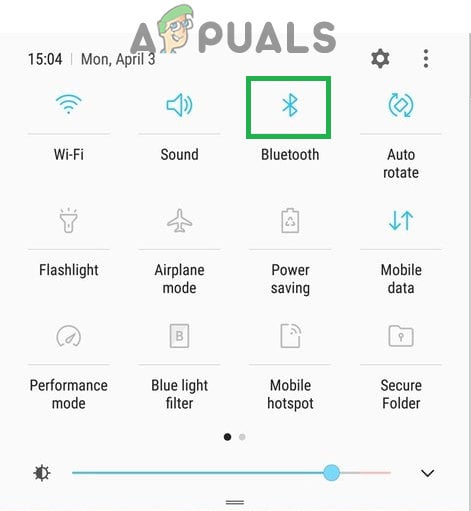
In some situations, the Fixed Dialing feature on your phone might have been enabled due to which this error is being seen on your mobile. Therefore, in this step, we will be disabling this feature on our mobile. In order to do this, we will have to reconfigure it from our settings. For that:
- Unlock your device and drag down the notifications panel.
- Click on the “Settings” icon and select the “Call” option. Dragging down the notifications panel and tapping on the “Bluetooth” icon
- From the calling settings, click on the “Additional Settings” or “More” option.
- In this setting, click on the Fixed Dialing Numbers option and then select the “Disable FDN” option.
- After disabling Fixed Dialing Numbers on your mobile, check to see if the error message still persists.
 Dragging down the notifications panel and tapping on the “Bluetooth” icon
Solution 8: Perform Factory Reset
It is possible that there is a faulty app or configuration on your device that is preventing the SIM card from functioning properly. It is also possible that the software installed on your mobile phone has been bugged and to get rid of any such issues, we can perform a full Factory Reset on our device to rule them out. In order to do this, make sure to back up any necessary data beforehand and follow the steps below.
- Unlock your device and drag down the notifications panel.
- Click on the “Settings” cog to open the Phone settings.
- In the Phone settings, scroll down and click on the “System” option.
- Select the “Reset” option from the next screen and then click on the “Factory Reset” option. Factory Data Reset
- Enter in your password and PIN to grant authorization for the reset.
- Once the reset has been completed, check to see if the issue still persists.
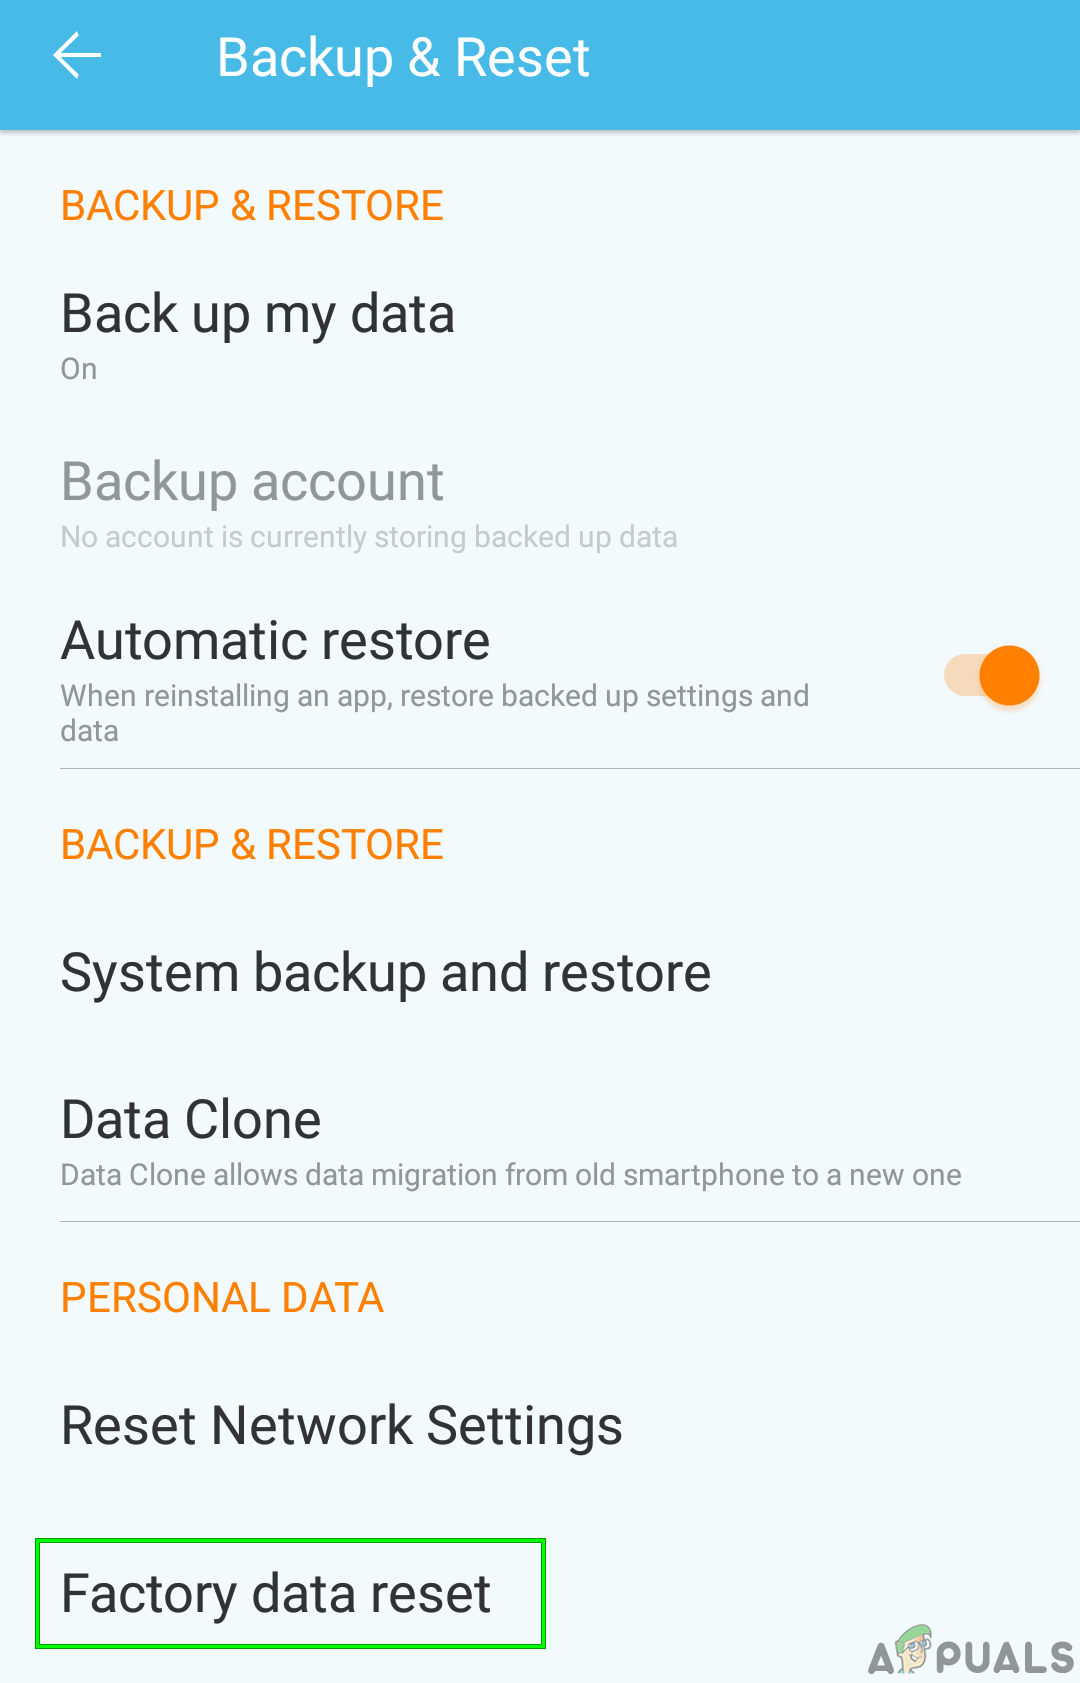 Factory Data Reset
Solution 9: Verify IMEI
It is possible that the IMEI number on your cellphone might’ve been changed due to a software flash or due to any other reason. The IMEI is like a physical trace of the cellphone device and it is a unique number that is assigned by the manufacturer to identify the device and the same number is also used by the SIM card provider to propagate their network services on your device. However, if this number has been replaced or improperly configured, you might get the SIM card issue where only emergency calls are allowed. In order to check this:
- Unlock your phone and launch the dialer.
- Type in “*#06#” and press the dial button on your device to get the IMEI number being used by the device.
- Once the number is shown on the device, match it with the IMEI number listed on the box in which the phone came.
- If the numbers match up, the issue shouldn’t be due to an IMEI mismatch.
- However, if the numbers don’t match, it means that the IMEI on your device has been changed due to which you are getting this error, it is recommended that you replace this phone device as it probably won’t be able to function with a SIM card anymore.

Solution 10: Reset Network Settings
It is possible that the network settings on the mobile were changed manually or they were changed automatically by the phone and now they have been misconfigured due to which this issue is arising. Therefore, in this step, we will reset the network settings to the default ones in an attempt to get rid of this issue. In order to do so:
- Unlock your device and drag down the notifications panel.
- Click on the “Settings” cog to open the phone settings. Dragging down the notification panel and clicking on the Settings icon
- Inside the phone settings, scroll down and click on the “System Settings” option.
- In the system settings, click on the “Reset” button and on the next screen, select the “Reset Network Settings” option. Clicking on the “Reset Network Settings” button
- Confirm any prompts that pop up on your screen and wait for the network settings to be reset.
- Check to see if doing so fixes the issue with the SIM card.
 Dragging down the notification panel and clicking on the Settings icon
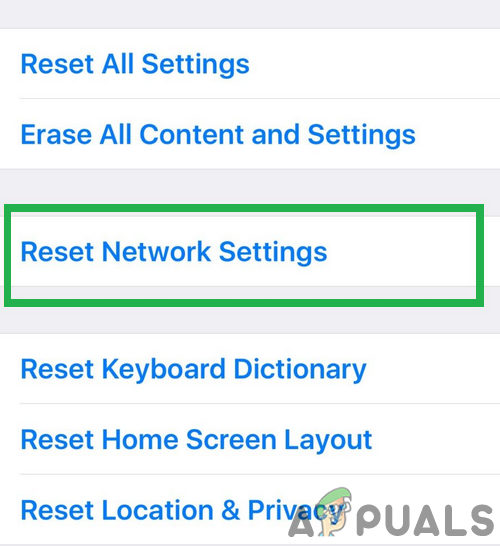 Clicking on the “Reset Network Settings” button
Solution 11: Clear Cache Partition
Some data is cached by almost all applications to decrease load times and to provide a more optimized experience to the user. However, sometimes this cached data can be corrupted and it might interfere with system functions. Therefore, in this step, we will be booting the phone into the reboot menu to clear out the cache partition. For that:
- Unlock your device and press and hold the power button to display the reboot options.
- In the reboot options, select the power off button.
- Wait for the device to be fully powered off before proceeding with the next steps.
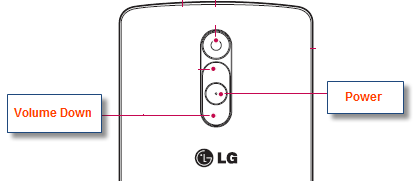
- Press and hold the Volume Down button on your phone and press the Power button as well to power the device up.
- Keep the Volume Down button pressed until the phone boots up to the bootloader screen.
- On the bootloader screen, navigate through the options using the volume buttons until you highlight the “Wipe Cache Partition” button. Navigating down to the “Wipe Cache Partition option”
- Press the “Power” button to select the highlighted option and wait for the phone to proceed.
- Once the cache partition is wiped, highlight the reboot option and use the power button to select it.
- Check to see if the issue still persists after wiping the cache partition.
 Navigating down to the “Wipe Cache Partition option”
Solution 12: Run SIM Card Test
It is possible that the SIM might not be functioning properly because the phone is unable to properly register it on the network and verify the signal strength. Therefore, in this step, we will be running a SIM card test to verify and isolate the issue on the phone and ensure that the SIM card is not at fault, for that, follow the steps that have been listed below.
- Unlock your device and launch the phone dialer.
- Enter in the following code inside the dialer. Opening Dialer
- Now that you have booted inside the testing mode, click on the “Phone Information” option.
- Scroll down on the screen that is displayed and you should see the “Turn off Radio” option.
- Select this option to turn off the radio and ensure that the command went through, otherwise you might have to repeat this step a couple of times.
- Also, there should be a “Set Preferred Network Type” option, select the option to open the dropdown.
- Select the “LTE/GSM/CDMA (Auto)” option from the dropdown.
- After this, click on the “Turn on Radio” option to turn the radio back on.
- After completing these steps, check to see if the issue still persists.
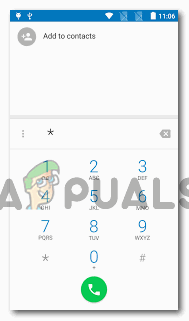 Opening Dialer
Solution 13: Check for Faulty SIM Card
It is possible that in some cases you might have damaged your SIM card through water damage or you might have broken or cracked it during usage. This seems highly unlikely but there have been cases where the SIM card doesn’t work after water or physical damage. Therefore, first of all, remove the SIM card from the device after powering it down and place it inside another phone and check if the SIM card works fine with that phone.
If the SIM card doesn’t work with the other phone as well, it means that the issue doesn’t exist within your phone and it is limited to the SIM card only. Furthermore, you also need to ensure that you have recharged your SIM card and that your account is in good standing with the service provider. It might be the case that you have not paid your dues due to which the SIM card has been blocked by the service provider. Verify that it is not the case and then check to see if the issue still persists.
Solution 14: Remove SD Card
It has been seen in some rare cases that the user was unable to utilize their mobile devices with the SD card inserted inside the SIM tray. This seems like a weird solution to this problem but if you have been unable to fix it so far, you can give it a go and power down your device, take out the SIM tray and remove the SD card from the mobile device. After doing so, reinsert the SIM tray after seating the SIM card properly and power on the device. Check to see if the issue persists after the device powers on.
Solution 15: Check for Updates
It is sometimes the case that the Phone company that you are using might’ve released a software update that might’ve broken some components of the phone and that might be preventing you from being able to use the SIM card properly. As most companies release software patches immediately if there is such an issue, we will try to check if there are any available for your device. For that:
- Unlock your device and drag down the notifications panel.
- Click on the “Settings” button to open the Phone settings.
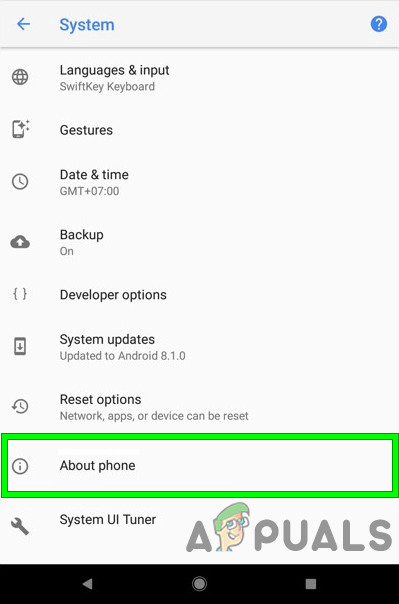
- Inside of the phone settings, click on the “About Device” option. About Phone
- After that, click on the “SystemUpdate” button and on the next screen, select the “Check for System Updates” button.
- This will trigger a manual check for any available updates and they will now be automatically downloaded on your device.
- After the update has been downloaded, click on the “Install” button, and accept any prompts to install the new update on your device.
- Check to see if the issue still persists after installing this update on your mobile device.
 About Phone
If none of the methods shown above helped you at all, it’s possible that the carrier you are using having some signal issues try contacting them and explain the issue to them. If they said that everything seems to be fine, then there is something wrong with your phone hardware.
Источник


