OneSignal Push Notification Service Documentation
OneSignal Help & Documentation
Welcome to the OneSignal New IA developer hub. You’ll find comprehensive guides and documentation to help you start working with OneSignal New IA as quickly as possible, as well as support if you get stuck. Let’s jump right in!
Android Notification Icons
Adding custom icons to some or all of your notifications. Works with Android (and derivatives like Amazon).
Icons are a way to provide a more unique, branded experience for your Android and Amazon app.
You may add a default icon that appears with every notification you send, or you may add icons to just certain types of notifications. The below tutorial shows you how to do both.
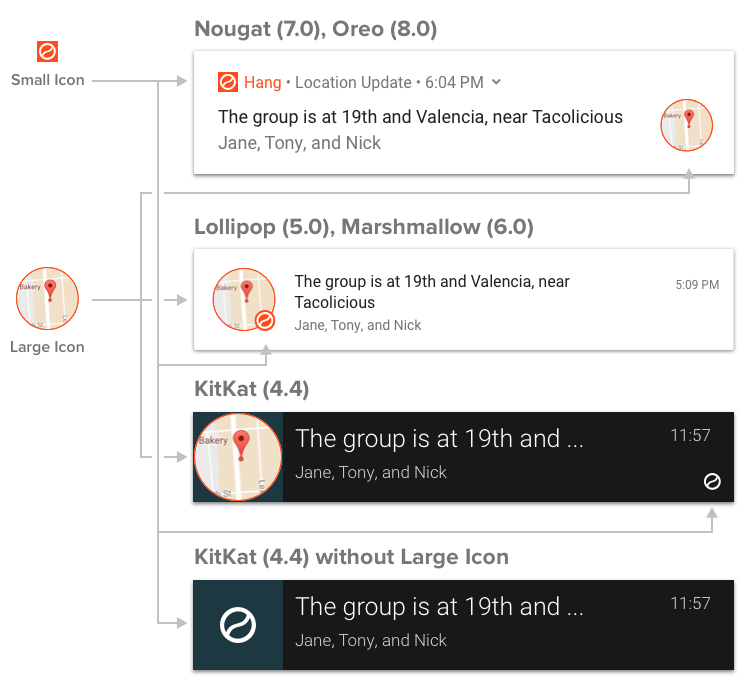
Android supports both Small and Large Notification Icons.
The small icon is displayed on the top status bar as well as the notification itself. By default OneSignal will show a bell icon, however we recommend you customize this so users recognize it’s a notification from your app. Note that Android only uses the alpha channel for the icon. It will display monochrome in the status bar but an accent color can be applied to the left side the notification itself.
The large notification icon will show up to the left of the notification text on Android 4.0.3 — 6.0 devices, and shows on the right for Android 7.0+ devices. If you do not set a large icon, the small icon will be used instead. OneSignal will auto scale large notification icons for you to prevent the icon from being cropped. The recommended size of the large icon is 256×256 pixels.
We strongly recommend adding default icons to every Android and Amazon app.
REQUIRED: Add every icon size listed below
You must add each image with listed size and alpha transparency.
For help generating images with alpha transparency, see this clipart link for examples in the Android Asset Studio.
Recommended
To quickly and easily generate small icons with the correct settings, we recommend using the Android Asset Studio. Use ic_stat_onesignal_default as the name.
If you prefer to create your own icons, you must make your icons the following sizes and make the small ones in white with a transparent background.
You must be sure the icon filenames are correct for Native, Unity, PhoneGap, Cordova, Ionic, PhoneGap Build (PGB), Xamarin, React Native, Ionic Package (Cloud Build)
Note: If you used Android Asset Studio for your small icon then this step may have already been done for you.
Required: Each name and pixel size must be present in the app.
If using Solar2D/Corona the file names and sizes are different, as follows:
Make sure the following paths exist, create any folders you are missing.
Required: Each image must be present in the following paths.
res/drawable-mdpi/ (24×24)
res/drawable-hdpi/ (36×36)
res/drawable-xhdpi/ (48×48)
res/drawable-xxhdpi/ (72×72)
res/drawable-xxxhdpi/ (96×96)
res/drawable-xxxhdpi/ (256×256) (Large Icon)
Assets/Plugins/Android/OneSignalConfig/res/drawable-mdpi/ (24×24)
Assets/Plugins/Android/OneSignalConfig/res/drawable-hdpi/ (36×36)
Assets/Plugins/Android/OneSignalConfig/res/drawable-xhdpi/ (48×48)
Assets/Plugins/Android/OneSignalConfig/res/drawable-xxhdpi/ (72×72)
Assets/Plugins/Android/OneSignalConfig/res/drawable-xxxhdpi/ (96×96)
Assets/Plugins/Android/OneSignalConfig/res/drawable-xxxhdpi/ (256×256) (Large Icon)
PhoneGap, Cordova, Ionic, Intel XDK
/platforms/android/app/src/main/res/drawable-xxxhdpi/ (256×256) (Large Icon)
PhoneGap Build (PGB), Ionic Package
(Cloud Build)
/locales/android/drawable-xxxhdpi/ (256×256) (Large Icon)
See this github link for more details on the directory structure if you’re having issues.
android/app/src/main/res/drawable-mdpi/ (24×24)
android/app/src/main/res/drawable-hdpi/ (36×36)
android/app/src/main/res/drawable-xhdpi/ (48×48)
android/app/src/main/res/drawable-xxhdpi/ (72×72)
android/app/src/main/res/drawable-xxxhdpi/ (96×96)
android/app/src/main/res/drawable-xxxhdpi/ (256×256) (Large Icon)
Add files to root (all sizes)
Resources/drawable-mdpi/ (24×24)
Resources/drawable-hdpi/ (36×36)
Resources/drawable-xhdpi/ (48×48)
Resources/drawable-xxhdpi/ (72×72)
Resources/drawable-xxxhdpi/ (96×96)
Resources/drawable-xxxhdpi/ (256×256) (Large Icon)
Screenshot
Issue with Older Versions of Cordova
With versions of Cordova before 7.0, you will need to use
/platforms/android/res/drawable-
instead of the path shown above when adding the icon resource to config.xml
Add the following lines to your config.xml under the Android section.
Troubleshooting Icons Not Showing
If you see the default OneSignal bell icon, you did not add all icon sizes. Please add all icons sizes and correct paths.
If you see a solid square, you set the image to the correct path, but the image does not have alpha transparency. For more help, try using images from this Android Asset Studio clipart.
You should be all set with your new default icons.
Optional
After you’ve added your default icons, you may choose to add more non-default icons. These will let you show different icons depending on the types of notifications your app sends. For instance, a game with a title like «Jewel Breaker» may wish to have a different colored jewel icon for every notification sent that represents the player’s level. Meanwhile, a social network may wish to show a chat bubble icon when the user receives a message from another user to differentiate those notifications from more generic system notifications.
OneSignal supports overriding default icons on a per-message basis.
Follow the steps above to generate icons and place them in the appropriate folder for your SDK.
To add non-default icons, you must name them something other than the default names specified above. For instance, you may name one message_icon .
If you’ve followed the above steps for creating default icons, and have updated your app, you’ll be able to reference those icons when you send a notification. To send a notification with a custom icon:
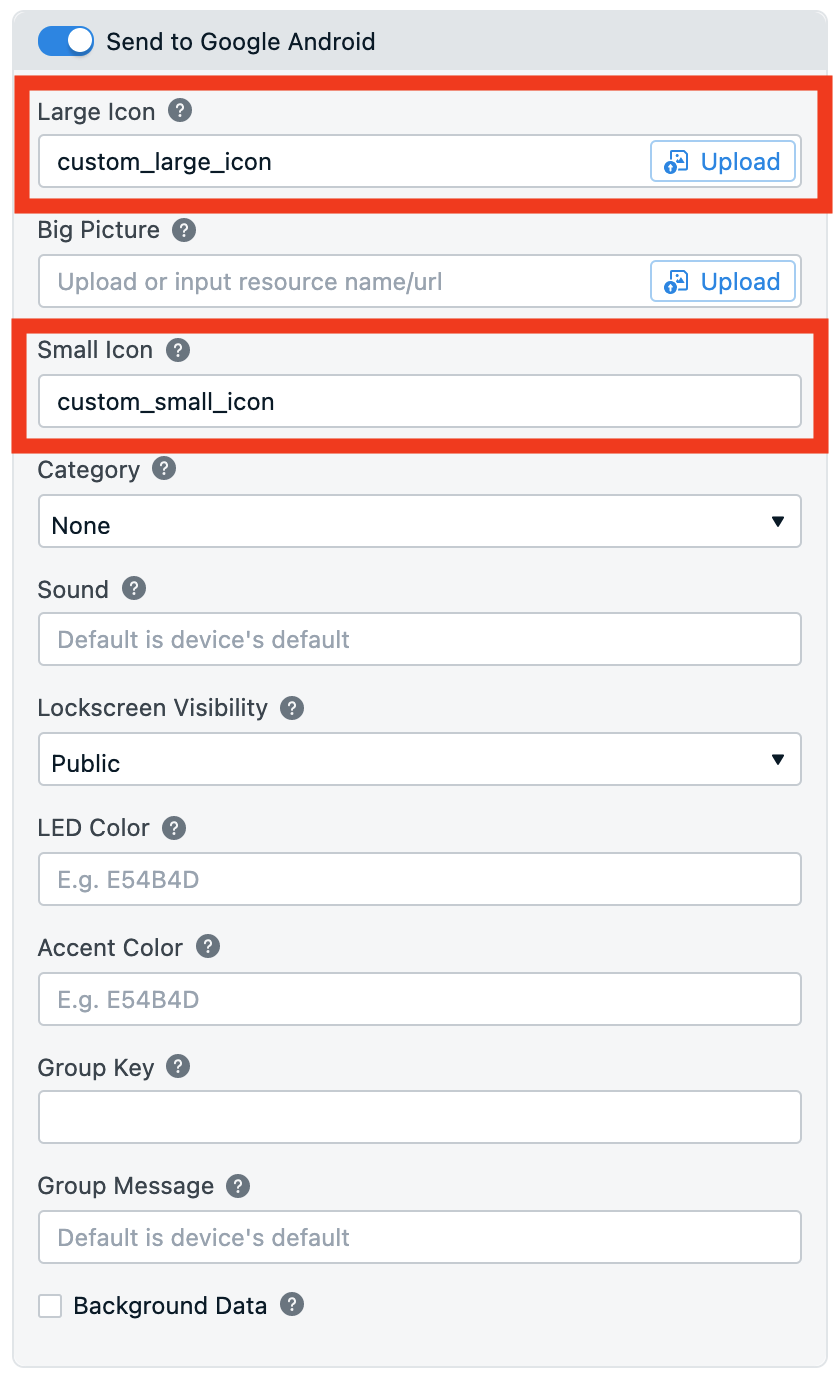
- Dashboard: Messages > New Push > Platform Settings > Google Android Options > Set the icon name without the file extension. With Large Notification Icons, you can also supply a URL where the icon will be displayed from.
- REST API: Instead of sending via the dashboard, you can send notifications with icons in the REST API by using the appropriate parameter and file extension depending on your platform (see more in Create notification REST API docs).
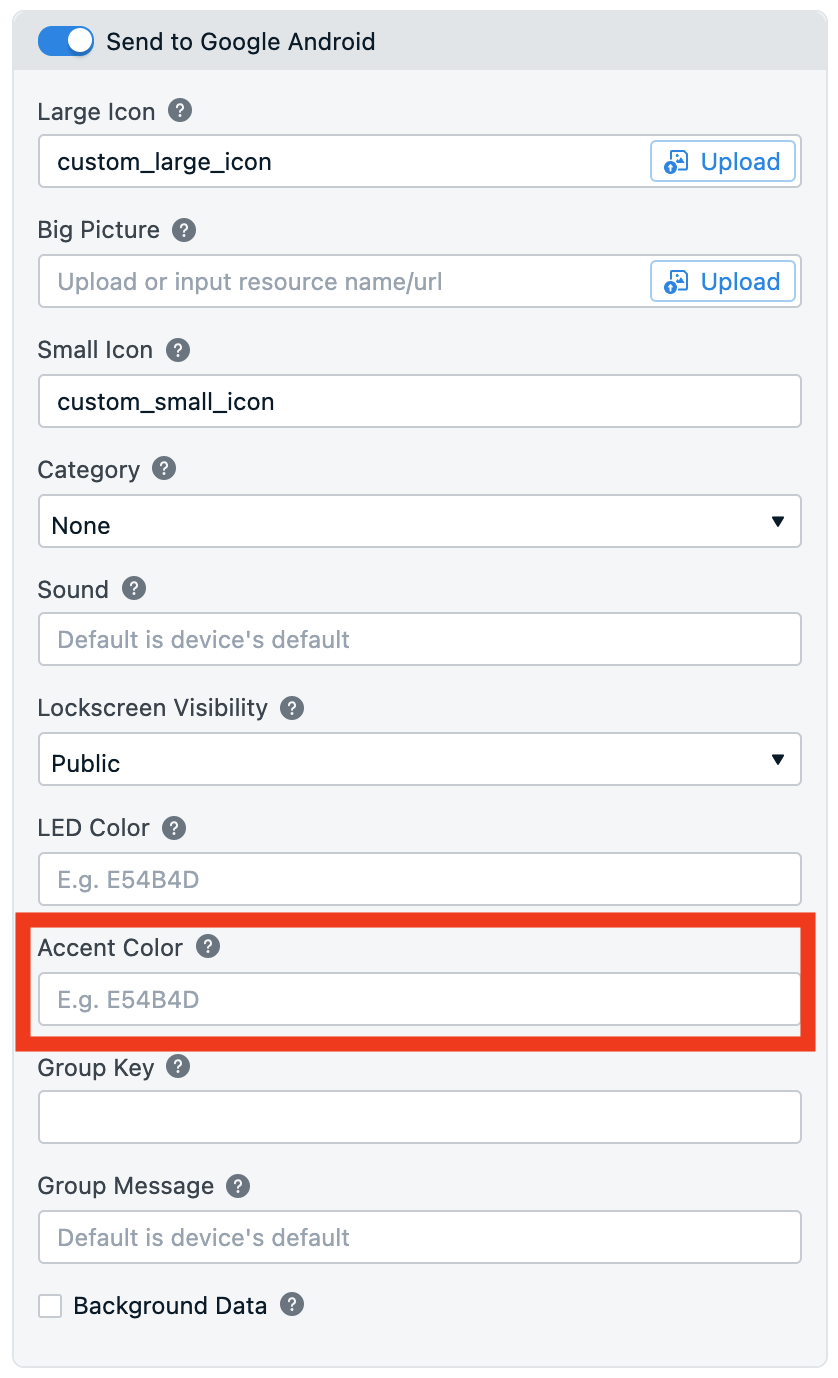
Android 5.0+ enforces your icon to only be white and transparent however it still allows tinting on the notification shown in the shade, known as the «accent color». (The status bar icon color will still be unaffected). These may be adjusted in Messages > New Push > Platform Settings > Google Android Options or as defaults in your manifest.
To set a default color add the following line to your res/values/strings.xml file in your project.
- If you want a different color for dark mode add the key to your res/values-night/strings.xml as well.
To set the color on per notification bases set android_accent_color on our Create notification API call, or enter a value in the Accent color field under Messages > New Push > Platform Settings > Google Android Options.
New icons take a while to propagate to all users
If you’ve very recently added an icon resource to your app, you may want to wait a few days before sending notifications using the icon. This is because it can take many days or even weeks for the majority of your users to update their apps to the latest version which contain your new icons.
Some device manufactures display the image as-is (basically ignoring the alpha channel rule). You can setup a custom notification layout based on Android’s documentation if you wish to use non-alpha channel images across all devices.
We highly recommend following the alpha rule as the icons may not look consistent on all devices. Google designed it this way as the icon is small enough you can’t see any meaningful detail, so enforcing a single color helps enforce an easier to recognize icon at a glance.
Updated a day ago
What’s Next
Learn about setting up more features, or start using the OneSignal Dashboard
Источник
OneSignal Push Notification Service Documentation
OneSignal Help & Documentation
Welcome to the OneSignal New IA developer hub. You’ll find comprehensive guides and documentation to help you start working with OneSignal New IA as quickly as possible, as well as support if you get stuck. Let’s jump right in!
Android Customizations
Customizing Android mobile app notifications with your app icons, colors, and style.
Android Mobile App Notifications Only
This section is for Android Mobile app customizations only. If you have a website, please see our Web Push Customizations guide.
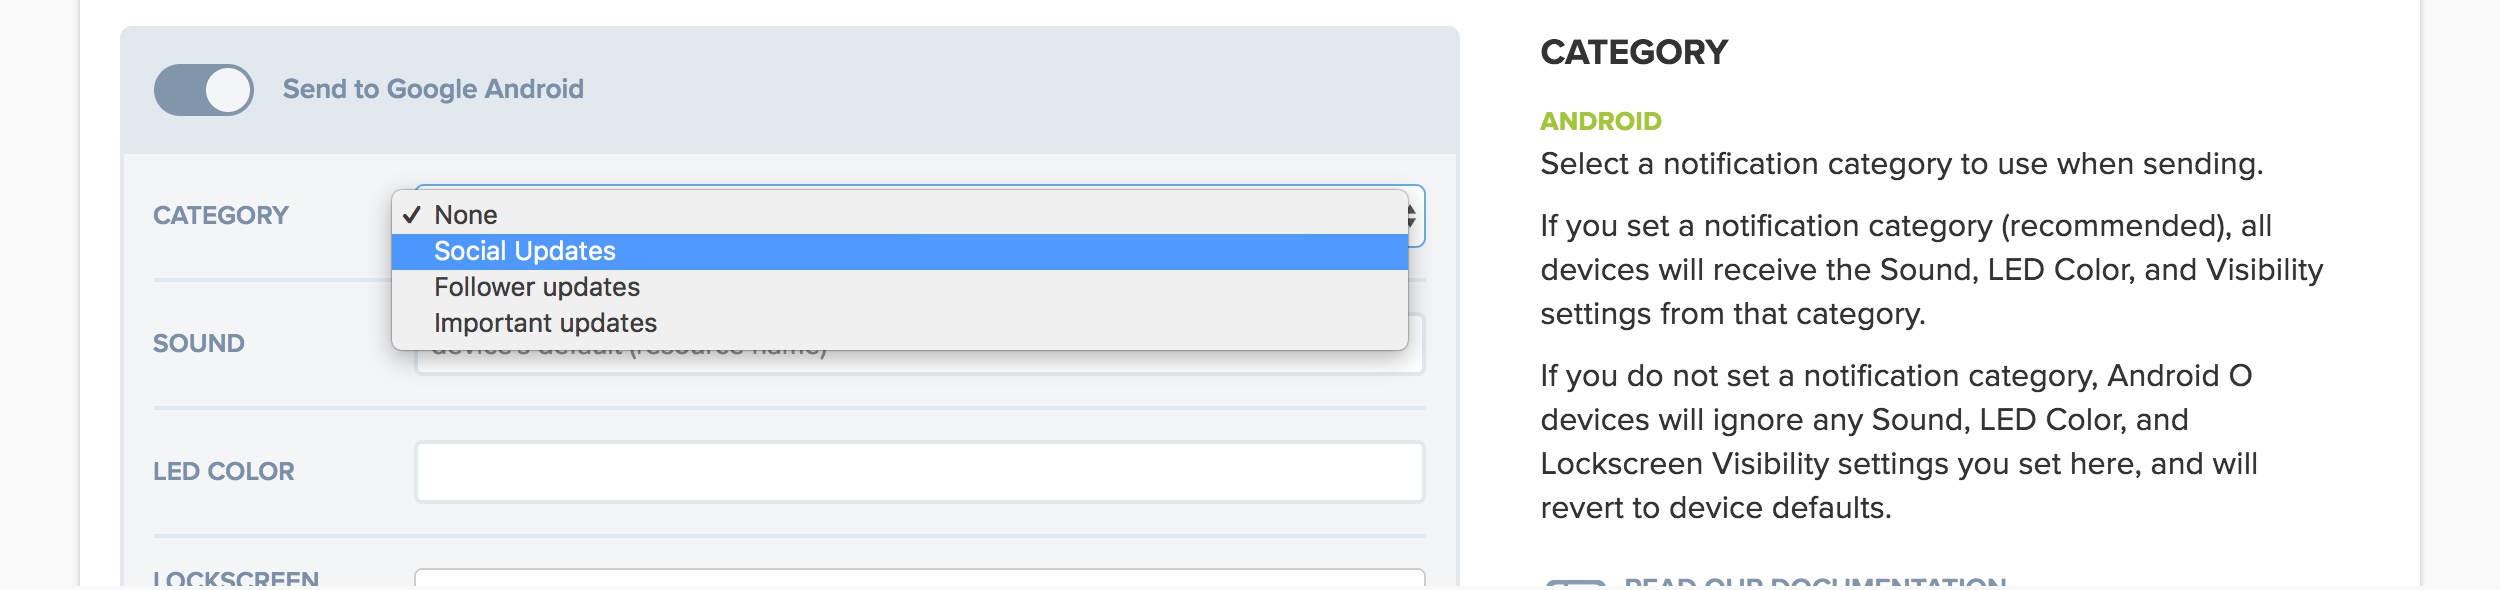
Notification categories are a new Android Oreo (8.0) feature which gives users finer control over notifications. You can select a category from Android Options or API android_channel_id when Sending Push Messages. To learn more about how Android Categories see Android Notification Categories.
Android 4.1 and newer devices support actions buttons. You can specify up to 3 buttons that will display below your notification content. See Action Buttons.
Option to add a background image to your notifications.
Android 12+ is changing the «Customizable Area» within notifications. So background images will look different and we recommend creating your own custom layout to handle this. Please review Android 12 Behavior Changes for details.
The Android Background Layout does not support different Android Themes.
The small and large icons will be overridden by the background image. Include it as part of your image if you need it to show still.
Big Pictures will not work with Background Images.
Our SDK does not provide an expanded view that supports multiline text. However you can create your own by following Google’s Custom View Documentation.
You can add a background image to your Google Android Mobile App notifications by adding an image file named onesignal_bgimage_default_image to your res/drawable-xxxhdpi folder.
The size should be 2600×256 (91.4:9) to fit all devices including landscape mode.
(Such as the Samsung Galaxy S7)
In portrait mode the user may only see 1280×256 (5:1) on some devices so do design your image accordingly.
Use onesignal_bgimage_notif_title_color and onesignal_bgimage_notif_body_color in your values/colors.xml to set text colors to match your image.
Example color.xml file. Title is set to red and the body is set to green below.
The image by default will be top left aligned, you may change it to be right aligned by setting the key onesignal_bgimage_notif_image_align to right in your strings.xml .
Example:
In additional to locally setting the image in your app, it can be with the android_background_layout field through the Create notification REST API call.
The image can be a resource set within the app or an external URL with direct link to the image resource.
Certain Android hardware devices have LED notification lights built-in, allowing notifications to trigger a colored notification light on a device upon receipt. Notification colors may be set on a per-message basis in the OneSignal dashboard, or via the OneSignal SDK/API.
Notification colors are set using ARGB Hex values (e.g. a red LED notification light would be in the format FF99000 ). If LED Color is not set, the light uses the device’s default color.
Accent colors only apply to apps targeting Android API level 21+ running on Android 5.0+ devices.
Accent colors are the background color around your small icon, which appears to the left of the notification content in a notification. Like LED Colors, accent colors may be set with an ARGB Hex value in either the dashboard or SDK/API. If Accent Color is not set, the color is set to grey. Read more in Android Notification Icons
Android supports grouping or combining notifications together.
The OneSignal SDK automatically sets the badge count on your app to the number of notifications that are currently in the notification shade. If you want to disable this you can add the following to your AndroidManifest.xml .
See our Android Badges Guide for more details.
OneSignal supports sending additional data along with a notification as key value pairs. You can read this additional data when a notification is opened by adding a setNotificationOpenedHandler instead.
However, if you want to one of the following.
- Receive data in the background with or without displaying a notification.
- Override specific notification settings depending on client-side app logic such as custom accent color, vibration pattern, or other any other NotificationCompat options available. See Android’s documentation on the NotificationCompat options.
. continue with the instructions in our Service Extensions Setup.
Add the following code to the top of onCreate in your launcher Activity .
Additional information:
By default OneSignal calls startActivity with the following intent flags.
By default OneSignal will open or resume your launcher Activity when a notification is tapped on. You can disable this behavior by adding the meta-data tag com.onesignal.NotificationOpened.DEFAULT set to DISABLE inside your application tag in your AndroidManifest.xml .
Make sure you are initializing OneSignal with setNotificationOpenedHandler in the onCreate method in your Application class. You will need to call startActivity from this callback. See example setNotificationOpenedHandler method.
This disables the Launch URL
This will stop the OneSignal Launch URL from opening a URL in an in-app browser. You will need to open URLs with your own webview.
To prevent more than one copy of your Activity from running add android:launchMode=»singleTask» to your Activity in your AndroidManifest.xml .
To support notifications with right-to-left languages correctly you must add android:supportsRtl=»true» to your tag in your AndroidManifest.xml .
Note, make sure to test all your Activities as this effect all views in your app.
Updated about a month ago
What’s Next
Learn about setting up more features, or start using the OneSignal Dashboard
Источник


