- Android Application Launch explained: from Zygote to your Activity.onCreate()
- When does Android process start?
- Zygote : Spawning new life, new process
- When a user clicks an app icon in Launcher …
- There are three distinct phases of process launch :
- Thanks for reading through 🙌🏼. If you found this post useful, please applaud using the 👏 button and share it through your circles.
- Полный список
Android Application Launch explained: from Zygote to your Activity.onCreate()

Apr 30, 2018 · 6 min read
This article explains how Android launches your application when a user clicks an app icon. The Android system does a lot of heavy lifting behind the curtains to make your launch activity visible to a user. This article covers this process in detail by highlighting the important phases and call sequences.
Android applications are unique in two ways:
- Multiple Entry points: Android apps are composed of different components and they can invoke the components owned by other apps. These components roughly correspond to multiple entry points for any application. Hence, they differ from traditional applications which have a single entry point like main() method.
- Own Little World: Every Android application lives in its own world, it runs in a separate process, it has its own Dalvik VM instance and is assigned a unique user ID.
When does Android process start?
An Android process is started whenever it is required.
Any time a user or some other sys t em component requests a component (could be a service, an activity or an intent receiver) that belongs to your application be executed, the Android system spins off a new process for your app if it’s not already running. Generally processes keep running until killed by the system. Application processes are created on demand and a lot of things happen before you see your application’s launch activity up and running.
Every app runs in its own process: By default, every Android app runs in its own Android process which is nothing but a Linux process which gets one execution thread to start with. For example, when you click on a hyper-link in your e-mail, a web page opens in a browser window. Your mail client and the browser are two separate apps and they run in their two separate individual processes. The click event causes Android platform to launch a new process so that it can instantiate the browser activity in the context of its own process. The same holds good for any other component in an application.
Zygote : Spawning new life, new process
Let’s step back for a moment and have a quick look on system start-up process. Like the most Linux based systems, at startup, the boot loader loads the kernel and starts the init process. The init then spawns the low level Linux processes called “daemons” e.g. android debug daemon, USB daemon etc. These daemons typically handle the low level hardware interfaces including radio interface.
Init process then starts a very interesting process called ‘ Zygote ’.
As the name implies it’s the very beginning for the rest of the Android application. This is the process which initializes a very first instance of Dalvik virtual machine. It also pre-loads all common classes used by Android application framework and various apps installed on a system. It thus prepares itself to be replicated. It stats listening on a socket interface for future requests to spawn off new virtual machines (VM)for managing new application processes. On receiving a new request, it forks itself to create a new process which gets a pre-initialized VM instance.
After zygote, init starts the runtime process.
The zygote then forks to start a well managed process called system server. System server starts all core platform services e.g activity manager service and hardware services in its own context.
At this point the full stack is ready to launch the first app process — Home app which displays the home screen also known as Launcher application.
When a user clicks an app icon in Launcher …
The click event gets translated into startActivity(intent) and it is routed to ActivityManagerService via Binder IPC. The ActvityManagerService performs multiple steps
- The first step is to collect information about the target of the intent object. This is done by using resolveIntent() method on PackageManager object. PackageManager.MATCH_DEFAULT_ONLY and PackageManager.GET_SHARED_LIBRARY_FILES flags are used by default.
- The target information is saved back into the intent object to avoid re-doing this step.
- Next important step is to check if user has enough privileges to invoke the target component of the intent. This is done by calling grantUriPermissionLocked() method.
- If user has enough permissions, ActivityManagerService checks if the target activity requires to be launched in a new task. The task creation depends on Intent flags such as FLAG_ACTIVITY_NEW_TASK and other flags such as FLAG_ACTIVITY_CLEAR_TOP.
- Now, it’s the time to check if the ProcessRecord already exists for the process.If the ProcessRecord is null, the ActivityManager has to create a new process to instantiate the target component.
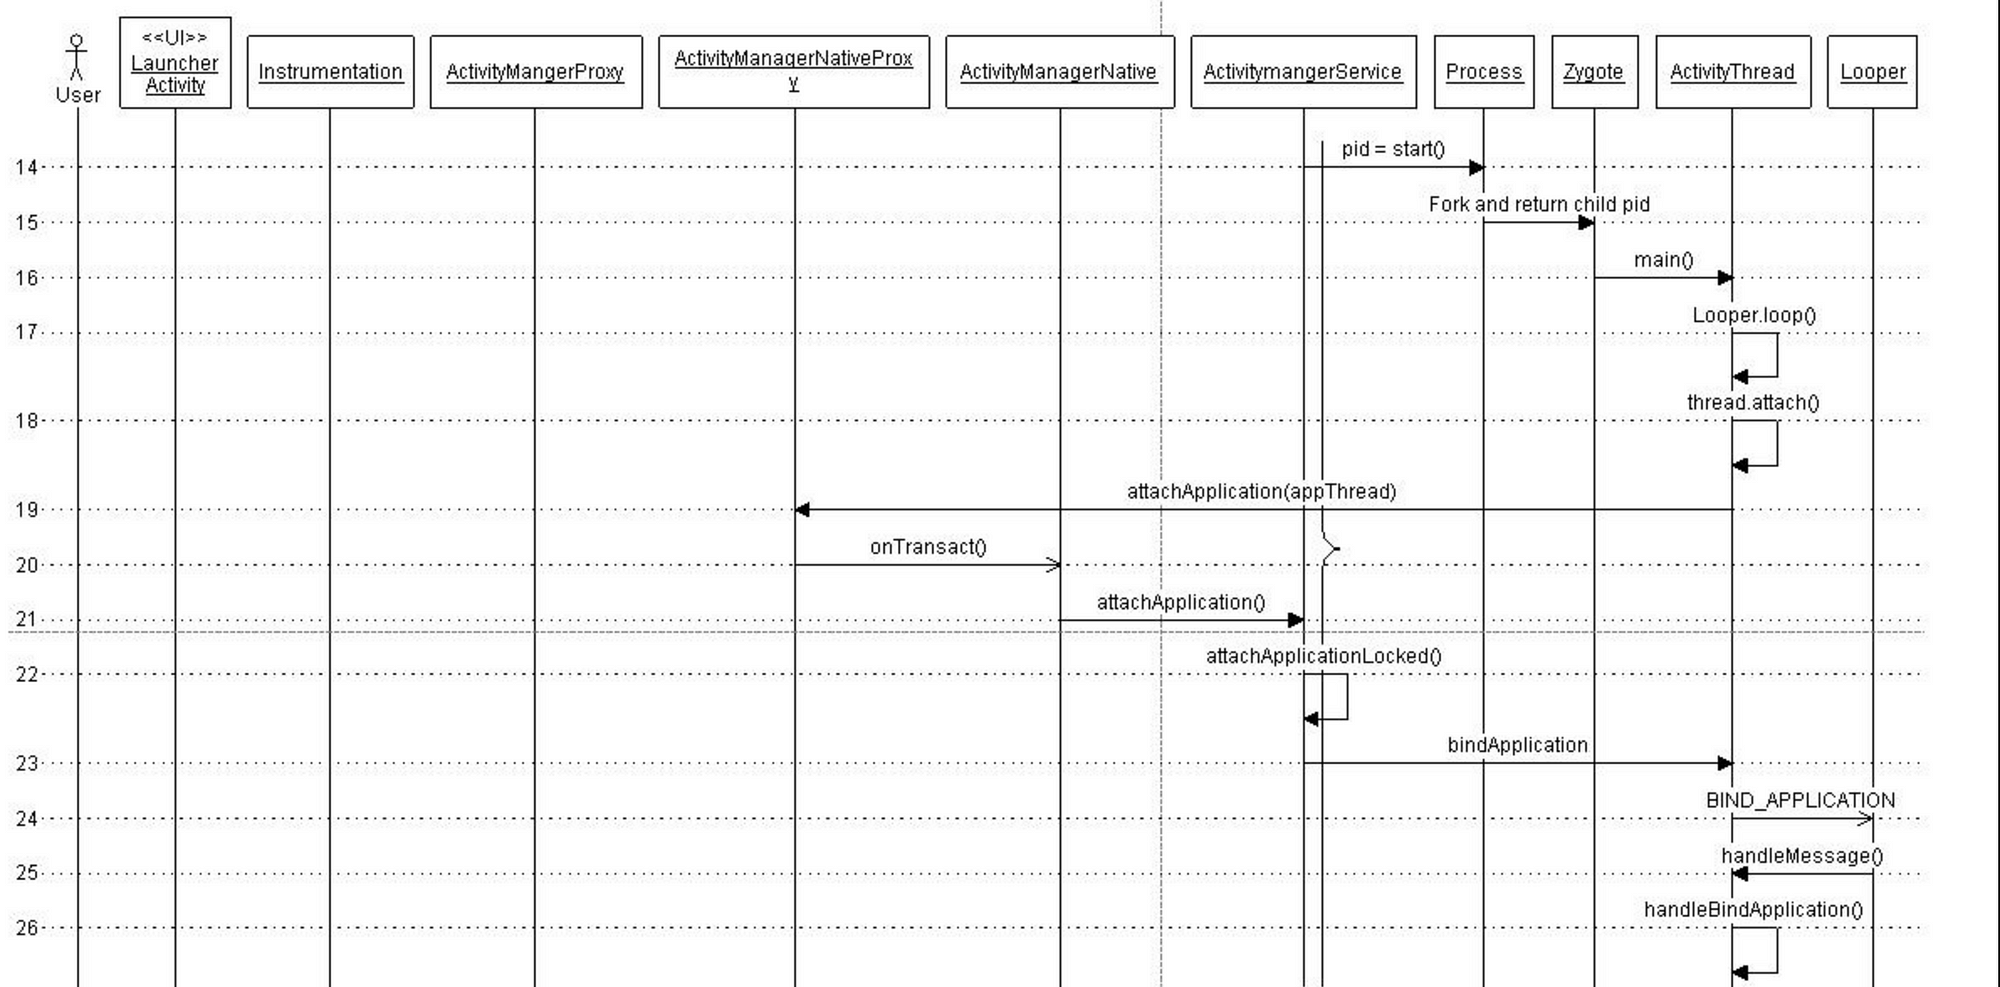
As you saw above many things happen behind the scene when a user clicks on an icon and a new application gets launched. Here is the full picture :

There are three distinct phases of process launch :
- Process Creation
- Binding Application
- Launching Activity / Starting Service / Invoking intent receiver …
ActivityManagerService creates a new process by invoking startProcessLocked() method which sends arguments to Zygote process over the socket connection. Zygote forks itself and calls ZygoteInit.main() which then instantiates ActivityThread object and returns a process id of a newly created process.
Every process gets one thread by default. The main thread has a Looper instance to handle messages from a message queue and it calls Looper.loop() in its every iteration of run() method. It’s the job of a Looper to pop off the messages from message queue and invoke the corresponding methods to handle them. ActivityThread then starts the message loop by calling Looper.prepareLoop() and Looper.loop() subsequently.
The following sequence captures the call sequence in detail —

The next step is to attach this newly created process to a specific application. This is done by calling bindApplication() on the thread object. This method sends BIND_APPLICATION message to the message queue. This message is retrieved by the Handler object which then invokes handleMessage() method to trigger the message specific action — handleBindApplication(). This method invokes makeApplication() method which loads app specific classes into memory.
This call sequence is depicted in following figure.
Launching an Activity:
After the previous step, the system contains the process responsible for the application with application classes loaded in process’s private memory. The call sequence to launch an activity is common between a newly created process and an existing process.
The actual process of launching starts in realStartActivity() method which calls sheduleLaunchActivity() on the application thread object. This method sends LAUNCH_ACTIVITY message to the message queue. The message is handled by handleLaunchActivity() method as shown below.
Assuming that user clicks on Video Browser application. the call sequence to launch the activity is as shown in the figure.
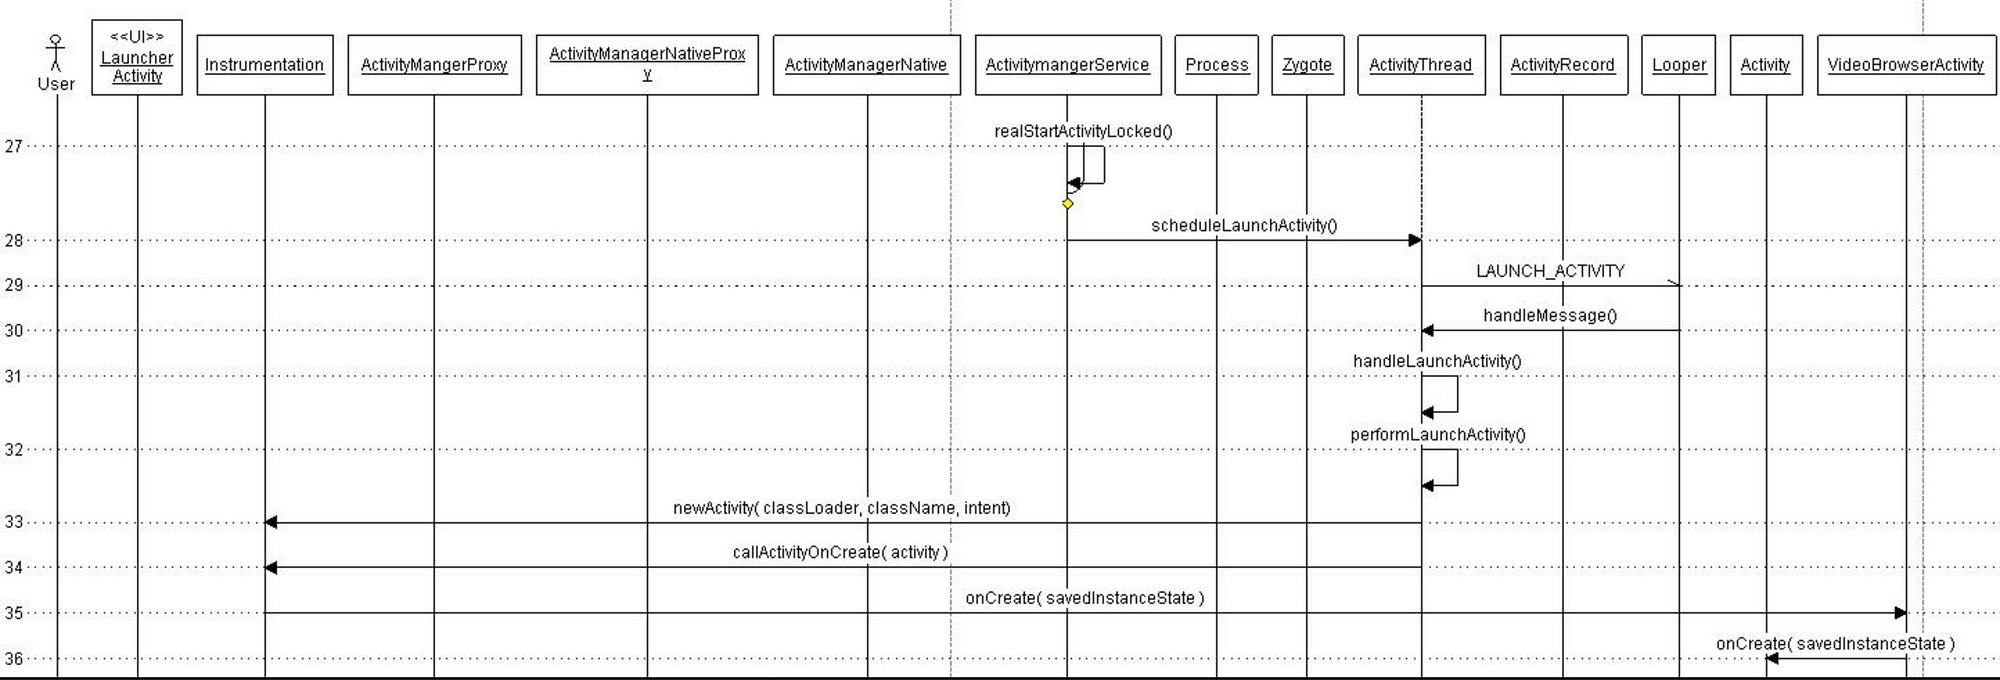
The Activity starts its managed lifecycle with onCreate() method call. The activity comes to foreground with onRestart() call and starts interacting with the user with onStart() call.
Thanks for reading through 🙌🏼. If you found this post useful, please applaud using the 👏 button and share it through your circles.
This article was initially published as two part series (Part 1 and Part 2) on my blog ./ mult-core-dump in 2010. These articles have been cited in multiple documents including the very famous Introduction to the Android Graphics Pipeline
Источник
Полный список
— рассмотрим подробнее метод onStartCommand
Метод onStartCommand должен возвращать int. В прошлых примерах мы использовали ответ метода супер-класса. В этом уроке разберемся, что мы можем возвращать, и чем нам это грозит. Также посмотрим, что за флаги (второй параметр) идут на вход этому методу.
Система может убить сервис, если ей будет не хватать памяти. Но в наших силах сделать так, чтобы наш сервис ожил, когда проблема с памятью будет устранена. И более того, не просто ожил, а еще и снова начал выполнять незавершенные вызовы startService.
Т.е. мы вызываем startService, срабатывает onStartCommand и возвращает одну из следующих констант:
START_NOT_STICKY – сервис не будет перезапущен после того, как был убит системой
START_STICKY – сервис будет перезапущен после того, как был убит системой
START_REDELIVER_INTENT – сервис будет перезапущен после того, как был убит системой. Кроме этого, сервис снова получит все вызовы startService, которые не были завершены методом stopSelf(startId).
А второй параметр flags метода onStartCommand дает нам понять, что это повторная попытка вызова onStartCommand.
В хелпе написано, что flags может принимать значения 0, START_FLAG_RETRY или START_FLAG_REDELIVERY.
На практике я ни разу не встречал значения 0. Постоянно приходит START_FLAG_RETRY. По этому поводу я видел в инете мнение, что это реальный баг системы.
А вот на флаг START_FLAG_REDELIVERY можно положиться. Если он пришел вам в методе onStartCommand, значит, прошлый вызов этого метода вернул START_REDELIVER_INTENT, но не был завершен успешно методом stopSelf(startId).
В общем, на словах трудно все это объяснять, сейчас нарисуем приложение, и все станет понятнее.
Будем создавать два проекта — соответственно, два Application-а у нас получится. В первом будет только одно Activity, которое будет вызывать сервис. А во втором собственно и будет этот сервис. Т.е. в прошлых уроках у нас приложение и сервис были в одном Application, а в этом уроке мы их раскидаем по двум разным Application. И сейчас даже объясню, зачем мы так сделаем.
В начале урока я написал «Система может убить сервис». Этим мы и будем сейчас заниматься, чтобы на практике проверить поведение сервиса в таких случаях. Мы будем убивать процесс, который отвечает за сервис. Если бы у нас сервис и приложение были бы в одном Application, то они выполнялись бы в одном процессе. И убив процесс, мы грохнули бы и сервис и приложение. А нам надо убить только сервис, поэтому выносим его в отдельное Application, и он в своем процессе будет работать.
Я раскидал сервис и приложение по разным проектам для большей наглядности. А вообще, организовать работу сервиса и приложения в разных процессах можно было и в одном проекте (в одном Application). Для этого в манифесте для сервиса надо прописать атрибут: android:process=»:newproc». Вместо newproc можно использовать свое слово.
Итак, создадим первый проект:
Project name: P0941_ServiceKillClient
Build Target: Android 2.3.3
Application name: ServiceKillClient
Package name: ru.startandroid.develop.p0941servicekillclient
Create Activity: MainActivity
Это у нас будет приложение-клиент, оно будет вызывать сервис.
Добавим в strings.xml строки:
Просто вызов сервиса. Вспоминаем способы вызова Activity, которые мы знаем, и понимаем, что здесь идет аналогичный вызов сервиса через Action. А значит, когда будем создавать сервис, надо будет настроить Intent Filter с этим Action. На прошлых уроках мы сервис вызывали через класс, т.к. там приложение и сервис в одном Application у нас были.
В Intent помещаем параметр с именем name и значением value. Это нам понадобится, чтобы убедиться, что система при восстановлении сервиса и повторном вызове не потеряет наши данные.
Создадим второй проект, без Activity:
Project name: P0942_ServiceKillServer
Build Target: Android 2.3.3
Application name: ServiceKillServer
Package name: ru.startandroid.develop.p0942servicekillserver
Уберите эту галку

Нам в этом Application не понадобится Activity.
В втором проекте создаем сервис, класс MyService.java:
Он похож на сервис с прошлого урока.
MyRun – Runnable класс, который эмулирует долгую работу. Ставим в нем паузу 15 секунд. После этого вызываем stopSelfResult.
В onStartCommand пишем в лог значение из Intent, создаем экземпляр MyRun и отправляем его работать в новый поток. Также здесь вызываем метод readFlags и передаем ему flags. И возвращаем константу START_NOT_STICKY. Напомню, что START_NOT_STICKY означает, что сервис не будет перезапущен после того, как будет убит.
В методе readFlags определяем, какие флаги содержатся в readFlags, и отмечаем это в логе.
Прописываем сервис в манифесте и добавляем к нему IntentFilter c action = ru.startandroid.develop.p0942servicekillserver.MyService.
Все сохраняем. Для начала, запускаем второй проект (P0942_ServiceKillServer), он установится в эмулятор, но ничего не произойдет, т.к. Activity никаких не было, только сервис.
В консоли будут такие строки:
Installing P0942_ServiceKillServer.apk.
Success!
\P0942_ServiceKillServer\bin\P0942_ServiceKillServer.apk installed on device
Done!
Теперь запускаем первый проект. Приложение установится в эмулятор и запустится.

Нам надо получить доступ к процессам. Для этого можно открыть перспективу DDMS и там увидеть все процессы.
А можно и в нашу текущую перспективу добавить это окно.
В Eclipse меню Window > Show View > Other > Android > Devices.
Снизу должна появиться вкладка Devices. В ней показан наш эмулятор и запущенные процессы.

Мы видим, что запущено наше приложение. А когда мы нажмем в приложении кнопку Start, запустится сервис и в списке процессов появится еще один процесс. Вот его нам и надо будет остановить.
У нас будет 15 секунд, чтобы удалить его. Потому что через 15 секунд он успешно вызовет stopSelfResult и сам закроется.
Итак, жмем Start. Появился процесс

Выделяем его и жмем кнопку Stop Process. Процесс исчез. Смотрим логи:
MyService onCreate
MyService onStartCommand, name = value
START_FLAG_RETRY
MyRun#1 create
MyRun#1 start
Сервис создался и начал выполнять вызов startService. При этом почему-то мы получили флаг START_FLAG_RETRY. Хотя это у нас первая попытка вызова сервиса. Это я, к сожалению, никак не могу прокомментировать.
Далее видим, как создался и начал работу MyRun#1. А потом мы убили процесс, и все закончилось на этом. Метод onStartCommand вернул START_NOT_STICKY и поэтому не был восстановлен после убийства.
Давайте проверим следующую константу. Перепишем onStartCommand:
Теперь будем возвращать START_STICKY. Это значит, что сервис будет восстановлен после убийства.
Все сохраняем, запускаем (CTRL+F11). Наш сервис инсталлится на эмулятор. А приложение так и работает до сих пор.
Жмем Start и сразу же в процессах убиваем появившийся процесс сервиса. Но! Фокус еще не закончен. Проходит несколько секунд (у меня около 5, у вас может быть по-другому), и процесс снова появляется в списке! Система восстановила убитый сервис и сколько вы его теперь не грохайте, он постоянно будет восстанавливаться. Это нам обеспечила константа START_STICKY, которую мы возвращаем в onStartCommand.
MyService onCreate
MyService onStartCommand, name = value
START_FLAG_RETRY
MyRun#1 create
MyRun#1 start
Почти все так же, как и в прошлый раз. Сервис запустился, получил вызов startService, создал и запустил MyRun. Потом мы его убили — в логах это никак не отражено.
И далее сервис снова создан (MyService onCreate). Но вызов startService, который он получил в прошлый раз, потерян.
Для того, чтобы этот вызов не терялся, нужна константа START_REDELIVER_INTENT. Будем возвращать ее в методе onStartCommand:
Сохраняем, инсталлим сервис. Жмем Start и убиваем процесс. Процесс снова появляется спустя какое-то время. Смотрим логи:
MyService onCreate
MyService onStartCommand, name = value
START_FLAG_RETRY
MyRun#1 create
MyRun#1 start
Сервис начал работу и был убит, как в прошлые разы.
MyService onCreate
MyService onStartCommand, name = value
START_FLAG_REDELIVERY
START_FLAG_RETRY
MyRun#1 create
MyRun#1 start
MyRun#1 end, stopSelfResult(1) = true
MyService onDestroy
А далее он был снова запущен, снова получил вызов startService и успешно его отработал вплоть до stopSelfResult. После чего сервис сам остановился. Обратите внимание, что Intent мы получили тот же, что и в первую попытку, с параметром name = value. Т.е. система сохранила все, а когда процесс был убит, восстановила его и вернула нам данные.
В этот раз кроме START_FLAG_RETRY мы получили еще флаг START_FLAG_REDELIVERY, который говорит нам о том, что мы уже получали такой вызов, но в прошлый раз он по каким-то причинам не завершился методом stopSelf или stopSelfResult.
Если во время убийства сервиса будет висеть несколько таких работающих START_FLAG_REDELIVERY вызовов, для которых еще не был выполнен stopSelf, то все они будут снова отправлены в сервис при его восстановлении.
Вот такие три замечательные константы, которые позволяют нам управлять поведением сервиса после его насильственной смерти.
Наверняка возникает вопрос типа «Как поведет себя сервис, если отправить ему несколько вызовов и в каждом onStartCommand возвращать разные константы». Я в одном уроке не смогу рассмотреть все эти комбинации и варианты. Предлагаю потестить вам это самостоятельно.
И еще имеет смысл сказать, что метод onStartCommand появился только начиная с Android 2.0. До этого использовался более простой onStart, без механизма восстановления.
На следующем уроке:
— получаем из сервиса результат с помощью PendingIntent
Присоединяйтесь к нам в Telegram:
— в канале StartAndroid публикуются ссылки на новые статьи с сайта startandroid.ru и интересные материалы с хабра, medium.com и т.п.
— в чатах решаем возникающие вопросы и проблемы по различным темам: Android, Kotlin, RxJava, Dagger, Тестирование
— ну и если просто хочется поговорить с коллегами по разработке, то есть чат Флудильня
— новый чат Performance для обсуждения проблем производительности и для ваших пожеланий по содержанию курса по этой теме
Источник


