- Полный список
- Level List
- Transition Drawable
- Inset Drawable
- Clip Drawable
- Scale Drawable
- Animation drawable
- Android ImageView ScaleType: A Visual Guide
- Scale Types
- CENTER
- CENTER_CROP
- CENTER_INSIDE
- FIT_CENTER
- FIT_END
- FIT_START
- FIT_XY
- MATRIX
- Adjust View Bounds
- If you enjoyed this post, you might also like:
- Mobile design and development services for every stage of your app
- Understanding Android Matrix transformations
- How can we use the matrix?
- Translating
- Scaling
- Rotation
- Skewing
- Applying multiple transformations
Полный список
Продолжаем разбирать типы Drawable, которые можно описывать с помощью XML-разметки. Проектов в этом уроке создавать не будем. Я просто буду в своем проекте создавать XML-файлы в папке drawable и ставить их фоном для View. А в тексте урока приведу код и скрины. Иногда буду вешать дополнительно серый фон, чтобы был виден реальный размер View.
Чтобы программно добраться до Drawable, который вы для View повесили как фон, надо просто вызвать метод getBackground.
Level List
Тег позволяет отображать Drawable в зависимости от значения level. Рассмотрим пример, где будем отображать три разных Drawable: если level=0, то зеленый прямогуольник; если 1, то желтый; если 2, то красный. Создадим три Drawable
Level List, в котором мы указываем какой Drawable при каком максимальном уровне (maxLevel) отображать.
Менять уровень у Drawable мы можем методом setLevel. Ставим 0 (по умолчанию)


В соответствии с заданным уровнем отображается Drawable.
Кроме атрибута maxLevel можно также использовать атрибут minLevel для указания минимального значения.
Transition Drawable
XML выглядит так:
Также у item есть атрибуты left, top, right, bottom для задания отступа.
В коде, для переключения между Drawable используются методы startTransition и reverseTransition. Оба метода принимают на вход количество мсек, которое будет длиться переход.
Inset Drawable
Насколько я понял – это просто обертка Drawable, которая позволяет указать padding-отступы. Корневой тег – , атрибуты отступа insetLeft, insetTop, insetRight, insetBottom.
Clip Drawable
Тег позволяет обрезать Drawable по горизонтальной и (или) вертикальной оси. Какая часть картинки будет обрезана зависит от значения level. Используемый диапазон тут от 0 до 10000, где 0 — картинка полностью обрезана и не видна, 10000 — картинка видна полностью. Атрибут gravity позволяет указать направление урезания.
Рассмотрим несколько примеров.
Устанавливаем программно (методом setLevel) уровень в 7000. А XML рисуем такой:
Ось — горизонтальная, направление — влево. Т.е. картинка обрезается по горизонтали справа-налево до 70% (7000 от 10000).

Уровень установим в 2000, а xml делаем таким:
Картинка обрезается по вертикали снизу вверх до 20%

Уровень 5000, xml:
Картинка обрезается по обоим осям вправо и вниз до 50%

Уровень 6000, xml:
Картинка обрезается по горизонтали к центру до 60%

Scale Drawable
Тег позволяет сжать картинку по горизонтальной (scaleWidth) и (или) вертикальной (scaleHeight) оси и сместить полученное изображение в указанную часть (scaleGravity) доступного пространства.
У меня этот тип Drawable работал только, если установить ему level > 0.
Сжимаем на 30% по горизонтали и смещаем влево.

Сжимаем на 70% по вертикали и смещаем вниз.

Сжимаем на 50% по обоим сторонам и смещаем вправо-вниз.

Сжимаем на 40% по ширине и 60% по высоте, и смещаем в центр

Animation drawable
Список Drawable с указанием времени отображения для каждого. Атрибут oneShot установленный в true говорит системе о том, что воспроизведение нужно только один раз. Если поставить false, то анимация будет циклично повторяться.
Чтобы запустить процесс анимации, необходимо получить Drawable, привести его к типу AnimationDrawable и вызвать метод start.
Присоединяйтесь к нам в Telegram:
— в канале StartAndroid публикуются ссылки на новые статьи с сайта startandroid.ru и интересные материалы с хабра, medium.com и т.п.
— в чатах решаем возникающие вопросы и проблемы по различным темам: Android, Kotlin, RxJava, Dagger, Тестирование
— ну и если просто хочется поговорить с коллегами по разработке, то есть чат Флудильня
— новый чат Performance для обсуждения проблем производительности и для ваших пожеланий по содержанию курса по этой теме
Источник
Android ImageView ScaleType: A Visual Guide
If you’re anything like me, you are really, really, ridiculously good looking. But you’re also probably a tad forgetful. So when it comes time to scale an image in an ImageView , you cannot for the life of you remember what all the different ScaleType s actually look like on the screen. So, you spend the next 10-15 minutes building and rebuilding your app with each and every scale type to see what they all look like. Then you inevitably forget the difference between two of them and start the whole process all over again. As the kids say, “I gotchu fam”.
Below are screenshots of all the different ScaleType s placed side-by-side. And below that are all the ScaleType definitions copy and pasted directly from the official Android docs. And even further below those is a helpful tip for those brave souls who make it to the end of this post 🙂
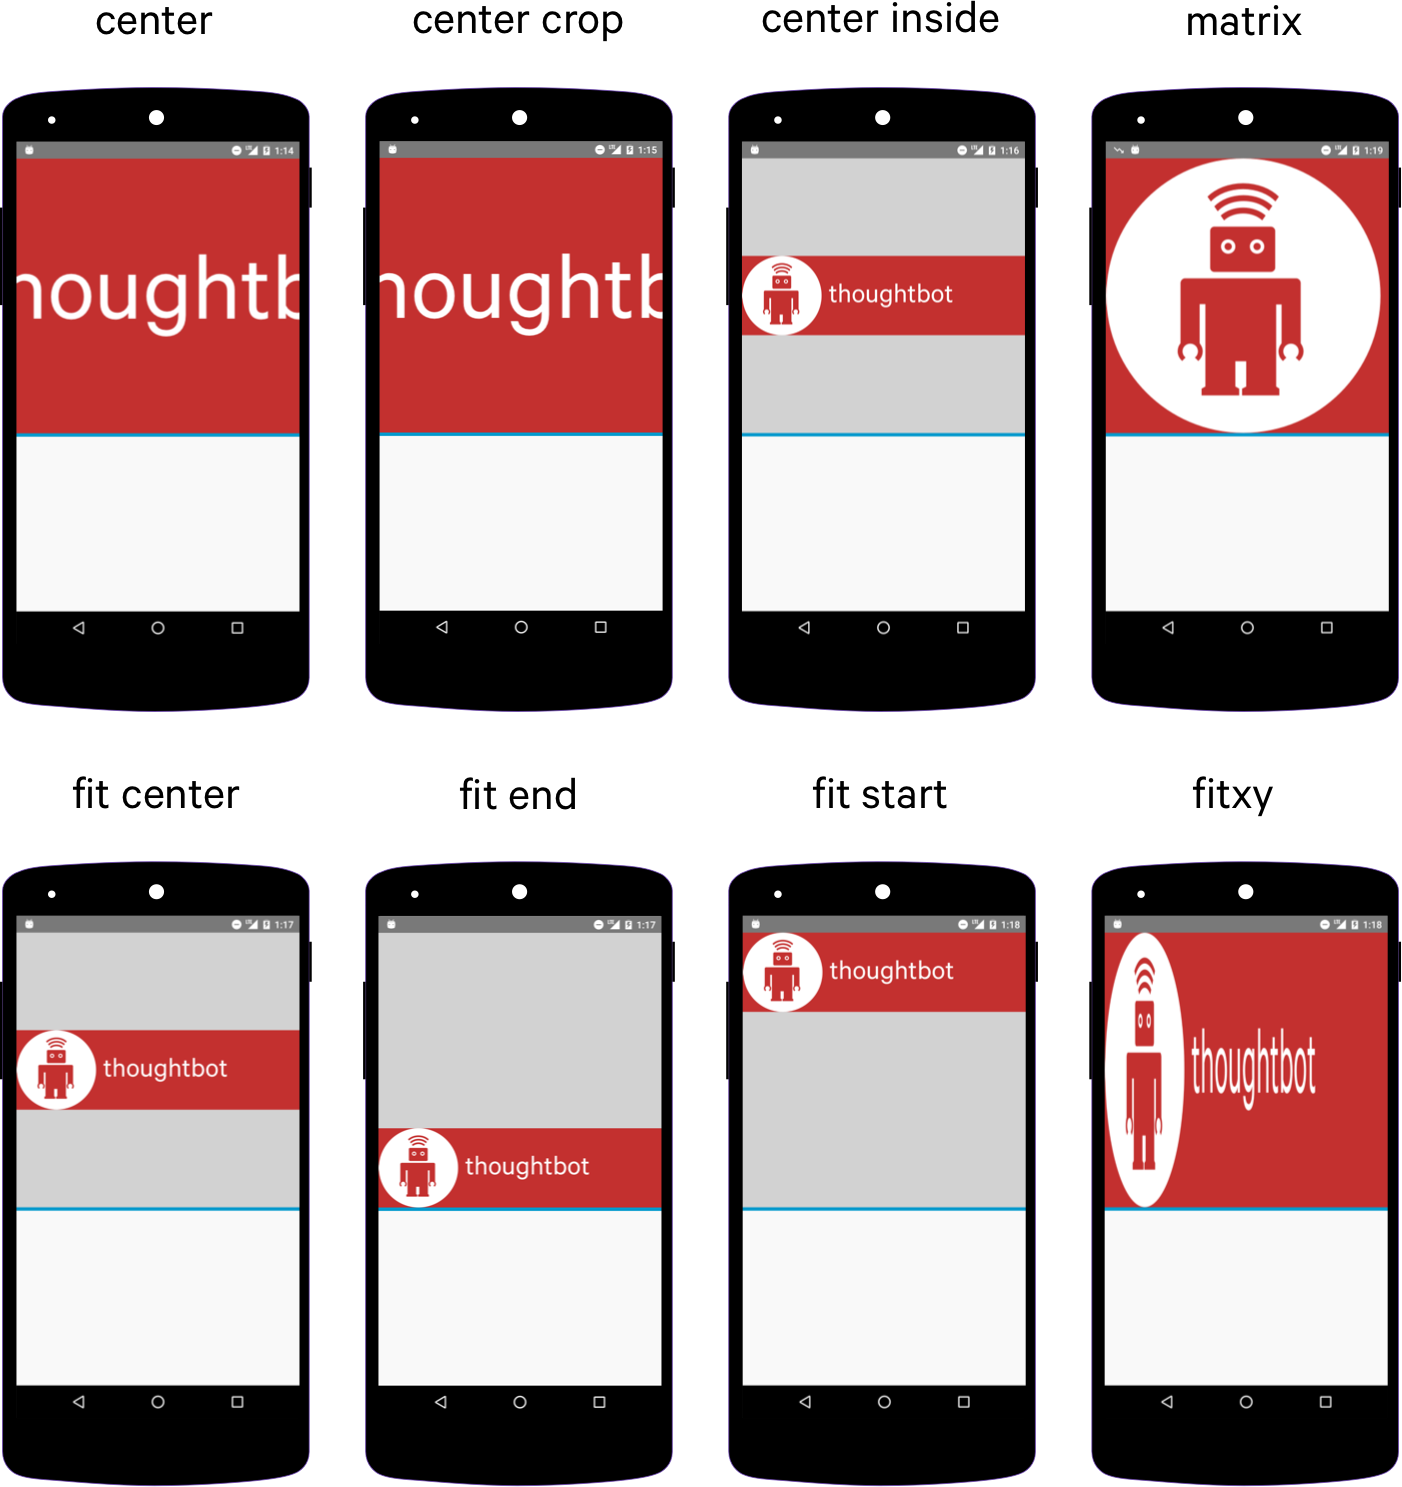
Scale Types
The full descriptions of each ScaleType from the official Android documentation.
CENTER
Center the image in the view, but perform no scaling.
CENTER_CROP
Scale the image uniformly (maintain the image’s aspect ratio) so that both dimensions (width and height) of the image will be equal to or larger than the corresponding dimension of the view (minus padding).
CENTER_INSIDE
Scale the image uniformly (maintain the image’s aspect ratio) so that both dimensions (width and height) of the image will be equal to or less than the corresponding dimension of the view (minus padding).
FIT_CENTER
Scale the image using Matrix.ScaleToFit.CENTER
Matrix.ScaleToFit.CENTER : Compute a scale that will maintain the original src aspect ratio, but will also ensure that src fits entirely inside dst. At least one axis (X or Y) will fit exactly. The result is centered inside dst.
FIT_END
Scale the image using Matrix.ScaleToFit.END
Matrix.ScaleToFit.END : Compute a scale that will maintain the original src aspect ratio, but will also ensure that src fits entirely inside dst. At least one axis (X or Y) will fit exactly. END aligns the result to the right and bottom edges of dst.
FIT_START
Scale the image using Matrix.ScaleToFit.START
Matrix.ScaleToFit.START : Compute a scale that will maintain the original src aspect ratio, but will also ensure that src fits entirely inside dst. At least one axis (X or Y) will fit exactly. START aligns the result to the left and top edges of dst.
FIT_XY
Scale the image using Matrix.ScaleToFit.FILL
Matrix.ScaleToFit.FILL : Scale in X and Y independently, so that src matches dst exactly. This may change the aspect ratio of the src.
MATRIX
Scale using the image matrix when drawing.
Adjust View Bounds
While not technically an ImageView.ScaleType this will come in handy. If you notice with CENTER_INSIDE , FIT_CENTER , FIT_END and FIT_START the actual bounds of the ImageView are much larger than the scaled image. To set the bounds of the ImageView to the height of the image inside, use android:adjustViewBounds=»true” in your XML. It looks like this:

If you enjoyed this post, you might also like:

Mobile design and development services for every stage of your app
We design and build iOS, Android, and cross-platform React Native apps for startups and established businesses.
© 2021 thoughtbot, inc. The design of a robot and thoughtbot are registered trademarks of thoughtbot, inc. Privacy Policy
Источник
Understanding Android Matrix transformations


Many years ago in school I was learning about matrices. I don’t remember much of it, but what I do remember was thinking, “but… what do you actually do with that knowledge?”
Fast forward a few years and I started working as an Android Developer and had to work with ImageView ‘s scaleType — if you ever looked at all the possible types you’d have noticed that one of them is matrix . For many years I shied away from it, using the other scale types or working around the issue otherwise. However a few weeks ago I was working on a design where the background image of a component should be aligned to the top-left of the view, without performing any scaling, like this:

So I went ahead and added an ImageView and went through all the scale types again — hoping there was a type I missed, but none of them was quite right until I tried scaleType=»matrix» and it did exactly what I wanted. But why is this working? What does it actually do?
So I had a look at the matrix documentation:
The Matrix class holds a 3×3 matrix for transforming coordinates.
Well… not very helpful. Luckily I wasn’t the only one lost with this and Arnaud Bos wrote a great article explaining the maths behind it in detail (warning: if you’re planning on reading it — get a coffee (or two) beforehand). If you get lost halfway through that article I can’t blame you — it’s quite complicated, but the good news is that you don’t really have to understand the maths to understand what you can do with the matrix (although it can help).
How can we use the matrix?
As I mentioned before we have to set scaleType=»matrix» on the ImageView . But to really be able to make use of it we have to set the imageMatrix in code:
Now that we have this — what can we do with it? The matrix supports a bunch of different transformations like translate , scale , rotate and skew . If those sound familiar it’s because they’re (mostly) the same as on a view, an animation or the canvas.
You’ll find that for each of these operations there’s a set , pre and post version. I’ll get to that a bit later, but for now we’ll just use the set version.
So what can we do?
Translating

Setting the translation means moving the image to a different location. All you have to do is call setTranslate with the desired x and y coordinates on the Matrix :
In this example we’re just centring the drawable in the View, which results in the same behaviour as setting scaleType=»center» on an ImageView . So let’s take a look at how ImageView does this:
It’s exactly the same! So without knowing it we’ve already been using matrix transformations.
Scaling

Scaling (as you might’ve guessed by the name) defines the size of the image. You can define two values — one for the x-axis and the other for the y-axis. But with scale you can also set a pivot point.
The pivot point defines which point will be unchanged by the transformation. By default it is at 0, 0 — the top-left point — meaning the image will stretch to the right and bottom, leaving the top-left unchanged — just like in the above gif on the left.
If you want to scale the image from the centre (like the gif on the right), you can set the pivot to the centre of the image, like this:
This will scale the image to half of its size with a pivot point of its centre. If you want to just scale it from the top-left you can just omit the last two parameters, like this:
But there’s more you can do with scaling. If you provide negative scale values you can essentially mirror the image around an axis (or two). Quite nifty!

Rotation

You guessed right! With rotation you can rotate the image. Here we provide the angle we want to rotate by, as well as an optional pivot point, similar to scale.
This will rotate the image by 45 degrees around the centre of the image. If you rotate it by -45 degrees it’ll rotate to the left.
Skewing

Skewing might be the transformation you haven’t heard of before. Skewing will kind of stretch your image along an axis (or two), like in the gif above. Let’s look at an example:
This will skew the image across the x-axis (and around the centre point) by 1, which is the width of the image, resulting in a 45 degree tilt of the image, like in the gif above.
Applying multiple transformations
We can now translate, scale, rotate and skew images, but what if we want to combine them? The obvious thing might be calling multiple set methods in a row. This, however, will only apply the last transformation — all the previous ones will be overwritten. This is because the set method essentially resets the matrix.
But as I mentioned before there’s also a pre and post version of each transformation. By using these we can apply multiple transformations and really make use of the magic of the matrix.
But what’s the difference between pre and post ? For the first transformation it makes no difference which of the three versions to use, but for any future transformation it can make a big difference.
Let’s say we want to translate an image to the centre of the view and scale it to half the size. These two versions will result in the desired effect:
Note that in the first version we use postScale and the centre of the view, whereas in the second version we use preScale and the centre of the drawable.
So how does that work? The maths behind this is described by Arnauld Bos in a follow up article. But what does it mean in this case?
With postScale the scale transformation will be applied after the translation. As the image is already centred in the view we have to use the view’s centre point as the pivot.
When using preScale the scale transformation will be applied before the translation. At this point the image will still be positioned at 0, 0 and we have to use the centre point of the drawable.
So looking back at the example from the beginning — why does applying the scaleType=»matrix» simply work? Well with a default matrix the scale will be 1, the translation, rotation and skew will be 0, therefore the image will be drawn at the top left corner. So it does exactly what I needed!
Next time you have to lay out an image in a way where the default scale types don’t work — give the matrix a try!
Источник


