- How to Get One-Handed Mode on Any Android
- Get One-Handed Mode on Any Android Without Root
- Step 1: Get One-Handed Mode App by XDA
- Step 2: Set Up One-Handed Mode App
- Rooted Devices
- Non-Rooted Devices
- Step 3: Use One-Handed Mode on Your Android
- Step 4: Display DPI, Toggle Position, and One-Handed Mode Settings
- Android Activity Launch Mode
- Tasks
- Back Stack
- 1. standard
- Example:
- 2. singleTop
- Example:
- Case 1:
- Case 2:
- 3. singleTask
- Example:
- Case 1:
- Case 2:
- 4. singleInstance
- Example:
- Case 1:
- Case 2:
- Intent Flags
- FLAG_ACTIVITY_NEW_TASK
- FLAG_ACTIVITY_CLEAR_TASK
- FLAG_ACTIVITY_SINGLE_TOP
- FLAG_ACTIVITY_CLEAR_TOP
How to Get One-Handed Mode on Any Android
Trouble reaching out to your screen’s edge while your phone rests in one hand? This will solve it for you. Follow this guide to easily get One-Handed Mode on any Android device.
With increasing screen sizes, the reachability of our fingers starts to be a problem. Of course, right? Our fingers don’t grow along with the screen (ha!). If you have tried to hold phones like the Note 8, S8, or the Pixel 2 XL, you shall realize that it’s quite a discomfort to reach out to the status bar, while you are holding the phone in one hand. And that’s for an average sized hand, what about those who have a bit shorter fingers? Phones are not manufactured according to every customer’s hand measurements.
So how do we deal with this? By using a very specific feature that several OEMs have already implemented. If your phone doesn’t have this feature, like my Nexus 6P and OnePlus 5, then this guide will help you get One-Handed Mode on your device too, without root.
Get One-Handed Mode on Any Android
- How to Delete WhatsApp Sent Messages on Android
- How to Disable Persistent Notifications in Android 8.1 Oreo
- Google Camera NX Brings Pixel 2 Camera Features on Nexus 6P/5X
- How to Hide Private Photos in Google Photos App
Table of Contents
- Get One-Handed Mode on Any Android Without Root
- Step 1: Get One-Handed Mode App by XDA
- Step 2: Set Up One-Handed Mode App
- Step 3: Use One-Handed Mode on Your Android
- Step 4: Display DPI, Toggle Position, and One-Handed Mode Settings
Get One-Handed Mode on Any Android Without Root
Manufacturers like Xiaomi, Samsung, Huawei, etc already have this functionality as a proprietary feature on their devices. Even Apple has it, known as iOS’ Reachability feature. And according to TheNextWeb, every smartphone should have it and I am completely in agreement.
But I guess Google is not, at least not yet. Google has already denied Huawei’s contribution to bringing One-Handed Mode to all Android devices. But that doesn’t stop us right and especially not the guys over at XDA. Those geniuses tend to work around anything, and this time, we are actually talking about the XDA team itself. Earlier yesterday, they have released an app that will help you get One-Handed Mode on your Android device right away.
XDA-Developers came up with the app in light of the new phones that are becoming taller. The taller phones are quite hard to operate with one hand and sometimes require you to overstretch over fingers to reach the status bar or top menu of an app. Unfortunately, not every app works with OHM, and that’s not something the app developers can control. Apart from this, it could be a very useful feature for those using taller or large-screen devices.
 Get One-Handed Mode XDA App
The app is operational on any Android device, rooted or non-rooted. However, setting it up on non-rooted devices requires access to a PC and ADB. This is because the app requires special permission (WRITE_SECURE_SETTINGS) that is normally given to system apps. If your phone is rooted, it is much simpler and can be set up directly from the device itself.
Step 1: Get One-Handed Mode App by XDA
XDA’s One-Handed Mode could be installed on any Android phone or tablet that is running Android 4.0.3 or above (Uptill 8.1 Developer Preview). The app is FREE to install and test with the default settings. But you will have to make an in-app purchase if you wish to use the floating bubble feature.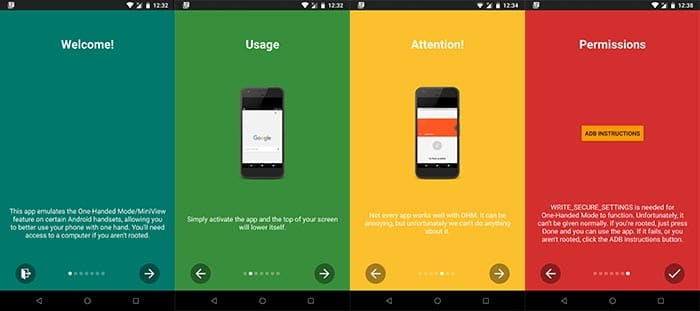
Get One-Handed Mode – XDA App InterfaceThe payment is pretty nominal. It is $0.99 for this week and will be $1.99 after that! So now is the best time to install the app, try it, and make the purchase if you really want to get One-Handed Mode on your device.
If you wish to install the app manually, you can also grab the latest version from APKMirror.
Step 2: Set Up One-Handed Mode App
Once you have downloaded and installed the ‘One-Handed Mode‘ app on your device, go to the app drawer and launch it. Now, the instructions will be a little different on rooted and non-rooted devices to get One-Handed Mode.
Rooted Devices
If your phone is rooted using Magisk or SuperSU, you can easily grant the required permissions to the app.
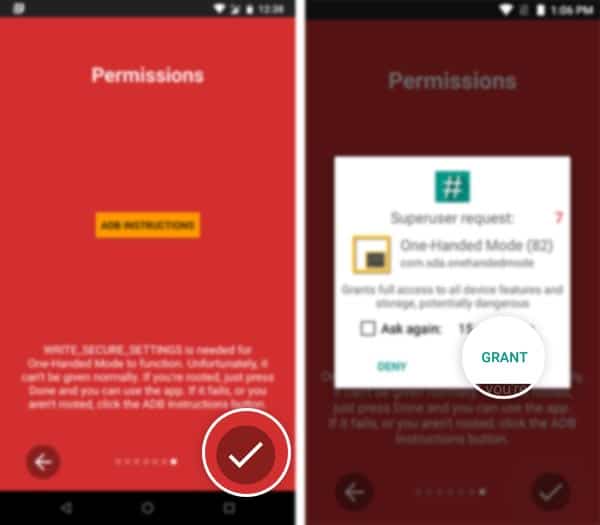
Once you open the app, go through the on-screen messages by swiping to the very right. Finally, on the ‘Permissions’ screen, tap on the Done (Check) icon on the bottom-right. As soon as you do it, the app will prompt for root permissions, so just tap on ‘GRANT’.
The app interface shall open for you now.
Non-Rooted Devices
Now, if you have a non-rooted device, you can follow the instructions below to get One-Handed Mode set up on your phone.
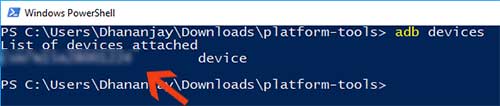
First, make sure to enable USB debugging on your phone and set up ADB on your PC. We have an extensive guide, which shouldn’t take more than 5 minutes to set up. You should now have ADB access to your phone connected to the PC. Open the app and swipe right to the Permissions screen.
Now, enter the following command in the Command Prompt (CMD)/PowerShell/Terminal window on your Windows, Linux, or macOS PC. Remember, on Linux and macOS, you will need to add (./) just before every command mentioned below.
- Check if you have proper ADB access and your device is being detected properly:
- The command should return a device ID along with ‘device’ message.
 If it shows ‘Unauthorized’, then make sure that you have gone through all the steps in this guide.
 - Finally, grant the WRITE_SECURE_SETTINGS permissions to get One-Handed Mode app started:
 If it shows ‘Unauthorized’, then make sure that you have gone through all the steps in this guide.
After you have done this, disconnect the phone and press on the rounded-check icon on the bottom-right of the app window.
 Get One-Handed Mode – Tap on the ‘Check’ icon
You should now have access to the app options and settings.
Step 3: Use One-Handed Mode on Your Android
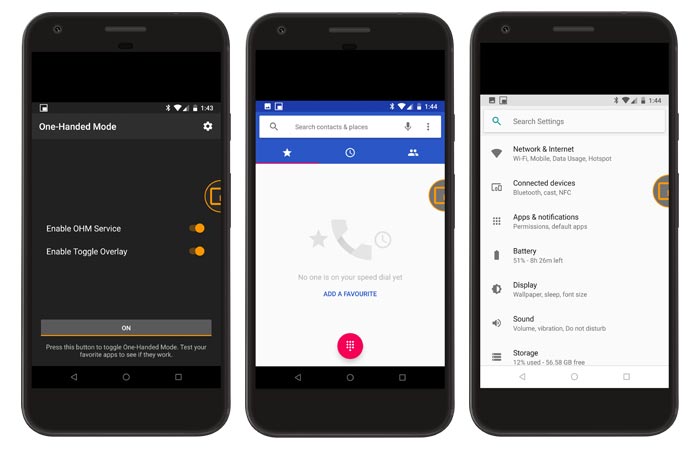
Now that you have been able to get One-Handed Mode, here’s how you can use it on your device.
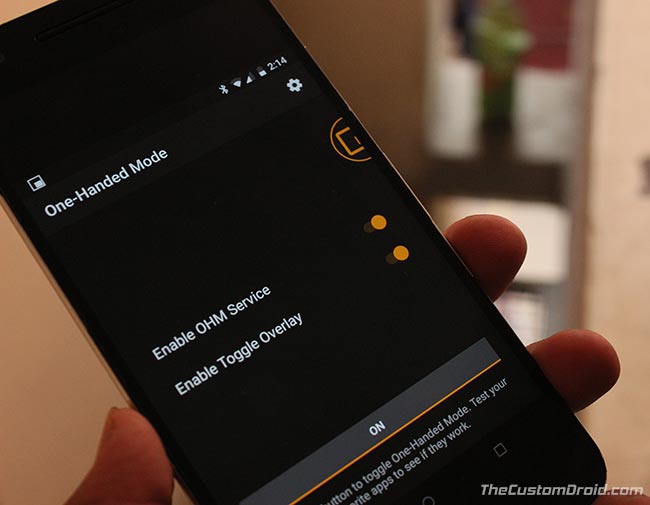
In the app interface, you shall see that there are two options. First ‘Enable OHM Service’, which was enabled when you granted the permissions during step #2. Second ‘Enable Toggle Overlay’ which shall be greyed out. This is because it is a premium feature and requires you to pay a relatively small amount ($0.99 till Nov 3).
 Get One-Handed Mode App by XDA and try it for FREE.
Now, if you choose to test drive the app for FREE, you can simply tap on the ‘OFF’ toggle on the bottom of the app. This will turn on One-Handed Mode on your device. You can try opening your favorite apps and see if they work well with this feature.
Further, if you like the app, you can make an in-app purchase by toggling ON THE ‘Enable Toggle Overlay’ option. Once done, you can switch it to ON and a circular toggle shall appear on the right edge of the screen. The toggle will stay persistent until you choose to turn it off.
Step 4: Display DPI, Toggle Position, and One-Handed Mode Settings
Over to the app settings and different customization options that it offers. Tap on the cog (gear) icon on the top-right of the app window, and this is where all the app settings reside. Below, we have tried to explain each setting for your reference.
- Toggle Settings (These are enabled-by-default)
- Start Service on Boot: This will initiate OHM service at boot.
- Auto-Anchor Toggle: Automatically adjust the toggle position. You can disable it further to manually adjust the position.
- Auto-Hide Toggle: Automatically pushes the toggle more inwards to provide a clutter-free experience.
- Size
- Adjust DP: Automatically adjust the DPI of the one-handed screen to better fit the content in the window.
- Resize Window: This option is required to change the size of the app window.
- Change Size: Once you have enabled ‘Resize Window’, you can easily change the size and position of the one-handed window.
There you go! You have been able to get One-Handed Mode on your Android phone. Go ahead and try it for different apps on your device.
Note that the size settings are potentially dangerous and could break several apps like Google Photos or XDA Labs app itself.
We have a theory as to why and a potential workaround to force any app to work nicely, but implementing it will be complex – Mishaal Rahman, XDA
You could also share any bug reports or provide your input at [email protected].
Let us know your opinion on this app and how you would compare it to the feature on Huawei, Samsung, and Xiaomi devices. Kindly leave your feedback in the comments section below.
Источник
Android Activity Launch Mode

Jan 13, 2017 · 5 min read
Launch mode is an instruction for Android OS which specifies how the activity should be launched. It instructs how any new activity should be associated with the current task. Before moving further you first need to understand about very important topics-
Tasks
A task is a collection of activities that users interact with when performing a certain job. In general an application contains number of activities. Normally when user launch an application a new task will be created and the first activity instance is called root of the task.
When us e r launches an app from home icon, it navigates through different screens so different activities placed on the top of one another. This collection of activities is known as tasks.
Back Stack
Activities are arranged with the order in which each activity is opened. This maintained stack called Back Stack. When you start a new activity using startActivity(), it “pushes” a new activity onto your task, and put the previous Activity in the back stack.
Once you press back button then “pops” the top most activity and remove it from the back stack and taking you back to the previous activity.

Above figure explains representation of how each new activity in a task adds an item to the back stack. When the user presses the Back button, the current activity is destroyed and the previous activity resumes. For more details you can also refer .
There are four launch modes for activity. They are:
In the AndroidManifest you can use “launchMode” attribute inside the element to declare the activity’s launch mode like-
Now let’s look at the differences between launch modes.
1. standard
This is the default launch mode of an activity (If not specified). It creates a new instance of an activity in the task from which it was started. Multiple instances of the activity can be created and multiple instances can be added to the same or different tasks. In other words you can create the same activity multiple times in the same task as well as in different tasks.
Example:
Suppose you have A, B, C and D activities and your activity B has “launch mode = standard”. Now you again launching activity B –
State of Activity Stack before launch B
State of Activity Stack after launch B
2. singleTop
In this launch mode if an instance of activity already exists at the top of the current task, a new instance will not be created and Android system will route the intent information through onNewIntent(). If an instance is not present on top of task then new instance will be created.
Using this launch mode you can create multiple instance of the same activity in the same task or in different tasks only if the same instance does not already exist at the top of stack.
Example:
Case 1:
Suppose you have A, B and C activities and your activity D has “launch mode = singleTop”. Now you launching activity D —
State of Activity Stack before launch D
State of Activity Stack after launch D activity
A -> B -> C -> D (Here D launch as usual)
Case 2:
Suppose you have A, B, C and D activities and your activity D has “launch mode = singleTop”. Now you again launching activity D —
State of Activity Stack before launch D
State of Activity Stack after launch D activity
A -> B -> C -> D (Here old instance gets called and intent data route through onNewIntent() callback)
3. singleTask
In this launch mode a new task will always be created and a new instance will be pushed to the task as the root one. If an instance of activity exists on the separate task, a new instance will not be created and Android system routes the intent information through onNewIntent() method. At a time only one instance of activity will exist.
Example:
Case 1:
Suppose you have A, B and C activities and your activity D has “launch mode = singleTask”. Now you launching activity D —
State of Activity Stack before launch D
State of Activity Stack after launch D activity
A -> B -> C -> D (Here D launch as usual)
Case 2:
Suppose you have A, B, C and D activities and your activity B has “launch mode = singleTask”. Now you again launching activity B-
State of Activity Stack before launch D
State of Activity Stack after launch B activity
A -> B (Here old instance gets called and intent data route through onNewIntent() callback)
Also notice that C and D activities get destroyed here.
4. singleInstance
This is very special launch mode and only used in the applications that has only one activity. It is similar to singleTask except that no other activities will be created in the same task. Any other activity started from here will create in a new task.
Example:
Case 1:
Suppose you have A, B and C activities and your activity D has “launch mode = singleInstance”. Now you launching activity D —
State of Activity Stack before launch D
State of Activity Stack after launch D activity
Task2 — D (here D will be in different task)
Now if you continue this and start E and D then Stack will look like-
Task1 — A -> B -> C -> E
Case 2:
Suppose you have A, B, C activities in one task and activity D is in another task with “launch mode = singleInstance”. Now you again launching activity D-
State of Activity Stack before launch D
State of Activity Stack after launch B activity
Task2 — D (Here old instance gets called and intent data route through onNewIntent() callback)
Intent Flags
Android also provides Activity flags by which you can change the default behavior of Activity association with Tasks while starting it via startActivity() method. These flags values can be pass through Intent extra data.
FLAG_ACTIVITY_NEW_TASK
This flag works similar to “launchMode = singleTask”.
FLAG_ACTIVITY_CLEAR_TASK
This flag will cause any existing task that would be associated with the activity to be cleared before the activity is started. The activity becomes the new root of an otherwise empty task, and any old activities are finished.
FLAG_ACTIVITY_SINGLE_TOP
This flag works similar to “launchMode = singleTop”.
FLAG_ACTIVITY_CLEAR_TOP
If set, and the activity being launched is already running in the current task, then instead of launching a new instance of that activity, all of the other activities on top of it will be closed and this Intent will be delivered to the (now on top) old activity as a new Intent.
There are quite a lot on flags. You could find more about it at Intent.
Thanks for reading. To help others please click ❤ to recommend this article if you found it helpful.
Stay tuned for upcoming articles. For any quires or suggestions, feel free to hit me on Twitter Google+ LinkedIn
Check out my blogger page for more interesting topics on Software development.
Источник


