- Android only one application
- Android: Make use of Android Application Class as Singleton Object
- Lock Android Tablet or Smartphone to a Single Application
- How to set up Single Application Mode on Android
- Conclusion
- Understand Android Activity’s launchMode: standard, singleTop, singleTask and singleInstance
- Assign a launchMode
- standard
- singleTop
- singleTask
- singleInstance
- Intent Flags
Android only one application
Последнее обновление игры в шапке: 18.08.2021


Краткое описание:
Only One is an arena style sword fighting game.
Описание:
Pick up a magic sword on the ancient pillar of sacrifice and fight to become the ‘Only One’ left standing
Only One is an arena style sword fighting game where you grab a magic sword declaring yourself the ‘Only One’ and then proceed to push and destroy waves of enemies off a sacrificial pillar in the sky
Defeat your enemies in gruelling combat or take the easy way out and push them off the pillar to their deaths down below
Gain powers and strength with a wide variety of abilities and upgrades. Fight over 70 waves and 7 bosses to ultimately become the only one left standing!
☆☆Android Gamepad Controller Support☆☆
★ Awesome retro pixel art graphics and music
★ Physics based sword combat with parry and shield mechanics
★ Upgrade your character over time with better stats and really cool abilities like push, freeze, bubble, whirlwind and dart
★70 levels of soldiers, slimes, archers, wizards, loot gnomes, berserkers and mini bosses
★ Push your opponents off the pillar for easy kills and more points or strike them where they stand to get their loot
★ Ladder based levelling with checkpoints every 10 levels, score resets each time you die
Источник
Android: Make use of Android Application Class as Singleton Object
Extending Android Application class is helpful when you would like to store session data or application wise global data.
In any android application, there will be only one application object, so you should you it as Singleton
MyAppApplication.java #29:
I called a method onAppCreated() and its an abstract method, that’s why i had to make the whole MyAppApplication as an abstract class
Reason:
the onAppCreated is particularly helpful when you will use library projects
For example, you would like to create an app with two versions liteand pro
Obviously there will be a lot of common features and pro version will have some additional features
so you are planning to make a library project named: CoreProject in android and make two sub classes named: appLite and appPro
Now suppose, you would like to know in your appLite that library project CoreProject is created successfully and then call a method
you can then easily implement onAppCreated() method in subclass appLite
MyAppApplication.java #32:
in initializeInstance(), you can do your app’s version wise specialized task
or may be something that you need to be done before the creation of your first activity
I have created and called screenConfiguration() method, which is used for determining the size of ScreenWidth and ScreenHeight
and it also helpful if you like to know the device is a tab or phone
Источник
Lock Android Tablet or Smartphone to a Single Application
Dec 30, 2020 | 42Gears Team

| Applies to : | |
| Product | SureLock |
| Platform | Android |
People often ask how to run only one app on Android devices, or how to lock Android device to run only one app. Combined with the popularity of Google searches like “Android allow only one app” and “Android tablet lock to one app,” it’s clear that everyone wants a way to easily lock their devices down. The answer is Android Single Application Mode or Single App Mode. As the name suggests, Android Single Application Mode means that only one application runs on the Android device at all times. If someone is currently using a Single Application Mode Android device, that user cannot exit the application, plus the app starts automatically if the device reboots.
How to set up Single Application Mode on Android
The easiest way to set up Single Application Mode Android devices is to use SureLock.
Install SureLock and follow the steps below to enable Single Application Mode and run only one app on Android devices you own:
1. Launch SureLock
2. On SureLock Home Screen, tap 5 times within 3 seconds to launch the password prompt
3. Enter your default password – 0000 (four zeros) and tap OK
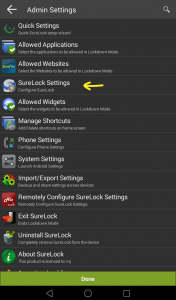
4. On Admin Settings screen, tap Allowed Applications
5. On Allowed Applications screen, use Add App option to add your desired application in Single Application Mode
6. Tap Done to go back to Admin Settings
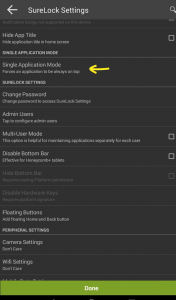
7. On Admin Settings screen, tap SureLock Settings
8. On SureLock Settings screen, tap Single Application Mode and enable Single Application Mode option
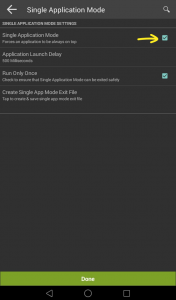
Note: Please read the information message before you tap on OK
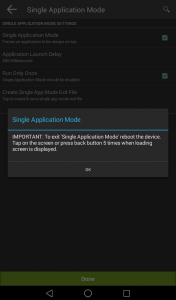
9. Return back to SureLock Home Screen. Your application will now run in Single Application Mode, also known as Android Single App Mode.
Note: For Single Application Mode to be enabled, only one application can be visible on SureLock’s Home Screen. If you need to run more than one app internally, you can add other apps to the list of allowed applications as well and mark them as hidden. These hidden applications can be launched when accessed via the application visible on SureLock Home Screen when Android Single App Mode is active.
Watch the video – Lock Android to a Single Application using SureLock
To learn on how to exit from Single Application Mode, click here
Conclusion
The next time you see a popular search query like “Android allow only one app,” you will know the best answer: SureLock by 42Gears. If you want to run only one custom app in Android and prevent users from running anything else, you can use SureLock to set up Single Application Mode or Single App Mode on your Android tablets, Android smartphones or Android rugged devices. It’s the easiest answer for anyone who needs to know how to run only one app on Android devices.
Источник
Understand Android Activity’s launchMode: standard, singleTop, singleTask and singleInstance


Activity is one of the most brilliant concept on Android from its well-design architecture on memory management which lets Multitasking works perfectly on this most popular mobile operating system.
Anyway, Activity is not just to be launched on the screen. The way it is launched is also concerned. There are so many details in this topic. One of those that is really important is launchMode, which is the one that we are going to talk about in this blog.
Since each Activity is made to work in different purpose. Some is designed to work separately with each Intent sent for example an Activity for email composing in email client. While some is designed to work as a singleton for example an email’s inbox Activity.
That’s why it does matter to specify whether Activity is needed to be created a new one or to use the existed one, or it may leads to the bad UX or malfunctional. Thanks to Android’s core engineer. It is the way easy to make it done with some help of launchMode which is designed for this especially.
Assign a launchMode
Basically we could assign a launchMode directly as an attribute of tag inside AndroidManifest.xml file list this:
There are 4 types of launchMode available. Let’s see it one by one.
standard
This is the default mode.
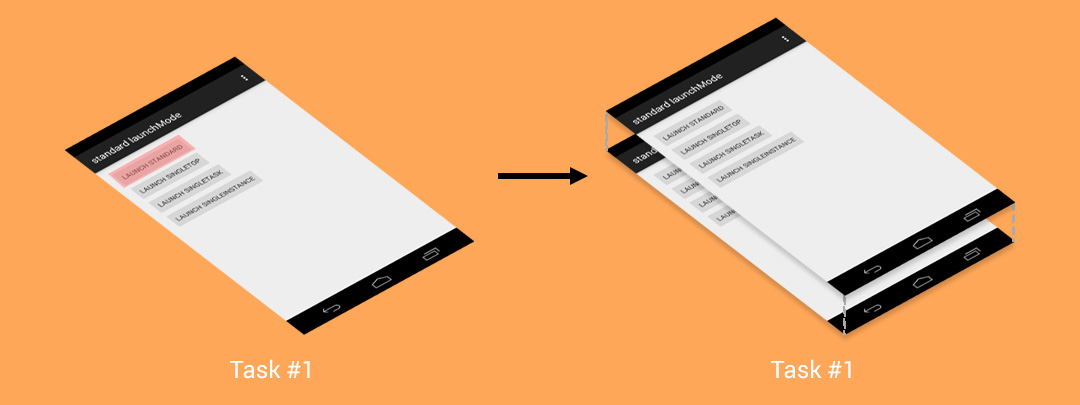
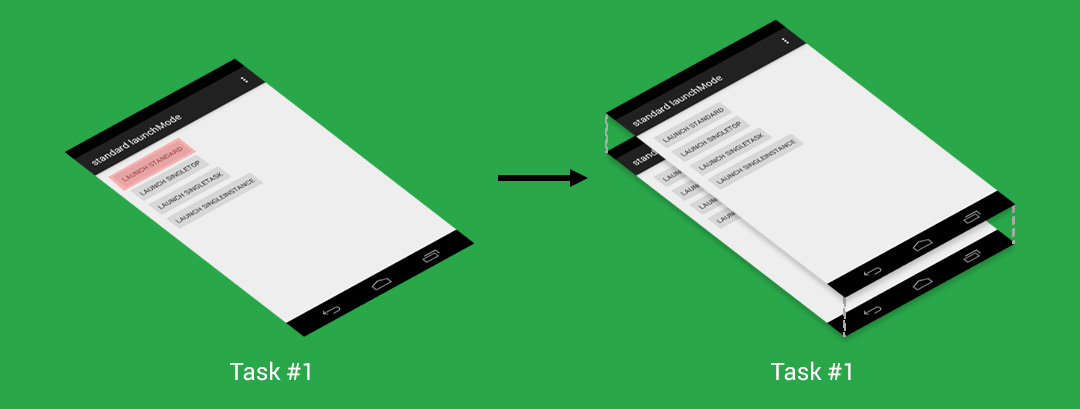
The behavior of Activity set to this mode is a new Activity will always be created to work separately with each Intent sent. Imagine, if there are 10 Intents sent to compose an email, there should be 10 Activities launch to serve each Intent separately. As a result, there could be an unlimited number of this kind of Activity launched in a device.
Behavior on Android pre-Lollipop
This kind of Activity would be created and placed on top of stack in the same task as one that sent an Intent.
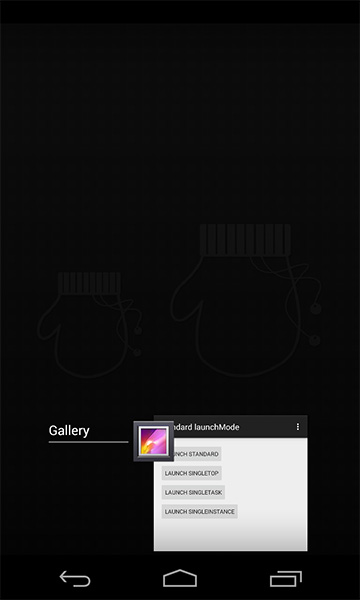
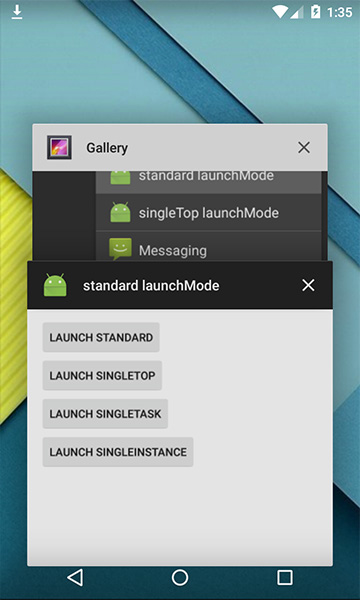
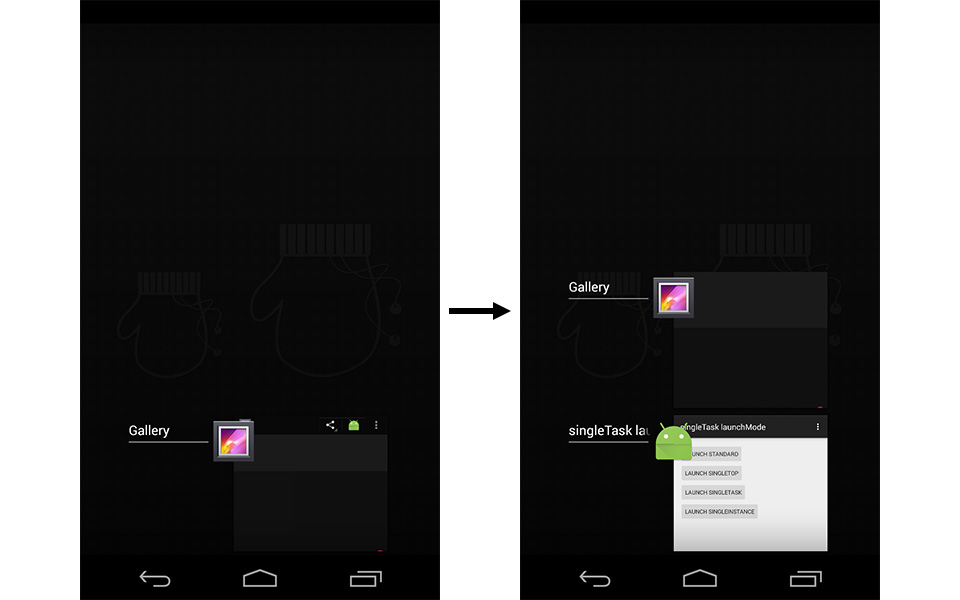
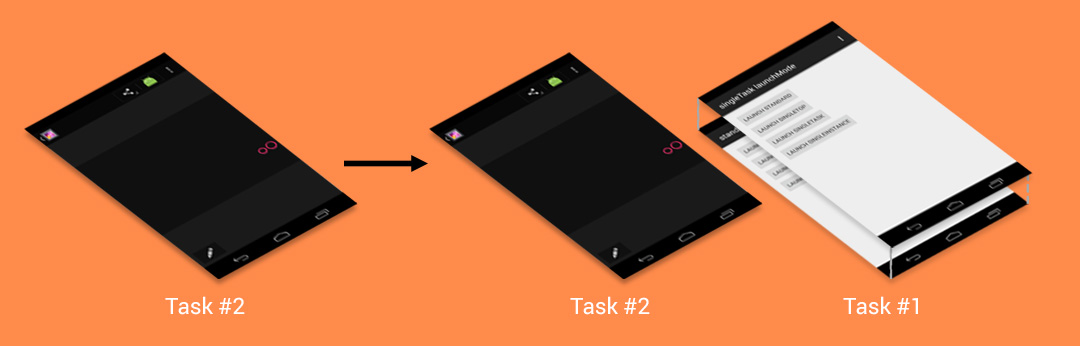
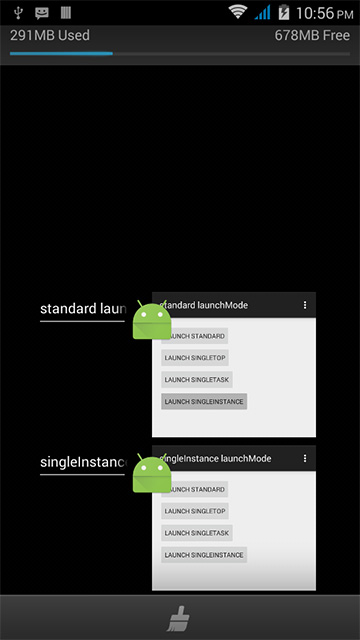
An image below shows what will happen when we share an image to a standard Activity. It will be stacked in the same task as described although they are from the different application.
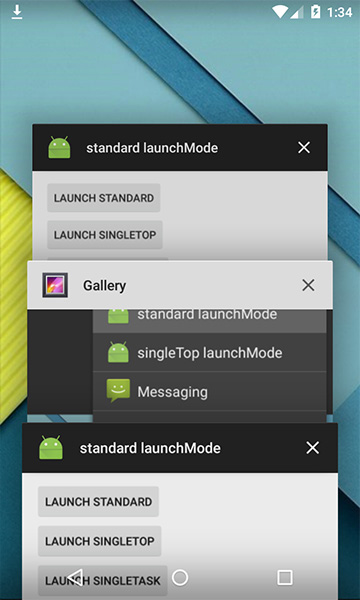
And this is what you will see in the Task Manager. (A little bit weird may be)
If we switch the application to the another one and then switch back to Gallery, we will still see that standard launchMode place on top of Gallery’s task. As a result, if we need to do anything with Gallery, we have to finish our job in that additional Activity first.
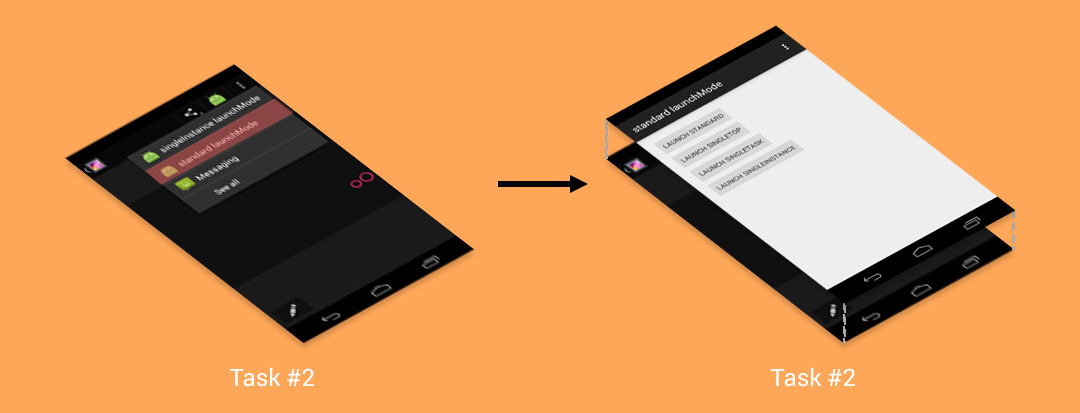
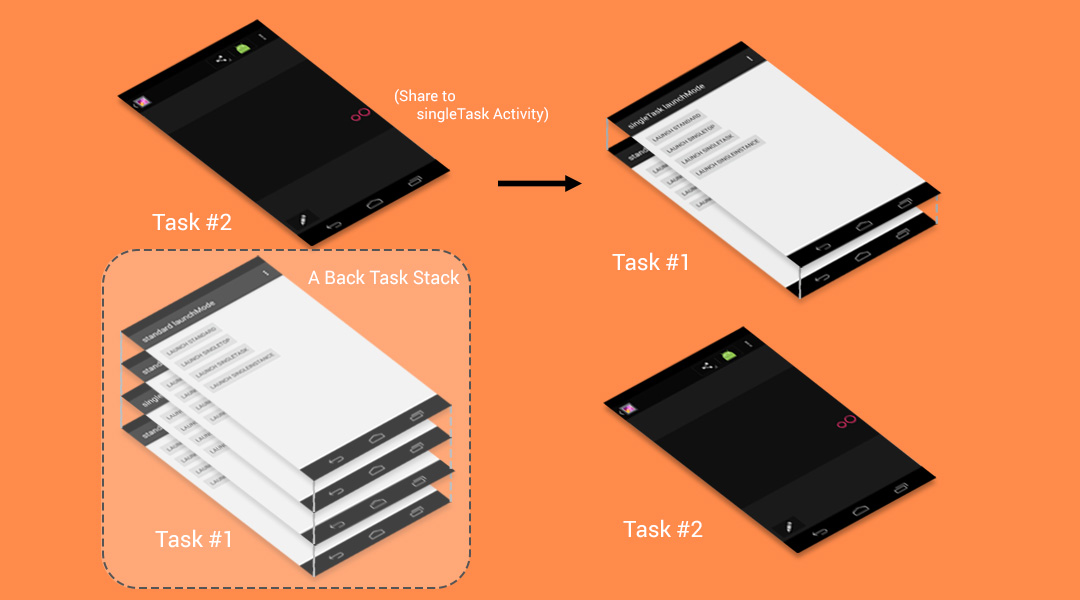
Behavior on Android Lollipop
If those Activities are from the same application, it will work just like on pre-Lollipop, stacked on top of the task.
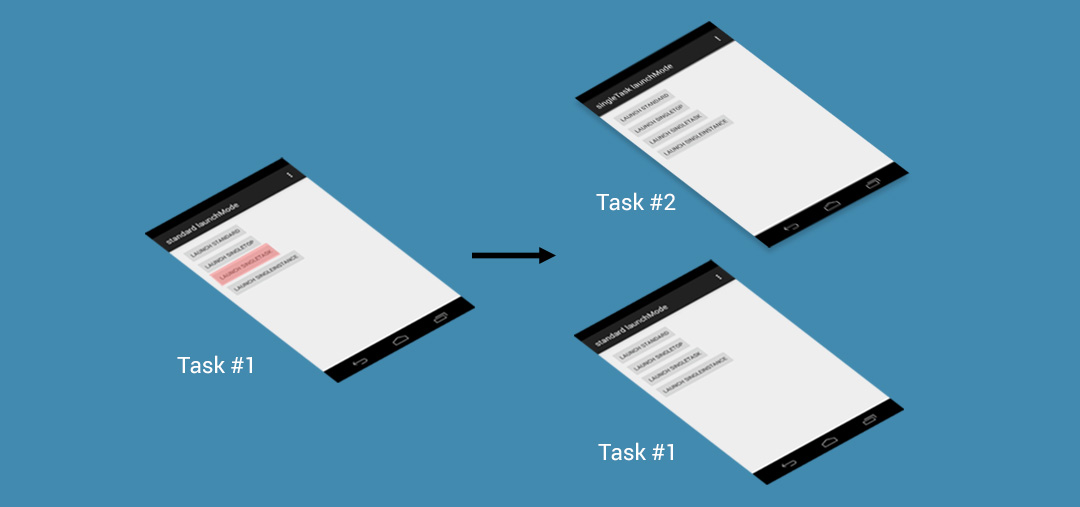
But in case that an Intent is sent from a different application. New task will be created and the newly created Activity will be placed as a root Activity like below.

And this is what you will see in Task Manager.
This happens because Task Management system is modified in Lollipop to make it better and more make sense. In Lollipop, you can just switch back to Gallery since they are in the different Task. You can fire another Intent, a new Task will be created to serve an Intent as same as the previous one.
An example of this kind of Activity is a Compose Email Activity or a Social Network’s Status Posting Activity. If you think about an Activity that can work separately to serve an separate Intent, think about standard one.
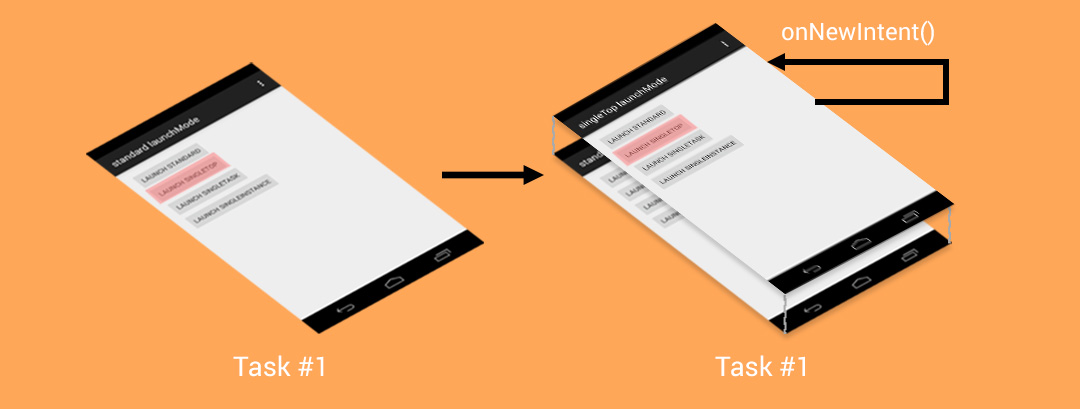
singleTop
The next mode is singleTop. It acts almost the same as standard one which means that singleTop Activity instance could be created as many as we want. Only difference is if there already is an Activity instance with the same type at the top of stack in the caller Task, there would not be any new Activity created, instead an Intent will be sent to an existed Activity instance through onNewIntent() method.
In singleTop mode, you have to handle an incoming Intent in both onCreate() and onNewIntent() to make it works for all the cases.
A sample use case of this mode is a Search function. Let’s think about creating a search box which will lead you to a SearchActivity to see the search result. For better UX, normally we always put a search box in the search result page as well to enable user to do another search without pressing back.
Now imagine, if we always launch a new SearchActivity to serve new search result, 10 new Activities for 10 searching. It would be extremely weird when you press back since you have to press back for 10 times to pass through those search result Activities to get back to your root Activity.
Instead, if there is SearchActivity on top of stack, we better send an Intent to an existed Activity instance and let it update the search result. Now there will be only one SearchActivity placed on top of stack and you can simply press just back button for a single time to get back to previous Activity. Makes a lot more sense now.
Anyway singleTop works with the same task as caller only. If you expect an Intent to be sent to an existed Activity placed on top of any other Task, I have to disappoint you by saying that it doesn’t work that way. In case Intent is sent from another application to an singleTop Activity, a new Activity would be launched in the same aspect as standard launchMode (pre-Lollipop: placed on top of the caller Task, Lollipop: a new Task would be created).
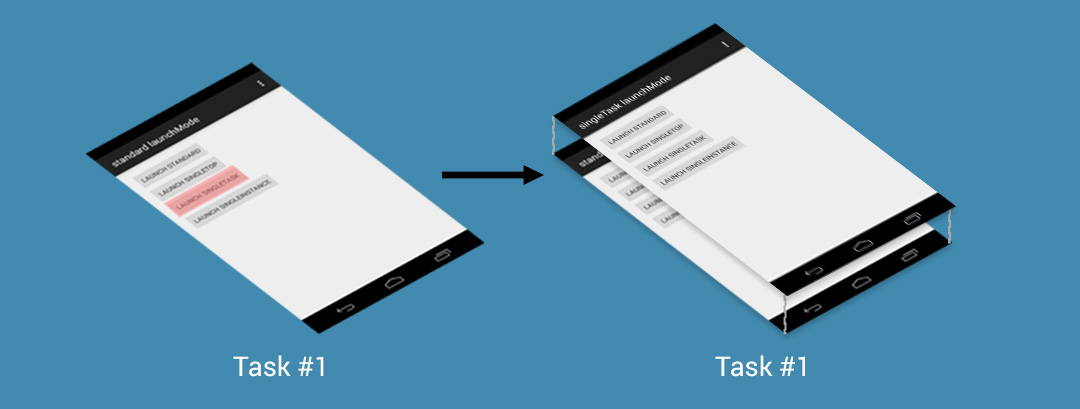
singleTask
This mode is quite different from standard and singleTop. An Activity with singleTask launchMode is allowed to have only one instance in the system (a.k.a. Singleton). If there is an existed Activity instance in the system, the whole Task hold the instance would be moved to top while Intent would be delivered through onNewIntent() method. Otherwise, new Activity would be created and placed in the proper Task.
Working in the same application
If there is no that singleTask Activity instance existed in the system yet, new one would be created and simply placed on top of stack in the same Task.
But if there is an existed one, all of Activities placed above that singleTask Activity would be automatically and cruelly destroyed in the proper way (lifecycle trigged) to make that an Activity we want to appear on top of stack. In the mean time, an Intent would be sent to the singleTask Activity through the lovely onNewIntent() method.
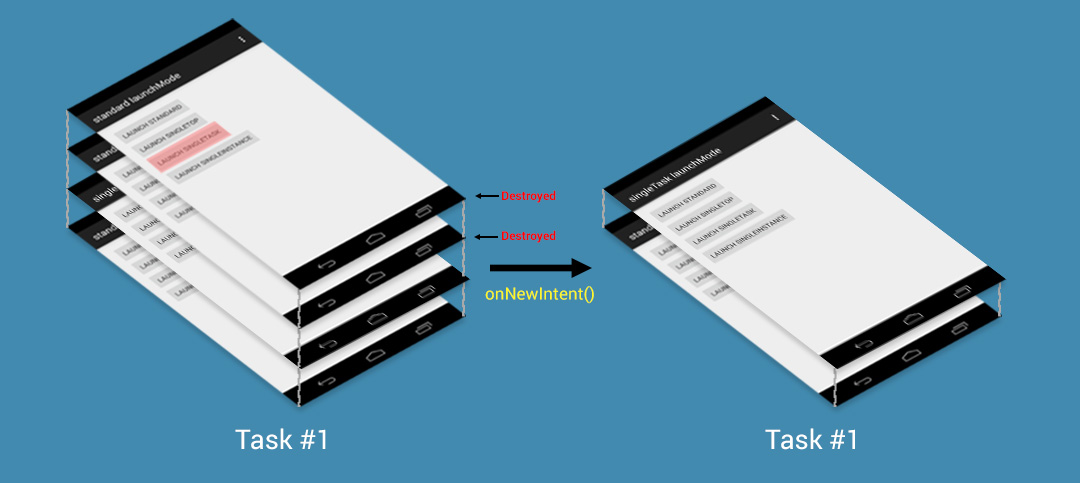
Doesn’t make a good sense in term of user experience but it is designed this way .
You may notice one thing that it is mentioned in document that
The system creates a new task and instantiates the activity at the root of the new task.
But from the experiment, it doesn’t seem to work as described. A singleTask Activity still stack up on top of the Task’s Activity stack as we can see from what dumpsys activity command shows up.
If you wish to to let a singleTask Activity acts like described in document: create a new Task and put an Activity as a root Activity. You need to assign taskAffinity attribute to the singleTask Activity like this.
This is a result when we try to launch SingleTaskActivity .

It’s your job to consider whether to use taskAffinity or not by the behavior of the Activity.
Collaborate with another application
Once an Intent is sent from another application and there is no any Activity instance created in the system yet, new Task would be created with a newly created Activity placed as a root Activity.
Unless there is a Task of the application that is an owner of the calling singleTask Activity existed, a newly created Activity would be placed on top of it instead.
In case that there is an Activity instance existed in any Task, the whole Task would be moved to top and every single Activity placed above the singleTask Activity will be destroyed with lifecycle. If back button is pressed, user has to travel through the Activities in the stack before going back to the caller Task.
A sample use case of this mode is any Entry Point Activity for example Email Client’s Inbox page or Social Network’s Timeline. Those Activities are not designed to have more than one instance so singleTask would do a job perfectly. Anyway you have to use this mode wisely since Activities could be destroyed without user’s acknowledgement in this mode like described above.
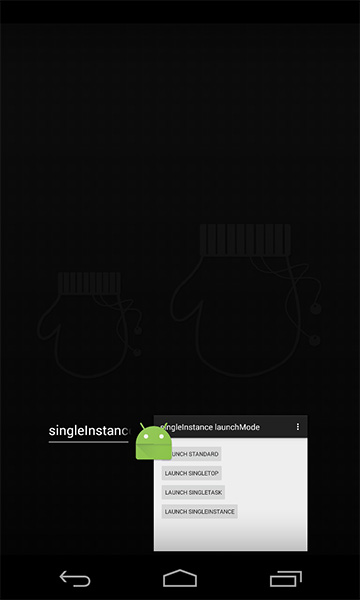
singleInstance
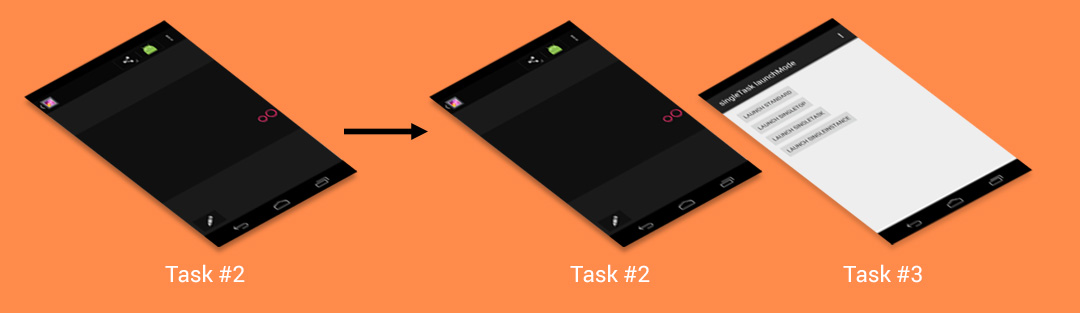
This mode is quite close to singleTask, only single instance of Activity could be existed in the system. The difference is Task hold this Activity could have only one Activity, the singleInstance one. If another Activity is called from this kind of Activity, a new Task would be automatically created to place that new Activity. Likewise, if singleInstance Activity is called, new Task would be created to place the Activity.
Anyway the result is quite weird. From the information provided by dumpsys , it appears that there are two Tasks in the system but there is only one appeared in Task Manager depends on which is latest one that is moved to top. As a result, although there is a Task that is still working in the background but we couldn’t switch it back to foreground. Doesn’t make any sense at all.
This is what that happened when singleInstance Activity is called while there already is some Activity existed in the stack.
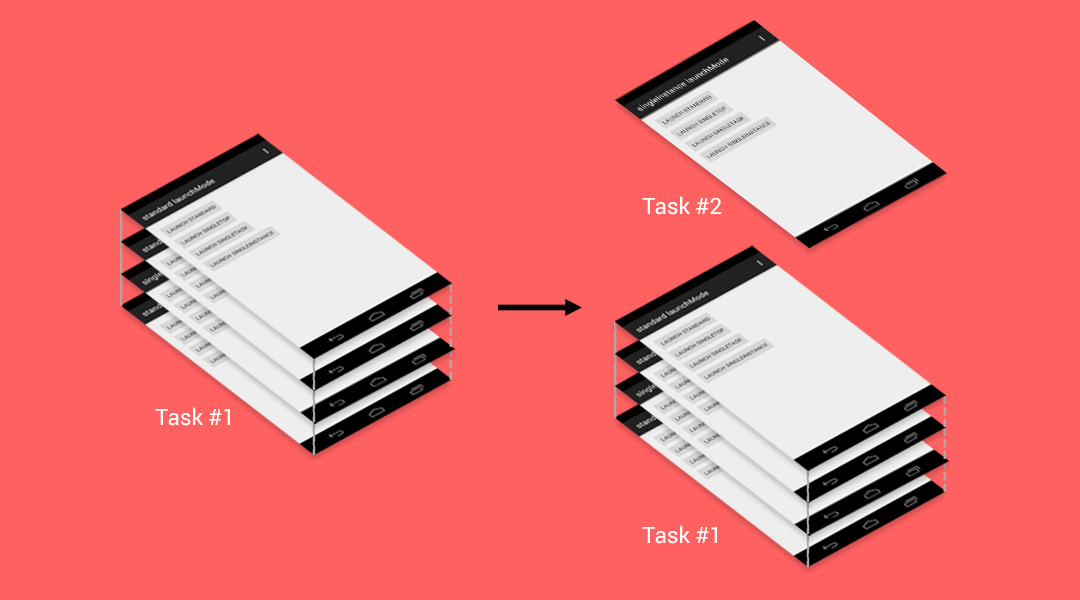
But this is what we see from Task Manager.
Since this Task could has only one Activity, we couldn’t switch back to Task #1 anymore. Only way to do so is to relaunch the application from launcher but it appears that the singleInstance Task would be hidden in the background instead.
Anyway there is some workaround for the issue. Just like we did with singleTask Acvity, simply assign a taskAffinity attribute to the singleInstance Activity to enable multiple Tasks on Task Manager.
It makes more sense now.
This mode is rarely used. Some of the real use case is an Activity for Launcher or the application that you are 100% sure there is only one Activity. Anyway I suggest you not to use this mode unless it is really necessary.
Intent Flags
Beside from assigning the launch mode directly in AndroidManifest.xml , we are also able to assign more behavior through thing called Intent Flags, for example:
would launch a StandardActivity with singleTop launchMode condition.
There are quite a lot of Flags you can play with. You could find more about it at Intent.
Источник


