- Tek Eye
- Start with a Basic Hello World App
- Add Another Activity
- Add a Button to the First Screen
- Add Text to the Second Screen
- AndroidManifest.xml
- Add Code to Start Screen 2
- See Also
- Archived Comments
- Do you have a question or comment about this article?
- Starting Another Activity
- This lesson teaches you to
- You should also read
- Respond to the Send Button
- Build an Intent
- Sending an intent to other apps
- Start the Second Activity
- Create the Second Activity
- Add the title string
- Add it to the manifest
- Receive the Intent
- Display the Message
Tek Eye
If you are new to Android development it is often easier to see simple examples rather than decode the developers online documentation. Building on the simple example seen in Your First Android Java Program — Hello World! another screen containing a simple message is loaded from a button. This demonstrates the principles of starting a new User Interface (UI) screen, helping to understanding on how Android handles UI creation.
To get a screen up and running in an app the following is required:
- The definition of the screen must be composed in a layout.
- An Activity class must be defined in a Java class file to handle the screen.
- Android must be notified that the Activity exists, via the app’s manifest file.
- The app must tell Android to start the new screen.
Studio handles most of the plumbing when adding a new activity to an app, performing tasks 1 to 3 automatically when an Activity is created using Studio’s options. This leaves only a small amount of code to be written to load a second screen from the first app screen.
Start with a Basic Hello World App
Fire up Android Studio and open the Hello World project (see Your First Android Java Program — Hello World! on how to create the Hello World app).
Add Another Activity
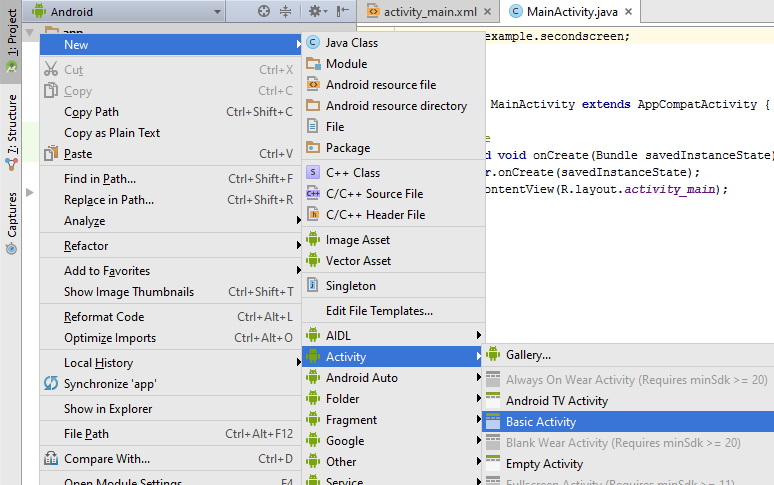
In the Project explorer tree in the Studio select the app folder. (See the Android Project Structure article to become familiar with project files). Using the File menu or the context menu (commonly right-click) add a new Activity to the app via New and Activity. A Basic Activity can be used:
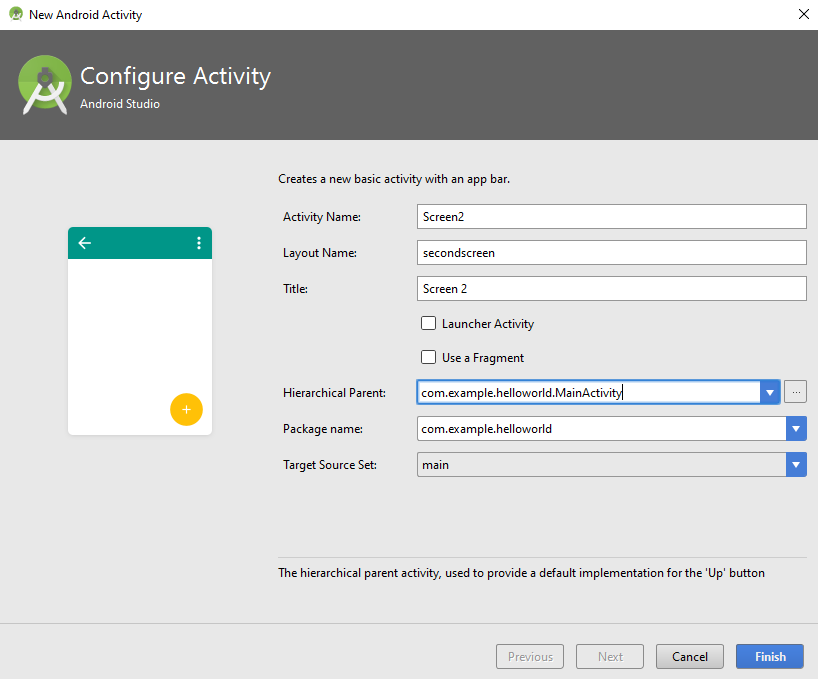
Set the properties for the new Activity, e.g.:
- Activity Name — Screen2
- Layout Name — secondscreen
- Title — Screen 2
Select the Parent to be the first Activity, com.example.helloworld.MainActivity (the parent is the screen the app returns to when the back button is pressed). All other settings remain as default (not a Launcher Activity, not a Fragment, Package set to com.example.helloworld, Target Source Set is main).
Click Finish and the Activity and associated layout is created. (If an error message is displayed on the new screen try the Invalidate Caches / Restart option on the File menu as discussed in the article Your First Android Java Program.)
Add a Button to the First Screen
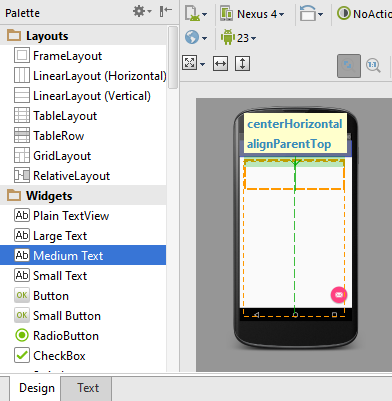
Add a Button to the first screen in the layout folder. (Tip: To find an item, e.g. layout, click the to level in the Project explorer and start typing the item’s name to start a search.) The file activity_main.xml contains the screen elements for the first screen. With the file open drag and drop a Button widget onto the screen:
Set the Button’s text to Next, use the right hand Component Tree tab to see the Properties.
Add Text to the Second Screen
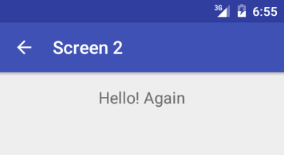
Open the content_screen2.xml file in the layout folder and drag and drop a TextView on to the screen:
As for the Button set the TextView text, e.g. to Hello! Again.
AndroidManifest.xml
When the Screen2 Activity was added to the app the correct definitions were added to the app’s manifest file, AndroidManifest.xml in app/src/main. This file must be present in an app project. It provides the Android Operating System (OS) all the information it needs to manage the application and the components it contains. If AndroidManifest.xml is opened it will be seen that both the initial screen, MainActivity and the new screen, Screen2 are defined in activity sections. The information in these sections tells Android about the screens in an app.
Add Code to Start Screen 2
The button on the first screen will tell Android of our «intention» to start the Activity that loads the new Screen 2. To do this the button runs an onClick method:
In onClick the name of the required activity, Screen2.class, is passed in an Intent object to the startActivity method. The startActivity method is available on a Context object; Context has a host of useful methods which provide access to the environment in which the app is executing. Context, and hence startActivity is always available within an Activity due to Android API subclassing.
The onClick method is connected to the button by an OnClickListener callback from a View . The following code is added to the MainActivity class, before the last closing brace (curly bracket, >) in the file MainActivity.java. Press Alt-Enter when prompted for the correct import statements to be added automatically:
The Intent object is also given a reference to the app Context, and since MainActivity is subclassed we can use this (here MainActivity.this because of the inner class for the onClick handler). The startActivity method gives Android the opportunity to perform any required housekeeping and then fire up the Activity named in the Intent (Screen2).
The findViewById method, available to activities, is used to get a reference to the button. The setOnClickListener method can then be called to link the button to the onClick code. This is done before the closing brace at the end of the onCreate method in MainActivity:
This is the full MainActivity code:
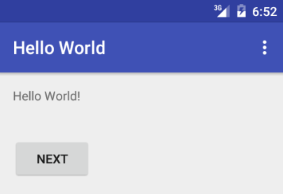
When the app runs the first screen will show:
And pressing the Next button shows:
A button is not required to go back to the first screen. Android automatically provides a back button as part of the platform.
This article has shown the basics of starting another screen in an app. The code is available in a zip file, secondscreen.zip, with an instructions.txt on how to import the project into Studio. Later articles will show how data can be passed between screens.
See Also
Archived Comments
Arthur Lu in January 2018 said: For some reason, whenever I run my code, it is unable to open the second activity, and instead re-opens the main activity.
Arthur Lu in January 2018 said: OK, so it turns out I accidentally deleted some important code on the second activity.
Gili Alafia in January 2018 said: But that doesn’t answer the question of how to open the app from screen2 to mainactivity.
Dan from Tek Eye in January 2018 said: As it says in the article, use back (e.g. via the arrow on the action bar) to return to the first activity. If you want an explicit button just use the same type of code in the second screen that was used for the main activity:
Author: Daniel S. Fowler Published: 2012-01-09 Updated: 2016-01-28


Do you have a question or comment about this article?
(Alternatively, use the email address at the bottom of the web page.)
↓markdown↓ CMS is fast and simple. Build websites quickly and publish easily. For beginner to expert.
Free Android Projects and Samples:
Источник
Starting Another Activity
This lesson teaches you to
You should also read
After completing the previous lesson, you have an app that shows an activity (a single screen) with a text field and a button. In this lesson, you’ll add some code to MainActivity that starts a new activity when the user clicks the Send button.
Respond to the Send Button
To respond to the button’s on-click event, open the activity_main.xml layout file and add the android:onClick attribute to the element:
The android:onClick attribute’s value, «sendMessage» , is the name of a method in your activity that the system calls when the user clicks the button.
Open the MainActivity class (located in the project’s src/ directory) and add the corresponding method:
This requires that you import the View class:
Tip: In Eclipse, press Ctrl + Shift + O to import missing classes (Cmd + Shift + O on Mac).
In order for the system to match this method to the method name given to android:onClick , the signature must be exactly as shown. Specifically, the method must:
- Be public
- Have a void return value
- Have a View as the only parameter (this will be the View that was clicked)
Next, you’ll fill in this method to read the contents of the text field and deliver that text to another activity.
Build an Intent
An Intent is an object that provides runtime binding between separate components (such as two activities). The Intent represents an app’s «intent to do something.» You can use intents for a wide variety of tasks, but most often they’re used to start another activity.
Inside the sendMessage() method, create an Intent to start an activity called DisplayMessageActivity :
The constructor used here takes two parameters:
- A Context as its first parameter ( this is used because the Activity class is a subclass of Context )
- The Class of the app component to which the system should deliver the Intent (in this case, the activity that should be started)
Sending an intent to other apps
The intent created in this lesson is what’s considered an explicit intent, because the Intent specifies the exact app component to which the intent should be given. However, intents can also be implicit, in which case the Intent does not specify the desired component, but allows any app installed on the device to respond to the intent as long as it satisfies the meta-data specifications for the action that’s specified in various Intent parameters. For more information, see the class about Interacting with Other Apps.
Note: The reference to DisplayMessageActivity will raise an error if you’re using an IDE such as Eclipse because the class doesn’t exist yet. Ignore the error for now; you’ll create the class soon.
An intent not only allows you to start another activity, but it can carry a bundle of data to the activity as well. Inside the sendMessage() method, use findViewById() to get the EditText element and add its text value to the intent:
Note: You now need import statements for android.content.Intent and android.widget.EditText . You’ll define the EXTRA_MESSAGE constant in a moment.
An Intent can carry a collection of various data types as key-value pairs called extras. The putExtra() method takes the key name in the first parameter and the value in the second parameter.
In order for the next activity to query the extra data, you should define the key for your intent’s extra using a public constant. So add the EXTRA_MESSAGE definition to the top of the MainActivity class:
It’s generally a good practice to define keys for intent extras using your app’s package name as a prefix. This ensures they are unique, in case your app interacts with other apps.
Start the Second Activity
To start an activity, call startActivity() and pass it your Intent . The system receives this call and starts an instance of the Activity specified by the Intent .
With this new code, the complete sendMessage() method that’s invoked by the Send button now looks like this:
Now you need to create the DisplayMessageActivity class in order for this to work.
Create the Second Activity
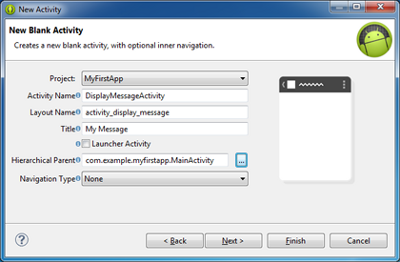
Figure 1. The new activity wizard in Eclipse.
To create a new activity using Eclipse:
- Click New
 in the toolbar.
 - In the window that appears, open the Android folder and select Android Activity. Click Next.
- Select BlankActivity and click Next.
- Fill in the activity details:
- Project: MyFirstApp
- Activity Name: DisplayMessageActivity
- Layout Name: activity_display_message
- Title: My Message
- Hierarchial Parent: com.example.myfirstapp.MainActivity
- Navigation Type: None
 in the toolbar.
Click Finish.
If you’re using a different IDE or the command line tools, create a new file named DisplayMessageActivity.java in the project’s src/ directory, next to the original MainActivity.java file.
Open the DisplayMessageActivity.java file. If you used Eclipse to create this activity:
- The class already includes an implementation of the required onCreate() method.
- There’s also an implementation of the onCreateOptionsMenu() method, but you won’t need it for this app so you can remove it.
- There’s also an implementation of onOptionsItemSelected() which handles the behavior for the action bar’s Up behavior. Keep this one the way it is.
Because the ActionBar APIs are available only on HONEYCOMB (API level 11) and higher, you must add a condition around the getActionBar() method to check the current platform version. Additionally, you must add the @SuppressLint(«NewApi») tag to the onCreate() method to avoid lint errors.
The DisplayMessageActivity class should now look like this:
If you used an IDE other than Eclipse, update your DisplayMessageActivity class with the above code.
All subclasses of Activity must implement the onCreate() method. The system calls this when creating a new instance of the activity. This method is where you must define the activity layout with the setContentView() method and is where you should perform initial setup for the activity components.
Note: If you are using an IDE other than Eclipse, your project does not contain the activity_display_message layout that’s requested by setContentView() . That’s OK because you will update this method later and won’t be using that layout.
Add the title string
If you used Eclipse, you can skip to the next section, because the template provides the title string for the new activity.
If you’re using an IDE other than Eclipse, add the new activity’s title to the strings.xml file:
Add it to the manifest
All activities must be declared in your manifest file, AndroidManifest.xml , using an element.
When you use the Eclipse tools to create the activity, it creates a default entry. If you’re using a different IDE, you need to add the manifest entry yourself. It should look like this:
The android:parentActivityName attribute declares the name of this activity’s parent activity within the app’s logical hierarchy. The system uses this value to implement default navigation behaviors, such as Up navigation on Android 4.1 (API level 16) and higher. You can provide the same navigation behaviors for older versions of Android by using the Support Library and adding the element as shown here.
Note: Your Android SDK should already include the latest Android Support Library. It’s included with the ADT Bundle but if you’re using a different IDE, you should have installed it during the Adding Platforms and Packages step. When using the templates in Eclipse, the Support Library is automatically added to your app project (you can see the library’s JAR file listed under Android Dependencies). If you’re not using Eclipse, you need to manually add the library to your project—follow the guide for setting up the Support Library then return here.
If you’re developing with Eclipse, you can run the app now, but not much happens. Clicking the Send button starts the second activity but it uses a default «Hello world» layout provided by the template. You’ll soon update the activity to instead display a custom text view, so if you’re using a different IDE, don’t worry that the app won’t yet compile.
Receive the Intent
Every Activity is invoked by an Intent , regardless of how the user navigated there. You can get the Intent that started your activity by calling getIntent() and retrieve the data contained within it.
In the DisplayMessageActivity class’s onCreate() method, get the intent and extract the message delivered by MainActivity :
Display the Message
To show the message on the screen, create a TextView widget and set the text using setText() . Then add the TextView as the root view of the activity’s layout by passing it to setContentView() .
The complete onCreate() method for DisplayMessageActivity now looks like this:
You can now run the app. When it opens, type a message in the text field, click Send, and the message appears on the second activity.
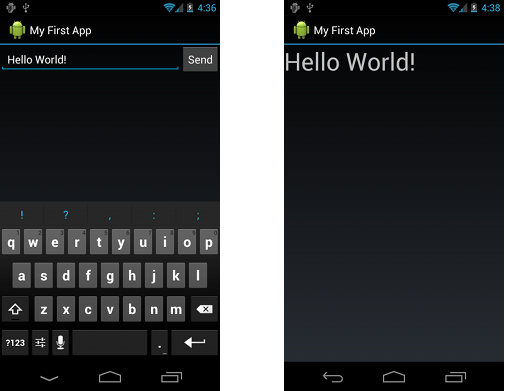
Figure 2. Both activities in the final app, running on Android 4.0.
That’s it, you’ve built your first Android app!
To learn more about building Android apps, continue to follow the basic training classes. The next class is Managing the Activity Lifecycle.
Источник


