- Как устанавливать мобильные приложения и игры с помощью APK, XAPK и APKM файлов
- Что такое файлы APK?
- Зачем устанавливать приложения с помощью APK файлов?
- Как устанавливать приложения и игры с помощью APK файлов?
- В Android 7 и ниже:
- В Android 8 и выше:
- Что такое файлы XAPK и APKM?
- Как устанавливать приложения и игры с помощью XAPK файлов?
- Как устанавливать приложения и игры с помощью APKM файлов?
- Что такое APK файл и для чего он нужен
- Что такое файлы APK
- Для чего нужны APK-файлы
- Android package file format
- What is an APK file? A file with .apk extension is a Google Android app file that is used to install apps (applications) on the Android devices. It is created as an executable file using the official IDE Google Android Studio, and is uploaded to Google Play store to be downloaded and installed by end users. APK files can be generated and made available for manual installation as well prior to publishing to Google Play store. This helps in testing the functionality and behaviour of the generated APK package file. Therefore, one needs to be sure that the APK file is from a trusted source and does not contain any malware. APK File Format APK files are packaged as compressed in ZIP file format that can be opened with any ZIP file opening software. The .apk extension of such a file can be renamed to .zip and open the file in any ZIP application or extract its contents. APK Package Contents A single APK file contains all the necessary files that are required for its installation and execution. An APK file, when extracted with a ZIP application, contains the following files and folders. META-INF/ : Directory that contains the manifest file, signature, and a list of resources in the archive lib/ : Directory containing compiled code related to specific platforms such as armeabi-v7a, x86, arm64-v8a, etc. res/ : Directory containing Non-compiled resources such as images assets/ : Directory containing applications assets, which can be retrieved by AssetManager. androidManifest.xml : Contains the name, versioning information and contents of the APK file classes.dex : These are compiled Java classes that can be run on Dalvik virtual machine and by the Android Runtime resources.arsc : Compiled resources file such as strings How to install APK file on Android Device? In order to install an APK file on your Android devices, the following steps can be used. Download the APK using web browser Tap it – you should then be able to see it downloading on the top bar of your device Once it’s downloaded, open Downloads, tap on the APK file, and tap Yes when prompted. Following these steps will start installation of the app on your device. Источник Packaging Android Projects Taking a look at packaging your final Android project. In order to understand and use the content on this page, make sure you are familiar with the following topics: In the following How-To we will take a look how to package your Unreal Engine 4 (UE4) project for deployment to an Android device. The Android packaging process in UE4 is simple to use and outputs several convenient files for installing and uninstalling your project from phones for testing. Essential Setup Before we begin, you will need to fulfill the following requirements and project setup: You will need Android Studio set up on your computer. See Setting up Android SDK and NDK . Your Android device must have Development Mode and USB Debugging enabled. See Setting Up Your Android Device For Development . You will need to configure your Project Settings for Android and accept the Android SDK license agreement. See the Android Quickstart Guide . If you have not already created a project, create one using the Third-Person Template, with Target Hardware set to Mobile/Tablet and quality set to Scalable 3D or 2D. 1. Packaging Your Project In this section we will package the project as a .APK file. We are currently packaging in Development because we are testing this game, but when your game is complete, you can package it in Shipping by hovering over the Build Configurations option in the Package Project menu. In the File menu, go to Package Project > Android and select the Texture format you want to package. For this example, we will choose Android ETC2 as it is supported by all devices. Click to enlarge image. Different devices support different Texture formats depending on the hardware they run on. See, Android Development Reference for a detailed breakdown of the various formats. Format Description ETC2 Supported by all OpenGL 3.x class devices and supports alpha compression. DXT Supported by Nvidia Tegra GPUs and supports alpha compression. ASTC Latest Texture compression format allowing more quality control by specifying block size and supports alpha compression. Available on some devices at this point. If you are using an older version of Unreal Engine to support an existing project, you will also have access to the following legacy Texture formats. Format Description ETC1 Supported by all Android based devices but cannot compress alpha textures (they are stored uncompressed). Recommend using an RGB and a separate alpha texture if need alpha to get better compression. ETC1a Uses ETC1 for non-alpha textures and ETC2 for alpha texture. If the device does not support ETC2, alpha textures will be uncompressed into RGBA at runtime. This format can be used on both ETC1 and ETC2 devices, but ETC1 for non-alpha textures may not be as high-quality as ETC2. ATC Supported by Qualcomm Adreno GPUs and supports alpha compression. PVRTC Supported by PowerVR GPUs and supports alpha compression. You will be prompted for a location to save your packaged game, which should default to your project folder. Create a new folder and call it AndroidBuilds. Click to enlarge image. While your project is being packaged a packaging message will appear in the bottom right corner showing the progress of the packing. Once packaging is successful, a Packaging Complete message will appear in the bottom right of the editor. Navigate to the folder you created in step two. There will be a new folder named specifically for the texture type you selected when packaging. In this example, the folder is named Android_ETC2. Click to enlarge image. 2. Deploying A Packaged Project to Device Now that we have packaged your project as a .APK, this section will instruct you on how to deploy your build to a device. Plug your Android device into your PC with a USB cable. If prompted, allow your PC to change files. Open up the Android_ETC2 folder and then Double-click on the Install_[ProjectName]_Development.bat batch file to install the project on your Android device. Click to enlarge image. If you do not have your device plugged in via USB, running the .BAT file will do nothing. Plug your Android device into your PC with a USB cable. If prompted, allow your PC to change files. Open up the Android_ETC2 folder and then Double-click on the Install_[ProjectName]_Development_armv7-es3.command file to install the project on your Android device. If you do not have your device plugged in via USB, running the .command file will do nothing. Plug your Android device into your PC with a USB cable. If prompted, allow your PC to change files. Open the Android_ETC2 folder, where you’ll find the files that were created during the packaging process. You should see the Installation and Uninstallation shell scripts (.sh) along with the Android Application Package (.apk) that contains all of the files you need to install the project onto any Android device that supports the ETC1 compression scheme. Now, open up the terminal from this folder’s location by right-clicking inside of the folder and selecting Open in Terminal. Enter ./Install_LinuxAndroidProject_Development-arm64.es2.sh into the terminal to install the project onto your Android device. Click to enlarge image. If you’re having trouble running the shell script, try entering adb devices into the terminal to verify that your device is connected to your computer. During the installation process, the shell script should flush the following output to your terminal Click to enlarge image. When the shell script has completed the installation process, you should see an Installation successful message. When you have completed this How-To, your project should appear on your Android device per the following image: In addition, you will have packaged .APK files and accompanying helpers to deploy them to other devices for testing. Packaging App Bundles Android App Bundles are a distribution format offered by Google as an alternative to packaging .apks. Instead of creating different .apks for different subsets of devices, you can create a single Android App Bundle build (.aab) and upload it to the Google Play Store. The store’s dynamic distribution system then uses the contents of the App Bundle to generate a .apk optimized for the user’s specific device when they download the application. In addition to greatly condensing the work involved in maintaining builds on the Google Play Store, App Bundle builds can distribute .apks with up to 150 MB instead of the previous limit of 100 MB. This limit applies to the final .apk and not the App Bundle used to generate it. To create an App Bundle Build, open your Project Settings and navigate to the Platforms > Android section. In the App Bundles section, enable Generate Bundle (AAB). Now when you package a project for Android, you will generate a .aab file to upload to Google Play. You will also generate a universal .apk for testing purposes. As a limitation of the Google Play Store, Android App Bundles can not be distributed with .obb files. The other settings available for configuring App Bundle builds enable you to fine-tune the degree of sensitivity that the App Bundle will use in generating the final .apks for your project. Generate Universal APK from Bundle Enabling this setting will allow the App Bundle to generate a universal .apk file for end-users, which can be run on any kind of device. This does not affect the universal .apk that is generated for testing on your machine. Enable ABI Split The App Bundle will generate separate .apks based on the Application Binary Interface used by the user’s CPU. For example: arm64-v8a, x86, x86_64. Enable language split The App Bundle will generate separate .apks based on the user’s language. Only strings localized for the user will be downloaded. Enable density split The App Bundle will generate separate .apks based on image resolution and DPI. Only icons and splash screens compatible with the user’s device will be downloaded. As an example, if you enabled ABI split but disabled language split, the .aab would tailor the final APK to a user’s device based on the compatible ABI for their device, but every user would receive resources for all languages regardless of their device or language settings. The default settings will result in the smallest possible size for the final .apk, while disabling these settings will result in larger .apks. For information on how to upload either .apks or .aabs to the Google Play Store, refer to our guide on Shipping with Android . Источник
- APK File Format APK files are packaged as compressed in ZIP file format that can be opened with any ZIP file opening software. The .apk extension of such a file can be renamed to .zip and open the file in any ZIP application or extract its contents. APK Package Contents A single APK file contains all the necessary files that are required for its installation and execution. An APK file, when extracted with a ZIP application, contains the following files and folders. META-INF/ : Directory that contains the manifest file, signature, and a list of resources in the archive lib/ : Directory containing compiled code related to specific platforms such as armeabi-v7a, x86, arm64-v8a, etc. res/ : Directory containing Non-compiled resources such as images assets/ : Directory containing applications assets, which can be retrieved by AssetManager. androidManifest.xml : Contains the name, versioning information and contents of the APK file classes.dex : These are compiled Java classes that can be run on Dalvik virtual machine and by the Android Runtime resources.arsc : Compiled resources file such as strings How to install APK file on Android Device? In order to install an APK file on your Android devices, the following steps can be used. Download the APK using web browser Tap it – you should then be able to see it downloading on the top bar of your device Once it’s downloaded, open Downloads, tap on the APK file, and tap Yes when prompted. Following these steps will start installation of the app on your device. Источник Packaging Android Projects Taking a look at packaging your final Android project. In order to understand and use the content on this page, make sure you are familiar with the following topics: In the following How-To we will take a look how to package your Unreal Engine 4 (UE4) project for deployment to an Android device. The Android packaging process in UE4 is simple to use and outputs several convenient files for installing and uninstalling your project from phones for testing. Essential Setup Before we begin, you will need to fulfill the following requirements and project setup: You will need Android Studio set up on your computer. See Setting up Android SDK and NDK . Your Android device must have Development Mode and USB Debugging enabled. See Setting Up Your Android Device For Development . You will need to configure your Project Settings for Android and accept the Android SDK license agreement. See the Android Quickstart Guide . If you have not already created a project, create one using the Third-Person Template, with Target Hardware set to Mobile/Tablet and quality set to Scalable 3D or 2D. 1. Packaging Your Project In this section we will package the project as a .APK file. We are currently packaging in Development because we are testing this game, but when your game is complete, you can package it in Shipping by hovering over the Build Configurations option in the Package Project menu. In the File menu, go to Package Project > Android and select the Texture format you want to package. For this example, we will choose Android ETC2 as it is supported by all devices. Click to enlarge image. Different devices support different Texture formats depending on the hardware they run on. See, Android Development Reference for a detailed breakdown of the various formats. Format Description ETC2 Supported by all OpenGL 3.x class devices and supports alpha compression. DXT Supported by Nvidia Tegra GPUs and supports alpha compression. ASTC Latest Texture compression format allowing more quality control by specifying block size and supports alpha compression. Available on some devices at this point. If you are using an older version of Unreal Engine to support an existing project, you will also have access to the following legacy Texture formats. Format Description ETC1 Supported by all Android based devices but cannot compress alpha textures (they are stored uncompressed). Recommend using an RGB and a separate alpha texture if need alpha to get better compression. ETC1a Uses ETC1 for non-alpha textures and ETC2 for alpha texture. If the device does not support ETC2, alpha textures will be uncompressed into RGBA at runtime. This format can be used on both ETC1 and ETC2 devices, but ETC1 for non-alpha textures may not be as high-quality as ETC2. ATC Supported by Qualcomm Adreno GPUs and supports alpha compression. PVRTC Supported by PowerVR GPUs and supports alpha compression. You will be prompted for a location to save your packaged game, which should default to your project folder. Create a new folder and call it AndroidBuilds. Click to enlarge image. While your project is being packaged a packaging message will appear in the bottom right corner showing the progress of the packing. Once packaging is successful, a Packaging Complete message will appear in the bottom right of the editor. Navigate to the folder you created in step two. There will be a new folder named specifically for the texture type you selected when packaging. In this example, the folder is named Android_ETC2. Click to enlarge image. 2. Deploying A Packaged Project to Device Now that we have packaged your project as a .APK, this section will instruct you on how to deploy your build to a device. Plug your Android device into your PC with a USB cable. If prompted, allow your PC to change files. Open up the Android_ETC2 folder and then Double-click on the Install_[ProjectName]_Development.bat batch file to install the project on your Android device. Click to enlarge image. If you do not have your device plugged in via USB, running the .BAT file will do nothing. Plug your Android device into your PC with a USB cable. If prompted, allow your PC to change files. Open up the Android_ETC2 folder and then Double-click on the Install_[ProjectName]_Development_armv7-es3.command file to install the project on your Android device. If you do not have your device plugged in via USB, running the .command file will do nothing. Plug your Android device into your PC with a USB cable. If prompted, allow your PC to change files. Open the Android_ETC2 folder, where you’ll find the files that were created during the packaging process. You should see the Installation and Uninstallation shell scripts (.sh) along with the Android Application Package (.apk) that contains all of the files you need to install the project onto any Android device that supports the ETC1 compression scheme. Now, open up the terminal from this folder’s location by right-clicking inside of the folder and selecting Open in Terminal. Enter ./Install_LinuxAndroidProject_Development-arm64.es2.sh into the terminal to install the project onto your Android device. Click to enlarge image. If you’re having trouble running the shell script, try entering adb devices into the terminal to verify that your device is connected to your computer. During the installation process, the shell script should flush the following output to your terminal Click to enlarge image. When the shell script has completed the installation process, you should see an Installation successful message. When you have completed this How-To, your project should appear on your Android device per the following image: In addition, you will have packaged .APK files and accompanying helpers to deploy them to other devices for testing. Packaging App Bundles Android App Bundles are a distribution format offered by Google as an alternative to packaging .apks. Instead of creating different .apks for different subsets of devices, you can create a single Android App Bundle build (.aab) and upload it to the Google Play Store. The store’s dynamic distribution system then uses the contents of the App Bundle to generate a .apk optimized for the user’s specific device when they download the application. In addition to greatly condensing the work involved in maintaining builds on the Google Play Store, App Bundle builds can distribute .apks with up to 150 MB instead of the previous limit of 100 MB. This limit applies to the final .apk and not the App Bundle used to generate it. To create an App Bundle Build, open your Project Settings and navigate to the Platforms > Android section. In the App Bundles section, enable Generate Bundle (AAB). Now when you package a project for Android, you will generate a .aab file to upload to Google Play. You will also generate a universal .apk for testing purposes. As a limitation of the Google Play Store, Android App Bundles can not be distributed with .obb files. The other settings available for configuring App Bundle builds enable you to fine-tune the degree of sensitivity that the App Bundle will use in generating the final .apks for your project. Generate Universal APK from Bundle Enabling this setting will allow the App Bundle to generate a universal .apk file for end-users, which can be run on any kind of device. This does not affect the universal .apk that is generated for testing on your machine. Enable ABI Split The App Bundle will generate separate .apks based on the Application Binary Interface used by the user’s CPU. For example: arm64-v8a, x86, x86_64. Enable language split The App Bundle will generate separate .apks based on the user’s language. Only strings localized for the user will be downloaded. Enable density split The App Bundle will generate separate .apks based on image resolution and DPI. Only icons and splash screens compatible with the user’s device will be downloaded. As an example, if you enabled ABI split but disabled language split, the .aab would tailor the final APK to a user’s device based on the compatible ABI for their device, but every user would receive resources for all languages regardless of their device or language settings. The default settings will result in the smallest possible size for the final .apk, while disabling these settings will result in larger .apks. For information on how to upload either .apks or .aabs to the Google Play Store, refer to our guide on Shipping with Android . Источник
- APK Package Contents A single APK file contains all the necessary files that are required for its installation and execution. An APK file, when extracted with a ZIP application, contains the following files and folders. META-INF/ : Directory that contains the manifest file, signature, and a list of resources in the archive lib/ : Directory containing compiled code related to specific platforms such as armeabi-v7a, x86, arm64-v8a, etc. res/ : Directory containing Non-compiled resources such as images assets/ : Directory containing applications assets, which can be retrieved by AssetManager. androidManifest.xml : Contains the name, versioning information and contents of the APK file classes.dex : These are compiled Java classes that can be run on Dalvik virtual machine and by the Android Runtime resources.arsc : Compiled resources file such as strings How to install APK file on Android Device? In order to install an APK file on your Android devices, the following steps can be used. Download the APK using web browser Tap it – you should then be able to see it downloading on the top bar of your device Once it’s downloaded, open Downloads, tap on the APK file, and tap Yes when prompted. Following these steps will start installation of the app on your device. Источник Packaging Android Projects Taking a look at packaging your final Android project. In order to understand and use the content on this page, make sure you are familiar with the following topics: In the following How-To we will take a look how to package your Unreal Engine 4 (UE4) project for deployment to an Android device. The Android packaging process in UE4 is simple to use and outputs several convenient files for installing and uninstalling your project from phones for testing. Essential Setup Before we begin, you will need to fulfill the following requirements and project setup: You will need Android Studio set up on your computer. See Setting up Android SDK and NDK . Your Android device must have Development Mode and USB Debugging enabled. See Setting Up Your Android Device For Development . You will need to configure your Project Settings for Android and accept the Android SDK license agreement. See the Android Quickstart Guide . If you have not already created a project, create one using the Third-Person Template, with Target Hardware set to Mobile/Tablet and quality set to Scalable 3D or 2D. 1. Packaging Your Project In this section we will package the project as a .APK file. We are currently packaging in Development because we are testing this game, but when your game is complete, you can package it in Shipping by hovering over the Build Configurations option in the Package Project menu. In the File menu, go to Package Project > Android and select the Texture format you want to package. For this example, we will choose Android ETC2 as it is supported by all devices. Click to enlarge image. Different devices support different Texture formats depending on the hardware they run on. See, Android Development Reference for a detailed breakdown of the various formats. Format Description ETC2 Supported by all OpenGL 3.x class devices and supports alpha compression. DXT Supported by Nvidia Tegra GPUs and supports alpha compression. ASTC Latest Texture compression format allowing more quality control by specifying block size and supports alpha compression. Available on some devices at this point. If you are using an older version of Unreal Engine to support an existing project, you will also have access to the following legacy Texture formats. Format Description ETC1 Supported by all Android based devices but cannot compress alpha textures (they are stored uncompressed). Recommend using an RGB and a separate alpha texture if need alpha to get better compression. ETC1a Uses ETC1 for non-alpha textures and ETC2 for alpha texture. If the device does not support ETC2, alpha textures will be uncompressed into RGBA at runtime. This format can be used on both ETC1 and ETC2 devices, but ETC1 for non-alpha textures may not be as high-quality as ETC2. ATC Supported by Qualcomm Adreno GPUs and supports alpha compression. PVRTC Supported by PowerVR GPUs and supports alpha compression. You will be prompted for a location to save your packaged game, which should default to your project folder. Create a new folder and call it AndroidBuilds. Click to enlarge image. While your project is being packaged a packaging message will appear in the bottom right corner showing the progress of the packing. Once packaging is successful, a Packaging Complete message will appear in the bottom right of the editor. Navigate to the folder you created in step two. There will be a new folder named specifically for the texture type you selected when packaging. In this example, the folder is named Android_ETC2. Click to enlarge image. 2. Deploying A Packaged Project to Device Now that we have packaged your project as a .APK, this section will instruct you on how to deploy your build to a device. Plug your Android device into your PC with a USB cable. If prompted, allow your PC to change files. Open up the Android_ETC2 folder and then Double-click on the Install_[ProjectName]_Development.bat batch file to install the project on your Android device. Click to enlarge image. If you do not have your device plugged in via USB, running the .BAT file will do nothing. Plug your Android device into your PC with a USB cable. If prompted, allow your PC to change files. Open up the Android_ETC2 folder and then Double-click on the Install_[ProjectName]_Development_armv7-es3.command file to install the project on your Android device. If you do not have your device plugged in via USB, running the .command file will do nothing. Plug your Android device into your PC with a USB cable. If prompted, allow your PC to change files. Open the Android_ETC2 folder, where you’ll find the files that were created during the packaging process. You should see the Installation and Uninstallation shell scripts (.sh) along with the Android Application Package (.apk) that contains all of the files you need to install the project onto any Android device that supports the ETC1 compression scheme. Now, open up the terminal from this folder’s location by right-clicking inside of the folder and selecting Open in Terminal. Enter ./Install_LinuxAndroidProject_Development-arm64.es2.sh into the terminal to install the project onto your Android device. Click to enlarge image. If you’re having trouble running the shell script, try entering adb devices into the terminal to verify that your device is connected to your computer. During the installation process, the shell script should flush the following output to your terminal Click to enlarge image. When the shell script has completed the installation process, you should see an Installation successful message. When you have completed this How-To, your project should appear on your Android device per the following image: In addition, you will have packaged .APK files and accompanying helpers to deploy them to other devices for testing. Packaging App Bundles Android App Bundles are a distribution format offered by Google as an alternative to packaging .apks. Instead of creating different .apks for different subsets of devices, you can create a single Android App Bundle build (.aab) and upload it to the Google Play Store. The store’s dynamic distribution system then uses the contents of the App Bundle to generate a .apk optimized for the user’s specific device when they download the application. In addition to greatly condensing the work involved in maintaining builds on the Google Play Store, App Bundle builds can distribute .apks with up to 150 MB instead of the previous limit of 100 MB. This limit applies to the final .apk and not the App Bundle used to generate it. To create an App Bundle Build, open your Project Settings and navigate to the Platforms > Android section. In the App Bundles section, enable Generate Bundle (AAB). Now when you package a project for Android, you will generate a .aab file to upload to Google Play. You will also generate a universal .apk for testing purposes. As a limitation of the Google Play Store, Android App Bundles can not be distributed with .obb files. The other settings available for configuring App Bundle builds enable you to fine-tune the degree of sensitivity that the App Bundle will use in generating the final .apks for your project. Generate Universal APK from Bundle Enabling this setting will allow the App Bundle to generate a universal .apk file for end-users, which can be run on any kind of device. This does not affect the universal .apk that is generated for testing on your machine. Enable ABI Split The App Bundle will generate separate .apks based on the Application Binary Interface used by the user’s CPU. For example: arm64-v8a, x86, x86_64. Enable language split The App Bundle will generate separate .apks based on the user’s language. Only strings localized for the user will be downloaded. Enable density split The App Bundle will generate separate .apks based on image resolution and DPI. Only icons and splash screens compatible with the user’s device will be downloaded. As an example, if you enabled ABI split but disabled language split, the .aab would tailor the final APK to a user’s device based on the compatible ABI for their device, but every user would receive resources for all languages regardless of their device or language settings. The default settings will result in the smallest possible size for the final .apk, while disabling these settings will result in larger .apks. For information on how to upload either .apks or .aabs to the Google Play Store, refer to our guide on Shipping with Android . Источник
- How to install APK file on Android Device? In order to install an APK file on your Android devices, the following steps can be used. Download the APK using web browser Tap it – you should then be able to see it downloading on the top bar of your device Once it’s downloaded, open Downloads, tap on the APK file, and tap Yes when prompted. Following these steps will start installation of the app on your device. Источник Packaging Android Projects Taking a look at packaging your final Android project. In order to understand and use the content on this page, make sure you are familiar with the following topics: In the following How-To we will take a look how to package your Unreal Engine 4 (UE4) project for deployment to an Android device. The Android packaging process in UE4 is simple to use and outputs several convenient files for installing and uninstalling your project from phones for testing. Essential Setup Before we begin, you will need to fulfill the following requirements and project setup: You will need Android Studio set up on your computer. See Setting up Android SDK and NDK . Your Android device must have Development Mode and USB Debugging enabled. See Setting Up Your Android Device For Development . You will need to configure your Project Settings for Android and accept the Android SDK license agreement. See the Android Quickstart Guide . If you have not already created a project, create one using the Third-Person Template, with Target Hardware set to Mobile/Tablet and quality set to Scalable 3D or 2D. 1. Packaging Your Project In this section we will package the project as a .APK file. We are currently packaging in Development because we are testing this game, but when your game is complete, you can package it in Shipping by hovering over the Build Configurations option in the Package Project menu. In the File menu, go to Package Project > Android and select the Texture format you want to package. For this example, we will choose Android ETC2 as it is supported by all devices. Click to enlarge image. Different devices support different Texture formats depending on the hardware they run on. See, Android Development Reference for a detailed breakdown of the various formats. Format Description ETC2 Supported by all OpenGL 3.x class devices and supports alpha compression. DXT Supported by Nvidia Tegra GPUs and supports alpha compression. ASTC Latest Texture compression format allowing more quality control by specifying block size and supports alpha compression. Available on some devices at this point. If you are using an older version of Unreal Engine to support an existing project, you will also have access to the following legacy Texture formats. Format Description ETC1 Supported by all Android based devices but cannot compress alpha textures (they are stored uncompressed). Recommend using an RGB and a separate alpha texture if need alpha to get better compression. ETC1a Uses ETC1 for non-alpha textures and ETC2 for alpha texture. If the device does not support ETC2, alpha textures will be uncompressed into RGBA at runtime. This format can be used on both ETC1 and ETC2 devices, but ETC1 for non-alpha textures may not be as high-quality as ETC2. ATC Supported by Qualcomm Adreno GPUs and supports alpha compression. PVRTC Supported by PowerVR GPUs and supports alpha compression. You will be prompted for a location to save your packaged game, which should default to your project folder. Create a new folder and call it AndroidBuilds. Click to enlarge image. While your project is being packaged a packaging message will appear in the bottom right corner showing the progress of the packing. Once packaging is successful, a Packaging Complete message will appear in the bottom right of the editor. Navigate to the folder you created in step two. There will be a new folder named specifically for the texture type you selected when packaging. In this example, the folder is named Android_ETC2. Click to enlarge image. 2. Deploying A Packaged Project to Device Now that we have packaged your project as a .APK, this section will instruct you on how to deploy your build to a device. Plug your Android device into your PC with a USB cable. If prompted, allow your PC to change files. Open up the Android_ETC2 folder and then Double-click on the Install_[ProjectName]_Development.bat batch file to install the project on your Android device. Click to enlarge image. If you do not have your device plugged in via USB, running the .BAT file will do nothing. Plug your Android device into your PC with a USB cable. If prompted, allow your PC to change files. Open up the Android_ETC2 folder and then Double-click on the Install_[ProjectName]_Development_armv7-es3.command file to install the project on your Android device. If you do not have your device plugged in via USB, running the .command file will do nothing. Plug your Android device into your PC with a USB cable. If prompted, allow your PC to change files. Open the Android_ETC2 folder, where you’ll find the files that were created during the packaging process. You should see the Installation and Uninstallation shell scripts (.sh) along with the Android Application Package (.apk) that contains all of the files you need to install the project onto any Android device that supports the ETC1 compression scheme. Now, open up the terminal from this folder’s location by right-clicking inside of the folder and selecting Open in Terminal. Enter ./Install_LinuxAndroidProject_Development-arm64.es2.sh into the terminal to install the project onto your Android device. Click to enlarge image. If you’re having trouble running the shell script, try entering adb devices into the terminal to verify that your device is connected to your computer. During the installation process, the shell script should flush the following output to your terminal Click to enlarge image. When the shell script has completed the installation process, you should see an Installation successful message. When you have completed this How-To, your project should appear on your Android device per the following image: In addition, you will have packaged .APK files and accompanying helpers to deploy them to other devices for testing. Packaging App Bundles Android App Bundles are a distribution format offered by Google as an alternative to packaging .apks. Instead of creating different .apks for different subsets of devices, you can create a single Android App Bundle build (.aab) and upload it to the Google Play Store. The store’s dynamic distribution system then uses the contents of the App Bundle to generate a .apk optimized for the user’s specific device when they download the application. In addition to greatly condensing the work involved in maintaining builds on the Google Play Store, App Bundle builds can distribute .apks with up to 150 MB instead of the previous limit of 100 MB. This limit applies to the final .apk and not the App Bundle used to generate it. To create an App Bundle Build, open your Project Settings and navigate to the Platforms > Android section. In the App Bundles section, enable Generate Bundle (AAB). Now when you package a project for Android, you will generate a .aab file to upload to Google Play. You will also generate a universal .apk for testing purposes. As a limitation of the Google Play Store, Android App Bundles can not be distributed with .obb files. The other settings available for configuring App Bundle builds enable you to fine-tune the degree of sensitivity that the App Bundle will use in generating the final .apks for your project. Generate Universal APK from Bundle Enabling this setting will allow the App Bundle to generate a universal .apk file for end-users, which can be run on any kind of device. This does not affect the universal .apk that is generated for testing on your machine. Enable ABI Split The App Bundle will generate separate .apks based on the Application Binary Interface used by the user’s CPU. For example: arm64-v8a, x86, x86_64. Enable language split The App Bundle will generate separate .apks based on the user’s language. Only strings localized for the user will be downloaded. Enable density split The App Bundle will generate separate .apks based on image resolution and DPI. Only icons and splash screens compatible with the user’s device will be downloaded. As an example, if you enabled ABI split but disabled language split, the .aab would tailor the final APK to a user’s device based on the compatible ABI for their device, but every user would receive resources for all languages regardless of their device or language settings. The default settings will result in the smallest possible size for the final .apk, while disabling these settings will result in larger .apks. For information on how to upload either .apks or .aabs to the Google Play Store, refer to our guide on Shipping with Android . Источник
- Packaging Android Projects
- Taking a look at packaging your final Android project.
- Essential Setup
- 1. Packaging Your Project
- 2. Deploying A Packaged Project to Device
- Packaging App Bundles
Как устанавливать мобильные приложения и игры с помощью APK, XAPK и APKM файлов
Что такое файлы APK?
APK файл (Android Package) – это стандартный формат приложений для Android. По сути, APK файл это сжатый архив, который включает ресурсы и код мобильного приложения. Разработчики приложений и игр загружают эти файлы в Google Play Маркет, а в дальнейшем, пользователи могут устанавливать эти приложения на свой смартфон и планшет.
Для одного приложения определённой версии, может быть доступно несколько файлов APK, каждый из которых предназначен для устройств определённой архитектуры, версии операционной системы и с различными разрешениями экрана. Чем больше вариантов APK файлов предоставляет разработчик, тем меньше данных будет скачено при установке или обновлении приложения, так как будет загружаться файл не содержащий кода и данных, предназначенных для других устройств.
В настоящий момент, выпускаются APK для четырёх архитектур: armeabi-v7a (arm), arm64-v8a (aarch64), x86 (i386) и x86_64. Многие разработчики выпускают и комплексный установочный файл, включающий поддержку нескольких архитектур, но имеющий больший размер. Если открыть страницу приложения в Play Маркете, вы увидите номер версии и размер приложения для вашего устройства. На устаревших устройствах могут предлагаться более старые версии приложения, если обновление не поддерживается или ещё не выпущено для вашего устройства.
Зачем устанавливать приложения с помощью APK файлов?
Иногда, установка с использованием APK является единственным способом получить приложение или игру на своё устройство. Например, приложение не соответствует правилам Google и не доступно в магазине Play Маркет. В таких случаях, их можно скачать на сайтах и форумах, на которых их разместил автор, и установить вручную.
В некоторых случаях, вы захотите использовать более старую версию приложения, например, если в новейшей версии отсутствуют или некорректно работают некоторые функции, или вам не нравится новый дизайн. Или же после обновления приложения оно вовсе не запускается, и вам понадобится откатиться на предыдущую версию, в то время, как в Play Маркете предлагается только новая.
Также, некоторые приложения могут быть не доступны в вашем регионе, и вы не сможете установить их из Play Маркета.
У опытных пользователей или мастеров по ремонту мобильных устройств, может возникнут необходимость установить антивирус на заражённое устройство, и часто APK файл может быть единственным вариантом запустить проверку и лечение системы. Многие вирусы для Android могут заполнять экран рекламными баннерами или блокировать интернет, и в таком случае, чтобы не прибегать к сбросу или перепрошивке устройства и потере всех данных, установка антивируса для Android с помощью APK файла будет хорошим вариантом лечения системы.
Как устанавливать приложения и игры с помощью APK файлов?
Поскольку APK является стандартным форматом приложений в операционной системе Android, их установка проста и не требует дополнительных программ. Вам нужно просто скачать файл на смартфон или планшет, найти его расположение в любом файловом менеджере, нажать по нему и выбрать «Установить».
Единственное ограничение, которое может препятствовать установке, это блокировка операционной системой установки приложений из неизвестных источников. В этом случае, выполните следующие действия:
В Android 7 и ниже:
- В любом файловом менеджере нажмите по файлу APK.
- В окне предупреждения «Установка заблокирована», нажмите «Настройки».
- В открывшемся окне настроек, найдите пункт «Неизвестные источники» и активируйте ползунок.
- В окне подтверждения, нажмите «OK».
- Вернитесь к файлу APK и нажмите «Установить».
В Android 8 и выше:
- В файловом менеджере или браузере нажмите по файлу APK.
- В окне предупреждения, нажмите «Настройки».
- В открывшемся окне настроек, активируйте ползунок «Разрешение для этого источника» или «Разрешить установку приложений».
- Вернитесь назад и нажмите «Установить».
Обратите внимание, что после разрешения установки из неизвестных источников, ваше устройство может быть уязвимо. Рекомендуем отключать эту опцию каждый раз после установки приложений с помощью APK файлов.
Что такое файлы XAPK и APKM?
Из-за некоторых ограничений, введённых Google для публикации приложений в Play Маркет, размер приложения для Android не может превышать определённый размер. Разработчики больших приложений, например мобильных игр, могут использовать дополнительные файлы с ресурсами, которые необходимы для работы приложения или игры и будут скачиваться после её установки и первого запуска.
Сообщество разработчиков и пользователей придумали новые форматы распространения мобильных приложений, которые позволяют в одном файле хранить все необходимые ресурсы и файлы. Файлы XAPK и APKM – это архивы, которые можут включать несколько APK файлов и дополнительные ресурсы (кэш). Эти форматы набирает популярность на софт порталах, например apkpure.com и apkmirror.com, особенно для скачивания мобильных игр.
Как устанавливать приложения и игры с помощью XAPK файлов?
Есть несколько способов установки мобильных приложений и игр с помощью XAPK файлов. Рассмотрим три варианта.
Вариант 1 – использование мобильных приложений. Для установки XAPK можно использовать мобильное приложение APKPure для Android.
Для установки XAPK с помощью APKPure для Android:
- Откройте приложение APKPure для Android.
- Перейдите в главное меню, щелкнув по значку в правом верхнем углу.
- Переключитесь на вкладку «Управление APK / XAPK».
- Приложение просканирует память устройства и отобразит список найденных установочных файлов APK и XAPK. Нажмите «Установить» напротив нужного вам приложения и дождитесь распаковки и копирования файлов кэша.
- После этого начнётся установка извлечённого APK установщика. Подтвердите действие, нажав «Установить» и следуйте инструкции по установке AKP, написанной выше.
Также, после установки приложения APKPure для Android, файлы .xapk будут ассоциированы с приложением APKPure, что позволит устанавливать их в несколько кликов, щёлкнув по ним в любом файловом менеджере.
Вариант 2 – использование USB кабеля и компьютера. Для установки XAPK можно использовать приложение Pure APK Install для Windows.
Для установки XAPK с помощью Pure APK Install:
- Включите на мобильном устройстве отладку по USB (найдите в интернете инструкцию для вашей версии Android).
- Подключите мобильное устройство к компьютеру с помощью USB-кабеля.
- Откройте на компьютере приложение Pure APK Install.
- Перетащите .xapk или .apk файл в окно программы Pure APK Install, или используйте кнопку «Open APK file» и укажите путь к файлу.
- Появится информация о выбранном приложении: название, версия, размер и минимальные требования. Выберите место установки приложения: встроенное хранилище (Internal android memory), карта памяти (External SD card) или оставьте «Auto select».
- Нажмите кнопку «Install».
- На мобильном устройстве дождитесь сообщения и подтвердите доступ с компьютера.
- Дождитесь завершения установки и нажмите «OK».
Вариант 3 – извлечение APK файла из XAPK. Скачайте нужный вам файл XAPK и откройте его архиватором, например WinRAR или 7-Zip. Для удобства, можно предварительно изменить расширение файла с .xapk на .zip.
Извлеките из него файл с расширением .apk и установите его, следуя выше написанной инструкции. Также, скопируйте содержимое папки «Android», в которой находится кэш приложения, в соответствующую папку на вашем устройстве.
Как устанавливать приложения и игры с помощью APKM файлов?
Для установки мобильных приложений и игр с помощью файлов APKM доступно официальное мобильное приложение от разработчиков этого формата – APKMirror Installer.
Установите мобильное приложение APKMirror Installer и скачайте нужные файлы формата APKM в любую папку на устройстве или установленной карте памяти. Приложение APKMirror Installer просканирует ваше мобильное устройство и отобразит список найденных установочных файлов APK и APKM. Для большинства установочных файлов APKM доступны опции установки, такие как архитектура, включённые языки и разрешения экрана.
Источник
Что такое APK файл и для чего он нужен
Пользователи Android вероятно слышали термин «APK», большинство знает что это и для чего, но есть и те кто недавно перешел на операционную систему от Google. Давайте вместе разберемся что такое APK и для чего он нужен на Android.
Что такое файлы APK
APK — это сокращение от Android Package Kit обозначает формат файлов, которые на Android используются для распространения и установки приложений. APK-файл содержит все необходимые элементы для правильной установки приложения на устройстве.
APK-файл своим назначением чем-то похож на исполняемые EXE-файлы в Windows. Установка приложения в ручную с помощью APK-файла называется — загрузка из стороннего источника. Не забудьте подписаться на канал нашего техноблога в Telegram https://t.me/appdatemedia .
Таким образом, когда вы заходите в Google Play, чтобы загрузить приложение, магазин автоматически скачивает и устанавливает APK с нужным приложением. Есть возможность извлечь APK из магазина Google Play (в ближайшее время мы посвятим этому вопросу отдельную статью), а также загрузить их альтернативных магазинов приложений.
Для чего нужны APK-файлы
Существует несколько преимуществ установки APK вручную. Одно из самых важных — возможность получить доступ к приложению раньше, чем оно появится в Google Play. Когда разработчики выпускают крупные обновления, проходит некоторое время до того момента, когда оно появится в магазине приложений. Установка в ручную позволяет избежать этих ожиданий.
Установка с помощью APK-файла позволяет устанавливать приложения, которые недоступны в магазине Google. Здесь очень важно быть осторожным с источником приложений. Как и в случае с Windows-ПК, скачивание APK из непроверенных источников может привести к заражению устройства вирусом. Мы рекомендуем только проверенные источники: APKMirror , F-Droid , Aptoide или APKPure .
APK — это основной формат, который Android использует для распространения и установки приложений. Для опытных пользователей это еще один удобный способ установки приложений из сторонних источников, с которым вы должны быть очень осторожны.
Источник
Android package file format
What’s on this Page
What is an APK file?
A file with .apk extension is a Google Android app file that is used to install apps (applications) on the Android devices. It is created as an executable file using the official IDE Google Android Studio, and is uploaded to Google Play store to be downloaded and installed by end users. APK files can be generated and made available for manual installation as well prior to publishing to Google Play store. This helps in testing the functionality and behaviour of the generated APK package file. Therefore, one needs to be sure that the APK file is from a trusted source and does not contain any malware.
APK File Format
APK files are packaged as compressed in ZIP file format that can be opened with any ZIP file opening software. The .apk extension of such a file can be renamed to .zip and open the file in any ZIP application or extract its contents.
APK Package Contents
A single APK file contains all the necessary files that are required for its installation and execution. An APK file, when extracted with a ZIP application, contains the following files and folders.
- META-INF/ : Directory that contains the manifest file, signature, and a list of resources in the archive
- lib/ : Directory containing compiled code related to specific platforms such as armeabi-v7a, x86, arm64-v8a, etc.
- res/ : Directory containing Non-compiled resources such as images
- assets/ : Directory containing applications assets, which can be retrieved by AssetManager.
- androidManifest.xml : Contains the name, versioning information and contents of the APK file
- classes.dex : These are compiled Java classes that can be run on Dalvik virtual machine and by the Android Runtime
- resources.arsc : Compiled resources file such as strings
How to install APK file on Android Device?
In order to install an APK file on your Android devices, the following steps can be used.
- Download the APK using web browser
- Tap it – you should then be able to see it downloading on the top bar of your device
- Once it’s downloaded, open Downloads, tap on the APK file, and tap Yes when prompted.
Following these steps will start installation of the app on your device.
Источник
Packaging Android Projects
Taking a look at packaging your final Android project.
In order to understand and use the content on this page, make sure you are familiar with the following topics:
In the following How-To we will take a look how to package your Unreal Engine 4 (UE4) project for deployment to an Android device. The Android packaging process in UE4 is simple to use and outputs several convenient files for installing and uninstalling your project from phones for testing.
Essential Setup
Before we begin, you will need to fulfill the following requirements and project setup:
You will need Android Studio set up on your computer. See Setting up Android SDK and NDK .
Your Android device must have Development Mode and USB Debugging enabled. See Setting Up Your Android Device For Development .
You will need to configure your Project Settings for Android and accept the Android SDK license agreement. See the Android Quickstart Guide .
If you have not already created a project, create one using the Third-Person Template, with Target Hardware set to Mobile/Tablet and quality set to Scalable 3D or 2D.
1. Packaging Your Project
In this section we will package the project as a .APK file.
We are currently packaging in Development because we are testing this game, but when your game is complete, you can package it in Shipping by hovering over the Build Configurations option in the Package Project menu.
In the File menu, go to Package Project > Android and select the Texture format you want to package. For this example, we will choose Android ETC2 as it is supported by all devices.
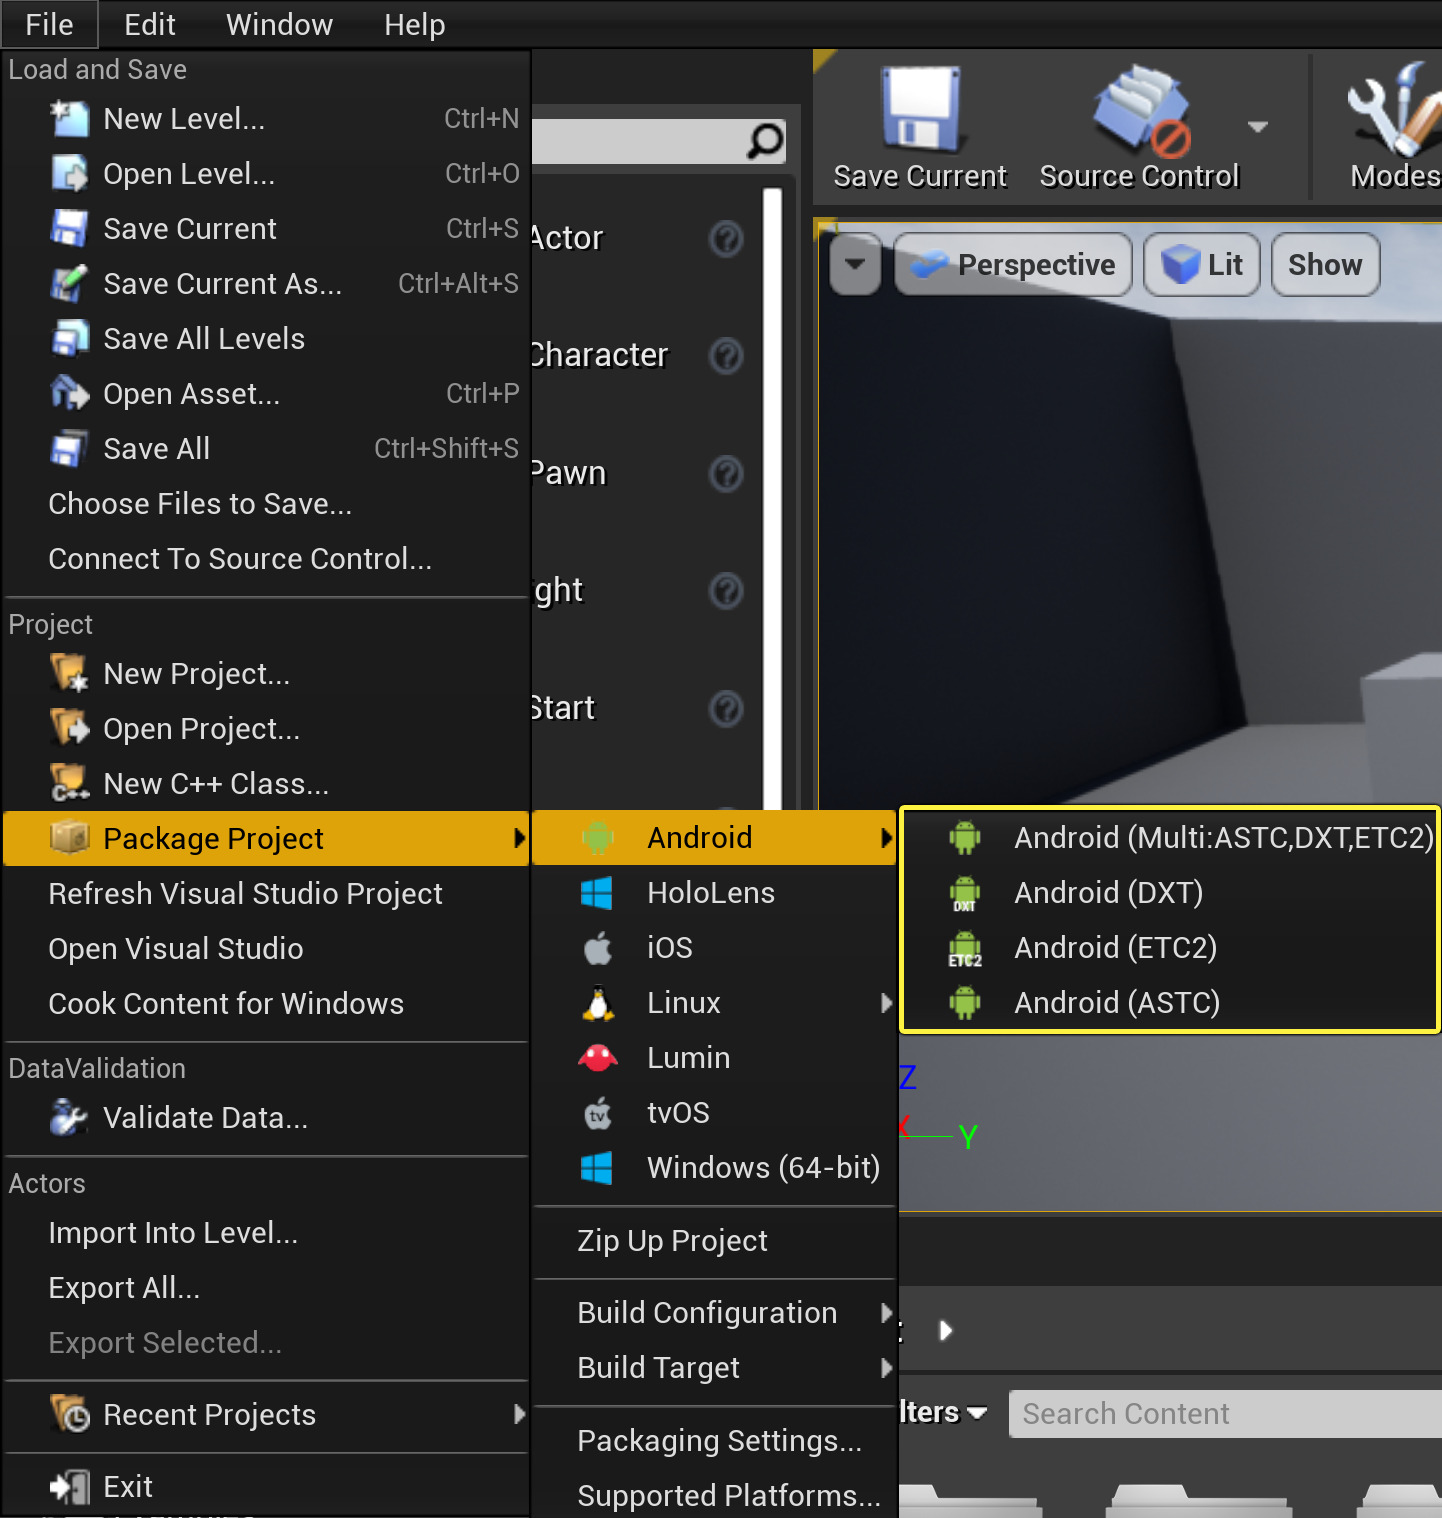


Click to enlarge image.
Different devices support different Texture formats depending on the hardware they run on. See, Android Development Reference for a detailed breakdown of the various formats.
Format
Description
ETC2
Supported by all OpenGL 3.x class devices and supports alpha compression.
DXT
Supported by Nvidia Tegra GPUs and supports alpha compression.
ASTC
Latest Texture compression format allowing more quality control by specifying block size and supports alpha compression. Available on some devices at this point.
If you are using an older version of Unreal Engine to support an existing project, you will also have access to the following legacy Texture formats.
Format
Description
ETC1
Supported by all Android based devices but cannot compress alpha textures (they are stored uncompressed). Recommend using an RGB and a separate alpha texture if need alpha to get better compression.
ETC1a
Uses ETC1 for non-alpha textures and ETC2 for alpha texture. If the device does not support ETC2, alpha textures will be uncompressed into RGBA at runtime. This format can be used on both ETC1 and ETC2 devices, but ETC1 for non-alpha textures may not be as high-quality as ETC2.
ATC
Supported by Qualcomm Adreno GPUs and supports alpha compression.
PVRTC
Supported by PowerVR GPUs and supports alpha compression.
You will be prompted for a location to save your packaged game, which should default to your project folder. Create a new folder and call it AndroidBuilds.


Click to enlarge image.
While your project is being packaged a packaging message will appear in the bottom right corner showing the progress of the packing.

Once packaging is successful, a Packaging Complete message will appear in the bottom right of the editor.

Navigate to the folder you created in step two. There will be a new folder named specifically for the texture type you selected when packaging. In this example, the folder is named Android_ETC2.


Click to enlarge image.
2. Deploying A Packaged Project to Device
Now that we have packaged your project as a .APK, this section will instruct you on how to deploy your build to a device.
Plug your Android device into your PC with a USB cable. If prompted, allow your PC to change files.
Open up the Android_ETC2 folder and then Double-click on the Install_[ProjectName]_Development.bat batch file to install the project on your Android device.

Click to enlarge image.
If you do not have your device plugged in via USB, running the .BAT file will do nothing.
Plug your Android device into your PC with a USB cable. If prompted, allow your PC to change files.
Open up the Android_ETC2 folder and then Double-click on the Install_[ProjectName]_Development_armv7-es3.command file to install the project on your Android device.
If you do not have your device plugged in via USB, running the .command file will do nothing.
Plug your Android device into your PC with a USB cable. If prompted, allow your PC to change files.
Open the Android_ETC2 folder, where you’ll find the files that were created during the packaging process.

You should see the Installation and Uninstallation shell scripts (.sh) along with the Android Application Package (.apk) that contains all of the files you need to install the project onto any Android device that supports the ETC1 compression scheme.
Now, open up the terminal from this folder’s location by right-clicking inside of the folder and selecting Open in Terminal.

Enter ./Install_LinuxAndroidProject_Development-arm64.es2.sh into the terminal to install the project onto your Android device.

Click to enlarge image.
If you’re having trouble running the shell script, try entering adb devices into the terminal to verify that your device is connected to your computer.
During the installation process, the shell script should flush the following output to your terminal
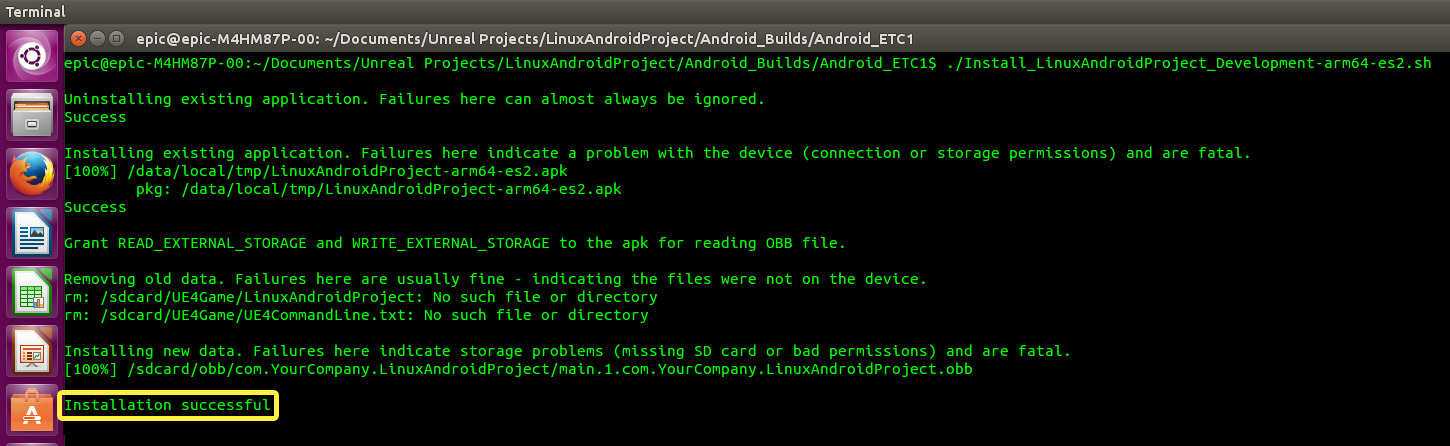
Click to enlarge image.
When the shell script has completed the installation process, you should see an Installation successful message.
When you have completed this How-To, your project should appear on your Android device per the following image:

In addition, you will have packaged .APK files and accompanying helpers to deploy them to other devices for testing.
Packaging App Bundles
Android App Bundles are a distribution format offered by Google as an alternative to packaging .apks. Instead of creating different .apks for different subsets of devices, you can create a single Android App Bundle build (.aab) and upload it to the Google Play Store. The store’s dynamic distribution system then uses the contents of the App Bundle to generate a .apk optimized for the user’s specific device when they download the application.
In addition to greatly condensing the work involved in maintaining builds on the Google Play Store, App Bundle builds can distribute .apks with up to 150 MB instead of the previous limit of 100 MB. This limit applies to the final .apk and not the App Bundle used to generate it.
To create an App Bundle Build, open your Project Settings and navigate to the Platforms > Android section. In the App Bundles section, enable Generate Bundle (AAB).

Now when you package a project for Android, you will generate a .aab file to upload to Google Play. You will also generate a universal .apk for testing purposes.
As a limitation of the Google Play Store, Android App Bundles can not be distributed with .obb files.
The other settings available for configuring App Bundle builds enable you to fine-tune the degree of sensitivity that the App Bundle will use in generating the final .apks for your project.
Generate Universal APK from Bundle
Enabling this setting will allow the App Bundle to generate a universal .apk file for end-users, which can be run on any kind of device. This does not affect the universal .apk that is generated for testing on your machine.
Enable ABI Split
The App Bundle will generate separate .apks based on the Application Binary Interface used by the user’s CPU. For example: arm64-v8a, x86, x86_64.
Enable language split
The App Bundle will generate separate .apks based on the user’s language. Only strings localized for the user will be downloaded.
Enable density split
The App Bundle will generate separate .apks based on image resolution and DPI. Only icons and splash screens compatible with the user’s device will be downloaded.
As an example, if you enabled ABI split but disabled language split, the .aab would tailor the final APK to a user’s device based on the compatible ABI for their device, but every user would receive resources for all languages regardless of their device or language settings.
The default settings will result in the smallest possible size for the final .apk, while disabling these settings will result in larger .apks.
For information on how to upload either .apks or .aabs to the Google Play Store, refer to our guide on Shipping with Android .
Источник


