- Paging 3 Android Tutorial
- Introduction to Paging 3 library
- Understanding and Implementing Paging 3 library
- Step 01.
- Step 02.
- Step 03.
- Step 04.
- Step 05.
- Step 06.
- Step 07.
- Getting the States of the data
- Adding the Header and Footer view
- Using it with RxJava
- Step 01.
- Step 02.
- Step 03.
- Step 04.
- Conclusion
- Pagination in Android with Paging 3, Retrofit and kotlin Flow
- Non library approach
- Android Jetpack Paging 3 and Flow
- Paging3 — Doing Recyclerview Pagination the Right Way
- Jetpack Paging library release version 3.0.0-alpha03 is full of new features and is Kotlin first with a pinch of Coroutines & Flow 😊.
- Intro:
- How it’s different:
- Paging3 & Application Architecture:
- So what’s the plan?
- Before we start:
- Network as a Data Source 🌐:
- PagingDataAdapter with loading states:
- Room as a data source:
Paging 3 Android Tutorial
When working with RecyclerViews in our Android project, we display a list with a lot of items in it. Sometimes we have use-case like fetching a contact list from the phone and displaying it on the list. Loading a lot of data at once in a list is not a very efficient task to do. To get over this, we have paging in Android.
By using the Paging library, we can load a lot of data efficiently, and only we will load the data when needed. In this blog, we will be learning about the Paging 3 library in Android and how we can use it to load our large set of data in our RecyclerView efficiently.
In this blog, we are going to learn,
- Introduction to Paging 3 library
- Understanding and Implementing Paging 3 library.
- Getting the States of the data
- Adding the Header and Footer view.
- Using it with RxJava.
Introduction to Paging 3 library
Google launched Paging 3 as a part of the Jetpack series. It is still in the early stages. Paging 3 is written entirely using Kotlin Coroutines. It has support for requesting the next page to load more data automatically. It supports Flow, LiveData, and RxJava along with Kotlin Coroutine.
Paging 3 also adds support for caching and handles the state efficiently like loading and failed states while loading the items on ti the list. It also keeps track for the keys to get data from the next and previous pages.
Understanding and Implementing Paging 3 library
In this, we are going to learn implementing Paging 3 library by fetching the list from an API and displaying it in the list. We are going to use the following API for displaying the list,
Our project structure looks like,

Here, we have an adapter package which is responsible for displaying the list in the RecyclerView. data package is responsible for fetching data from the API. We also have MainActivity in which we are going to display the list.
So, now let’s get started.
Step 01.
Let’s first setup the dependencies for Paging 3 in our app’s build.gradle like,
Note: At the time of writing the blog, its version is 3.0.0-alpha04
and we will also add the support for Retrofit and Moshi as we are going to use Moshi as convertor factory for Retrofit like,
Step 02.
Now, we are going to setup APIService and Retrofit client like,
Here, we have created an APIService interface with getListData function which takes a query parameter which will take the page number from which we have to fetch the data from.
We also setup the Retrofit client, by adding the base URL and the convertor factory of Moshi.
Step 03.
Now, we have to create the data class for the following JSON output which we get as the response,
and we create the corresponding data classes for the above JSON response. Our ApiResponse data class looks like,
The Ad data class looks like,
and Data data class looks like,
Step 04.
Now, since we have setup the data class and APIService, let’s setup the paging library. In PostDataSource we will update the code as,
Here, we have extended PostDataSource with PagingSource which will implement a suspend load function which will help us to load the data.
PostDataSource also takes a primary constructor parameter APIService. PostDataSource acts here as a repository and the load function gets the data from the API.
Since the load function is a suspend function, we can call other suspend functions inside it without any issues which we created in APIService.
In the PostDataSource, we take two parameters one of integer type and other of the data type we have to load on the list item. The integer parameter represents the page number here.
Now, we update the load function like,
Here, we get the page number from params and assign it to nextPage variable using param.key and if it returns null, we set a default value 1.
We also do the API call and get assign the response to the response variable using APIService which we passed as a constructor parameter to PostDataSource class.
After doing all the operations with the successful response, we return the LoadResult.Page object here with the required data and it something went wrong we use LoadResult.Error.
We are also passing null as the next key if there is no corresponding data in that direction.
Here, the PostDataSource is responsible to keep track of the page which has to be requested next which we get from the APIService.
Step 05.
Now, since we have the DataSource setup we will now get the data in the MainViewModel. We will create the MainViewModel by adding the APIService as a parameter to the primary constructor. So, we will update the ViewModel like,
Now, inside the ViewModel, we will create a variable called listData and assign it to the Pager instance.
Here, the Pager will call the load function from the PostDataSource and we will pass the apiService as well in the object of PostDataSource.
In the Pager object, we also pass the configuration which is used to configure the behavior of Paging and how it should load its data. We are passing the PagingConfig with the pageSize.
PageSize specifics the number of items loaded at once from the PostDataSource. Recommended is to always keep the page size to more than the visible items on the screen.
And lastly, we will convert the listData as flow by adding .flow .
It will convert the stream of data into a Flow. If we want to return LiveData we can replace .flow with .liveData.
And at last, we cache the data in viewModelScope, and the data will be alive until the scope is active. Here, we are using viewModelScope and since we are caching the data in the ViewModel it would not be impacted on any configuration changes.
Step 06.
Now, since we are getting the data in ViewModel, we now need to pass the data in the RecyclerView of MainActivity. We will update the activity_main.xml like,
Now, we will update the MainActivity like,
Here, we have setup our ViewModel by passing the MainViewModelFactory with the instance of APIService.
The MainViewModelFactory looks like,
And then we have to setup the RecyclerView in the setupList function and lastly, in the setupView function, we will collect the data from listData variable from ViewModel inside the lifecycleScope and then pass it to the submitData function which is part of PagingDataAdapter which helps us to update the data we fetched from the API and display in the UI.
Step 07.
Now, we will update the MainListAdapter. We will extend the MainListAdapter with PagingDataAdapter and the PagingDataAdapter will take the type of data we need to display in the list and the ViewHolder.
It also takes a DiffUtil callback, as a parameter to its primary constructor which helps the PagingDataAdapter to update the items if they are changed or updated. And DiffUtil callback is used because they are more performant.
Now, the MainListAdapter looks like,
Here, in the MainListAdapter, inside the onCreateViewHolder we are returning the ViewHolder by inflating the R.layout.list_item.
Here, the list_item layout file looks like,
and inside the onBindViewHolder we will assign the full name and email to both the TextViews.
And when we run the app, we will see the desired output on the screen and when we scroll the list to the bottom it will load the item from the second page and so on.
Getting the States of the data
Now, while loading the data we might also want to show progress view, and when we have loaded the data we should hide the progress view.
To react to the states of data we use addLoadStateListener like,
Here, we get the CombinedLoadState in addLoadStateListener and we use this to show or hide the progress views.
We can also react to errors inside the addLoadStateListener if all the state methods like refresh, append, and prepend are instance of LoadState.Error.
Adding the Header and Footer view
Now, since we have successfully integrated the Paging 3 library, now we will see how we can setup a footer view and header view.
FooterView is the one that when we go the last item of the list and the data is getting loaded from the next page, the footer view gets displayed. And as soon as the data is loaded the footer view is hidden.
For creating these views we will create a RecyclerViewAdapter similar to how we do in general use of RecyclerViews.
But in this case, we will extend the RecyclerView with LoadStateAdapter and pass the ViewHolder to it like,
Here, inside the onBindViewHolder, we get an additional parameter now of LoadState which we can use to show or hide the loading view based on if the data is getting loaded or not and add it to the adapter we use withLoadStateHeaderAndFooter like,
If we want to just add a footer we will use,
and to use with header we use,
And now, if the data is getting loaded from the paging library, the footer/header is displayed based on which one or both are attached to the RecyclerView adapter.
Using it with RxJava
If we don’t want to use it with Coroutines and Flow and want to go ahead and use RxJava, we still need to follow the above steps but with few changes.
Let me list them down.
Step 01.
First, we need to add the dependencies for Paging 3 Rx support,
and we will also add the dependency for RxJava2 adapter factory,
Step 02.
Now, as a next step, we need to update the PostDataSource and extend it using RxPagingSource in place of PagingSource like,
Now, the PostDataSource will implement the loadSingle function of return type Single like,
Step 03.
Now, we will update the APIService interface like,
Here, the getListData returns a Single and is not a suspend function anymore. And we have added another adapter factory to support RxJava2 to the Retrofit builder.
Step 04.
Now, inside the loadSingle function, we can do our tasks and return LoadResult.Page object if the output is successful or LoadResult.Error if it isn’t.
And to get the data from the PostDataSource to ViewModel we will update the listData variable in MainViewModel like,
This will return a Flowable of PagingData and their rest remains the same as above.
We can also pass make listData of type Observable of PagingData like,
The MainListAdapter remains untouched and in the setupView function in MainActivity gets updated like,
Here, we are passing the lifecycle of the View and the paging data to submit data to inflate the list.
This is how you can use the Paging 3 library with RxJava as well.
Conclusion
Paging 3 library is still in its early stage and it is completely re-written using Kotlin coroutines but it can be used with Flow and RxJava both.
Источник
Pagination in Android with Paging 3, Retrofit and kotlin Flow

Haven’t you asked how does Facebook, Instagram, Twitter, Forbes, etc… let you “scroll infinitely” without reach a “end” of information in their apps? Wouldn’t you like to implement something like that?
This “endless scrolling” feature is commonly called “Pagination” and it’s nothing new. In a brief resume, pagination help you to load chunks of data associated with a “page” index.
Let’s assume you have 200 items to display in your RecyclerView. What you would do normally is just execute your request, get the response items and submit your list to your adapter. We already know that RecyclerView by it’s own is optimized for “recycle our views”. But do we really need to get those 200 items immediately? What if our user never reach the top 100, or top 50? The rest of the non displayed items are still keep on memory.
What pagination does (in conjunction with our API) is that it let us establish a page number, and how many items per page can we load. In that way, we can request for the next page of items only when we reach the bottom of our RecyclerView.
Non library approach
Before paging 3, you could have implemented Pagination by adding some listeners to your RecyclerView and those listeners would be triggered when you reach the bottom of your list. There are some good samples about it, here is a video with a vey detailed explanation (it’s on Indi, but it is understandable anyways).
A real PRODUCTION ready example is on the Plaid app. Look at their InfinteScrollListener class.
Android Jetpack Paging 3 and Flow
Today you gonna learn how to implement Pagination by using paging 3 from the android jetpack libraries. For my surprise the codelab of Paging 3 was one of the most easiest I have ever done. Florina Muntenescu did a great job with each step of the codelab, go check it out and give it a try. If you want to go straight to the sample code, check this pull request and see step by step how I implement paging 3 to this project.
Источник
Paging3 — Doing Recyclerview Pagination the Right Way
Jetpack Paging library release version 3.0.0-alpha03 is full of new features and is Kotlin first with a pinch of Coroutines & Flow 😊.

Intro:
Paging3 is one of the new Jetpack libraries for managing and loading a large chunk of the dataset from various data sources efficiently. It allows us to load pages of data from the network or local database with ease and saves our development time. Paging3 is designed to follow the Android app architecture and coordinates with other Jetpack components. It is Kotlin first and works with some of the new async threading solutions like Coroutines and Flow and of course, it has the support for RxJava & LiveData users as well.
How it’s different:
- It caches the paged data in-memory for better usage of the system resources which not only gives fast response but also helps in data loading without hiccups.
- It handles the network request duplication very elegantly hence saving the user’s bandwidth and system resources.
- A much flexible Recyclerview Adapter which requests & loads the data gracefully whenever the user reaches near the end of the page, yes now adapter is controlling when and what to load with a one-time setup.
- It is Kotlin first means the whole library is written in Kotlin and works very well with other offerings of the Kotlin like Coroutines and Flow. Also, it supports the much-used libraries like RxJava and LiveData as well.
- It has inbuilt support for error handling, retry and refresh use cases.
Paging3 & Application Architecture:
When I say Paging3 works and integrates well with our application architecture is means that it sits in all the basic layers of our application like Repository -> ViewModel -> UI and makes it very easy to understand and include in our existing flow. Have a look below to understand it visually.

PagingSource: It is a generic abstract class that is responsible for loading the paging data from the network. To implement PagingSource we need to define the Page Key type in our case it will be of type Int and the response data type from API in our case it will be DoggoImageModel.
RemoteMediator: It is responsible for loading the paging data from the network and local DB. This is a good way to implement paging since in this case, our local DB is the main source of data for the paging adapter. This method is much more reliable and less error-prone.
Pager: This API consumes whatever the RemoteMediator or PagingSource returns as a data source to it and returns a reactive stream of PagingData. It can be returned as a Flow, Observable, LiveData as shown in the above diagram.
PagingData: This is the final return type and something that PagingDataAdapter understands and has the original data type inside it. It acts as a paging data container.
PagingConfig: This is our paging configuration class here you can define how the PagingSource should be constructed means you can define how much data should be there on each page and many more options are there to customize our PagingSource.
PagingDataAdapter: This is the primary UI component that is responsible for presenting the data in the RecyclerView. It consumes the PagingData as the input type and listens to its internal loading events. It loads data after fine graining using DiffUtil on a background thread, so expect no hiccups while adding new items on the UI thread.
So what’s the plan?
We will be creating a small Doggo android application to exploit 😄 the new Paging3 library different use cases and see how different implementations of data source works with newly introduced Coroutines and Flow as well as RxJava and LiveData. We will try loading data from local Room DB as well as hot network calls. I know we have covered a lot of heavy definitions and terms but as we go ahead and implement them it will start to make sense and looks easy once we implement them so bear with me a bit longer 🙇.
Before we start:
We need to add this compulsory dependency of Paging3 available in google maven.
I have added those above along with few other dependencies like Retrofit, Coil, Navigation, Lifecycle LiveData, ViewModel have a look here at the full dependencies snapshot. Ok now dependencies are in place let’s start with the implementation of the Paging3
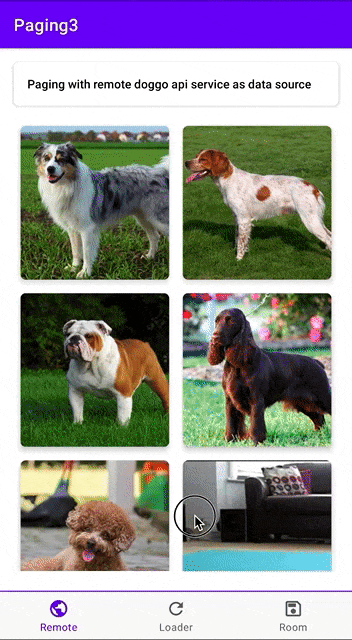
Network as a Data Source 🌐:
In our 🐶 application, we will be fetching the list of all the cute dogs from the remote network using the TheDogApi API service. It seems my love for dogs is now showing into my medium articles as well 🤷♂️, you can create an application for cats 😻 if you want. Let’s define our API service endpoint as we do use a retrofit.
Please note the important thing here, the page & limit which is important for our Pagination /Endless scrolling /Lazy Loading. The param page is here to keep track of the current page for which we will be requesting new data similarly the limit defines how much data we need per page. These keys might be different for your API so add them accordingly to the definition.
We have completed the first part of our API call now let’s see how Paging3 helps us automate this process of pagination. PagingSource is the way to go here since we are going to use remote network API as the data source. so let’s create a class DoggoImagePagingSource and implement PagingSource like below. Here I have passed the DoggoApiService which we have created earlier so that our PagingSource can call our doggo API and get results. Apart from this while inheriting from PagingSource we need to define the type of paging our API supports in our case it is simple Int based number paging and the return type of the API response that is DoggoImageModel. Now we have implemented the PagingSource let’s dig and get familiar with the load function.
— params: Keeps the basic information related to the current page for which API needs to be called and the page size.
— LoadResult: It’s a Kotlin Sealed class and we can return LoadResult.Error(exception) in case of exception or some error and in case of success we will return LoadResult.Page from load() function. If for some reason data is not available and might have reached the end of the list then pass null as the value for prevKey or nextKey to indicate the end of the list condition .
Inside the load() function we call the doggo API service to get the data from the network passing the current page and page loadSize. The current page can be retrieved from params.key which is null on start so we will assign a default value in that case. Click to see full DoggoImagePagingSource class implementation.
We have just completed our first phase according to the app architecture diagram defined above. Now we need to configure and return PagingData with the help of Pager class. To do it let’s create a DoggoImagesRepository class. Inside this class let’s define a function that returns the reactive stream of PagingData using Pager class.
now to construct Pager we need PagingConfig first. This allows you to change various configurations related to the paging like page size, enable placeholders, etc. Here we are just returning a very basic PagingConfig instance.
Now the second thing that Pager needs is the PagingSource which we have created earlier i.e DoggoImagePagingSource. Let’s assemble these two to return a reactive PagingData like below. Click to see full DoggoImagesRepository.kt
Now, this almost completes the second phase we just need to call this from ViewModel class where we can modify the returned PagingData or perform some collection actions like mapping or filtering if needed and many more Flow related operations can be done which is a quite interesting addition. If you are working with RxJava then just call .observable or .liveData on Pager() if you are working with LiveData.
Let’s create RemoteViewModel class and expose the data from the repository to the UI components by adding the following methods in our ViewModel. See full RemoteViewModel here.
for showing the mapping operation on Flow we have here tweaked the data type from Flow
> and mapped it to Flow
> you can always return whatever you want.
Note: If you’re doing any operations on the Flow , like map or filter , make sure you call cachedIn after you execute these operations to ensure you don’t need to trigger them again.
Let’s move to our final stage of implementing paging with the network as the data source. We are going to club the data returned from RemoteViewModel functions to our customized PagingDataAdapter in the fragment. We have created a basic RecyclerviewAdapter extending the PagingDataAdapter have a look here 👇. The only difference you might have noticed here is that in this new adapter we are passing implementation of the DiffUtil to the PagingDataAdapter constructor, I guess the rest is quite understandable and is regular Recyclerview adapter implementation.
let’s see how we can pass the data to this adapter from UI. Just call this function from your activity or fragment life cycle methods like onCreate() or onViewCreated() to collect the created flow in the view model. You can subscribe to the Rxjava Observables or Observe the LiveData if you are returning the same from view model class functions. See here the full implementation of our RemoteFragment class.
That’s it if you run this setup now it will produce the following output 👏.
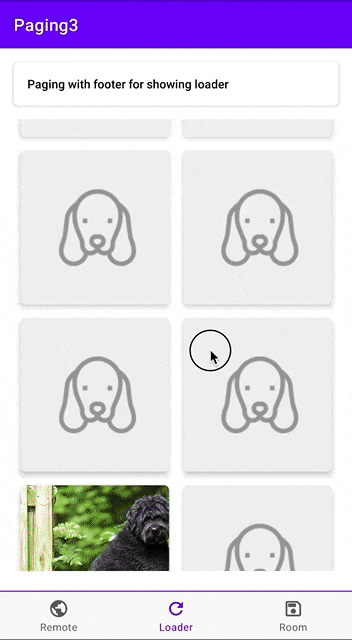
I hope some of you are still with me to see this 😄. Now, this completes our basic Paging3 implementation. Next, we will see how to add a progress loader to this adapter for automatically handling the error cases and will add a try button to fetch again.
PagingDataAdapter with loading states:
This enables our adapter to have the additional capability of handling the error cases automatically and loads the right state accordingly.

To leverage this feature Paging3 comes with additional LoadStateAdapter just create an adapter and extend to it. This is again no different than our regular Recyclerview adapter the only difference is that it gives LoadState as the data type then our regular data model. This is quite helpful in knowing in which state is the paging adapter right now. Here is our implementation of the LoadStateAdapter.
we can use this LoadState sealed class to react accordingly. It returns three states Loading, Error, NotLoading. We are hiding the retry button in case the adapter returns LoadState as Loading and showing a progress bar. Now let’s see how we can use this newly created adapter with our existing created RemoteDoggoImageAdapter.
noting much here, we have just created an instance passing a higher-order function in the constructor which calls adapter.retry() function on RemoteDoggoImageAdapter and second thing we did is we called withLoadStateFooter(loaderStateAdapter) function on the RemoteDoggoImageAdapter passing our newly created loaderStateAdapter. Let’s run to see this in action.
Room as a data source:
We can use local DB for pagination as well and it’s good to provide offline support as well. If you do offline content support and don’t know how to leverage local DB for your paging use case then this feature is made for you 😎. In this case, the local Db will be the only source of data and whenever needed it will get new data from the network. So it handles both the cases where we need to fetch the new data from the network and save it to the local DB and UI will observe this to reflect new changes.
To support this type of paging first we need to create some local DB. Here we are using Room as our local DB. Let’s create some entities quickly to save our API response model as well as paging related info Entity.
We have converted our existing data class DoggoImageModel to a Room Entity.
Our model is quite simple since we are just taking a URL to show images from API. Next, we need some Dao as well for this newly created Entity. So do something like below.
Next, create an Entity to store the paging information for offline paging which Paging3 needs while making paging assumptions.
Dao for RemoteKeys
Now we are ready with our Entities and Dao’s let’s assemble them in one place and create an AppDatabase class to provide the room database object for use.
This is the same thing we do while creating regular Room DB nothing special but here comes the complicated part of this article 😬. Let me now introduce you guys to RemoteMediator this class is responsible for getting the results from the Db for pagination and whenever needed it gets the fresh data from the network as well and saves it to the local DB. This manages both the network and local DB and coordinates with both of them to perform the pagination.
We gonna create a class DoggoMediator to implement the RemoteMediator.
here we are passing DoggoApiService and AppDatabase for performing network and DB related operations. RemoteMediator is quite the same as PagingSource where we defined the page type as Int and passed DoggoImageModel as the data model the same thing we need to do here as well. Let’s dig and understand the load() function here:
- MediatorResult: As we can see it’s a return type of this function and it can be MediatorResult.Success for success case and MediatorResult.Error for error cases.
- LoadType: This tells us where we need to append the data in the page. It can be of the following types.
— LoadType.APPEND: Means we need to load the new data at the end of the page.
— LoadType.PREPEND: Means we need to load the data at the beginning of the previously loaded data.
— LoadType.REFRESH: Means this is the first time we are loading data for pagination. - PagingState: It holds the information related to the recently accessed index in the list and some information related to the pages which have been loaded earlier. This gives information about the paging configuration which we add while returning Pager.
We need to do the following to complete the load() function for the mediator.
- Find out what page we need to load from the network, based on the LoadType .
- Trigger the network request.
- Once the network request completes, if the received list of repositories is not empty, then do the following:
- We compute the RemoteKeys for every DoggoImageModel .
- If this a new query ( loadType = REFRESH ) then we clear the database.
- Save the RemoteKeys and DoggoImageModel in the database.
- Return MediatorResult.Success(endOfPaginationReached = false) .
- If the list of DoggoImageModel was empty then we return MediatorResult.Success(endOfPaginationReached = true) . If we get an error requesting data we return MediatorResult.Error .
Let’s distribute the work into functions for more clarity on what is going on.
Create a function called getFirstRemoteKey() which returns RemoteKeys for the loadType= LoadType.PREPEND. It basically gets the first page from PagingState and queries the database with the id of the DoggoImageModel.
now let’s create function getLastRemoteKey() for the loadType=LoadType. APPEND and return the RemoteKeys as below. This queries the last page from PagingState and queries the database for RemoteKeys.
create last function getClosestRemoteKey() for the loadType=LoadType. REFRESH in case of first time data loading or we have called PagingDataAdapter.refresh() from UI.
The point of reference for loading our data is the state.anchorPosition . If this is the first load, then the anchorPosition is null . When PagingDataAdapter.refresh() is called, the anchorPosition is the first visible position in the displayed list. So the above function calls state.closestItemToPosition() to get the closest DoggoImageModel.
Let’s club these functions into one function and return a result based on LoadType.
The first point for loading page type is now done now fill the rest of the load() function as per given points which is easy to follow. Here is a full implementation of the load() function after fill up.
This completes the DoggoMediator. Now let’s see how we can call this mediator from the repository to get the reactive PagingData. Add the following function in the DoggoImagesRepository class.
again you can return Observable and LiveData which is the same as we have done for PagingSource implementation. Calling this from ViewModel is the same nothing changed except the function name.
If we tie this up with our UI PagingDataAdapter then it will produce some output like below.

There are more cool features in the Paging3 Jetpack library and is under active development. Here is the full repository for this article feel free to fork or pull to see the implementation in details.
Источник


