- Урок 14. Paging Library. Основы
- PagedListAdapter
- PagedList
- DataSource
- Практика
- Pagination in Android with Paging 3, Retrofit and kotlin Flow
- Non library approach
- Android Jetpack Paging 3 and Flow
- Paging3 — Doing Recyclerview Pagination the Right Way
- Jetpack Paging library release version 3.0.0-alpha03 is full of new features and is Kotlin first with a pinch of Coroutines & Flow 😊.
- Intro:
- How it’s different:
- Paging3 & Application Architecture:
- So what’s the plan?
- Before we start:
- Network as a Data Source 🌐:
- PagingDataAdapter with loading states:
- Room as a data source:
Урок 14. Paging Library. Основы
В этом уроке начнем знакомство с Paging Library. Рассмотрим общую схему работы связки PagedList и DataSource.
Полный список уроков курса:
Paging Library содержит инструменты для постраничной подгрузки данных. Т.е. когда данные подгружаются не все сразу, а по мере прокрутки списка. Давайте сначала рассмотрим в общих чертах, чем этот способ отличается от обычного, а потом выполним несколько примеров.
Для подключения к проекту добавьте в dependencies
Итак, мы хотим отобразить данные в списке. Данные могут быть откуда угодно: база данных, сервер, файл со строками и т.д. Т.е. любой источник, который может предоставить нам данные для отображения их в списке. Для удобства давайте называть его общим словом Storage.
Обычно мы получаем данные из Storage и помещаем их в List в адаптер. Далее RecyclerView будет у адаптера просить View, а адаптер будет просить данные у List.
Получается такая схема:
RecyclerView >> Adapter >> List
где List сразу содержит все необходимые данные и ничего не надо больше подгружать.
С Paging Library схема будет немного сложнее:
RecyclerView >> PagedListAdapter >> PagedList > DataSource > Storage
Т.е. обычный Adapter мы меняем на PagedListAdapter. А вместо List у нас будет связка PagedList + DataSource, которая умеет по мере необходимости подтягивать данные из Storage.
Рассмотрим подробнее эти компоненты.
PagedListAdapter
PagedListAdapter — это RecyclerView.Adapter, заточенный под чтение данных из PagedList.
Как видите, он очень похож на RecyclerView.Adapter. От него также требуется биндить данные в Holder.
1) Ему сразу надо предоставить DiffUtil.Callback. Если вы еще не знакомы с этой штукой, посмотрите мой материал.
2) Нет никакого хранилища данных (List или т.п.)
3) Нет метода getItemCount
Пункты 2 и 3 обусловлены тем, что адаптер внутри себя использует PagedList в качестве источника данных, и он сам будет заниматься хранением данных и определением их количества.
Чтобы передать адаптеру PagedList, мы будем использовать метод адаптера )» target=»_blank» rel=»noopener noreferrer»>submitList.
PagedList
Если не сильно вдаваться в детали, то PagedList — это обертка над List. Он тоже содержит данные и умеет отдавать их методом get(position). Но при этом он проверяет, насколько запрашиваемый элемент близок к концу имеющихся у него данных и при необходимости подгружает себе новые данные с помощью DataSource.
Т.е. у PagedList в списке уже есть, например, 40 элементов. Адаптер просит у него элемент с позицией 31. PagedList дает ему этот элемент и при этом понимает, что адаптер просил элемент, близкий к концу его данных. А значит есть вероятность, что скоро адаптер придет за элементами с позицией 40 и далее. Поэтому PagedList обращается к DataSource за новой порцией данных, например, от 41 до 50.
Создается PagedList с помощью билдера:
От нас требуется предоставить пару Executor-ов. Один для выполнения запроса данных в отдельном потоке, а второй для возврата результатов в UI поток.
На вход конструктору билдера необходимо предоставить DataSource и PagedList.Config. Про DataSource мы поговорим чуть позже, а PagedList.Config — это конфиг PagedList. В нем мы можем задать различные параметры, например, размер страницы.
Создание PagedList.Config может выглядеть так:
Подробно все его параметры мы рассмотрим позже.
Вариант реализации MainThreadExecutor:
DataSource
DataSource — это посредник между PagedList и Storage. Возникает вопрос: зачем нужен этот посредник? Почему PagedList не может напрямую попросить очередную порцию данных у Storage? Потому что у Storage могут быть разные требования к способу запроса данных.
Например, базе данных мы можем дать позицию и желаемое количество записей, и в ответ получим порцию данных, начиная с указанной позиции. А вот сервер может работать совсем по-другому. Например, он отдает данные постранично и будет ожидать от нас номер следующей страницы, чтобы отдать новую порцию данных. Также у сервера бывает схема, когда с очередной порцией данных он присылает нам токен. Этот токен необходимо использовать для получения следующей порции данных.
Paging Library предоставляет три разных DataSource, которые должны нам помочь связать между собой PagedList и Storage. Это PositionalDataSource, PageKeyedDataSource и ItemKeyedDataSource. В отдельном уроке мы еще подробно рассмотрим, в чем разница между ними. А пока будем работать с PositionalDataSource, т.к. он проще и понятнее остальных.
Практика
Давайте перейдем к практическому примеру и все станет понятнее. В качестве DataSource будем использовать PositionalDataSource.
Итак, чтобы вся схема заработала, нам надо создать DataSource, PagedList и адаптер:
DataSource передаем в PagedList. PagedList передаем в адаптер. Адаптер передаем в RecyclerView.
EmployeeStorage — это созданный мною класс, который эмулирует Storage и содержит 100 Employee записей. Не привожу здесь реализацию этого класса, потому что она не имеет значения. В реальном примере вместо него будет база данных или сервер (Retrofit), к которым мы обращаемся за данными.
MyPositionalDataSource наследует PositionalDataSource и должен реализовать пару методов:
Когда мы создаем PagedList, он сразу запрашивает порцию данных у DataSource. Делает он это методом loadInitial. В качестве параметров он передает нам:
requestedStartPosition — с какой позиции подгружать
requestedLoadSize — размер порции
Используя эти параметры, мы запрашиваем данные у Storage. Полученный результат передаем в callback.onResult
Когда мы прокручиваем список, PagedList подгружает новые данные. Для этого он вызывает метод loadRange. В качестве параметров он передает нам позицию, с которой надо подгружать данные, и размер порции.
Используя эти параметры, мы запрашиваем данные у Storage. Полученный результат передаем в callback.onResult
Я добавил логов в эти методы, чтобы было видно, что происходит.
О том, что означает второй параметр в callback.onResult, поговорим во второй части. А потоки, в которых будет выполняться этот код, обсудим в третьей части.
Для наглядности я сделал гифку, в которой вы можете видеть, какие логи появляются по мере прокрутки списка.

Разбираемся, что происходит.
Сразу после запуска в логах видим строку:
loadInitial, requestedStartPosition = 0, requestedLoadSize = 30
PagedList запросил первоначальную порцию данных размером 30 элементов (requestedLoadSize), начиная с нулевого (requestedStartPosition). DataSource передает эти параметры в Storage, получает данные и возвращает их в PagedList. В итоге адаптер отображает эти записи.
Откуда взялось число 30? По умолчанию размер первоначальной загрузки равен размер страницы * 3. Размер страницы мы установили равным 10 (в PagedList.Config методом setPageSize), поэтому requestedLoadSize равен 30.
Теперь начинаем скроллить список вниз. Когда список показал запись с позицией 20, PagedList запросил следующую порцию данных:
loadRange, startPosition 30, loadSize = 10
Почему он сделал это именно по достижении записи с позицией 20? За это отвечает параметр prefetchDistance. По умолчанию он равен pageSize, т.е. 10. Соответственно, когда до конца списка остается 10 записей, PagedList подгружает следующую порцию.
По мере прокрутки списка, подгружаются следующие порции данных
loadRange, startPosition = 40, loadSize = 10
loadRange, startPosition = 50, loadSize = 10
loadRange, startPosition = 60, loadSize = 10
loadRange, startPosition = 70, loadSize = 10
loadRange, startPosition = 80, loadSize = 10
loadRange, startPosition = 90, loadSize = 10
loadRange, startPosition = 100, loadSize = 10
После сотой записи список не прокручивается. Так происходит потому, что мой EmployeeStorage содержит всего 100 записей. При попытке получить у него 10 записей, начиная с позиции 100, он просто вернет пустой список. Когда DataSource передаст этот пустой список в callback.onResult, это будет сигналом для PagedList, что данные закончились. После этого PagedList больше не будет пытаться подгружать данные и список не будет скроллиться.
На этом пока остановимся, иначе будет слишком много новой информации. Рекомендую прочитать урок 2-3 раза, чтобы материал лучше зашел. В следующем уроке продолжим.
Присоединяйтесь к нам в Telegram:
— в канале StartAndroid публикуются ссылки на новые статьи с сайта startandroid.ru и интересные материалы с хабра, medium.com и т.п.
— в чатах решаем возникающие вопросы и проблемы по различным темам: Android, Kotlin, RxJava, Dagger, Тестирование
— ну и если просто хочется поговорить с коллегами по разработке, то есть чат Флудильня
— новый чат Performance для обсуждения проблем производительности и для ваших пожеланий по содержанию курса по этой теме
Источник
Pagination in Android with Paging 3, Retrofit and kotlin Flow

Haven’t you asked how does Facebook, Instagram, Twitter, Forbes, etc… let you “scroll infinitely” without reach a “end” of information in their apps? Wouldn’t you like to implement something like that?
This “endless scrolling” feature is commonly called “Pagination” and it’s nothing new. In a brief resume, pagination help you to load chunks of data associated with a “page” index.
Let’s assume you have 200 items to display in your RecyclerView. What you would do normally is just execute your request, get the response items and submit your list to your adapter. We already know that RecyclerView by it’s own is optimized for “recycle our views”. But do we really need to get those 200 items immediately? What if our user never reach the top 100, or top 50? The rest of the non displayed items are still keep on memory.
What pagination does (in conjunction with our API) is that it let us establish a page number, and how many items per page can we load. In that way, we can request for the next page of items only when we reach the bottom of our RecyclerView.
Non library approach
Before paging 3, you could have implemented Pagination by adding some listeners to your RecyclerView and those listeners would be triggered when you reach the bottom of your list. There are some good samples about it, here is a video with a vey detailed explanation (it’s on Indi, but it is understandable anyways).
A real PRODUCTION ready example is on the Plaid app. Look at their InfinteScrollListener class.
Android Jetpack Paging 3 and Flow
Today you gonna learn how to implement Pagination by using paging 3 from the android jetpack libraries. For my surprise the codelab of Paging 3 was one of the most easiest I have ever done. Florina Muntenescu did a great job with each step of the codelab, go check it out and give it a try. If you want to go straight to the sample code, check this pull request and see step by step how I implement paging 3 to this project.
Источник
Paging3 — Doing Recyclerview Pagination the Right Way
Jetpack Paging library release version 3.0.0-alpha03 is full of new features and is Kotlin first with a pinch of Coroutines & Flow 😊.

Intro:
Paging3 is one of the new Jetpack libraries for managing and loading a large chunk of the dataset from various data sources efficiently. It allows us to load pages of data from the network or local database with ease and saves our development time. Paging3 is designed to follow the Android app architecture and coordinates with other Jetpack components. It is Kotlin first and works with some of the new async threading solutions like Coroutines and Flow and of course, it has the support for RxJava & LiveData users as well.
How it’s different:
- It caches the paged data in-memory for better usage of the system resources which not only gives fast response but also helps in data loading without hiccups.
- It handles the network request duplication very elegantly hence saving the user’s bandwidth and system resources.
- A much flexible Recyclerview Adapter which requests & loads the data gracefully whenever the user reaches near the end of the page, yes now adapter is controlling when and what to load with a one-time setup.
- It is Kotlin first means the whole library is written in Kotlin and works very well with other offerings of the Kotlin like Coroutines and Flow. Also, it supports the much-used libraries like RxJava and LiveData as well.
- It has inbuilt support for error handling, retry and refresh use cases.
Paging3 & Application Architecture:
When I say Paging3 works and integrates well with our application architecture is means that it sits in all the basic layers of our application like Repository -> ViewModel -> UI and makes it very easy to understand and include in our existing flow. Have a look below to understand it visually.

PagingSource: It is a generic abstract class that is responsible for loading the paging data from the network. To implement PagingSource we need to define the Page Key type in our case it will be of type Int and the response data type from API in our case it will be DoggoImageModel.
RemoteMediator: It is responsible for loading the paging data from the network and local DB. This is a good way to implement paging since in this case, our local DB is the main source of data for the paging adapter. This method is much more reliable and less error-prone.
Pager: This API consumes whatever the RemoteMediator or PagingSource returns as a data source to it and returns a reactive stream of PagingData. It can be returned as a Flow, Observable, LiveData as shown in the above diagram.
PagingData: This is the final return type and something that PagingDataAdapter understands and has the original data type inside it. It acts as a paging data container.
PagingConfig: This is our paging configuration class here you can define how the PagingSource should be constructed means you can define how much data should be there on each page and many more options are there to customize our PagingSource.
PagingDataAdapter: This is the primary UI component that is responsible for presenting the data in the RecyclerView. It consumes the PagingData as the input type and listens to its internal loading events. It loads data after fine graining using DiffUtil on a background thread, so expect no hiccups while adding new items on the UI thread.
So what’s the plan?
We will be creating a small Doggo android application to exploit 😄 the new Paging3 library different use cases and see how different implementations of data source works with newly introduced Coroutines and Flow as well as RxJava and LiveData. We will try loading data from local Room DB as well as hot network calls. I know we have covered a lot of heavy definitions and terms but as we go ahead and implement them it will start to make sense and looks easy once we implement them so bear with me a bit longer 🙇.
Before we start:
We need to add this compulsory dependency of Paging3 available in google maven.
I have added those above along with few other dependencies like Retrofit, Coil, Navigation, Lifecycle LiveData, ViewModel have a look here at the full dependencies snapshot. Ok now dependencies are in place let’s start with the implementation of the Paging3
Network as a Data Source 🌐:
In our 🐶 application, we will be fetching the list of all the cute dogs from the remote network using the TheDogApi API service. It seems my love for dogs is now showing into my medium articles as well 🤷♂️, you can create an application for cats 😻 if you want. Let’s define our API service endpoint as we do use a retrofit.
Please note the important thing here, the page & limit which is important for our Pagination /Endless scrolling /Lazy Loading. The param page is here to keep track of the current page for which we will be requesting new data similarly the limit defines how much data we need per page. These keys might be different for your API so add them accordingly to the definition.
We have completed the first part of our API call now let’s see how Paging3 helps us automate this process of pagination. PagingSource is the way to go here since we are going to use remote network API as the data source. so let’s create a class DoggoImagePagingSource and implement PagingSource like below. Here I have passed the DoggoApiService which we have created earlier so that our PagingSource can call our doggo API and get results. Apart from this while inheriting from PagingSource we need to define the type of paging our API supports in our case it is simple Int based number paging and the return type of the API response that is DoggoImageModel. Now we have implemented the PagingSource let’s dig and get familiar with the load function.
— params: Keeps the basic information related to the current page for which API needs to be called and the page size.
— LoadResult: It’s a Kotlin Sealed class and we can return LoadResult.Error(exception) in case of exception or some error and in case of success we will return LoadResult.Page from load() function. If for some reason data is not available and might have reached the end of the list then pass null as the value for prevKey or nextKey to indicate the end of the list condition .
Inside the load() function we call the doggo API service to get the data from the network passing the current page and page loadSize. The current page can be retrieved from params.key which is null on start so we will assign a default value in that case. Click to see full DoggoImagePagingSource class implementation.
We have just completed our first phase according to the app architecture diagram defined above. Now we need to configure and return PagingData with the help of Pager class. To do it let’s create a DoggoImagesRepository class. Inside this class let’s define a function that returns the reactive stream of PagingData using Pager class.
now to construct Pager we need PagingConfig first. This allows you to change various configurations related to the paging like page size, enable placeholders, etc. Here we are just returning a very basic PagingConfig instance.
Now the second thing that Pager needs is the PagingSource which we have created earlier i.e DoggoImagePagingSource. Let’s assemble these two to return a reactive PagingData like below. Click to see full DoggoImagesRepository.kt
Now, this almost completes the second phase we just need to call this from ViewModel class where we can modify the returned PagingData or perform some collection actions like mapping or filtering if needed and many more Flow related operations can be done which is a quite interesting addition. If you are working with RxJava then just call .observable or .liveData on Pager() if you are working with LiveData.
Let’s create RemoteViewModel class and expose the data from the repository to the UI components by adding the following methods in our ViewModel. See full RemoteViewModel here.
for showing the mapping operation on Flow we have here tweaked the data type from Flow
> and mapped it to Flow
> you can always return whatever you want.
Note: If you’re doing any operations on the Flow , like map or filter , make sure you call cachedIn after you execute these operations to ensure you don’t need to trigger them again.
Let’s move to our final stage of implementing paging with the network as the data source. We are going to club the data returned from RemoteViewModel functions to our customized PagingDataAdapter in the fragment. We have created a basic RecyclerviewAdapter extending the PagingDataAdapter have a look here 👇. The only difference you might have noticed here is that in this new adapter we are passing implementation of the DiffUtil to the PagingDataAdapter constructor, I guess the rest is quite understandable and is regular Recyclerview adapter implementation.
let’s see how we can pass the data to this adapter from UI. Just call this function from your activity or fragment life cycle methods like onCreate() or onViewCreated() to collect the created flow in the view model. You can subscribe to the Rxjava Observables or Observe the LiveData if you are returning the same from view model class functions. See here the full implementation of our RemoteFragment class.
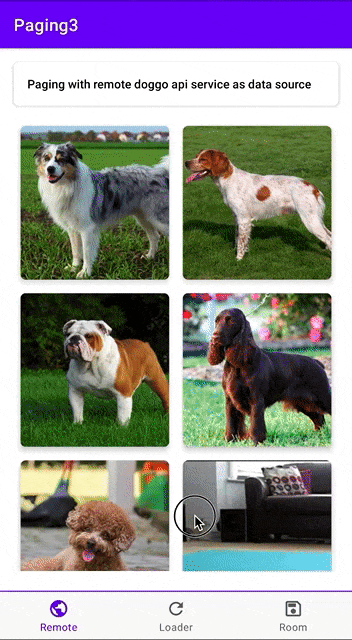
That’s it if you run this setup now it will produce the following output 👏.
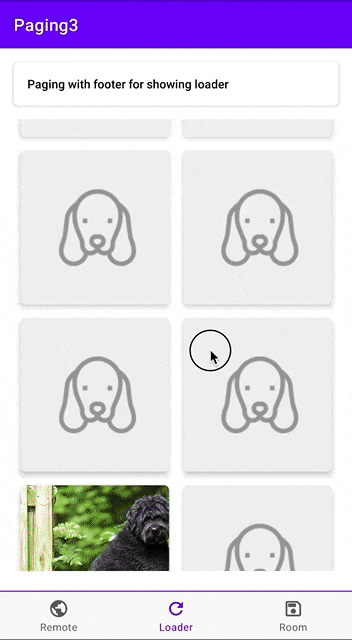
I hope some of you are still with me to see this 😄. Now, this completes our basic Paging3 implementation. Next, we will see how to add a progress loader to this adapter for automatically handling the error cases and will add a try button to fetch again.
PagingDataAdapter with loading states:
This enables our adapter to have the additional capability of handling the error cases automatically and loads the right state accordingly.

To leverage this feature Paging3 comes with additional LoadStateAdapter just create an adapter and extend to it. This is again no different than our regular Recyclerview adapter the only difference is that it gives LoadState as the data type then our regular data model. This is quite helpful in knowing in which state is the paging adapter right now. Here is our implementation of the LoadStateAdapter.
we can use this LoadState sealed class to react accordingly. It returns three states Loading, Error, NotLoading. We are hiding the retry button in case the adapter returns LoadState as Loading and showing a progress bar. Now let’s see how we can use this newly created adapter with our existing created RemoteDoggoImageAdapter.
noting much here, we have just created an instance passing a higher-order function in the constructor which calls adapter.retry() function on RemoteDoggoImageAdapter and second thing we did is we called withLoadStateFooter(loaderStateAdapter) function on the RemoteDoggoImageAdapter passing our newly created loaderStateAdapter. Let’s run to see this in action.
Room as a data source:
We can use local DB for pagination as well and it’s good to provide offline support as well. If you do offline content support and don’t know how to leverage local DB for your paging use case then this feature is made for you 😎. In this case, the local Db will be the only source of data and whenever needed it will get new data from the network. So it handles both the cases where we need to fetch the new data from the network and save it to the local DB and UI will observe this to reflect new changes.
To support this type of paging first we need to create some local DB. Here we are using Room as our local DB. Let’s create some entities quickly to save our API response model as well as paging related info Entity.
We have converted our existing data class DoggoImageModel to a Room Entity.
Our model is quite simple since we are just taking a URL to show images from API. Next, we need some Dao as well for this newly created Entity. So do something like below.
Next, create an Entity to store the paging information for offline paging which Paging3 needs while making paging assumptions.
Dao for RemoteKeys
Now we are ready with our Entities and Dao’s let’s assemble them in one place and create an AppDatabase class to provide the room database object for use.
This is the same thing we do while creating regular Room DB nothing special but here comes the complicated part of this article 😬. Let me now introduce you guys to RemoteMediator this class is responsible for getting the results from the Db for pagination and whenever needed it gets the fresh data from the network as well and saves it to the local DB. This manages both the network and local DB and coordinates with both of them to perform the pagination.
We gonna create a class DoggoMediator to implement the RemoteMediator.
here we are passing DoggoApiService and AppDatabase for performing network and DB related operations. RemoteMediator is quite the same as PagingSource where we defined the page type as Int and passed DoggoImageModel as the data model the same thing we need to do here as well. Let’s dig and understand the load() function here:
- MediatorResult: As we can see it’s a return type of this function and it can be MediatorResult.Success for success case and MediatorResult.Error for error cases.
- LoadType: This tells us where we need to append the data in the page. It can be of the following types.
— LoadType.APPEND: Means we need to load the new data at the end of the page.
— LoadType.PREPEND: Means we need to load the data at the beginning of the previously loaded data.
— LoadType.REFRESH: Means this is the first time we are loading data for pagination. - PagingState: It holds the information related to the recently accessed index in the list and some information related to the pages which have been loaded earlier. This gives information about the paging configuration which we add while returning Pager.
We need to do the following to complete the load() function for the mediator.
- Find out what page we need to load from the network, based on the LoadType .
- Trigger the network request.
- Once the network request completes, if the received list of repositories is not empty, then do the following:
- We compute the RemoteKeys for every DoggoImageModel .
- If this a new query ( loadType = REFRESH ) then we clear the database.
- Save the RemoteKeys and DoggoImageModel in the database.
- Return MediatorResult.Success(endOfPaginationReached = false) .
- If the list of DoggoImageModel was empty then we return MediatorResult.Success(endOfPaginationReached = true) . If we get an error requesting data we return MediatorResult.Error .
Let’s distribute the work into functions for more clarity on what is going on.
Create a function called getFirstRemoteKey() which returns RemoteKeys for the loadType= LoadType.PREPEND. It basically gets the first page from PagingState and queries the database with the id of the DoggoImageModel.
now let’s create function getLastRemoteKey() for the loadType=LoadType. APPEND and return the RemoteKeys as below. This queries the last page from PagingState and queries the database for RemoteKeys.
create last function getClosestRemoteKey() for the loadType=LoadType. REFRESH in case of first time data loading or we have called PagingDataAdapter.refresh() from UI.
The point of reference for loading our data is the state.anchorPosition . If this is the first load, then the anchorPosition is null . When PagingDataAdapter.refresh() is called, the anchorPosition is the first visible position in the displayed list. So the above function calls state.closestItemToPosition() to get the closest DoggoImageModel.
Let’s club these functions into one function and return a result based on LoadType.
The first point for loading page type is now done now fill the rest of the load() function as per given points which is easy to follow. Here is a full implementation of the load() function after fill up.
This completes the DoggoMediator. Now let’s see how we can call this mediator from the repository to get the reactive PagingData. Add the following function in the DoggoImagesRepository class.
again you can return Observable and LiveData which is the same as we have done for PagingSource implementation. Calling this from ViewModel is the same nothing changed except the function name.
If we tie this up with our UI PagingDataAdapter then it will produce some output like below.

There are more cool features in the Paging3 Jetpack library and is under active development. Here is the full repository for this article feel free to fork or pull to see the implementation in details.
Источник


