- Библиотека jsoup — Суп с котом
- Вместо предисловия
- Общая информация
- Подключаем библиотеку
- Первый пример для знакомства
- Извлекаем заголовок страницы
- Извлекаем ссылки
- Разбор текста с сайта
- Разбор текста из файла
- Getting Started with JSOUP in Android
- Update
- Example
- Parsing HTML in Android with Jsoup
- JSoup introduction
- Setup the project and integrate JSoup
- Creating the App
- JSoup and Volley
- Android parse html string
- Example 1 Of Parse HTML File content Using WebView With Example In Android Studio:
- Example 2 Of HTML In Android Studio Using TextView:
- Example 3 Of HTML content in WebView With Example in Android Studio:
Библиотека jsoup — Суп с котом

Вместо предисловия
Первоначально статья писалась, когда деревья были большими, коты были котятами, Android был версии 2.3, а библиотека jsoup была версии 1.6.1.
С тех пор утекло много воды. Хорошая новость — библиотека подросла до версии 1.13.1, стала чуть меньше размером, стала быстрее работать (почти в два раза). Плохая новость — мои примеры, связанные с интернетом, перестали работать в Android 4.0, так как теперь явно запретили использовать сетевые операции в основном потоке.
Я оставлю старую версию статьи здесь. Если вы пишете программы под старые устройства, то всё остаётся без изменений. Примеры под новые устройства находятся в закрытой зоне 4 курса.
Общая информация
Рассмотрим примеры работы с библиотекой jsoup. Java-библиотека jsoup предназначена для разбора HTML-страниц (парсинг), позволяя извлечь необходимые данные, используя DOM, CSS и методы в стиле jQuery.
Библиотека поддерживает спецификации HTML5 и позволяет парсить страницы, как это делают современные браузеры.
Библиотеке можно подсунуть для анализа URL, файл или строку.
Подключаем библиотеку
В Android Studio пропишите в файле build.gradle строку в блоке зависимостей.
Создаём новый проект JsoupDemo. Добавляем на форму кнопку и TextView.
После установки библиотеки вам нужно получить документ для разбора текста. Это может быть страница на сайте или локальный файл на устройстве. Таким образом вам надо подключиться к нужной странице и получить объект класса Document. При импортировании обращайте внимание на полное название класса org.jsoup.nodes.Document, так как многие пакеты имеют в своём составе одноимённый класс.
Получив документ в своё распоряжение, вы можете извлекать требуемую информацию. Например, вы можете получить все теги meta:
Метод select() позволяет получить нужные теги.
Если нужно получить атрибут тега, то используйте метод attr():
Можно выбрать теги с заданным классом. Например, на странице встречается тег типа
Первый пример для знакомства
Для первого знакомства разберём простой пример. А потом будем его усложнять. Создадим переменную, содержащий html-текст. Далее вызываем библиотеку jsoup и смотрим на результат.
Запустите проект и нажмите на кнопку. На экране отобразится наш текст. Но если вы присмотритесь внимательнее, то заметите некоторые отличия (скорее всего вы и не заметили). Я намеренно сделал две «ошибки». Во-первых, я не закрыл тег , а также не закрыл тег
у первого параграфа. Однако библиотека сама подставила недостающие элементы. Именно так поступают и браузеры, если веб-мастер по невнимательности забывает ставить закрывающие парные теги.

Что мы сделали? Мы передали нужный html-текст библиотеке Jsoup и попросили его осуществить его разбор (метод parse()). В результате мы получаем экземпляр класса Document, из которого с помощью метода html() извлекаем уже обработанный текст, с которым можно работать дальше.
Если у вас всё получилось, то можно перейти к более сложным примерам. Подробная документация по методам и свойствам есть на сайте библиотеки. Вам нужно только пробовать.
Извлекаем заголовок страницы
Заголовок страницы находится в теге . Чтобы получить текст заголовка, воспользуемся методом Document.title():
Извлекаем ссылки
Теперь попробуем поработать с ссылками. В нашем тексте есть ссылка, которую можно разбить на несколько логических элементов: адрес, на который ведёт ссылка, текст в ссылке и полная ссылка, которая объединяет оба элемента.
Начнём с адреса ссылки:
Чтобы получить текст ссылки:
И, наконец, общий вариант:
Разбор текста с сайта
Некоторые несознательные граждане могут меня обвинить в том, что я использовал синтетический пример, специально подготовленный для демонстрации. И хотят видеть пример с использованием ваших тырнетов. Ну что ж, вот вам пример.
Я подключаюсь к самой известной странице в мире http://developer.alexanderklimov.ru/android/ и получаю его заголовок.
Не забудьте установить разрешение на подключение к Интернету вашей программе. Я сам сначала долго тупил, не понимая, почему моя программа вылетала с ошибкой. Но, посмотрев в честные глаза своего кота, я понял в чем моя ошибка и исправил ее. Коты рулят.
Разбор текста из файла
Последний пример, который мы не разобрали — это разбор текста из файла. В этом случае используется метод Jsoup.parse(File in, String charsetName, String baseUri):
Попробуйте самостоятельно. Удачи в программировании! Да пребудет с вами кот!
Источник
Getting Started with JSOUP in Android

Nov 22, 2017 · 3 min read

Jsoup is a Java html parser. It is a Java library that is used to parse html documents. Jsoup gives programming interface to concentrate and control information from URL or HTML documents. It utilizes DOM, CSS and Jquery-like systems for concentrating and controlling records.
In this tutorial, you will get to know few steps to start with in parsing html document in an android application interface using Jsoup.
Update
Kindly note that this implementation might not be useful anymore. You can check out for articles that explain this with latest technologies. Thanks! 🙂
Example
This simple android application shows details of Firebase with Jsoup used to parse the logo and title from the web page.
Let’s get s t arted. Create a new android project with an Empty Activity.
Add Jsoup dependency to the app level of your build.gradle file since this is an external library.
Add Internet permission to the Android Manifest file for internet access.
Prepare a layout to display the data that will be fetched from the web page. For example, logo and title.
Go to your MainActivity.java class, in the OnCreate() method, initialize your views. Create an AsyncTask class that will be used to fetch the data in the background before displaying it on the main thread.
Let me explain some lines of codes and elements of Jsoup before calling them in the AsyncTask class.
In the above codes;
Document document = Jsoup.connect(url).get(): Document is a Jsoup node API element used in connecting to the website.
Element img = document.select(“img”).first() : allows the program check through the webpage to get the first since logo is usually placed at the very beginning of the code.
String imgSrc = img.absUrl(“src”): allows the program check through absolute attribute ‘src’ of and get the respective URL.
InputStream input = new java.net.URL().openStream(imgSrc): this downloads the logo from the url.
Bitmap bitmap = BitmapFactory.decodeStream(input): this code creates the logo bitmap.
String title = document.title(): this automatically gets the title of the website.
These lines of codes work at the background process in the doInBackground() method and the respective results are displayed in the onPostexecute() method. Then the AsyncTask class is called to execute in the onCreate() method.
Running the application gives;

This brings us to the end of the tutorial… So far, Jsoup provides a very convenient API for extracting and manipulating data.
Источник
Parsing HTML in Android with Jsoup
Posted by: Francesco Azzola in Android Core April 30th, 2014 0 Views
In this post, I want to describe how to use JSoup in Android. JSoup is a Java library that helps us to extract and manipulate HTML file. There are some situations when we want to parse and extract some information from and HTML page instead of render it. In this case we can use JSoup that has a set of powerful API very easy to use and integrate in our Android projects. In this post we will discuss how to setup and Android project that uses JSoup and how to extract some information.
JSoup introduction
As said JSoup is a Java library providing a set of API to extract and manipulate HTML files. There are several methods to read and parse an HTML page; in our case we want to retrieve it from a remote server and then we have to provide an URL. If we want to parse the page as DOM,we have:
where doc is an instance of Document class that holds the document retrieved. Now we have our document and we are free to extract information. We can retrieve the title or other information using the HTML tags.
For example if we want to get all the tag named meta , we have:
where select is the method to use when we want to get tags using CSS-query. For example, if we want to retrieve the attribute value from a tag we have:
where name is the attribute name. Moreover, we can select all the elements in an HTML page that have a specific CSS class value. For example in this website there are some elements that has a CSS class equals to ‘ topic’, so we have:
where we select just the h2 tag having a class named topic.
If you want to have more information follow this link.
Setup the project and integrate JSoup
The first thing, we have to do is creating a standard Android project that contains a simple Activity, I will assume you are using Android Studio to do it. Once your project is ready, we have to add the JSoup dependency. So open build.gradle file and in the dependency section add:
Now we are ready to use JSoup API.
Creating the App
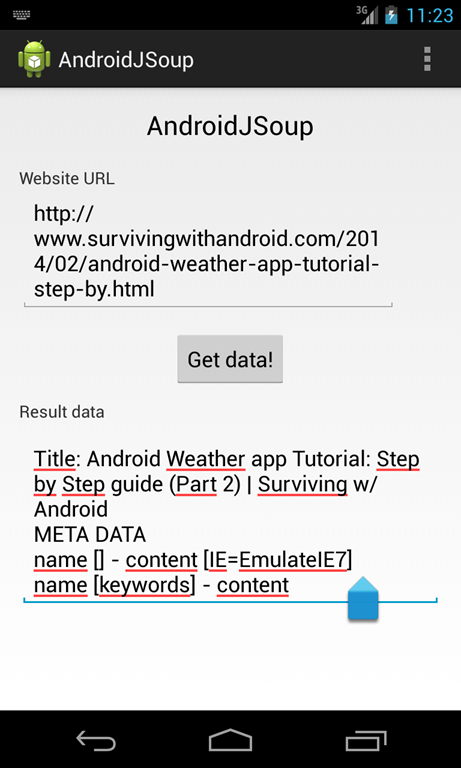
Once we know some basic information about JSoup API, we can start coding our app. At the end we will obtain:
The first thing to have in mind is that we are calling a remote website, so we can’t use our JSoup API in the main thread otherwise we could have ANR problems, so in this example we will use an AsyncTask.
As you can see the layout is very simple: we have an EditText to insert the URL, a button to lunch the HTML parsing and another EditText to show the results. In the main activity we have:
where ParseURL is the class in charge of parsing the HTML file using JSoup. Now in this class, we have:
Analyzing this class at line 8 we connect to the remote url and get the DOM representation of the HTML page. Then at line 11 we retrieve the page title. Using the information about JSoup introduced above, we start selecting the meta tags using select method (line 16). We know there are several meta tags so we iterate over them and retrieve name and content attribute (line 19-20). In the last part we select all the HTML tags having a class equals to topic and iterate over it extracting the text content.
JSoup and Volley
In the example above we used AsyncTask to do the work in background, but if you prefer you can use volley too. In this case we will parse the document not using an URL but a String containing the doc retrieved:
Источник
Android parse html string
7. FROM_HTML_SEPARATOR_LINE_BREAK_LIST: This flag is used to indicate that texts inside
- elements will be separated from other texts with one newline character by default.
8. FROM_HTML_SEPARATOR_LINE_BREAK_LIST_ITEM: This flag is used to indicate that texts inside
elements will be separated from other texts with one newline character by default.
9. FROM_HTML_SEPARATOR_LINE_BREAK_PARAGRAPH: This flag is used to indicate that inside
elements will be separated from other texts with one newline character by default.
Example 1 Of Parse HTML File content Using WebView With Example In Android Studio:
Below is the example of HTML in which we parse the HTML file and display the HTML content in our Android WebView. In this example firstly we create a assets folder and store a HTML file in it. After that we create a WebView in our XML file and then get the reference of WebView in our MainActivity and finally with the help of loadUrl() method we display the content in our webView.

Step 1: Create a new project and name it HtmlExample.
Step 2: Open res -> layout -> activity_main.xml (or) main.xml and add following code:
In this step we open an xml file and add the code for displaying a WebView.
Step 3: Now create assets folder in App. You can read here how to create assets folder in Android Studio
Step 4: Now inside assets folder add a HTML file name myfile.html. You can read here how to add local html file in Android Studio. Also inside myfile.html add the below HTML content or add any content in HTML format.
Step 5: Now Open src -> package -> MainActivity.java
In this step we open MainActivity where we add the code to initiate the WebView and then display the HTML content from file stored in assets folder into WebView.
Output:
Now run the App and you will see local content added in HTML file is loaded in Webview.
Example 2 Of HTML In Android Studio Using TextView:
Below is the example of HTML in which we display the HTML content in our Android TextView with the help of fromHtml() method. In this example firstly we create a TextView in our XML file and then get the reference of TextView in our MainActivity and finally with the help of fromHtml() method we set the content in our TextView.
Step 1: Create a new project and name it HtmlExample.
Step 2: Open res -> layout -> activity_main.xml (or) main.xml and add following code:
In this step we open an xml file and add the code for displaying a TextView.
Step 3: Now Open src -> package -> MainActivity.java
In this step we open MainActivity where we add the code to initiate the TextView and then set the HTML content which is stored in a string variable into TextView using fromHtml() method.
Output:
Now run the App and you will see HTML content is shown in TextView.
Example 3 Of HTML content in WebView With Example in Android Studio:
Below is the example of HTML in which we display the HTML content in our Android WebView. In this example firstly we create a WebView in our XML file and then get the reference of WebView in our MainActivity and finally with the help of loadDataWithBaseURL() method we display the content in our webView.
Step 1: Create a new project and name it HtmlWebViewExample.
Step 2: Open res -> layout -> activity_main.xml (or) main.xml and add following code:
In this step we open an xml file and add the code for displaying a WebView.
Step 3: Now Open src -> package -> MainActivity.java
In this step we open MainActivity where we add the code to initiate the WebView and then display the HTML content which is stored in a string variable into WebView.
Output:
Now run the App and you will see HTML content is displayed using Webview.
Источник


