- 2.2: Part 2 — Sending and Receiving SMS Messages
- Task 3. Receive SMS messages with a broadcast receiver
- 3.1 Add permission and create a broadcast receiver
- 3.2 Register the broadcast receiver
- 3.3 Implement the onReceive() method
- 3.4 Run the app and send a message
- Solution Code
- Coding challenge
- Android Receiving SMS Example
- Receive SMS Permissions
- Intent Filter to receive SMS
- Broadcast Receiver
- Main Activity
- Complete manifest XML
- Run the application
- Android Receive SMS Tutorial
- Receive SMS Application
- AndroidManifest.xml
- SmsBroadcastReceiver.java
- SmsActivity.java
- activity_sms.xml
- How to test SMS Application in Android Emulator
- Android: Обработка СМС
- 0. Вместо вступления
- 1. Перехватываем СМС
- 2. Обрабатываем СМС
2.2: Part 2 — Sending and Receiving SMS Messages
Contents:
Task 3. Receive SMS messages with a broadcast receiver
To receive SMS messages, use the onReceive() method of the BroadcastReceiver class. The Android framework sends out system broadcasts of events such as receiving an SMS message, containing intents that are meant to be received using a BroadcastReceiver. You need to add the RECEIVE_SMS permission to your app’s AndroidManifest.xml file.
3.1 Add permission and create a broadcast receiver
To add RECEIVE_SMS permission and create a broadcast receiver, follow these steps:
Open the AndroidManifest.xml file and add the android.permission.RECEIVE_SMS permission below the other permission for SMS use:
Receiving an SMS message is permission-protected. Your app can’t receive SMS messages without the RECEIVE_SMS permission line in AndroidManifest.xml.
Name the class «MySmsReceiver» and make sure «Exported» and «Enabled» are checked.
The «Exported» option allows your app to respond to outside broadcasts, while «Enabled» allows it to be instantiated by the system.
3.2 Register the broadcast receiver
In order to receive any broadcasts, you must register for specific broadcast intents. In the Intent documentation, under «Standard Broadcast Actions», you can find some of the common broadcast intents sent by the system. In this app, you use the android.provider.Telephony.SMS_RECEIVED intent.
Add the following inside the tags to register your receiver:
3.3 Implement the onReceive() method
Once the BroadcastReceiver intercepts a broadcast for which it is registered ( SMS_RECEIVED ), the intent is delivered to the receiver’s onReceive() method, along with the context in which the receiver is running.
- Open MySmsReceiver and add under the class declaration a string constant TAG for log messages and a string constant pdu_type for identifying PDUs in a bundle:
- Delete the default implementation inside the supplied onReceive() method.
In the blank onReceive() method:
Add the @TargetAPI annotation for the method, because it performs a different action depending on the build version.
Retrieve a map of extended data from the intent to a bundle .
Define the msgs array and strMessage string.
Get the format for the message from the bundle .
As you enter SmsMessage[] , Android Studio automatically imports android.telephony.SmsMessage .
Initialize the msgs array, and use its length in the for loop:
Use createFromPdu(byte[] pdu, String format) to fill the msgs array for Android version 6.0 (Marshmallow) and newer versions. For earlier versions of Android, use the deprecated signature createFromPdu(byte[] pdu).
Build the strMessage to show in a toast message:
Get the originating address using the getOriginatingAddress() method.
Get the message body using the getMessageBody() method.
Add an ending character for an end-of-line.
The complete onReceive() method is shown below:
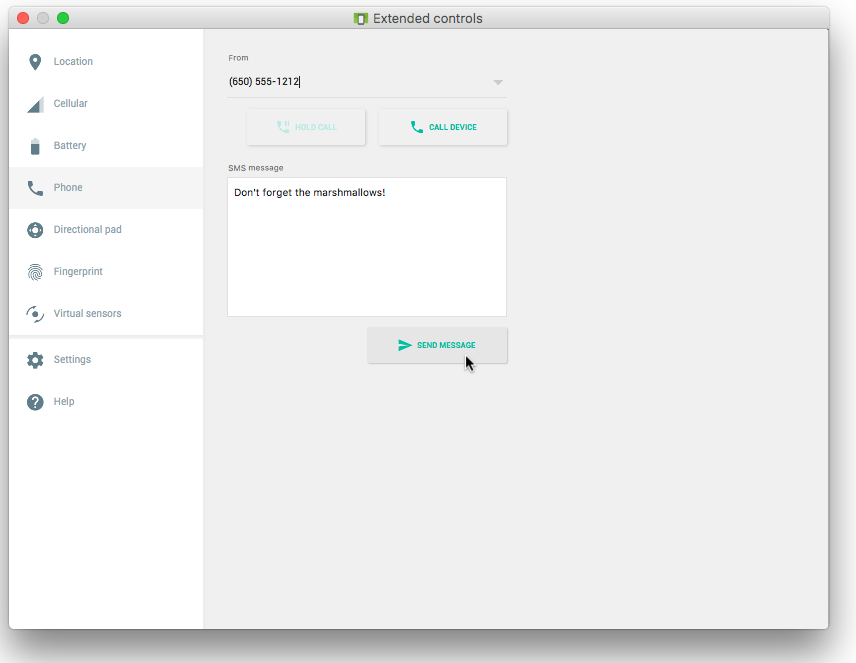
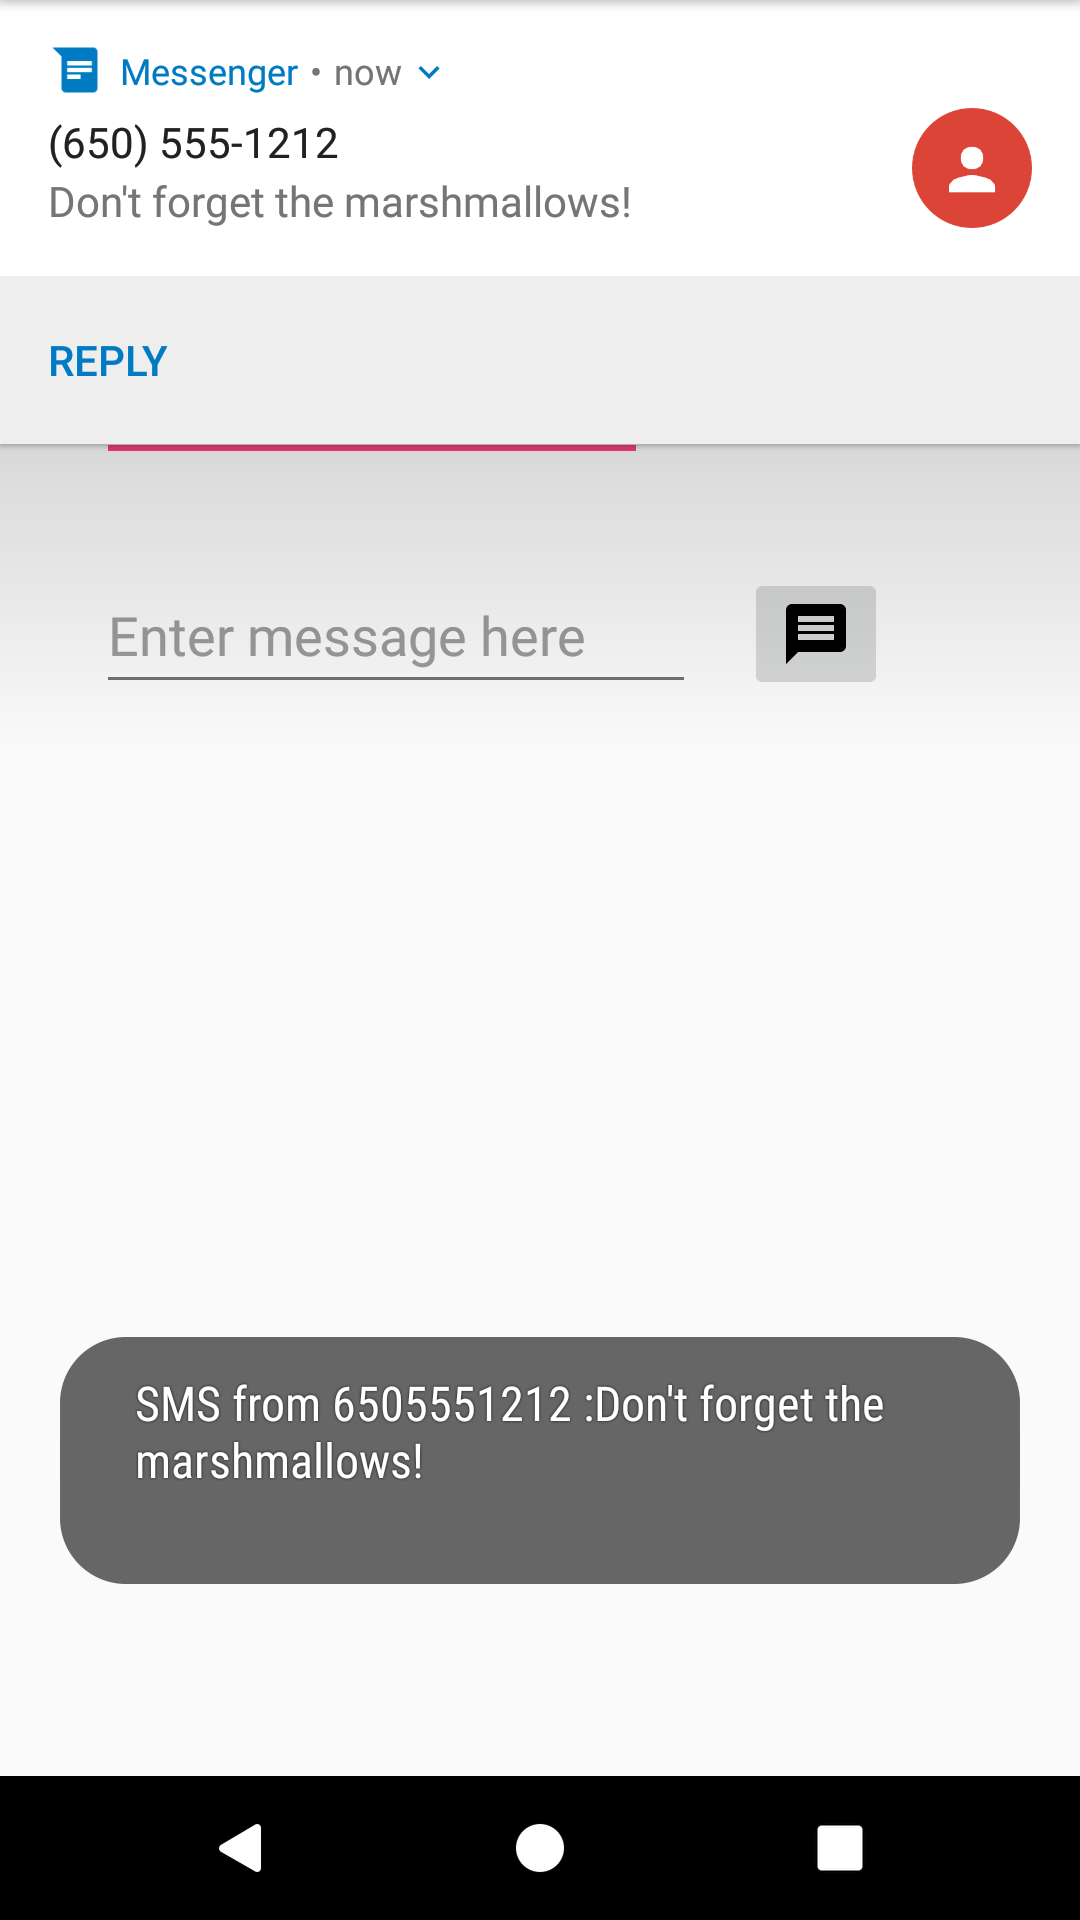
3.4 Run the app and send a message
Run the app on a device. If possible, have someone send you an SMS message from a different device.
You can also receive an SMS text message when testing on an emulator. Follow these steps:
- Run the app on an emulator.
Click the … (More) icon at the bottom of the emulator’s toolbar on the right side, as shown in the figure below:

Solution Code
Android Studio project: SmsMessaging
Coding challenge
Challenge: Create a simple app with one button, Choose Picture and Send, that enables the user to select an image from the Gallery and send it as a Multimedia Messaging Service (MMS) message. After tapping the button, a choice of apps may appear, including the Messenger app. The user can select the Messenger app, and select an existing conversation or create a new conversation, and then send the image as a message.
The following are hints:
- To access and share an image from the Gallery, you need the following permission in the AndroidManifest.xml file:
- To enable the above permission, follow the model shown previously in this chapter to check for the READ_EXTERNAL_STORAGE permission, and request permission if necessary.
- Use the following intent for picking an image:
- Override the onActivityResult method to retrieve the intent result, and use getData() to get the Uri of the image in the result:
- Set the image’s Uri, and use an intent with ACTION_SEND , putExtra() , and setType() :
- Android Studio emulators can’t pass MMS messages to and from each other. You must test this app on real Android devices.
- For more information about sending multimedia messages, see Sending MMS with Android.
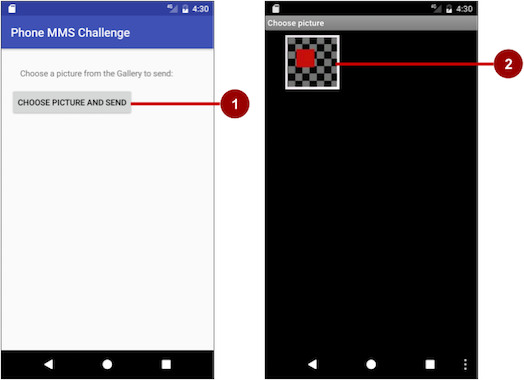
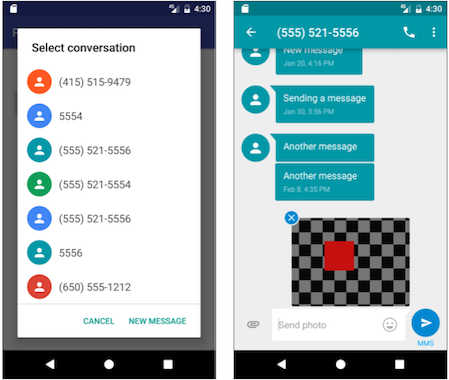
Android Studio project: MMSChallenge
Источник
Android Receiving SMS Example
In the last article, I showed you how to send SMS in android. In this article, we will see how to receive SMS messages. We can add the interested phone numbers in the settings.
We will start with the permissions required.
Receive SMS Permissions
We only need receive permission android.permission.RECEIVE_SMS . In case you also want to read SMS messages from the Inbox then you need android.permission.READ_SMS .
Intent Filter to receive SMS
We also need to tell Android that we want to handle incoming SMS messages. In order to do this, we will add a to register a broadcast receiver to the manifest XML. We will also add an to let Android know that we want to launch a specific class when an SMS comes in.
Add the below in AnrdoidManifest.xml:
Broadcast Receiver
SMSReceiver is a BroadcastReceiver . When SMS is received, onReceive will be called. Here we will look into the interested numbers based on a setting. If the message has originated from one of those numbers, we will launch a new Activity, and pass the phone number and the SMS message to the activity.
Main Activity
In the main activity, we will get the SMS data from the intent and set the text fields.
Layout will have couple of text fields, one for phone number and the other for the message.
Complete manifest XML
Let’s have a look at the android manifest XML.
Run the application

SMS Receive Main Screen
Set the interested phone numbers in the settings. If more than one, enter them comma separated.

Enter phone numbers
Open ‘Emulator Control’ to send spoof SMS. To open the ‘Emulator Control’, Go to Windows->others->Android->’Emulator Control’. 
Источник
Android Receive SMS Tutorial
This Android tutorial will walk you through to create an Android application to receive SMS messages in your Android mobile. SMS is popular utility now loosing sheen to Internet based instant messenger services like Whatsapp.
We will be using a BroadcastReceiver to receive the messages and parse the SMS message out of it and update our UI. We will also show a toast message. In a previous Android tutorial to send SMS we created an app to send SMS messages. These two tutorials combined together will create one complete SMS Android application.
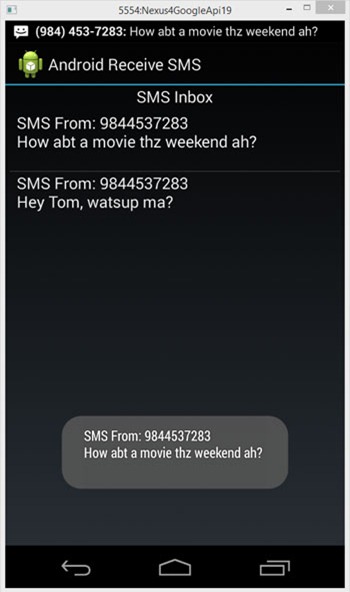
Receive SMS Application
Application uses the basis Android constructs. We should know about using BroadcastReceiver and using Android ListView. Knowing these two is enough to build this Android SMS application.
AndroidManifest.xml
Couple of things to note in the Android manifest file. Add permission to receive, read and write SMS to the application. Then add the broadcast receiver with an intent-filter to receiving SMS.
SmsBroadcastReceiver.java
This is a BroadcastReceiver which receives the intent-filtered SMS messages. onReceive , we extract the SMS message bundle and show a toast message and also update the UI by adding the SMS message to the SMS inbox list. When a SMS message arrives, the inbox is automatically refreshed.
SmsActivity.java
This is the main Android activity of the SMS application. It acts as the SMS inbox. It has a ListView to show the SMS messages. onCreate we read all the messages present in the internal SMS inbox from its Uri and show them using the ListView .
activity_sms.xml
Following is the layout file.
How to test SMS Application in Android Emulator
We need not have a real Android mobile to test this Android application. The Android emulator provides the facility to send test SMS messages to the deployed app via the DDMS Emulator Control as shown below.
Источник
Android: Обработка СМС
0. Вместо вступления
Периодически (когда у меня выпадает свободный вечер, и наш «клуб» организует игру) я играю в регбол. «Клуб» организован таким образом, что в день игры всем участникам приходит СМС такого вида:
Регбол! Сегодня в 19-30. Двор школы №30: ул. Володарского, 20. Открытая площадка с резиновым покрытием. Тел. 8 (951) ***-**-**.
И вот я подумал — почему бы не написать небольшое приложение, которое будет отлавливать эти сообщения, и забивать их в гугл-календарь. Зачем? Да, в основном, just for fun, ибо я не настолько занятой человек, чтобы мне были жизненно необходимы автоматические секретари.
Итак, приложение будет уметь следующее:
- Следить за входящими сообщениями. Если пришло сообщение от адресата RM FIGHT, то нужно сверить текст сообщения с шаблоном, и при совпадении создать мероприятие в гугл-календаре. Если же текст сообщения с шаблоном не совпадает (например, просто какие-то новости пришли), то сохраняем сообщение в базе, чтобы потом можно было его прочитать.
- Показывать сообщения от этого адресата, не попадающие в категорию «Оповещение об игре» (новости, реклама и т.д.).
В рамках статьи я полагаю, что у читателя есть базовые знания — как создать проект, что такое файл Manifest, и с чего вообще начинать разработку под андроид — на этот счет есть куча разных туториалов, и здесь на этом останавливаться не будем. В то же время статья не предназначена для продвинутых андроид-девелоперов, в ней будут рассматриваться достаточно базовые вещи, вроде мониторинга и обработки смс, работы с базой данных, подключения по HTTP.
Итак, приступим. Кстати, используемая версия SDK — 14 (Android 4.0).
1. Перехватываем СМС
Для мониторинга входящих СМС первым делом нам необходимо запросить разрешение на их получение. Для этого в файл AndroidManifest.xml необходимо добавить запись вида:
Следующим шагом будет реализация монитора для прослушивания входящих сообщений. Для этого в манифест-файле регистрируем receiver:
Здесь мы установили приоритет равным 100, чтобы наше приложение получило доступ к входящему СМС раньше стандартного обработчика СМС, которое имеет нулевой приоритет. После того, как наше приложение обработает сообщение, нет смысла отдавать его системе, и помещать в папку Входящие.
Теперь создаем класс, расширяющий BroadcastReceiver :
В этом классе реализуется абстрактный метод onReceive() , который вызывается системой каждый раз при получении сообщения. В методе прописываем:
Здесь мы получаем сообщение с помощью метода intent.getExtras().get(«pdus») , который возвращает массив объектов в формате PDU — эти объекты мы потом приводим к типу SmsMessage с помощью метода createFromPdu() .
Теперь внимание. То, что мы делаем после получения сообщения, должно исполняться быстро. Broadcast receiver получает в системе высокий приоритет, но он работает в фоновом режиме и должен выполняться за короткое время, так что наши возможности ограничены. Например, мы можем сгенерировать уведомление или запустить службу, чтобы продолжить обработку в ней. Поэтому мы проверим отправителя сообщения, и если это уведомление об игре — мы вытащим текст сообщения и запустим службу, в которой уже и будем проводить обработку этого сообщения.
Дописываем в методе onReceive() :
Здесь мы составляем текст сообщения (в случае, когда сообщение было длинным и пришло в нескольких смс-ках, каждая отдельная часть хранится в messages[i] ) и вызываем метод abortBroadcast() , чтобы предотвратить дальнейшую обработку сообщения другими приложениями.
2. Обрабатываем СМС
В предыдущем пункте мы остановились на том, что запускаем службу для обработки смс с помощью метода startService() . Собственно, что такое службы и с чем их едят хорошо описано на официальном сайте, поэтому здесь на этом останавливаться не будем.
Создаем класс SmsService , расширяющий класс Service :
Поскольку у нас локальная служба, метод onBind() возвращает null.
Для вывода уведомлений нам понадобится вспомогательный метод showNotification():
В методе onStartCommand() прописываем:
Осталось, собственно, реализовать метод smsProcess() , который добавит смс в базу и сформирует мероприятие в гугл-календаре. Этим и займемся в следующей части статьи.
UPDATE: выложил код на GitHub. Со второй частью статьи пока не успеваю, слишком уж загружен по работе. Надеюсь в ближайшее время с этим вопросом разберусь.
Источник


