- EaseUS MobiSaver
- How to Recover Data from Formatted Phone
- Steps to recover formatted Android phone
- How to Format Android Phone Entirely
- Method 1. To Format Android phone by Factory Reset
- Here is a guidance for your reference.
- Method 2. To Format Android phone by dr.fone – Android Erase.
- To make it a short story, here is a list of the main features of the dr.fone – Data Eraser:
- Now let me show you how simple it is to format Android phones entirely with this tool.
- Tips for better protection for your Android phone.
- How to Format SD Card on Android Phone?
- This is a detailed tutorial on how to format an SD card on Android. There are several situations when you may need to format a memory stick. We also show you how to troubleshoot common problems and recover lost data.
- What Are the Common Situations of Formatting an SD Card?
- Steps to Format SD Card on Android
- 1. Format SD Card on Android Phone
- 2. Format Android Memory Card on Computer
- 3. Format SD Card as Internal Storage
- Workable Solutions to SD Card Not Formatted Error
- 1. Damaged or Corrupt SD Card
- 2. Sudden Power Failure
- Tips You Should Know When Formatting an SD Card
- 1. How to Do an SD Card Data Backup
- 2. Recover Accidentally Formatted Android Files
- Closing Words
- Related Questions Searched for Frequently
EaseUS MobiSaver
The Android Data Recovery Software to Save All Your Lost Files
- Recover photos, videos, contacts, and more
- Recover data lost due to various reasons
- Compatible with most Android devices
Table of Contents
Reviews and Awards
How to Recover Data from Formatted Phone
To help you rescue your precious files when you accidentally formatted your Android phone, we introduce how to recover formatted Android phone with detailed guide in this page.
Summary
Nowadays Android phone is popular among numerous users. They used it to make calls, send text messages, surf the Internet and take photos. All these operations will create much personal data such as messages, pictures on the pone. Most android phones support SD card so that users can store all their files on the card. In this case, the performance of the phone won’t be affected by too much of data. However, the problem comes out. The files you saved on the SD card is easy to be erased if you accidentally format the SD card. To help you rescue your precious files when you encountered such situation, we introduce how to recover formatted Android phone in this page.
What should you do to recover formatted Android phone?
When you find you lost some important files after accidental formatting, you may want to get them back. But what should you do to recover formatted Android phone? Actually your action after the unexpected data loss decides whether you can retrieve you files on the Android phone. First, please stop using your phone and it’s better to pull out the SD card. It is helpful to protect the lost files from being rewritten by other new data. And then you should find a reliable Android phone data recovery tool to retrieve your data as soon as possible.
Steps to recover formatted Android phone
EsaeUS MobiSaver for Android is a professional Android data recovery program you can rely on. The software can help you easily retrieve your formatted pictures, videos, contacts, text messages and documents from you Android phone. Now you can download the program and try the following guide to recover formatted Android phone.
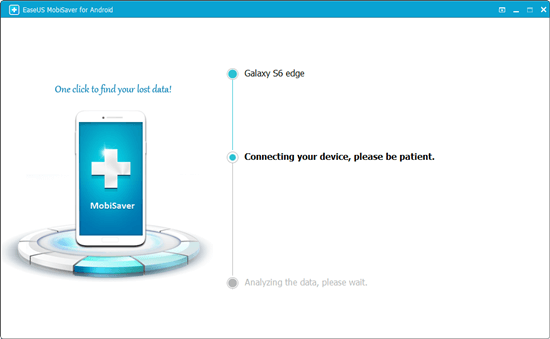
Step 1. Connect your Android phone to computer
Install and run EaseUS MobiSaver for Android and connect your Android phone to the computer with USB cable. Then click «Start» button to make the software recognize and connect your device.
NOTE:В As the software can only access the rooted Android device, you need to make sure that your phone has been rooted before recovery.
Step 2. Scan your Android phone find the deleted files
After connecting your phone, the software will quickly scan the device to find all the existing and lost data. You can easily find the lost files you want by choosing the correct file types.
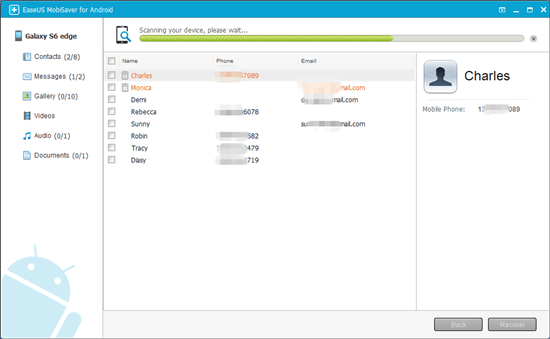
Step 3. Preview and get deleted files back from Android phone
Preview all the recoverable files one by one and then you can select out those you want quickly. «Only display deleted items«option to list the deleted files only. Finally, you can click «Recover» button to get the selected files back once.
Источник
How to Format Android Phone Entirely

Provided that you want to sell your old Android phone, remember to wipe & format all the personal data from your Android phone. And you may need to remove all the important files from your old Android phone before you put them on the shelf. The most convenient way to format all the files from an Android phone is to format it, namely to factory it or reset it. It is of great significance to know the detailed way to format a phone, and thus I would like to introduce two nice methods to you.
PS: here, you will learn more about the complete Quick Format Vs. Full Format comparison.
Method 1. To Format Android phone by Factory Reset
The Factory reset is a simple tool for formatting a mobile phone. It enables the users to reset their phones through a few simple operations. The main principle of this tool is to delete the files available on the phones so that people can get their phones as new phones from the factory. But before factoring, you need to encrypt your phone first.
Here is a guidance for your reference.
Step 1. To encrypt your Android phone, you need to go to the “Settings” app on the screen and find the “Security” option from the menu. Click on the “Security” option to open it. Choose the “Encrypt device” item and turn on the switch of it.
Step 2. The whole process of encrypting will last for a long time, so please make sure that your phone has been well charged. If possible, just make it fully charged before Step 1. Once the process finishes, go to the “Security” option again to see it successfully encrypted.
Step 3. Now you can start to factory your mobile phone. Just go to the “Settings” app again. And then, choose the “General” option and select the “Backup and reset” item.

Step 4. On the new screen, you can see many items for your choice. Simply find and click on the “Factory data reset” items. And then, you will get a confirmation message. Read it and click on the “Reset device” button in the lower middle.

Step 5. Now you can rest assured because the resetting process will finish in a few minutes, and you will find your phone become a formatted one.

Method 2. To Format Android phone by dr.fone – Android Erase.
Well, as you can see, it is not so simple to format an Android phone with built-in apps. So it is advisable to give it a nicer helper, like the dr.fone – Data Eraser (Android). The dr.fone, developed by the famous Wondershare company, is a professional tool to delete data from mobile phones and tablets. Just like its name, the dr.fone – Android Erase can permanently delete personal data safely and efficiently, and the data deleted will be unrecoverable. What’s more, it is compatible with both Android devices and iOS devices, so that you can simply manage these two kinds of devices with the same method.
To make it a short story, here is a list of the main features of the dr.fone – Data Eraser:
- 1. Delete unwanted data for you including the contacts, messages, photos, audios, videos, and apps.
- 2. Format the Android devices (dr.fone – Android Data Eraser) and iOS devices (dr.fone – iOS Data Eraser).
- 3. Optimize the performance of your devices.
- 4. A time-saving tool compared to its counterparts.
- 5. Support for both the Windows computer and the Mac computer.
Now let me show you how simple it is to format Android phones entirely with this tool.
Step 1. Download and install the dr.fone on your computer. And then connect your Android phone to your computer with a USB cable. And for the users who connect their phones to the computer for the first time, you enable the USB debugging on your phone.

Step 2. On the primary window, click the “Data Eraser” option and you need to click the “Erase All Data” button. And then the dr.fone will ask you to input the word “delete” in order to know you really want to format your phone. And then click on the “Erase Now” button to start the erasing process.


Step 3. Then the dr.fone will start to delete all the data on your phone, including the contacts, messages, photos, audios, videos, and apps.

Step 4. The whole process will finish in a short time. And after that, you need to click on the “Erase All Content” or “Factory Data Reset” on your mobile phone to erase the settings.

Tips for better protection for your Android phone.
- 1. Transfer the media files to your computer for long-time storage. The media files like the photos, audios, and videos may contain unforgettable memories of your life. So it is a pity to delete them directly. By transferring them to your computer, you can easily get access to them when you want.
- 2. In case that you may want the personal data on your old Android phone someday, you’ d better create a backup file for all the content. There are many ways to create a backup file. You can either back up the data on your computer or create one backup with a certain cloud application.
- 3. If there are some files with reactivation lock on your mobile phone, you need to unlock them before transferring or backup. Simply go to Settings > Security, and then disable the relevant option.
- 4. The media files and the backup files on your computer may need password protection so that people cannot see them without the correct password. After you set a password, you should take a mind note of the password. Or you can undo the password protection if you think there is no need to have that.
Track locations, messages, calls, and apps. Do it remotely and 100% discreetly.
Источник
How to Format SD Card on Android Phone?
This is a detailed tutorial on how to format an SD card on Android. There are several situations when you may need to format a memory stick. We also show you how to troubleshoot common problems and recover lost data.

Eleanor Reed
Oct 30, 2021 • Filed to: SD Card Solutions • Proven solutions
Why would we want to format an SD card? Well, with daily use on your Android phone, there are several situations — malware, storage errors, and other issues that can only be cured by formatting. In this article, we show you how to format an SD card on Android and recover from any errors that you encounter in the process.
What Are the Common Situations of Formatting an SD Card?
Formatting in computing refers to the deletion of all data in a storage medium and setting up a file system. Before you begin, you may want to back up your SD card (memory stick) if it contains files you don’t want to lose.
Before we begin, let us examine some common situations where you need to format a memory stick on an Android phone.
1. SD card is damaged or simply isn’t working and you have some kind of error message on your phone e.g. «SD card is corrupted».
2. Compatibility issues. Some older Android phones don’t have support for the exFAT file system. In such a scenario, you would need to reformat to FAT32.
3. You may experience performance degradation. If that’s the case and the memory stick’s performance can improve, then formatting becomes an option.
4. Data security. If you don’t know where the memory stick has been and you’re not sure what kind of files could be there, or you suspect it could be infected by a virus, the easiest thing to do is to format it.
5. File size restrictions. For large files over 4GB, you can’t use the FAT32 file system which has a maximum file size of 4GB. In such a situation, you would have to format the SD card to exFAT.
Steps to Format SD Card on Android
There are several ways to format a memory stick. As already mentioned most devices with SD cards including phones, computers, and cameras have a formatting option.
1. Format SD Card on Android Phone
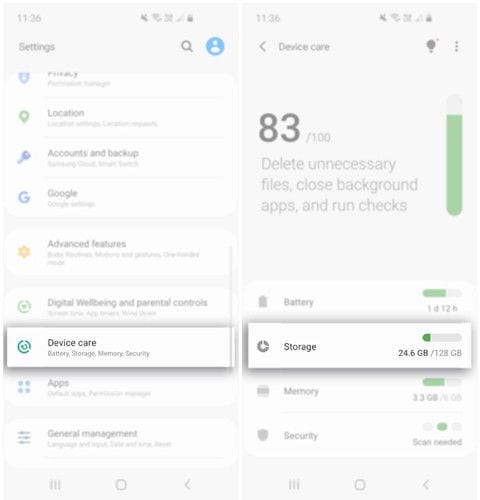
Different Android versions have slightly different steps on how you go about formatting. But the main idea is to navigate to the Storage area in your phone Settings, tap on the SD card, and look for the Format option. Below, we show you an example of how to format an SD card in Samsung on Android OS version 10.
On your phone, navigate to Settings > Device Care. Next, select Storage.
Tap on Advanced. Here, you will see Portable storage. Proceed and select SD Card.
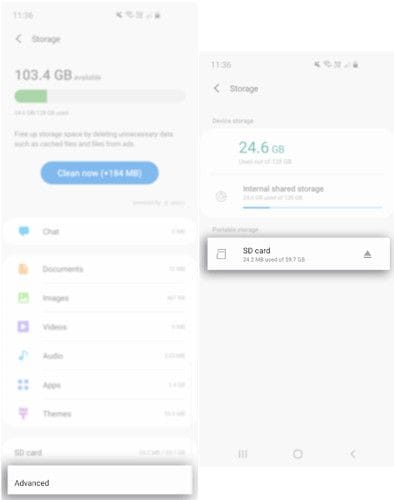
Next, tap Format. Finally, in the pop-up message, select Format SD Card.

Wait a few minutes for the process to terminate then begin using the card.
2. Format Android Memory Card on Computer
There are two options to format an SD memory card on a computer.
For the first option, connect the memory stick to the computer. Depending on the PC model, you can use a built-in reader or an adapter. Next, open Windows Explorer and locate the SD card on your drive list or wait for a few seconds for the drive to load.
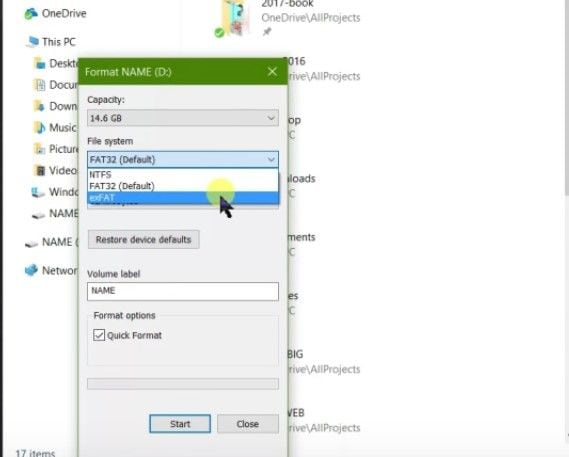
Right-click on the drive and select Format. You should then see a format window that defaults to FAT32. You may want to change this to exFAT if you anticipate having files larger than 4GB on the memory stick.

Next, enter the desired name in the Volume Label field. Check the Quick Format box or else the process can take a long time especially for large SD cards. To finish the process, click the Start button.
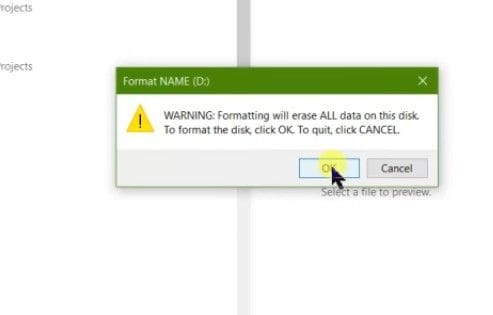
A warning message will appear. Click OK to proceed.
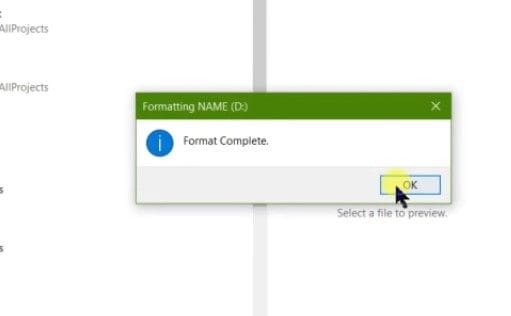
After a few seconds, the SD card is formatted.
3. Format SD Card as Internal Storage
If your Android phone runs out of internal memory for your apps, the only solution is to use the SD card as internal storage. To do so, you need to format it as Internal Storage.
Begin by inserting it on your Android phone and wait a few seconds for it to be detected.
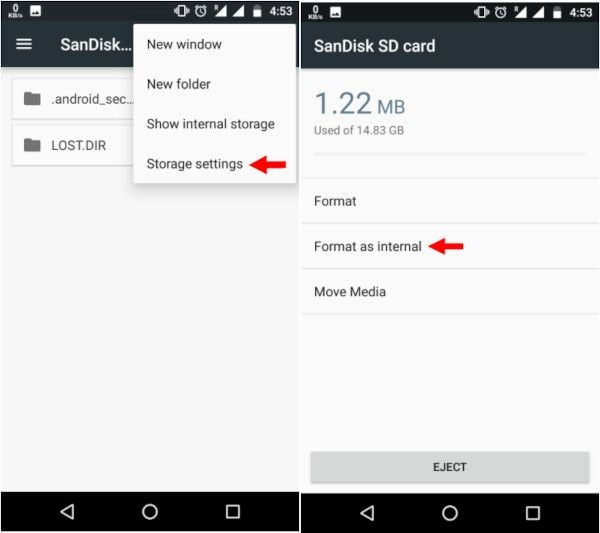
Next, go to Settings. Scroll down to Storage and Tap the SD card. Next, tap the three dots located in the top right corner of the screen. Tap Storage Settings. Next, select the Format as an Internal option.
Tap Erase & Format. If it is too slow, you will get a notification. Android may reject formatting a slow SD as Internal Storage.

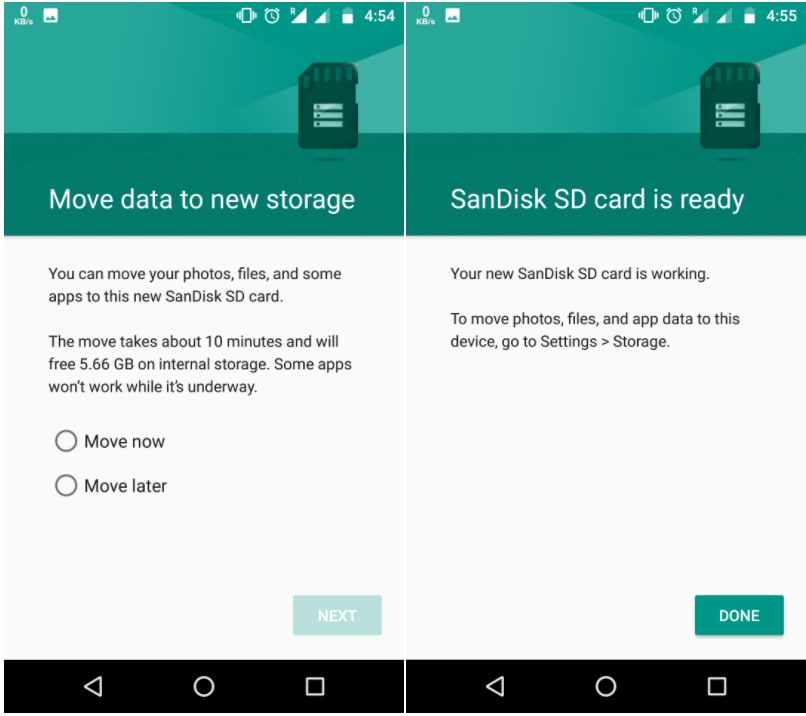
Tap OK to continue then begin the data migration process by checking the Move Now radio button or Move Later to do it later.
Tap Done to complete the process.
Workable Solutions to SD Card Not Formatted Error
In the process of formatting an SD card using any of the methods described above, you may come across some errors. If you come across an error message stating, «Micro SD card not formatted», then the following are possible causes and solutions.
1. Damaged or Corrupt SD Card
An SD card may be damaged or corrupted due to bad sectors or a virus in the files. To fix this error, connect the memory stick to your PC and navigate to File Explorer and take note of the drive letter.
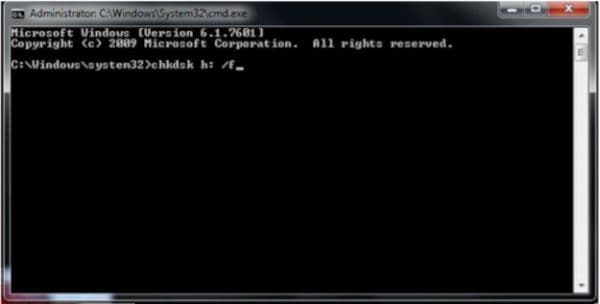
Next, launch the command line utility by typing «CMD» in the Windows search and running the app as an administrator.

In the command line window, type «chkdsk h: /f«, where «h» represents your drive letter. This commands the PC to check and fix (f) any disk errors.
If this does not work, you can try and change the letter assigned to the drive.
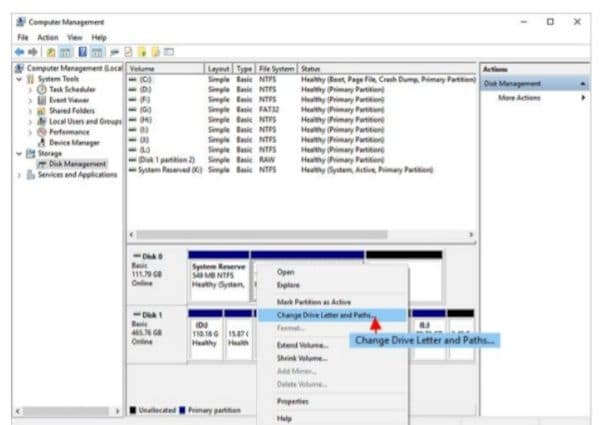
To do this, go to This PC, right-click then click Manage. Click on Disk Management under the Storage menu and then right-click on the volume of the drive letter you wish to change. In the drop-down menu, select Change Drive Letter and Paths. Click Change and choose a different drive letter. Select OK, then Yes to the warning then wait a few seconds for the new drive letter to be assigned. You can view this change in Disk Management or File Explorer.
Retry the process.
The Memory Stick is Write-protected
You may have write-protected the memory stick without realizing it. The fix for this is quite easy. If it uses physical protection, identify the switch, and slide it to the appropriate position.

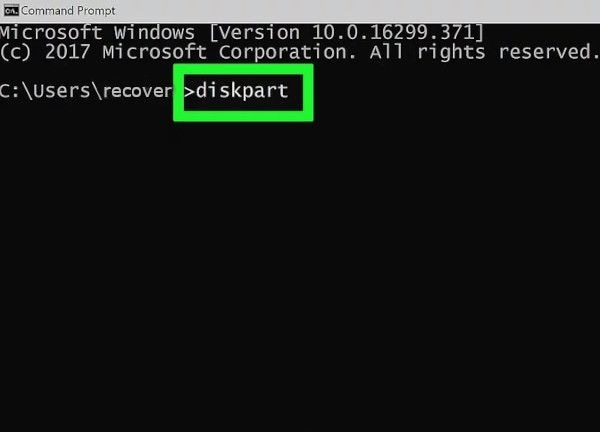
If it isn’t using a physical switch, connect it to your PC. Take note of the drive letter in File Explorer and then type «CMD» in the Windows search bar at the bottom left of your screen. This will launch the Command Line utility. Type «diskpart» and press Enter.
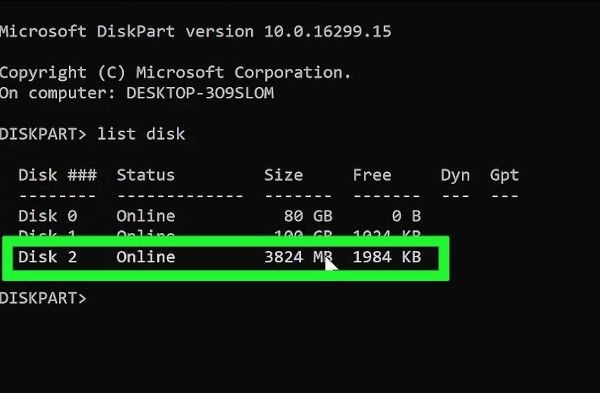
Next, type «list disk» to see a list of all the drives.
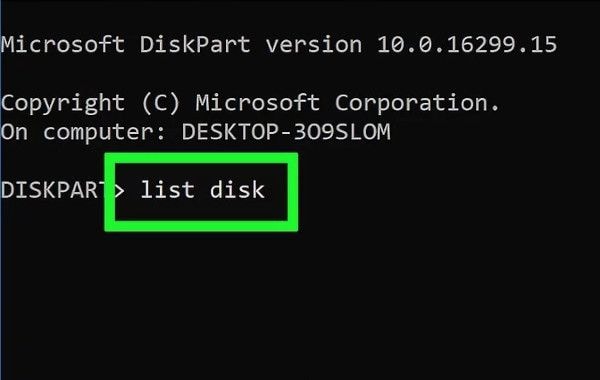
Identify it and note the disk number allocated to it.
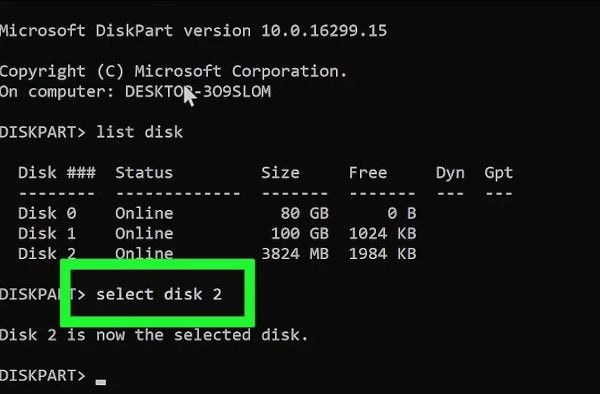
Next, type «Select Disk x» where «x» represents the actual disk number on your system e.g. «Select Disk 2».
Next, type «attributes disk clear readonly«. This will clear the read-only attribute.
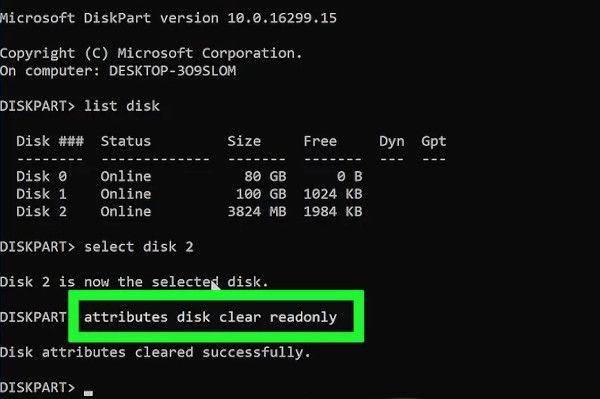
Close the Command Line utility and retry formatting the memory stick.
2. Sudden Power Failure
In the event of a sudden power loss, as the Phone or computer is formatting the memory stick, the process terminates prematurely. This is a simple fix, just retry the process once again and you should succeed.
All-Around Tips to Format SD Card Without Losing Data
One of the problems that can arise when formatting an SD card is data loss. Below are a few tips to format an SD card without losing data.
Tips You Should Know When Formatting an SD Card
Formatting refers to the complete erasure of data on the SD card and the creation of a file system.
1. How to Do an SD Card Data Backup
The best way to prevent data loss is to first perform a data backup. There are two ways to do this. Using your Android phone or backing up to a PC.
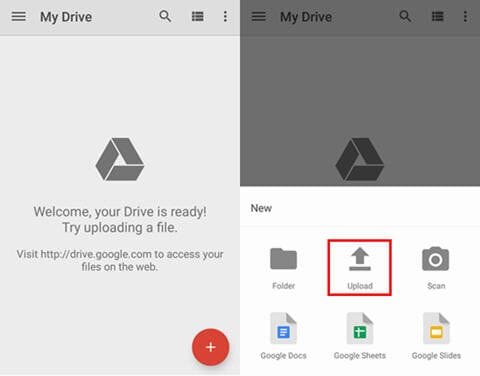
1. To back up using an Android phone, you will need a Google account and the Google Drive app. Install the Google Drive app from the Play Store and launch it.
2. Next, tap the + icon and select Upload.
3. Navigate to your SD card then select the files you want to upload or choose to upload everything.
4. Click Done and Google will begin uploading the files to Google Drive.
The second backup method involves using a PC. Connect the SD card to a PC and use File Explorer to navigate the drive. Right-click on the drive, click Copy and then paste in a different location on your computer. This action makes a copy of your SD card contents on your PC.
2. Recover Accidentally Formatted Android Files
In the unfortunate event that you fail to make a backup, do not worry. Wondershare Recoverit software can recover accidentally formatted Android files using Windows or Mac. This useful software can save you the trouble of having to hire a data recovery expert to get back your files. With Wondershare Recoverit Software, you can recover accidentally formatted Android files in three minutes.
To recover your files, follow these steps.
Step 1: Launch Wondershare Recoverit on Windows
Download Wondershare Recoverit and install it on your PC. Next, open the application. You can do so by typing «Recoverit» in the Windows search bar. Click it to launch it.
Step 2: Connect the SD Card
Next, connect the SD card to the computer and make sure it is recognized or detected.
Step 3: Select the SD Card
From within Wondershare Recoverit software, select the SD card from the list of locations.

Step 4: Scan the SD Card
Click Start and a scan will be launched on the SD card. You can pause or stop this process at any time.

Step 5: Preview and Recover the Files
At the end of the scan, preview the files from the list of results. To get your files back, simply click Recover, and save them in a location on your computer.

Wondershare Recoverit software is guaranteed to recover files accidentally deleted from an SD card. It can recover data in numerous types and formats, and even includes a video repair tool to repair corrupted videos.
Closing Words
We hope these tips have taught you how to format an SD card on Android without losing data. If you encounter a problem, go through the solutions again to solve the problem. And, most importantly, if you accidentally delete your data, you can always recover files from your Android SD card using Wondershare Recoverit Software.
Related Questions Searched for Frequently
1. How do I format my SD card on my Samsung?
Источник


