- How to restore your apps and settings to a new Android phone
- How to enable the Android backup service
- How to restore apps and settings on a new Android phone
- Your privacy
- These are the best USB-C cables you can find for Android Auto
- Keep your Galaxy Z Fold 3 looking fantastic with these screen protectors
- These are the best rugged Android phones
- Harish Jonnalagadda
- App Settings: что это за приложение на Андроид и нужно ли оно?
- Возможности
- Преимущества
- Когда нужно это приложение
- Android phone setting app
- Android phone setting app
- Setting up your Android smartphone for the first time: tips and tricks
- Skip to step:
- 1. Select a language
- 2. Insert the SIM card and enter your PIN
- 3. Select a Wi-Fi network
- 4. Got another device?
- 5. Set up/login to Google account (optional)
- 6. Protect your phone
- 7. Notifications
- 8. Set up Google Assistant
- 9. Other services
- 10. Insert your microSD card (if you have one)
- 11. Download apps from the Google Play Store (optional)
- 12. Install software and Android updates
- 13. Personalize your phone
How to restore your apps and settings to a new Android phone
 Source: Harish Jonnalagadda/Android Central
Whether you’re upgrading to a new device or are resetting your phone, it’s incredibly easy to restore your apps and settings. Google automatically backs up information like contacts, calendar entries, call logs, texts, Do Not Disturb settings, and more to the cloud, allowing you to pick up from where you left off. Here’s how you can restore your apps and settings when moving to a new Android phone.
How to enable the Android backup service
Before we get started with restoring data, you have to make sure that the backup service is running on your current phone. Here’s how you can get started:
- Open Settings from the home screen or app drawer.
- Scroll down to the bottom of the page.
Tap System.
 Source: Android Central
You’ll be able to see the data that is being backed up.
Source: Android Central
Now that you’ve enabled the Android backup service, your system settings and app data will be automatically saved to Drive. When you’re switching to a new phone, you can rely on the service to restore your settings, apps, and associated data.
Note: The menu layout may not look exactly as above on your phone, but any phone running Nougat and above should have an equivalent of Backup & reset. If you’re on a Samsung phone running One UI, use the search box in settings for backup and you should see this setting.
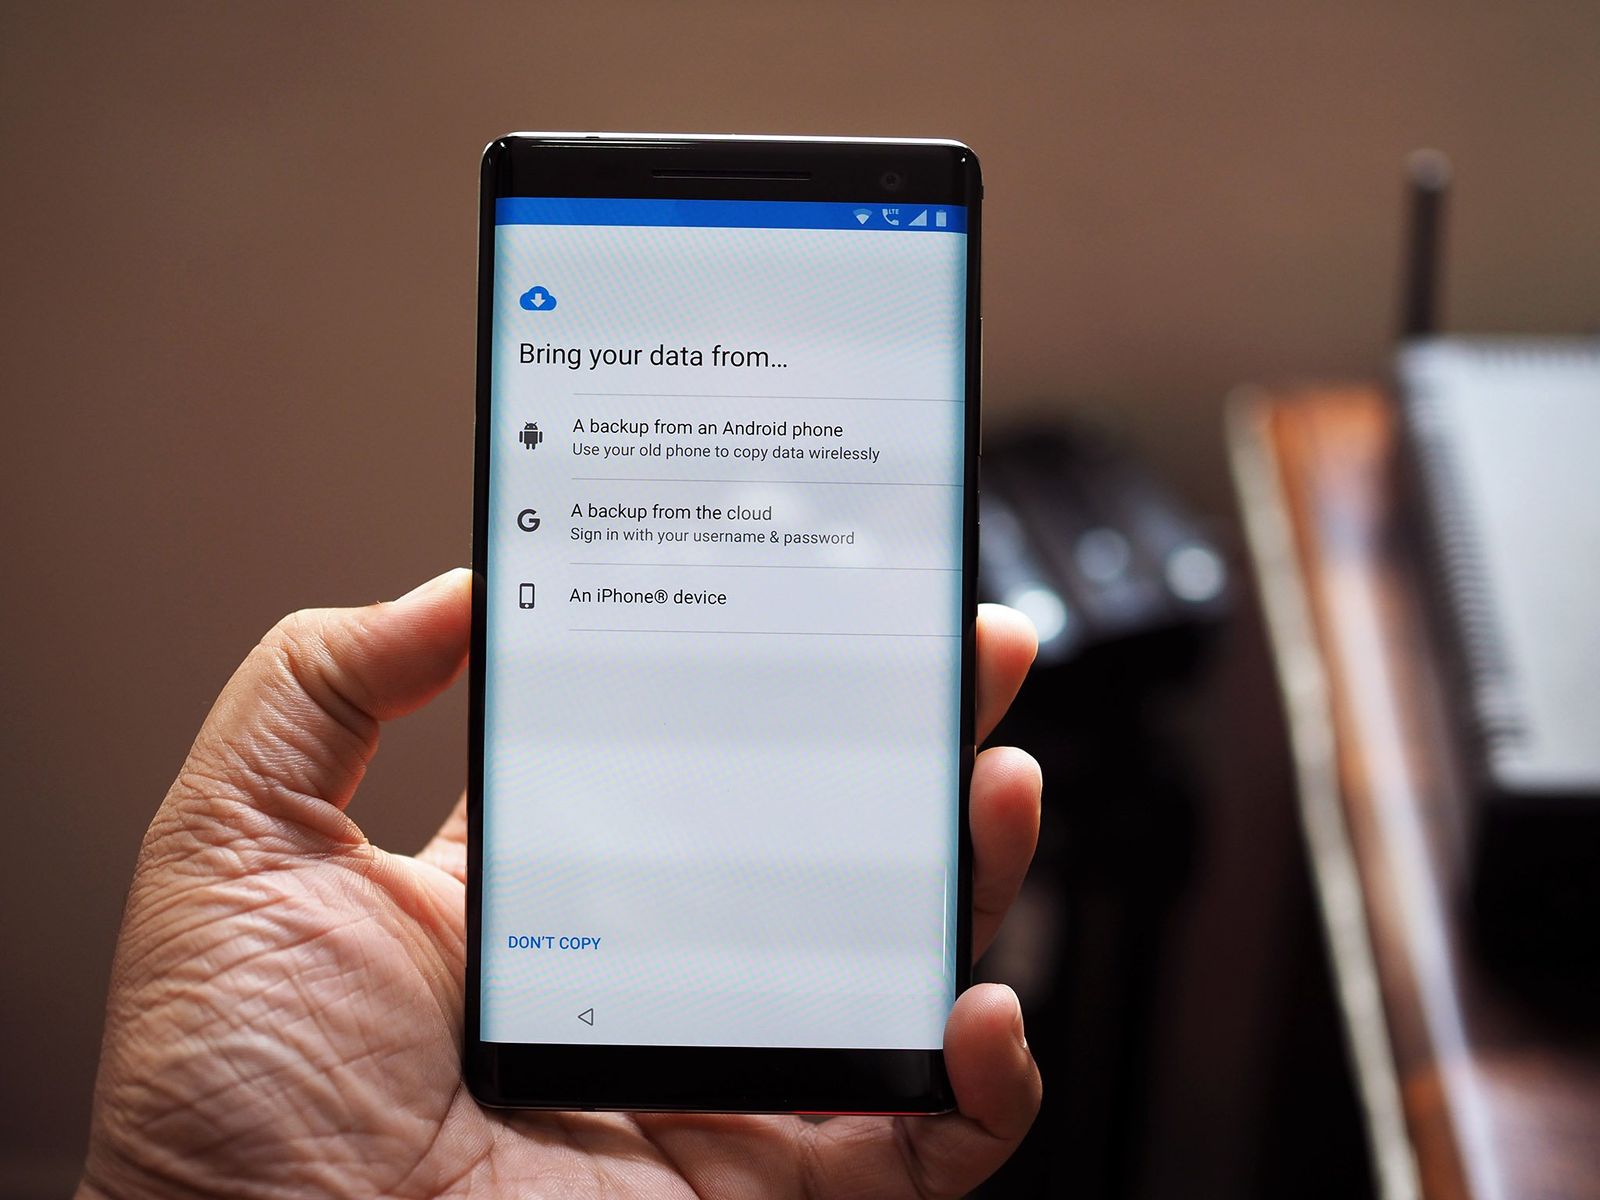
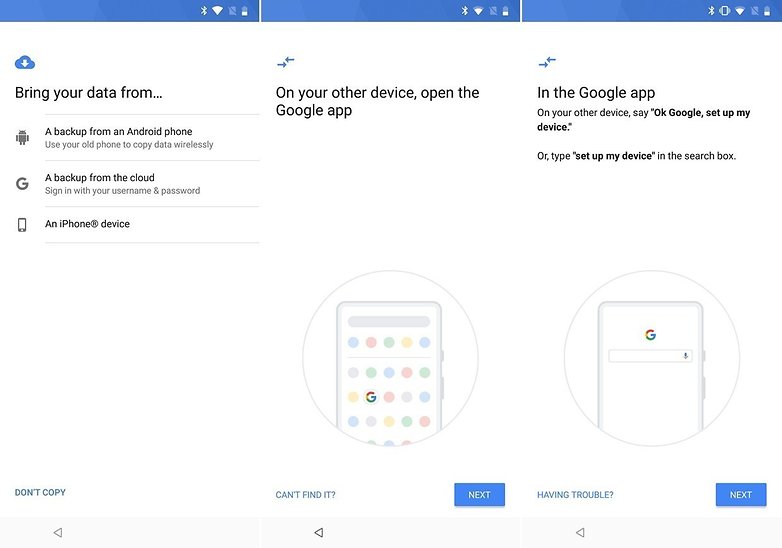
How to restore apps and settings on a new Android phone
Restoring apps is straightforward, and you’ll be able to do so during the initial configuration. If you’re using the Google Now or Pixel Launcher, your home screen background, icon and widget layout, as well as the folder structure, is now saved to the cloud, allowing you to restore your settings to a new handset and retain your home screen layout.
- Select the language and hit the Let’s Go button at the welcome screen.
- Tap Copy your data to use the restore option.
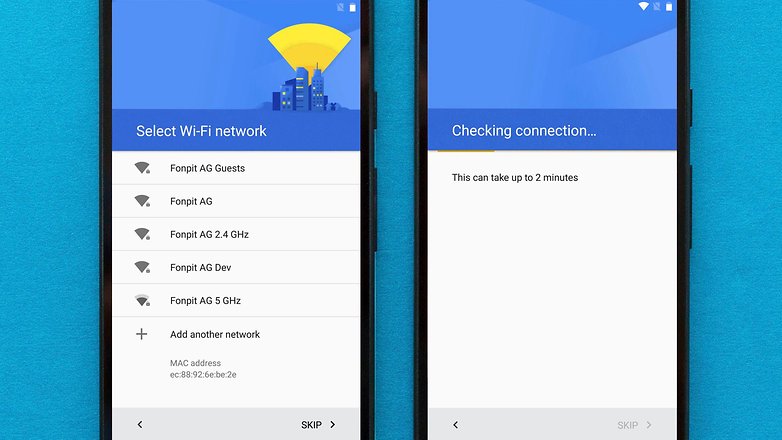
Connect to a Wi-Fi network to get started.
Source: Android Central
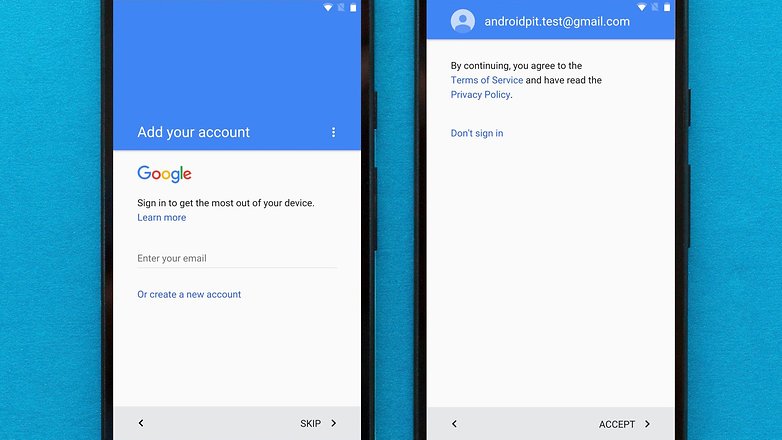
Select I agree to Google’s Terms of Service to proceed.
Source: Android Central
Hit Apps to choose what apps to install on your new device.
 Source: Android Central
Choose a mode of screen unlock and add your fingerprint.
Source: Android Central
Train Assistant to recognize your voice and hit Done to finish.
Source: Android Central
That’s it! Once the initial setup is completed, apps and settings will be restored in the background.
Where does all the app data get stored? Google backs up the app data to Drive, allocating 25MB for each individual app. Data used by the backup system doesn’t count toward your storage quota. Also, developers can choose to select what app data gets stored in the cloud, and you can opt-out of the service at any time through your device settings.
Your privacy
Gathering data and sending it off to a remote server means it’s outside the app sandbox and reliant on Google — as well as the people who made your phone — to do the right things. That may not always be the case, as phone manufacturers have a lot of leeway when they make an Android-powered phone. Google’s thoughts on the issue:
Caution: Because the backup transport can differ from device to device, Android cannot guarantee the security of your data while using backup. Be cautious about using backup to store sensitive data, such as usernames and passwords.
Google provides plenty of documentation on how to use the Backup service, so developers have the means to be cautious and do the right thing with sensitive data. Don’t let this scare you away from using the service, but you do need to be aware.
The ability to restore apps and settings is available on all current phones running Android 6.0 and above, and the process itself is identical regardless of the manufacturer. It doesn’t matter if you’re using a Samsung, LG, Xiaomi, Nokia, or Motorola phone; you’ll see the same steps when restoring your settings and data to your new phone.
![]()
These are the best USB-C cables you can find for Android Auto
Android Auto is an absolute necessity when driving, regardless of whether you’re headed out to the grocery store or for a long road trip. These cables will ensure your phone stays protected and charged, no matter what.
![]()
Keep your Galaxy Z Fold 3 looking fantastic with these screen protectors
The Galaxy Z Fold 3 is a beautiful phone with improved durability. But you might want to get some extra insurance by throwing on one of these screen protectors.
![]()
These are the best rugged Android phones
Living the rough and tumble life? Get yourself a smartphone that can handle everything you throw at it — or throw your phone at.

Harish Jonnalagadda
Harish Jonnalagadda is the Asia Editor at Android Central. A reformed hardware modder, he now spends his time writing about India’s technology revolution. Previously, he used to ponder the meaning of life at IBM. Contact him on Twitter at @chunkynerd.
Источник
App Settings: что это за приложение на Андроид и нужно ли оно?
08.08.2021 2 Просмотры
Ежегодно выпускается большое количество программ, сориентированных под запросы пользователей. О том, какие из них полезны, а какие — нет, можно долго дискутировать . большое количество людей интересует приложение App Settings и его целесообразность для загрузки. При помощи программного софта есть возможность видоизменять настройки устройства быстро и легко.
Использование этого инструмента оказывает помощь в управлении настройками телефона и делает возможным создание собственных профилей.
Возможности
В меню программного продукта доступна настройка различных функций телефона, а в созданных профилях есть возможность выполнить активацию, когда это необходимо.
В распоряжении пользователя, скачавшего рекламный продукт, большое количество опций, с которыми возможна корректировка параметров устройства.
С программным продуктом можно выполнить настраивание телефона в разных режимах: на работе или в спортивном зале, при вождении авто или во время сна. Достаточно настроить яркость дисплея, с наступлением темного времени суток.
Преимущества
Работа приложения на этом устройстве сопровождается рядом положительных моментов:
- Активация домашнего интернета, как только пользователь приходит домой.
- Переключение в профиль «Не беспокоить», при управлении ТС. Внимание!

Когда нужно это приложение
Если у пользователя устройства пытливый ум и он хочет по-максимуму использовать устройства и программные продукты, имеющиеся на нем, в этом случае App Settings будет незаменим. Но, если о программе ничего неизвестно и продукт не используется, так как собственник устройства с ним на «Вы», приложение скачивать необязательно.
В общем, продукт есть и в зависимости от предпочтений пользователя, его ожиданий и запросов принимается решение относительно загрузки его на устройство.
Источник
Android phone setting app

Краткое описание:
Настройка своего профиля под каждое приложение.
Описание:
Различные приложения должны иметь различные конфигурации настроек. Это приложение поможет вам переключиться на другие параметры для каждого приложения в отдельности. Оно включает в себя громкость, ориентацию, состояние сети, подключение Bluetooth, яркость экрана, предотвращать отключение экрана в приложении, и т.д..
Вы можете создать профиль для каждого приложения. Когда вы запускаете приложение, будет применяться соответствующий профиль. После этого, вы можете настроить параметры, как обычно. Также есть профиль по умолчанию. Он будет применяться, когда вы работаете в других приложениях, и когда ваш экран выключен.
Это поможет вам сэкономить время и заряд, потому что вам не нужно переключать настройки системы вручную. Вы можете уменьшить яркость экрана, когда это необходимо, и выключить его снова в профиле по умолчанию. Также можно настроить такие функции, такие как автоповорот экрана Wi-Fi и Bluetooth.
Можно настроить поведение приложения, регулируя профиль для этого приложения. Например, когда вы читаете новости и просматриваете видео, вы можете настроить профиль, указать ориентацию и держать экран включенным.
* Пожалуйста, не используйте его с другими инструментами настройки профиля, чтобы избежать конфликта.
Требуется Android: 3.0
Русский интерфейс: Нет
версия: 1.0.112 Patched Pro Settings app (Пост Alex0047 #62098269)
версия: 1.0.108 Patched Pro Settings app (Пост Alex0047 #61223437)
Версия: 1.0.108 GP Settings app (Пост vitaxa978 #61035517)
версия: 1.0.103 Pro Settings app (Пост Alex0047 #58616087)
версия: 1.0.103 Settings app (Пост vitaxa978 #58400359)
версия: 1.0.95 Pro Settings app (Пост Vista_21 #48626716)
версия: 1.0.100 Settings app (Пост vitaxa978 #55043568)
версия: 1.0.87  Settings_App_1.0.87[1].apk ( 1.92 МБ )
версия: 1.0.87 mod (перевел, убрал рекламу) settings_app_rus_1.0.87[1].apk ( 1.92 МБ )
Сообщение отредактировал iMiKED — 29.02.20, 16:10
Источник
Android phone setting app
Краткое описание:
Настройка своего профиля под каждое приложение.
Описание:
Различные приложения должны иметь различные конфигурации настроек. Это приложение поможет вам переключиться на другие параметры для каждого приложения в отдельности. Оно включает в себя громкость, ориентацию, состояние сети, подключение Bluetooth, яркость экрана, предотвращать отключение экрана в приложении, и т.д..
Вы можете создать профиль для каждого приложения. Когда вы запускаете приложение, будет применяться соответствующий профиль. После этого, вы можете настроить параметры, как обычно. Также есть профиль по умолчанию. Он будет применяться, когда вы работаете в других приложениях, и когда ваш экран выключен.
Это поможет вам сэкономить время и заряд, потому что вам не нужно переключать настройки системы вручную. Вы можете уменьшить яркость экрана, когда это необходимо, и выключить его снова в профиле по умолчанию. Также можно настроить такие функции, такие как автоповорот экрана Wi-Fi и Bluetooth.
Можно настроить поведение приложения, регулируя профиль для этого приложения. Например, когда вы читаете новости и просматриваете видео, вы можете настроить профиль, указать ориентацию и держать экран включенным.
* Пожалуйста, не используйте его с другими инструментами настройки профиля, чтобы избежать конфликта.
Требуется Android: 3.0
Русский интерфейс: Нет
версия: 1.0.112 Patched Pro Settings app (Пост Alex0047 #62098269)
версия: 1.0.108 Patched Pro Settings app (Пост Alex0047 #61223437)
Версия: 1.0.108 GP Settings app (Пост vitaxa978 #61035517)
версия: 1.0.103 Pro Settings app (Пост Alex0047 #58616087)
версия: 1.0.103 Settings app (Пост vitaxa978 #58400359)
версия: 1.0.95 Pro Settings app (Пост Vista_21 #48626716)
версия: 1.0.100 Settings app (Пост vitaxa978 #55043568)
версия: 1.0.87 Settings_App_1.0.87[1].apk ( 1.92 МБ )
версия: 1.0.87 mod (перевел, убрал рекламу) settings_app_rus_1.0.87[1].apk ( 1.92 МБ )
Сообщение отредактировал iMiKED — 29.02.20, 16:10
Источник
Setting up your Android smartphone for the first time: tips and tricks
![]()
If you’ve just bought a shiny new smartphone or tablet, you’ll probably want to start playing with it right away. Before that, you’ll need to configure it first. In this beginner’s article, we’ll give you a step-by-step guide on how to set up your new Android smartphone.
Each Android device is different, and each manufacturer gives its own devices little extras that make them stand out from the crowd of competitors. Deep down, Android devices are ultimately similar.
Skip to step:
1. Select a language
Once you’ve switched on the phone on, you’ll arrive at a welcome screen where you will be prompted to choose a language. Tapping on the default language opens a list of all those available on the system. Select your preferred language from the list and tap the arrow to continue. This will set the language of the system and its menus, but you can choose to add extra languages to your keyboard later if you’re multilingual.
 Android’s friendly first screen. / © NextPit
2. Insert the SIM card and enter your PIN
Next, you will be asked to insert a SIM card. You can actually skip this, but assuming you actually want to use this device as a phone, it’s an important step. Putting your SIM card in your phone can sometimes be a little tricky – Sony devices, for example, have flaps that you need to open, while most phones require inserting a PIN to open the slot. If you’ve got an older phone, then the SIM needs to go under the battery, in which case you will need to carefully open the back of the device.
You’ll then be asked to enter your SIM’s PIN number, which usually comes in the SIM package. This is a different PIN than the screen lock pin you may set later, which is used to prevent unauthorized access if someone picks up your devices.
After this step, you’ll be prompted to select whether you want to start as a new user or import data from your previous device. Either way, you’re going to want Wi-Fi next.
3. Select a Wi-Fi network
If you find yourself within range of a wireless network, you can now connect to it. Simply select your network from the list and enter the password if required. Then tap «Connect».
We suggest connecting to Wi-Fi at this stage so you can download updates and new apps as soon as possible.
 Log into your Wi-Fi and wait for the device to connect. / © NextPit
4. Got another device?
At this point, you will be asked if you wish to copy your data from another Android device. If you can and want to do this, then do so. Otherwise, select to set up as «new user» and proceed to step 4.
 Backups can be handy if you have a lot of data on your old device. / © NextPit (screenshot)
If you want to transfer from your old phone backups, it’ll then prompt you to open the Google app on your old phone and either ask Assistant «Ok Google, set up my device» or go to Settings > Google > Set up nearby device. Or you can just sign in with your Google account to back up from the cloud, which is the next step.
You’d be surprised at just how much can be transferred over, from files to text togs, pictures and more. Take a look at our detailed guide on how to transfer everything to a new phone from your old one.
5. Set up/login to Google account (optional)
If you skipped the step above, the next stage is to set up or log in to an account in order to use your smartphone with Google’s apps and services, such as Gmail or the Play Store.
If you already have a Google account, you can enter those details now. Then you will be asked to accept Google’s Terms of Service and Privacy policy. Read them (if you want) by tapping the highlighted phrases then hit “Accept”.
- 12 great Gmail tips and tricks for Android
 You can opt to make a Gmail account later, log in with an existing account, or create one. / © NextPit
If you don’t already have a Google account, but would like to set one up, just follow the steps to choose a username and create a password. You don’t need to have a Google account to use the phone, but you will need one in order to use all of its functions, including installing apps from the Play Store. To get the best out of your new Android phone, you really should have a Google account.
Some manufacturers, such as Samsung, ask you during the registration whether you want to create an extra account. This is only necessary if you want to use some special services from that company. These services can possibly come in handy if you lose your phone, or if you want to take advantage of special features exclusive to your phone manufacturer’s devices. You can simply skip this step if you want to.
 You can opt-out of Google’s data collection if you wish. / © NextPit
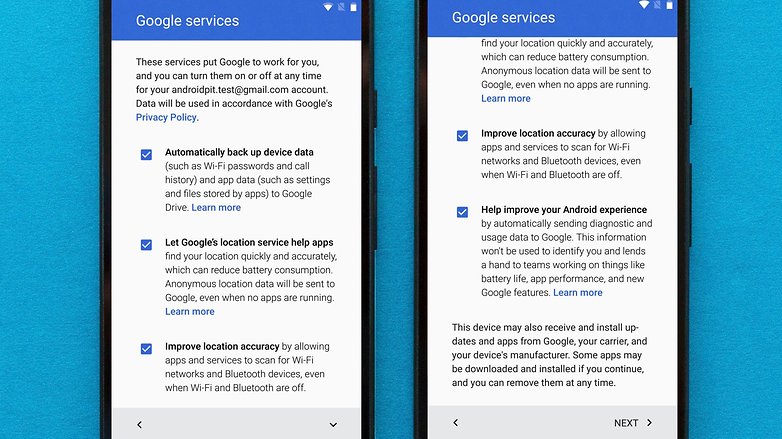
Google will also ask which services you would like to opt-into. This includes backing up your device, which is recommended in case anything should happen to your device. The others you can assess on a case-by-case basis. None of these are essential, and they can be switched on or off at any time.
6. Protect your phone
If you have an existing email address that you wish to sync with your Android phone, this is where you can add it. As with almost all of the steps in this list, this can be done at a later date.
Next, you will be asked if you want to secure your device. We strongly recommend this. Should you lose your device, this security measure is a key step in preventing unwanted access to your device. This can be done with face recognition for phones that support it, fingerprint recognition or with a simple PIN (distinct from the one for your SIM).
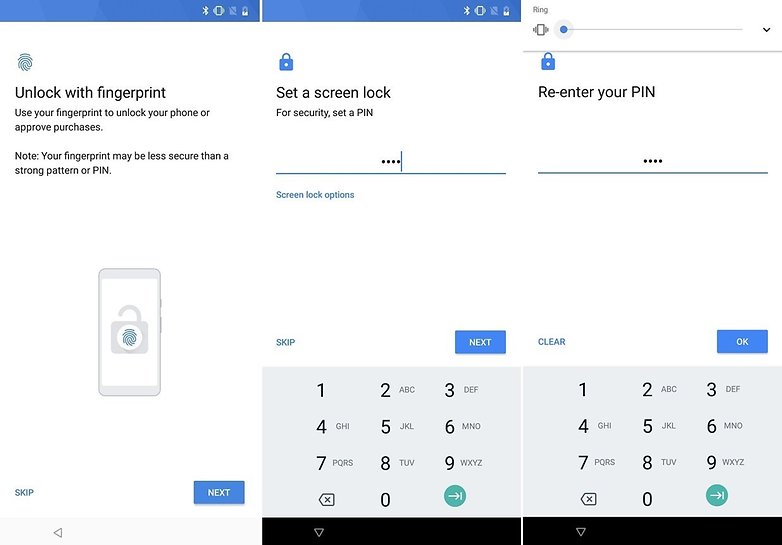 You should secure your phone one way or another. / © NextPit (screenshot)
7. Notifications
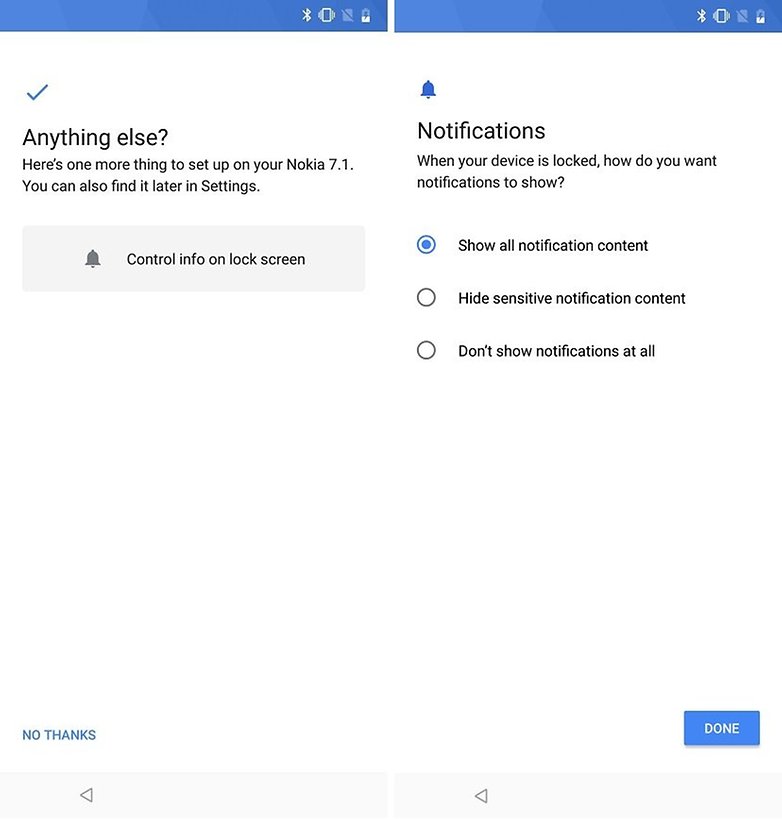
In this section, you set up how your device displays content when your phone is locked. You have three options:
- Show all notification content means that, when your device is locked, if you receive a message, for example, this message will be displayed on your lock screen.
- Hide sensitive notification content will show some notification information, like that you have received a message, but will hide the content of the message.
- Don’t show notifications at all means you won’t see any notifications on your lock screen at all, but these will still be found in your device’s notification shade.
 Set up your notifications, it is very important. / © NextPit (screenshot)
8. Set up Google Assistant
The next step that you might see is an invitation to use Google’s clever assistant. You’ll be prompted to repeat certain phrases so that assistant can recognize your voice, which it should do so promptly if you’ve already set up Voice Match on another device.
9. Other services
Many smartphones come with pre-installed software, such as cloud storage services like Dropbox, Box or Google Drive. Some even come with Facebook or Microsoft Office! If you already have an account for these services you may be asked to log into them now, or you can register for the ones you want.
10. Insert your microSD card (if you have one)
If your phone has a microSD card slot, the last thing to do is to insert a microSD card, if you have one. This will provide extra storage space for your device to allow you to save more files. If you don’t have a mircoSD card, consider buying one to save space on your phone’s internal storage. You may not need the extra storage space at first. But, once you start downloading apps, getting large software updates, and taking pictures and video, you may find yourself needing more space.
- How to pick the right microSD card
 If your device supports microSD cards, and you have one spare, try it out. / © NextPit
11. Download apps from the Google Play Store (optional)
The initial setup of the smartphone is now complete. For an overview of the apps that have already been installed on your device, have a look at the app drawer. The app drawer is a list of icons for all the apps on your phone and chances are that you’ll find this at the bottom of the home screen (the screen you should currently be on). The icon for the app drawer is a gray circle with six dots inside, which you can tap on from the home screen.
Now, look around your app drawer. If there are any apps you don’t have yet that you want, you can go to Google’s Play Store to download them. Don’t worry, the Play Store itself will be installed on your phone already. Installing apps is a simple process and the handset will walk you through anything you need to do (like signing in).
If you don’t find an app drawer, it means your phone doesn’t have one. To find your apps in this case, simply swipe your finger left or right from the home screen to see your other home screens views where apps could be located.
Check out these best apps lists to get started:
- The best apps for your new phone or tablet
- The best apps of the year
- The best backup apps: never lose your data
- The best free Android apps
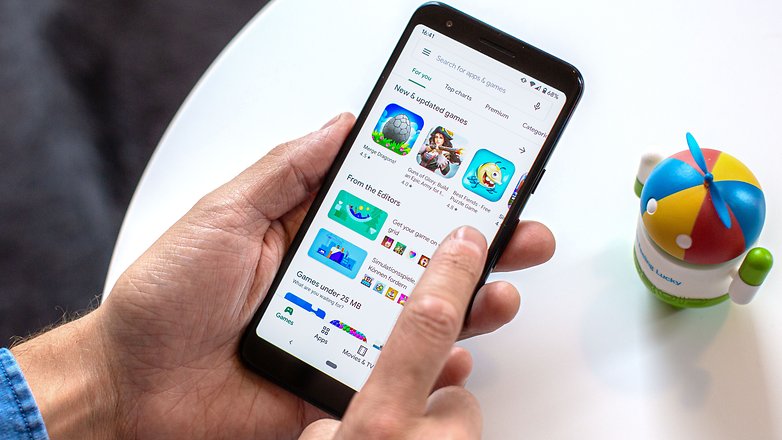 The Google Play Store is the place to get all your Android apps. / © NextPit
12. Install software and Android updates
When your Android is turned on for the first time, it might not be running the latest version of the software available for your specific model. For example, your phone could come with Android Pie out of the factory, even if that model has an update ready for Android 10, you’ll have to download it after setting up.
To check to see if an update is available, simply go into the settings of your phone. The settings are found as an app in the app drawer or by going through the notification shade and tapping on the settings icon (usually a cogwheel or a set of tools of some sort).
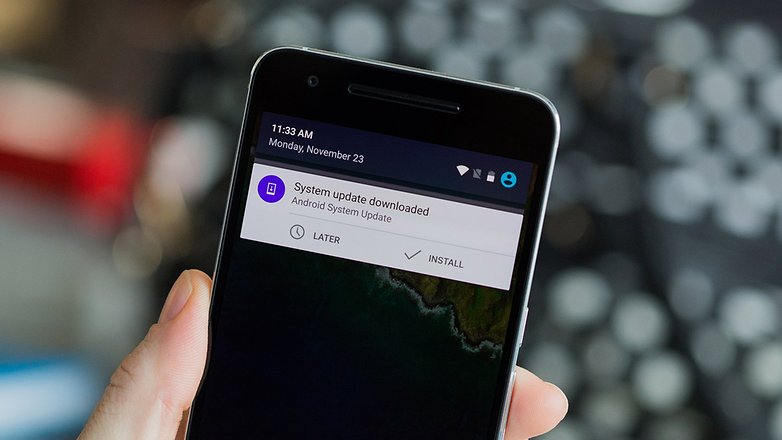 When you get a new phone, you usually have to install a system update straight away. / © NextPit
Find the About Phone tab, which is usually located at the bottom of the settings menu, and tap it. It will look different depending on your manufacturer. However, you will likely tap on something along the lines of «Check for software updates».
Software updates can take a long time to download and install, which can drain your battery and sometimes hundreds of MB from your mobile data plan. So, make sure that when you do this you are connected to a Wi-Fi connection and that your battery is at least 50 percent full. You should update to the latest version of Android available for your device because it (usually) provides more functionality, better battery life, and better security.
13. Personalize your phone
If you don’t like the background image that came with your device, do not despair – every smartphone offers a selection of different backgrounds from which you can choose. The way to do this changes depending on the manufacturer, but look for Display or Wallpaper in the settings menu.
Quite often, if you press on the home screen anywhere for a couple of seconds, a window will appear that enables you to change your wallpaper.
- The best apps for customizing your phone in your own style
 Got a favorite picture? Make it the wallpaper for your new phone or tablet. / © NextPit
If none of the options are to your liking, you could try out a new icon pack or test some other backgrounds – there are lots of these on the internet.
You should also check your phone’s default sound settings. If you don’t like the default ringtone, most phones come pre-loaded with alternatives. Make sure to adjust your ringtone and alarm volume to the appropriate level, too. You don’t want your cell phone annoying everyone when you go out in public. You can also set the sound settings for when you tap menu items or type on your keyboard to silent, if you like.
How do you like your new Android smartphone? Did setting up your phone run smoothly? Let us know in the comments.
Источник


