- A Full Guide to Use a Flash Drive on Android Phone [Partition Magic]
- Summary :
- Quick Navigation :
- How to Use a Flash Drive on Android
- How to Use a Flash Drive on Android
- Check Your Android USB Port
- Check If Your Android Supports USB On-The-Go (OTG)
- Prepare a USB OTG Cable
- Prepare a Flash Drive Formatted as FAT32
- How to Connect a USB Flash Drive to Android
- How to Safely Disconnect an Android Flash Drive
- Bottom Line
- Проект Артемия Ленькова
- Понемногу обо всём
- USB драйверы для смартфонов на ОС Android
- Драйверы Acer
- Download Android USB Drivers for popular OEMs
- Purpose of Android USB drivers
- Download Android USB drivers for popular OEMs
- How to install Android USB drivers
- Manually install the driver for an unsupported device
A Full Guide to Use a Flash Drive on Android Phone [Partition Magic]
By Irene | Follow | Last Updated January 29, 2021
Summary :
Do you know how to connect a USB flash drive to your Android phone? If you don’t know, this article from MiniTool will show you some tips about how to use a USB flash drive on an Android phone.
Quick Navigation :
Sometimes, you may need to connect a flash drive to your Android. As we all know, the USB port on your Android does not match that of a flash drive. How can you make it? Well, this article will give you some instructions on how to use such a drive with Android.
How to Use a Flash Drive on Android
- Check your Android USB port
- Check if your Android supports USB On-The-Go (OTG)
- Prepare a USB OTG cable
- It should be formatted as FAT32
- Connect it to Android
- Tab the pop-up file manager on Android to browse the files on the USB
How to Use a Flash Drive on Android
You can connect a USB drive to an Android so that you can use it on Android and transfer files at ease. The question is: how to connect the USB drive to an Android? Well, the way to connect the flash drive to your Android may depend on what types of USB port your Android has.
Check Your Android USB Port
If you have an Android with a USB Type-C port and you have USB drive with both a USB-C interface and a USB-A interface, you can use the USB drive on Android without the need for an adapter. If you are using the traditional USB-A flash drive, you will need an adapter such as the USB On-The-Go (OTG) cable.
However, currently, most Android use Micro USB interface (USB Micro-B) for data migration and charging. Although USB type-C port appears on some android nowadays with the maturity of technology, Micro USB interface is still widely used in various mobile portable devices including Android.
So, generally speaking, when people asking how to connect a flash drive to an Android, the USB interface of the Android refers to the Micro USB interface. For these Android users, they have to resort to a USB OTG cable.
In conclusion, if you have an Android with a USB-C port, you can buy a new flash drive with both a USB-C interface and an A interface or adopt the USB OTG cable if you are using the traditional USB-A drive. If your Android has the traditional Micro USB port, you have no choice but to use the adapter USB OTG cable to make the connection.
No matter what, a USB OTG cable is vital, but what’s more important is that your Android should support USB OTG.
Check If Your Android Supports USB On-The-Go (OTG)
USB On-The-Go enables your Android to act as a USB host, allowing your Android to connect additional hardware such as flash drive, keyboard and so on.
However, not all Android support USB On-The-Go. So before applying this method, you should check if your Android supports USB OTG first. There are many USB OTG Checker apps, which can quickly scan your Android to check it supports USB OTG. You can download one via the Google Play store.
You can also visit your Android’s manufacturer’s website. If you see USB OTG listed in the specifications, it means the device supports USB OTG. If your Android is not compatible, you are unable to use the USB OTG cable to connect your USB drive to Android.
Prepare a USB OTG Cable
The USB OTG cable has a male Micro USB connector on one side and female USB-A jack on the other, which enables you to connect the USB drive to the Android.
You can plug your USB drive into the USB A jack, and then plug the other end of the USB OTG cable into your Android. In this case, the USB drive can be connected to your Android, which is very convenient.
If your Android supports USB OTG, you can connect your drive to your Android via USB OTG cable. However, most Android don’t come with a USB OTG cable. If you do not have one, you can buy a USB OTG cable from Amazon.
Prepare a Flash Drive Formatted as FAT32
Prepare a USB drive to be used on your Android. If the USB drive is formatted as NTFS, you need to format it to FAT32, as NTFS doesn’t work properly with Android.
If you don’t know how to format USB drive to FAT32 file system, you can keep reading.
Format your Android Flash Drive to FAT32
To make sure the flash drive can be read on your Android, a proper file system is vital. If you want to use it with Android, the file system for the USB drive should be FAT32.
If you need to format Android flash drive to FAT32, MiniTool Partition Wizard Free Edition is recommended.
MiniTool Partition Wizard Free Edition is an all-in-one partition manager. It can help you move/resize partition, extend partition, format partition, convert FAT to NTFS, convert MBR to GPT disk, migrate OS to SSD/HD, backup partition and so on.
With its simple procedures, powerful features and user-friendly interface, it has become the most popular partition manager for Windows users. So if you want to format USB drive to FAT32, MiniTool Partition Wizard Free Edition is your best choice.
Before you format USB drive to FAT32, you need to connect the Android flash drive that you need to format to your computer. Then you can follow the detailed guide below.
Step 1. Download MiniTool Partition Wizard Free Edition by clicking the following button. Install it on your computer and launch it to get the main interface.
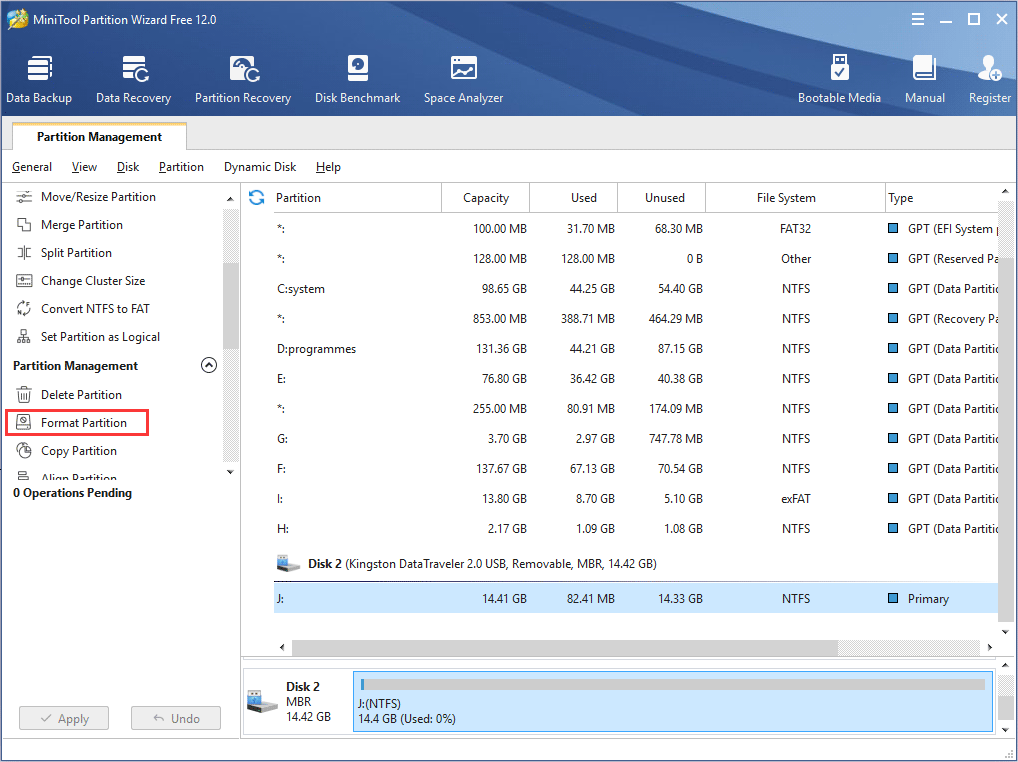
Step 2. Select the target partition, and then choose Format from the left action pane.
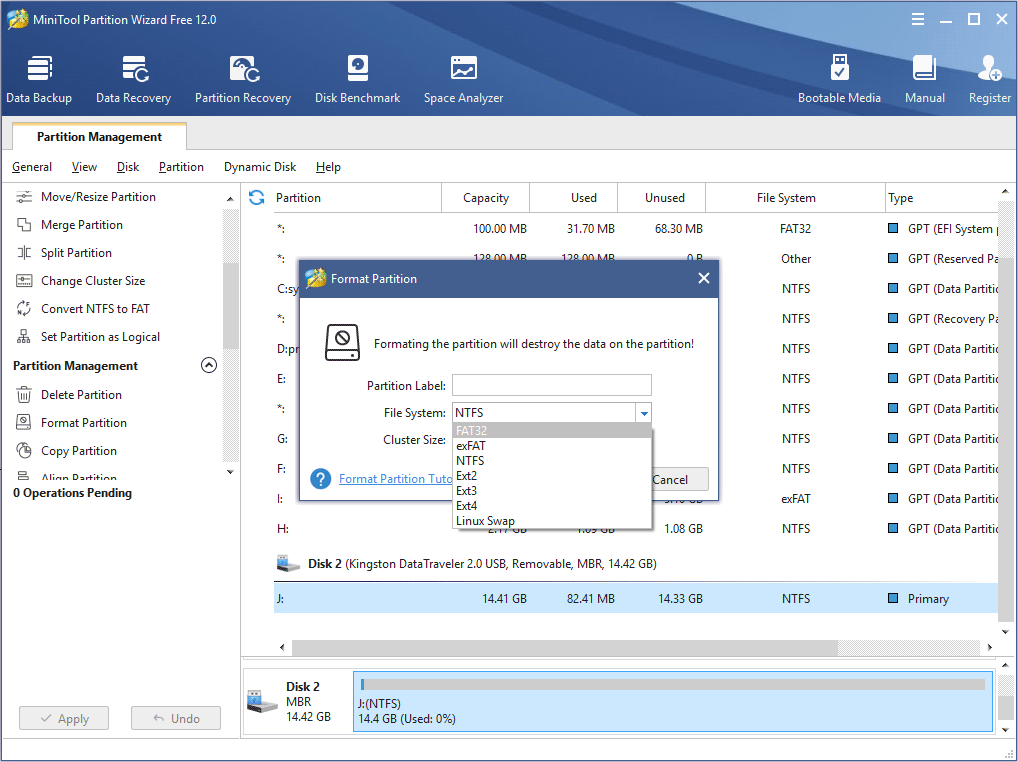
Step 3. On the Format partition page, choose FAT32 file system and click OK button.
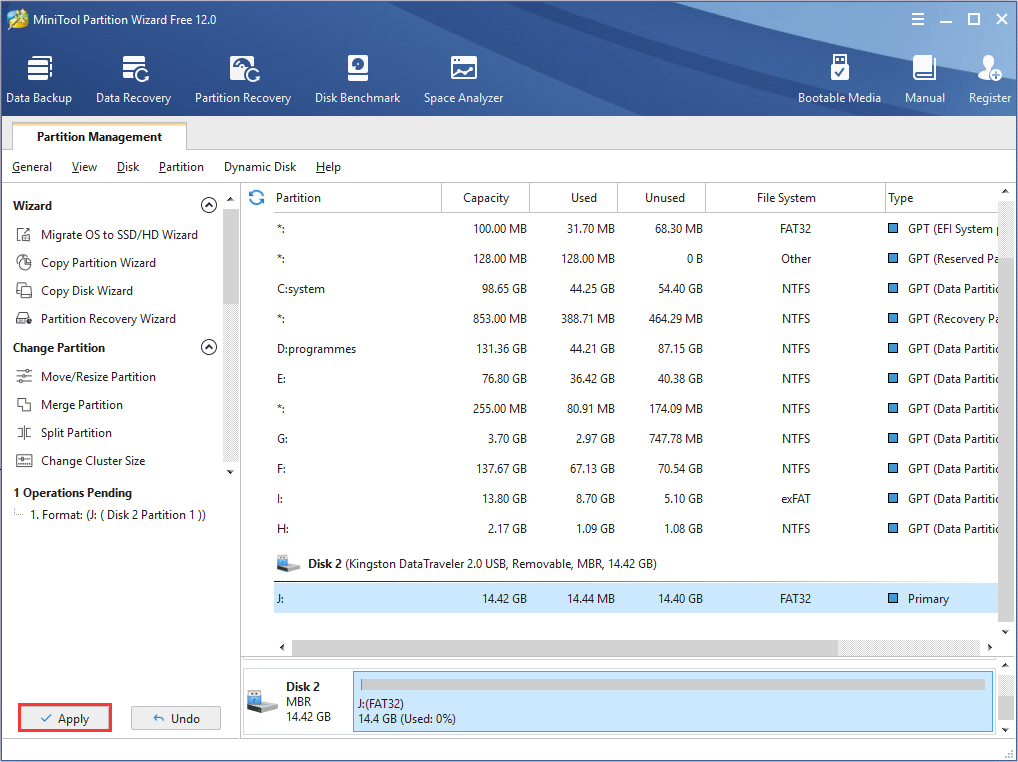
Step 4. At last, click Apply button on the top left corner to allow the change.
If there is no important file on the Android flash drive, you can format it to FAT32 using the following method. However, if there are important files stored on your USB drive, such as loads of movies that you want to play after connecting the USB drive to your Android device, what should you?
You can move them to another drive and restore them after formatting, but it consumes much time. If your Android flash drive is formatted as NTFS, here is another method for you: convert NTFS to FAT32 without data loss.
Convert Android Flash Drive from NTFS to FAT32
In most cases, a USB drive will be formatted to NTFS by default. If it is NTFS, you can convert the USB drive to FAT32 with MiniTool Partition Wizard Pro Edition.
Like the above steps, you just need to get MiniTool Partition Wizard Pro Edition by clicking the button. After installing the partition manager, select the USB drive and choose Convert NTFS to FAT32. At last, follow the prompts to apply the pending operation.
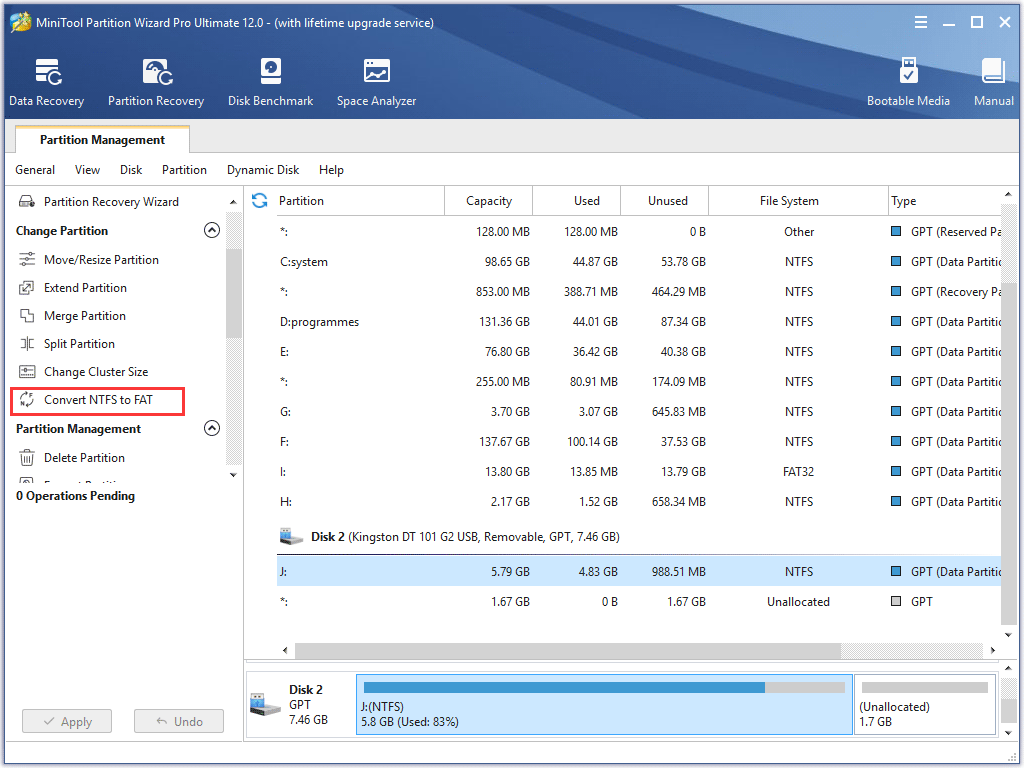
So if formatting is not a good idea for you, you can convert NTFS to FAT32 without data loss with MiniTool Partition Wizard Pro.
How to Connect a USB Flash Drive to Android
After having a USB OTG cable and formatting or converting the USB drive to FAT32, you can connect the drive to your Android. If you don’t know how to make the connection, this guide is helpful.
Step 1. Plug your cable into your Android.
Step 2. Plug your USB drive into the female connector of the cable.
Step 3. Then the file explorer on your Android should automatically pop up after detecting the USB drive.
Step 4. If the USB drive is not properly formatted, it will require you to erase and format your drive. If your USB drive is properly formatted with MiniTool Partition Wizard, you are able to tab the notification and open the file explorer to view the contents of the drive as if they were originally stored on your Android.
Then you are able to transfer files from android to this removable drive and play media files from the USB drive. Remember that do not remove the storage device while using it, as this will cause unexpected data loss on the USB drive.
If you need to copy and paste certain files from the flash drive to your Android device, you can long-press on the items you want to move and perform the proper operation. If you want to remove the Android USB drive, to avoid data loss, you should safely disconnect the Android flash drive.
How to Safely Disconnect an Android Flash Drive
When you don’t need the Android USB drive, you can follow this instruction below to safely disconnect the USB drive.
Step 1. Swipe down from the top of the screen.
Step 2. Tap the USB mass storage connected. Then you can now safely disconnect your flash storage device.
Now you should know how to safely disconnect the Android flash drive. It is not a difficult thing to connect and disconnect a flash drive to your Android.
After knowing how to connect a flash drive to an Android, you can use the USB drive on Android at ease no matter if you want to transfer files or play media files stored on the USB drive.
Bottom Line
After reading this post, you should know how to connect and use a USB drive on Android.
If you have any question about how to format Android flash drive or how to use such a drive on Android, you can leave a message in the following comment zone and we will reply as soon as possible. If you need any help when using MiniTool software, you may contact us via [email protected] .
Источник
Проект Артемия Ленькова
Понемногу обо всём
USB драйверы для смартфонов на ОС Android
Драйвер – это компьютерное программное обеспечение, с помощью которого операционная система получает доступ к аппаратному обеспечению некоторого устройства. Благодаря USB драйверам можно выполнять такие задачи, как передача данных между компьютером и мобильным телефоном, использование устройства в качестве MP3-плеера или фотокамеры, установка прошивки, а также получение прав суперпользователя и многое другое.
В былые времена при покупке любого мобильного устройства в штатной комплектации шёл диск, на котором были записаны USB драйверы от производителя. Однако, в настоящее время даже гарнитура считается роскошью. Поэтому, чтобы долго не искать на просторах интернета, я подготовил ссылки на загрузку USB драйверов для устройств, работающих на ОС Android.
Перед установкой данных USB драйверов необходимо предварительно удалить проинсталлированные драйверы от предыдущего производителя. Сделать это можно вручную через Диспетчер устройств или при помощи небольшой утилиты USBDeview.
Драйверы Acer
Установка USB драйверов для устройств Acer:
- Открываем официальный сайт
- Выбираем регион
- Выбираем Драйверы и Руководства
- Вводим серийный номер устройства или выбираем вручную из списка
- Скачиваем и устанавливаем нужные драйверы
Источник
Download Android USB Drivers for popular OEMs
So you’ve got an Android device and want to dive deep into the world of modding? Be it rooting or installing a custom ROM like LineageOS, most of the aftermarket modding requires you to connect your Android smartphone to a computer using a USB cable so you can use tools like the Android Debug Bridge (ADB) and Fastboot to interact with the device. For an Android power user, you may also want to reinstall the factory firmware on your phone, which means you have to deal with the OEM-specific flashing utilities.
However, none of these tinkering jobs are possible if your PC can’t see the target device in the first place. As in the case of Windows, the operating system may require an additional piece of software known as the “driver” in order to properly recognize all the different connection modes exposed by the Android device. Below you can find a list of official OEM-provided Android USB driver packages and a generic driver installation guide. If you don’t see the maker of your device listed or you see a misplaced link, send a message to Skanda HazarikaВ (SkandaHВ on the forums) with the device details.

Table of Contents:
Purpose of Android USB drivers
The USB interface of an Android device is a pretty complex object. Depending on the configuration, it may expose the standard Android USB debugging interface, the fastboot interface, and various other SoC-specific diagnostic interfaces to the computer. Simultaneously maintaining more than one interface is supported as well, e.g. you can interact with your device with ADB while configuring the internal modem parameters.
Keep in mind the aforementioned scenarios are a bit different from connecting the device through the plain old Media Transfer Protocol (MTP) or Picture Transfer Protocol (PTP) mode. MTP enables the end-user to browse the internal memory on the device from a PC as if it’s an external storage drive. Microsoft ships a generic MTP/PTP driver with every edition of Windows since Windows XP, so you don’t need an external driver for that.
Download Android USB drivers for popular OEMs
Most Android OEMs offer official driver packages for their devices. Besides the ADB and Fastboot interfaces, these drivers also support proprietary flashing protocols designed by the corresponding device maker. For example, if you want to flash a Samsung Galaxy device, you must install the Samsung USB driver package beforehand.
Note that Microsoft has been shipping a generic ADB driver with Windows for a while, so installing the OEM driver just for the sake of USB debugging might not sound worthwhile anymore. Windows can also check and install the missing drivers on the fly through Windows Update. However, Microsoft-recommended drivers are not always the best choice for complex USB interfaces, so do check out the official driver pack whenever possible.

The inbox Android USB debugging driver of Windows in action
Get the appropriate driver for your device from the index below:
| OEM | Android USB Driver |
|---|---|
| Acer | Download Link |
| Alcatel | Download Link |
| ASUS | Download Link |
| Blackberry | Download Link |
| Dell | Download Link |
| Fujitsu | Download Link |
| Download Link | |
| HTC | Download Link |
| Huawei | Download Link |
| Intel | Download Link |
| Kyocera | Download Link |
| Lenovo |
|
| LG | Download Link |
| Motorola | Download Link |
| MediaTek | Download Link |
| NVIDIA | Download Link |
| Samsung | Download Link |
| Sharp | Download Link |
| Sony | Download Link |
| Toshiba | Download Link |
| Vivo/iQOO | Download Link |
| Xiaomi | Download Link |
| ZTE | Download Link |
How to install Android USB drivers
Now that you’ve downloaded the suitable driver package for your device, it’s time for you to install it. Some OEMs offer standard installer executables, which means you can easily install the whole driver suite by double-clicking on the setup file and following the wizard.

However, Google and a few other vendors prefer to stick with the bare INF and associated binary files which are packed inside a zip or rar archive. Such packages need to be installed using Device Manager, but you have to extract the contents of the archive beforehand.
- Right-click on the Start button and select the Device Manager entry. You can also call the Microsoft Management Console snap-in named devmgmt.msc directly from Run to open Device Manager.

Device Manager under Windows 10
- Connect the Android device to your PC. Depending on the selected configuration, you may see one or more unknown devices popping up.

- (Optional) Right-click on the unknown device entry, select Properties, move to the Details tab, and finally select Hardware Ids from the dropdown menu. Now open your favorite search engine, paste the hardware identifier in the search box, and go through the search results. This is a crude way to determine the probable interface your device is currently exposing.

- Right-click on the unknown device entry and select Update drivers. Now select Browse my computer for drivers/driver software and point the wizard to the folder where you extracted the driver package.
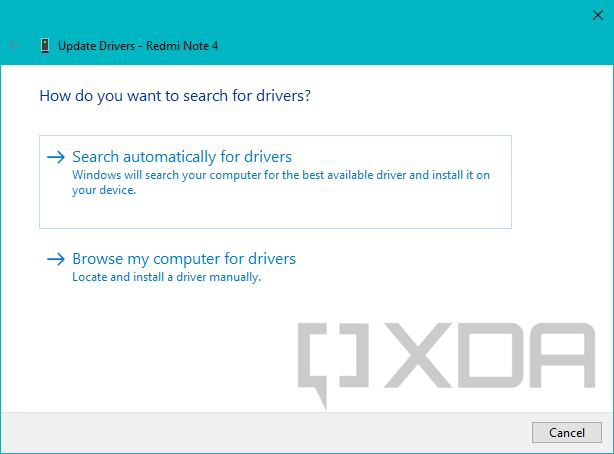

- If everything goes right, you should see a confirmation page like the following.

Manually install the driver for an unsupported device
On some occasions, the OEM drivers aren’t enough. Perhaps you’ve stumbled upon a no-name generic tablet, or the flash mode interface of your shiny new phone has yet to get an official driver from its maker. In that case, you can forcibly install an existing driver package for a similar USB interface through Device Manager.
- Open Device Manager and locate the unknown device entry.
- Right-click on it and select Update drivers. Select Browse my computer for driver software and then choose the option named Let me pick from a list of available drivers on my computer.

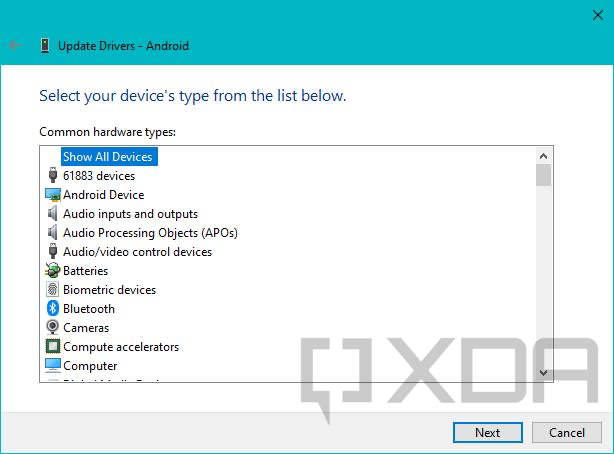
- Now select Show All Devices and click Next. On the next screen, click on the Have Disk… button.

- At this point, you need to browse to the location where the extracted driver for a similar device is located. Pick the INF file from the list of files and select Open.

- Now carefully choose the driver model. For example, if you’re trying to install the Fastboot mode driver for a device, select the Android Bootloader Interface from Google’s driver set. Windows might show a warning related to compatibility, but you can ignore it and continue the installation process anyway.


This method lets you force-install a signed driver without breaking its digital signature, so you don’t need to turn off driver signature enforcement on a 64-bit Windows instance.
You’ve now got the correct USB driver installed on your computer and your Android device is ready to receive instructions. Now it’s time to put it all together and run your first ADB command!
Источник


