- Build.VERSION
- Class Overview
- Summary
- Fields
- public static final String BASE_OS
- public static final String CODENAME
- public static final String INCREMENTAL
- public static final int PREVIEW_SDK_INT
- Как получить номер сборки/версии вашего приложения для Android?
- ОТВЕТЫ
- Ответ 1
- Ответ 2
- Ответ 3
- Ответ 4
- Ответ 5
- Использование Gradle и BuildConfig
- Получение VERSION_NAME из BuildConfig
- Возвращает ли пустая строка для VERSION_NAME?
- Удаление versionName и versionCode из AndroidManifest.xml
- Ответ 6
- Ответ 7
- Ответ 8
- Ответ 9
- Ответ 10
- Ответ 11
- Ответ 12
- Ответ 13
- Ответ 14
- Ответ 15
- Ответ 16
- Ответ 17
- Ответ 18
- Ответ 19
- Нет, вам не нужно ничего делать с AndroidManifest.xml
- Ответ 20
- Ответ 21
- Ответ 22
- Android Platform Guide
- Requirements and Support
- Installing the Requirements
- Java Development Kit (JDK)
- Gradle
- Android SDK
- Adding SDK Packages
- Android SDK Tools:
- Setting environment variables
- OS X and Linux
- Windows
- Project Configuration
- Setting up an Emulator
- Configuring Gradle
- Setting Gradle Properties
- Extending build.gradle
- Configuring Gradle JVM Args
- Setting the Version Code
- Signing an App
- Using Flags
- Using build.json
- Using Gradle
- Debugging
- Opening a Project in Android Studio
- Platform Centered Workflow
- Upgrading
- Lifecycle Guide
- Cordova and Android
- What makes Android different?
- When can this happen?
- Respecting the Lifecycle
- Retrieving plugin callback results (cordova-android 5.1.0+)
- Example
- Android Quirks
- Android Manifest Information
- Testing the Activity Lifecycle
Build.VERSION
Class Overview
Various version strings.
Summary
| Fields | |||||||||||
|---|---|---|---|---|---|---|---|---|---|---|---|
| BASE_OS | The base OS build the product is based on. | ||||||||||
| CODENAME | The current development codename, or the string «REL» if this is a release build. | ||||||||||
| INCREMENTAL | The internal value used by the underlying source control to represent this build. | ||||||||||
| PREVIEW_SDK_INT | The developer preview revision of a prerelease SDK. | ||||||||||
| RELEASE | The user-visible version string. | ||||||||||
| SDK | This field was deprecated in API level 4. Use SDK_INT to easily get this as an integer. | ||||||||||
| SDK_INT | The user-visible SDK version of the framework; its possible values are defined in Build.VERSION_CODES . | ||||||||||
| SECURITY_PATCH | The user-visible security patch level. | ||||||||||
| Public Constructors |
|---|
[Expand] Fieldspublic static final String BASE_OSThe base OS build the product is based on. public static final String CODENAMEThe current development codename, or the string «REL» if this is a release build. public static final String INCREMENTALThe internal value used by the underlying source control to represent this build. E.g., a perforce changelist number or a git hash. public static final int PREVIEW_SDK_INTThe developer preview revision of a prerelease SDK. This value will always be 0 on production platform builds/devices. When this value is nonzero, any new API added since the last officially published API level is only guaranteed to be present on that specific preview revision. For example, an API Activity.fooBar() might be present in preview revision 1 but renamed or removed entirely in preview revision 2, which may cause an app attempting to call it to crash at runtime. Experimental apps targeting preview APIs should check this value for equality ( == ) with the preview SDK revision they were built for before using any prerelease platform APIs. Apps that detect a preview SDK revision other than the specific one they expect should fall back to using APIs from the previously published API level only to avoid unwanted runtime exceptions. Источник Как получить номер сборки/версии вашего приложения для Android?Мне нужно выяснить, как получить или сделать номер сборки для моего приложения Android. Мне нужно, чтобы номер сборки отображался в пользовательском интерфейсе. Нужно ли что-то делать с AndroidManifest.xml ? ОТВЕТЫОтвет 1И вы можете получить код версии с помощью этого Ответ 2Если вы используете плагин Gradle/Android Studio, от версии 0.7.0, код версии и имя версии доступны статически в BuildConfig , Убедитесь, что вы импортируете пакет приложений, а не другой BuildConfig : Не требуется контекстный объект! Также не забудьте указать их в файле build.gradle вместо AndroidManifest.xml . Ответ 3Немного короче, если вам просто нужно имя версии. Ответ 4Есть две части, которые вам нужны: Android: версия Код Android: версия Имя versionCode — это число, и каждая версия приложения, которую вы отправляете в Маркет, должна иметь больший номер, чем последняя. VersionName — это строка, которая может быть любой, какой вы хотите. Здесь вы определяете свое приложение как «1.0», «2.5» или «2 Alpha EXTREME!» или что угодно. Ответ 5Использование Gradle и BuildConfigПолучение VERSION_NAME из BuildConfigДа, теперь это легко. Возвращает ли пустая строка для VERSION_NAME?Если вы получаете пустую строку для BuildConfig.VERSION_NAME , то читайте дальше. Я продолжал получать пустую строку для BuildConfig.VERSION_NAME , потому что я не устанавливал versionName в файле сборки Grade (я перенес из ANT в Gradle). Итак, вот инструкции по обеспечению установки VERSION_NAME с помощью Gradle. build.gradle Примечание: это от мастерски Jake Wharton. Удаление versionName и versionCode из AndroidManifest.xmlИ поскольку теперь вы установили versionName и versionCode в файл build.gradle , вы также можете удалить их из своего файла AndroidManifest.xml , если они есть. Ответ 6Я не вижу необходимости получать его от менеджера пакетов Ответ 7Вот чистое решение, основанное на решении scottyab (отредактированное Xavi). Он показывает, как сначала получить контекст, если он не предоставлен вашим методом. Кроме того, он использует несколько строк вместо вызова нескольких методов на строку. Это облегчает вам задачу отладки вашего приложения. Теперь, когда вы получили имя версии в String myVersionName , вы можете установить его в TextView или все, что вам нравится. Ответ 8Используйте класс BuildConfig Ответ 9Если вы используете PhoneGap, создайте собственный плагин PhoneGap: Создайте новый класс в своем приложении: В plugins.xml добавьте следующую строку: В deviceready event добавьте следующий код: Затем вы можете получить атрибут versionName, выполнив: Ответ 10Очень простой способ: Ответ 11Вот простой способ получить название версии и код версии Ответ 12Для пользователей xamarin используйте этот код, чтобы получить имя и код версии 1) Название версии: Ответ 13Получить код сборки, который используется для идентификации apk по его коду версии. Код версии используется для определения фактической конфигурации сборки во время обновления базы данных, публикации и т.д. int versionCode = BuildConfig.VERSION_CODE; Имя версии используется для ознакомления пользователей с разработчиками последовательности Developmemt. Вы можете добавить любое название версии по своему желанию. String versionName = BuildConfig.VERSION_NAME; Ответ 14Если вы хотите использовать его в xml, добавьте строку ниже в файл gradle: И затем используйте его на вашем xml следующим образом: Ответ 15Всегда делайте это с блоком try catch : Ответ 16Вот способ получения кода версии: Ответ 17У меня есть SOLVE this, используя класс предпочтений. Ответ 18Есть несколько способов получить versionCode и versionName программно.
Есть некоторые детали, кроме использования второго способа в проекте библиотеки. В новом плагине Android Gradle (3.0. 0+) некоторые функциональные возможности удалены. Итак, на данный момент, т.е. установка разных версий для разных вкусов работает некорректно. Код выше будет правильно установить значение в BuildConfig , но от PackageManager вы получите 0 и null , если вы не установили версию в по default конфигурации. Таким образом, ваше приложение будет иметь код 0 версии на устройстве. Существует обходной путь — установите версию для выходного файла apk вручную: Ответ 19Нет, вам не нужно ничего делать с AndroidManifest.xmlКак правило, название и код версии вашего приложения находятся в файле gradle уровня приложения под тегом defaultConfig: Примечание. Если вы хотите загрузить приложение в PlayStore, можно указать любое имя в качестве имени версии, но код версии должен отличаться от кода текущей версии, если это приложение уже находится в Play Store. Просто используйте следующий фрагмент кода, чтобы получить код версии и название версии из любой точки вашего приложения: Ответ 20для Api 28 PackageInfo.versionCode устарел, поэтому используйте следующий код: Ответ 21Этот код упоминался выше, но здесь он снова включен. Вам нужен блок try/catch, потому что он может вызывать «NameNotFoundException». Надеюсь, это упростит для кого-то дорогу.:) Ответ 22Кому-то, кому нужна информация о BuildConfig для пользовательского интерфейса приложения, однако, хочет использовать эту информацию для настройки конфигурации задания CI или других, таких как я. В вашем каталоге проектов автоматически создается файл BuildConfig.java, пока вы успешно строите проект. Разделите информацию, необходимую для python script или других инструментов. Вот пример: Пожалуйста, извините мои ограниченные возможности английского языка, но надеюсь, что это поможет. Источник Android Platform GuideThis guide shows how to set up your SDK environment to deploy Cordova apps for Android devices, and how to optionally use Android-centered command-line tools in your development workflow. You need to install the Android SDK regardless of whether you want to use these platform-centered shell tools or cross-platform Cordova CLI for development. For a comparison of the two development paths, see the Overview. For details on the CLI, see Cordova CLI Reference. Requirements and SupportCordova for Android requires the Android SDK which can be installed on OS X, Linux or Windows. See the Android SDK’s System Requirements. Cordova’s latest Android package supports up to Android API Level 29. The supported Android API Levels and Android Versions for the past few cordova-android releases can be found in this table:
Please note that the versions listed here are for Cordova’s Android package, cordova-android, and not for the Cordova CLI. To determine what version of Cordova’s Android package is installed in your Cordova project, run the command cordova platform ls in the directory that holds your project. As a general rule, Android versions become unsupported by Cordova as they dip below 5% on Google’s distribution dashboard. Installing the RequirementsJava Development Kit (JDK)When installing on Windows you also need to set JAVA_HOME Environment Variable according to your JDK installation path (see Setting Environment Variables) GradleAs of Cordova-Android 6.4.0, Gradle is now required to be installed to build Android. When installing on Windows, you need to add Gradle to your path, (see Setting Environment Variables) Android SDKInstall Android Studio. Follow the instructions at the linked Android Developer site to get started. Opening Android Studio for the first time will guide you through the process of installing the Android SDK. Adding SDK PackagesAfter installing the Android SDK, you must also install the packages for whatever API level you wish to target. It is recommended that you install the highest SDK version that your version of cordova-android supports (see Requirements and Support). Open the Android SDK Manager ( Tools > SDK Manager in Android Studio, or sdkmanager on the command line), and make sure the following are installed:
Android SDK Tools:In Android Studio 3.6 or later, you need to manually add the old version of the Android SDK Tools. To do this:
See Android’s documentation on Installing SDK Packages for more details. Setting environment variablesCordova’s CLI tools require some environment variables to be set in order to function correctly. The CLI will attempt to set these variables for you, but in certain cases you may need to set them manually. The following variables should be updated:
OS X and LinuxOn a Mac or Linux, you can use a text editor to create or modify the /.bash_profile file. To set an environment variable, add a line that uses export like so (substitute the path with your local installation): To update your PATH , add a line resembling the following (substitute the paths with your local Android SDK installation’s location): Reload your terminal to see this change reflected or run the following command: WindowsThese steps may vary depending on your installed version of Windows. Close and reopen any command prompt windows after making changes to see them reflected. Click on the Start menu in the lower-left corner of the desktop In the search bar, search for Environment Variables and select Edit the system Environment Variables from the options that appear In the window that appears, click the Environment Variables button To create a new environment variable:
To set your PATH:Select the PATH variable and press Edit. Add entries for the relevant locations to the PATH. For example (substitute the paths with your local Android SDK installation’s location): Project ConfigurationSetting up an EmulatorIf you wish to run your Cordova app on an Android emulator, you will first need to create an Android Virtual Device (AVD). See the Android documentation for managing AVDs, configuring the emulator, and setting up hardware acceleration. Once your AVD is configured correctly, you should be able to deploy your Cordova application to the emulator by running: Configuring GradleAs of cordova-android@4.0.0, Cordova for Android projects are built using Gradle. For instructions on building with Ant, refer to older versions of the documentation. Please note that Ant builds are deprecated as of the Android SDK Tools 25.3.0. Setting Gradle PropertiesIt is possible to configure the Gradle build by setting the values of certain Gradle properties that Cordova exposes. The following properties are available to be set:
You can set these properties in one of four ways: By setting environment variables like so: By using the —gradleArg flag in your Cordova build or run commands: By placing a file called gradle.properties in your Android platform folder ( /platforms/android ) and setting the properties in it like so: By extending build.gradle via a build-extras.gradle file and setting the property like so: The latter two options both involve including an extra file in your Android platform folder. In general, it is discouraged that you edit the contents of this folder because it is easy for those changes to be lost or overwritten. Instead, these two files should be copied from another location into that folder as part of the build command by using the before_build hook. Extending build.gradleIf you need to customize build.gradle , rather than edit it directly, you should create a sibling file named build-extras.gradle . This file will be included by the main build.gradle when present. This file must be placed in the app folder of the Android platform directory ( /platforms/android/app ), so it is recommended that you copy it over via a script attached to the before_build hook. Here’s an example: Note that plugins can also include build-extras.gradle files via: Configuring Gradle JVM ArgsTo change the Gradle JVM args, the —jvmargs flag can be used with both cordova build and run commands. This is mostly useful for controlling how much memory gradle is allowed to use during the build process. It is recommended to allow at least 2048 MB. By default, JVM args has a value of -Xmx2048m . To increase the max allowed memory, use the -Xmx JVM arg. Example given below: The following units are supported:
Setting the Version CodeTo change the version code for your app’s generated apk, set the android-versionCode attribute in the widget element of your application’s config.xml file. If the android-versionCode is not set, the version code will be determined using the version attribute. For example, if the version is MAJOR.MINOR.PATCH : If your application has enabled the cdvBuildMultipleApks Gradle property (see Setting Gradle Properties), the version code of your app will also be multiplied by 10 so that the last digit of the code can be used to indicate the architecture the apk was built for. This multiplication will happen regardless of whether the version code is taken from the android-versionCode attribute or generated using the version . Be aware that some plugins added to your project (including cordova-plugin-crosswalk-webview) may set this Gradle property automatically. Please Note: When updating the android-versionCode property, it is unwise to increment the version code taken from built apks. Instead, you should increment the code based off the value in your config.xml file’s android-versionCode attribute. This is because the cdvBuildMultipleApks property causes the version code to be multiplied by 10 in the built apks and thus using that value will cause your next version code to be 100 times the original, etc. Signing an AppUsing FlagsTo sign an app, you need the following parameters:
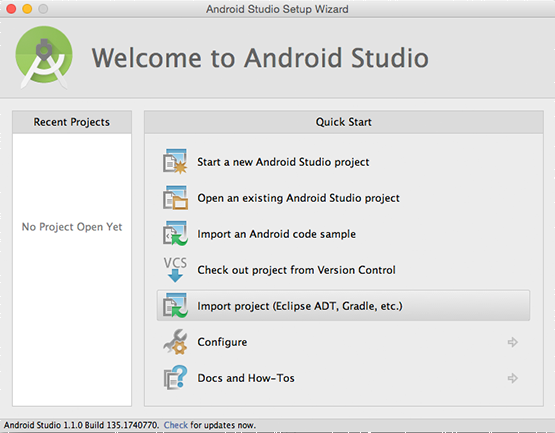
These parameters can be specified using the command line arguments above to the Cordova CLI build or run commands. Note: You should use double — to indicate that these are platform-specific arguments, for example: cordova run android —release — —keystore=../my-release-key.keystore —storePassword=password —alias=alias_name —password=password —packageType=bundle . Using build.jsonAlternatively, you could specify them in a build configuration file ( build.json ) using the —buildConfig argument to the same commands. Here’s a sample of a build configuration file: There is also support to mix and match command line arguments and parameters in build.json . Values from the command line arguments will get precedence. This can be useful for specifying passwords on the command line. Using GradleYou can also specify signing properties by including a .properties file and pointing to it with the cdvReleaseSigningPropertiesFile and cdvDebugSigningPropertiesFile Gradle properties (see Setting Gradle Properties). The file should look like this: storePassword and keyPassword are required for automated signing. DebuggingFor details on the debugging tools that come packaged with the Android SDK, see Android’s developer documentation for debugging. Additionally, Android’s developer documentation for debugging web apps provides an introduction for debugging the portion of your app running in the Webview. Opening a Project in Android StudioCordova for Android projects can be opened in the Android IDE, Android Studio. This can be useful if you wish to use Android Studio’s built in Android debugging/profiling tools or if you are developing Android plugins. Please note that when opening your project in Android studio, it is recommended that you do NOT edit your code in the IDE. This will edit the code in the platforms folder of your project (not www ), and changes are liable to be overwritten. Instead, edit the www folder and copy over your changes by running cordova build . Plugin developers wishing to edit their native code in the IDE should use the —link flag when adding their plugin to the project via cordova plugin add . This will link the files so that changes to the plugin files in the platforms folder are reflected in your plugin’s source folder (and vice versa). To open a Cordova for Android project in Android Studio: Launch Android Studio. Select Import Project (Eclipse ADT, Gradle, etc).
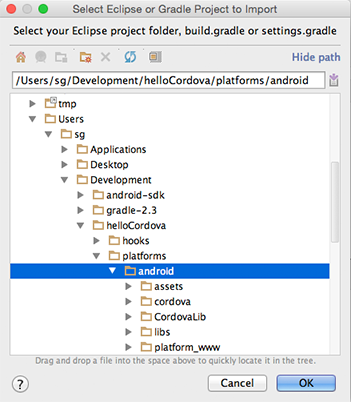
Select the Android platform directory in your project ( /platforms/android ).
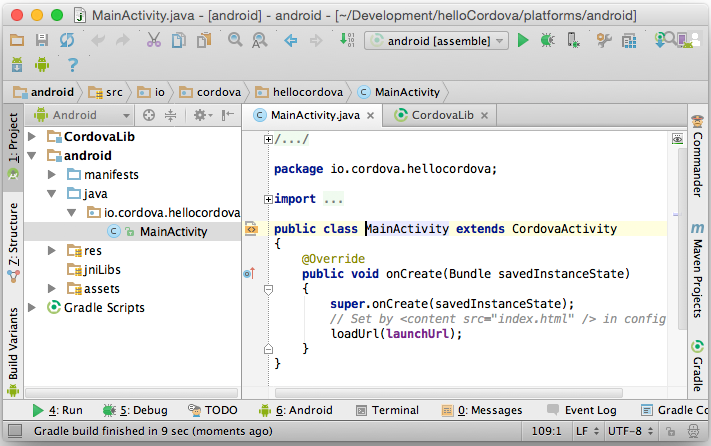
For the Gradle Sync question you can simply answer Yes. Once it finishes importing, you should be able to build and run the app directly from Android Studio. See Android Studio Overview and Building and Running from Android Studio for more details.
Platform Centered Workflowcordova-android includes a number of scripts that allow the platform to be used without the full Cordova CLI. This development path may offer you a greater range of development options in certain situations than the cross-platform cordova CLI. For example, you need to use shell tools when deploying a custom Cordova WebView alongside native components. Before using this development path, you must still configure the Android SDK environment as described in Requirements and Support above. For each of the scripts discussed below, refer to Cordova CLI Reference for more information on their arguments and usage. Each script has a name that matches the corresponding CLI command. For example, cordova-android/bin/create is equivalent to cordova create . To get started, either download the cordova-android package from npm or Github. To create a project using this package, run the create script in the bin folder: The created project will have a folder named cordova inside that contains scripts for the project-specific Cordova commands (e.g. run , build , etc.). Additionally, the project will feature a structure different from that of a normal Cordova project. Notably, /www is moved to /assets/www . To install plugins in this project, use the Cordova Plugman Utility. UpgradingRefer to this article for instructions to upgrade your cordova-android version. Lifecycle GuideCordova and AndroidNative Android apps typically consist of a series of activities that the user interacts with. Activities can be thought of as the individual screens that make up an application; different tasks in an app will often have their own activity. Each activity has its own lifecycle that is maintained as the activity enters and leaves the foreground of a user’s device. In contrast, Cordova applications on the Android platform are executed within a Webview that is embedded in a single Android activity. The lifecycle of this activity is exposed to your application through the document events that are fired. The events are not guaranteed to line up with Android’s lifecycle, but they can provide guidelines for saving and restoring your state. These events roughly map to Android callbacks as follows:
Most other Cordova platforms have a similar concept of lifecycles and should fire these same events when similar actions happen on a user’s device. However, Android presents some unique challenges that can sometimes show up thanks to the native Activity lifecycle. What makes Android different?In Android, the OS can choose to kill activities in the background in order to free up resources if the device is low on memory. Unfortunately, when the activity holding your application is killed, the Webview in which your application lives will be destroyed as well. Any state that your application is maintaining will be lost in this case. When the user navigates back to your application, the Activity and Webview will be recreated by the OS, but state will not be automatically restored for your Cordova app. For this reason, it is imperative that your application be aware of the lifecycle events that are fired and maintain whatever state is appropriate to make sure a user’s context in your app is not lost when they leave the application. When can this happen?Your application is susceptible to being destroyed by the OS whenever it leaves the sight of the user. There are two main situations in which this can occur. The first and most obvious case is when the user presses the home button or switches to another application. However, there is a second (and much more subtle) case that certain plugins can introduce. As noted above, Cordova applications are usually confined to the single activity that contains the Webview. However, there are instances in which other activities may be launched by plugins and temporarily push the Cordova activity to the background. These other Activities are typically launched in order to perform a specific task using a native application installed on the device. For example, the Cordova camera plugin launches whatever camera activity is natively installed on the device in order to take a photo. Reusing the installed camera application in this way makes your application feel much more like a native app when the user tries to take a photo. Unfortunately, when the native Activity pushes your app to the background there is a chance the OS will kill it. For a clearer understanding of this second case, let’s walk through an example using the camera plugin. Imagine you have an application that requires the user to take a profile photo. The flow of events in the application when everything goes as planned will look something like this:
However, this flow of events can be disrupted if a device is low on memory. If the Activity is killed by the OS, the above sequence of events instead plays out as follows:
In this instance, the OS killed the application in the background and the application did not maintain its state as part of the lifecycle. When the user returned to the app, the Webview was recreated and the app appeared to have restarted from scratch (hence the user’s confusion). This sequence of events is equivalent to what happens when the home button is pressed or the user switches applications. The key to preventing the above experience is subscribing to events and properly maintaining state as part of the activity lifecycle. Respecting the LifecycleIn the examples above, the javascript events that are fired are noted in italics. These events are your opportunity to save and restore your application’s state. You should register callbacks in your application’s bindEvents function that respond to the lifecycle events by saving state. What information you save and how you save it is left to your discretion, but you should be sure to save enough information so that you can restore the user to exactly where they left off when they return to your application. There is one additional factor in the example above that only applies in the second-discussed situation (i.e. when a plugin launches an external activity). Not only was the state of the application lost when the user finished taking a photo, but so was the photo that the user took. Normally, that photo would be delivered to your application through the callback that was registered with the camera plugin. However, when the Webview was destroyed that callback was lost forever. Luckily, cordova-android 5.1.0 and above provide a means for getting the result of that plugin call when your application resumes. Retrieving plugin callback results (cordova-android 5.1.0+)When the OS destroys the Cordova activity that was pushed into the background by a plugin, any pending callbacks are lost as well. This means that if you passed a callback to the plugin that launched the new activity (e.g. the camera plugin), that callback will NOT be fired when the application is recreated. However, starting in cordova-android 5.1.0, the resume event’s payload will contain any pending plugin results from the plugin request that launched the external activity made prior to the activity being destroyed. The payload for the resume event adheres to the following format: The fields of that payload are defined as follows:
The possible values for pluginStatus in the pendingResult field include the following:
Please note that it is up to the plugin to decide what is contained in the result field and the meaning of the pluginStatus that is returned. Reference the API of the plugin you are using to see what you should expect those fields to contain and how to use their values. ExampleBelow is a brief example application that uses the resume and pause events to manage state. It uses the Apache camera plugin as an example of how to retrieve the results of a plugin call from the resume event payload. The portion of the code dealing with the resume ‘s event.pendingResult object requires cordova-android 5.1.0+ The corresponding html: Android QuirksThe default API level in the Cordova Android platform has been upgraded. On an Android 9 device, clear text communication is now disabled by default. By default HTTP and FTP etc. will refuse the apps requests to use cleartext traffic. The key reason for avoiding cleartext traffic is the lack of confidentiality, authenticity, and protections against tampering; a network attacker can eavesdrop on transmitted data and also modify it without being detected. You can learn more about the android:usesCleartextTraffic or any other android application elements setting in the documentation for Android developers. To allow clear text communication again, set the android:usesCleartextTraffic on your application tag to true in config.xml file: And also you need to add Android XML namespace xmlns:android=»http://schemas.android.com/apk/res/android» to your widget tag in the same config.xml , like so: Android Manifest InformationYou can learn more about the Android manifest information in the documentation for Android developers. Testing the Activity LifecycleAndroid provides a developer setting for testing Activity destruction on low memory. Enable the «Don’t keep activities» setting in the Developer Options menu on your device or emulator to simulate low memory scenarios. You should always do some amount of testing with this setting enabled to make sure that your application is properly maintaining state. Источник  Когда к мобильному устройству присоединены наушники  ОС Google Android развивается, и по всему видимому |
|---|