- Managing Projects from Android Studio
- In this document
- Creating an Android Project
- Step 1: Create a New Project
- Step 2: Select Form Factors and API Level
- Step 3: Add an Activity
- Step 4: Configure Your Activity
- Step 5: Develop Your App
- Creating an Android Module
- Setting up a Library Module
- Adding a dependency on a library module
- Referencing a library module
- Declaring library components in the manifest file
- Using the Android Project View
- Use the Android Project View
- Build and run your app
- Change the run/debug configuration
- Change the build variant
- Build your project
- Monitor the build process
- Apply Changes
- Requirements
- Use Apply Changes
- Enable Run fallback for Apply Changes
- Platform-dependent changes
- Limitations of Apply Changes
- Code changes that require app restart
- Libraries and plugins
- Code that directly references content in an installed APK
Managing Projects from Android Studio
In this document
Android Studio provides graphical tools for creating and managing Android projects, which contain everything that define your Android apps, from app source code to build configurations and test code. Each project contains one or more different types of modules, such as application modules, library modules, and test modules.
This guide explains how to create Android projects and different modules using Android Studio. For more information about the Android project structure and module types, read Managing Projects Overview.
Creating an Android Project
Android Studio makes it easy to create Android apps for several form factors, such as phone, tablet, TV, Wear, and Google Glass. The New Project wizard lets you choose the form factors for your app and populates the project structure with everything you need to get started.
Follow the steps in this section to create a project in Android Studio.
Step 1: Create a New Project
If you didn’t have a project opened, Android Studio shows the Welcome screen. To create a new project, click New Project.
If you had a project opened, Android Studio shows the development environment. To create a new project, click File > New Project.
The next window lets you configure the name of your app, the package name, and the location of your project.

Figure 1. Choose a name for your project.
Enter the values for your project then click Next.
Step 2: Select Form Factors and API Level
The next window lets you select the form factors supported by your app, such as phone, tablet, TV, Wear, and Google Glass. The selected form factors become the application modules within the project. For each form factor, you can also select the API Level for that app. To get more information, click Help me choose.

Figure 2. Select the API Level.
The API Level window shows the distribution of mobile devices running each version of Android, as shown in figure 3. Click on an API level to see a list of features introduced in the corresponding version of Android. This helps you choose the minimum API Level that has all the features that your apps needs, so you can reach as many devices as possible. Then click OK.

Figure 3. Choose form factors for your app.
Then, on the Form Factors Window, click Next.
Step 3: Add an Activity
The next screen lets you select an activity type to add to your app, as shown in figure 4. This screen displays a different set of activities for each of the form factors you selected earlier.

Figure 4. Add an activity to your app.
Choose an activity type then click Next.
Note: If you choose «Add No Activity», click Finish to create the project.
Step 4: Configure Your Activity
The next screen lets you configure the activity to add to your app, as shown in figure 5.

Figure 5. Choose a name for your activity.
Enter the activity name, the layout name, and the activity title. Then click Finish.
Step 5: Develop Your App
Android Studio creates the default structure for your project and opens the development environment. If your app supports more than one form factor, Android Studio creates a module folder with complete source files for each of them as shown in figure 6.

Figure 6. The default project structure for a mobile app.
Now you are ready to develop your app. For more information, see the following links:
Creating an Android Module
Android application modules contain the src/main/ , AndroidManifest.xml , build.gradle , build output and other files you need to generate your app’s APK files. Android Studio provides a New Module Wizard that you can use to quickly create a new Android module (or a module from existing code) based on selected application settings, such as minimum SDK level and activity template.
To create a new module, select File > New > Module. Select the desire module type then click Next to enter the basic module settings:
- Enter an Application Name. This name is used as the title of your application launcher icon when it is installed on a device.
- Enter a Module Name. This text is used as the name of the folder where your Java-based activity files are stored.
- Enter a Package Name and Package Location. This class package namespace creates the initial package structure for your applications code files and is added as the package attribute in your application’s Android manifest file. This manifest value serves as the unique identifier for your application app when you distribute it to users. The package name must follow the same rules as packages in the Java programming language.
- Select the Minimum required SDK. This setting indicates the lowest version of the Android platform that your application supports for the selected form factor. This value sets the minSdkVersion attribute in the build.gradle file.
Note: You can manually change the minimum and target SDK for your module at any time: Double-click the module’s build.gradle in the Project Explorer, set the targetSdkVersion and targetSdkVersion in the defaultConfig section.
The wizard creates a new Android application module according to the options you have chosen.
Setting up a Library Module
A library module is a standard Android module, so you can create a new one in the same way as you would a new application module, using the New Module wizard and selecting Android Library as the module type. The created library module will appear in your project view along with the other modules.
You can easily change an existing application module to a library module by changing the plugin assignment in the build.gradle file to com.android.library.
Adding a dependency on a library module
The library dependency can be declared in the module’s manifest file or in the GameActivity :
To add the dependency declaration to the build file, edit the build file for the app module ( app/build.gradle ) and add a dependency on the lib module:
In this example, the lib module can still be built and tested independently, and the build system creates an AAR package for it that you could reuse in other projects.
Note: The library settings in the app/build.gradle file will override any shared library resources declared in the manifest file.
Referencing a library module
If you are developing an application and want to include the shared code or resources from a library module, you can also do so easily by adding a reference to the library module in the module’s dependency page.
To add a reference to a library module, follow these steps:
- Make sure that both the module library and the application module that depends on it are in your project. If one of the modules is missing, import it into your project.
- In the project view, right-click the dependent module and select Open >Module Settings.
- Right-click the plus icon to add a new dependencies.
If you are adding references to multiple libraries, you can set their relative priority (and merge order) by selecting a library and using the Up and Down controls. The tools merge the referenced libraries with your application starting from lowest priority (bottom of the list) to highest (top of the list). If more than one library defines the same resource ID, the tools select the resource from the library with higher priority. The application itself has highest priority and its resources are always used in preference to identical resource IDs defined in libraries.
Android Studio rebuilds the module, including the contents of the library module the next time the project or module is built.
Declaring library components in the manifest file
In the manifest file of the application module, you must add declarations of all components that the application will use that are imported from a library module. For example, you must declare any , , ,
, and so on, as well as
, , and similar elements.
Declarations should reference the library components by their fully-qualified package names, where appropriate.
For example, the TicTacToeMain example application declares the library activity GameActivity like this:
For more information about the manifest file, see the documentation for AndroidManifest.xml.
Using the Android Project View
The Android project view in Android Studio shows a flattened version of your project’s structure that provides quick access to the key source files of Android projects and helps you work with the new Gradle-based build system. The Android project view:
- Groups the build files for all modules at the top level of the project hierarchy.
- Shows the most important source directories at the top level of the module hierarchy.
- Groups all the manifest files for each module.
- Shows resource files from all Gradle source sets.
- Groups resource files for different locales, orientations, and screen types in a single group per resource type.
Use the Android Project View
The Android project view is enabled by default and shows all the build files at the top level of the project hierarchy under Gradle Scripts. The project module appears as a folder at the top level of the project hierarchy and contains these three elements at the top level:
- manifests/ — Manifest files for the module.
- java/ — Source files for the module.
- res/ — Resource files for the module.
Notice how the Android project view groups all instances of the ic_launcher.png resource for different screen densities under the same element.
Note: The Android project view shows a hierarchy that helps you work with Android projects by providing a flattened structure that highlights the most commonly used files while developing Android applications. However, the project structure on disk differs from this representation and maintains the traditional project structure.


Figure 10: Android and Traditional project view
Источник
Build and run your app
Android Studio sets up new projects to deploy to the Android Emulator or a connected device with just a few clicks. Once your app is installed, you can use Apply Changes to deploy certain code and resource changes without building a new APK.
To build and run your app, follow these steps:
- In the toolbar, select your app from the run configurations drop-down menu.
From the target device drop-down menu, select the device that you want to run your app on.
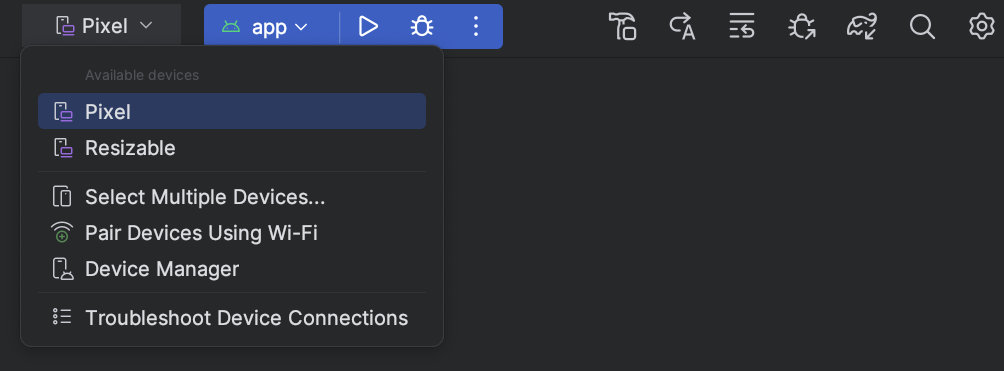
If you don’t have any devices configured, then you need to either connect a device via USB or create an AVD to use the Android Emulator.
Click Run .
Change the run/debug configuration
When you run your app for the first time, Android Studio uses a default run configuration. The run configuration specifies whether to deploy your app from an APK or an Android App Bundle, the module to run, package to deploy, activity to start, target device, emulator settings, logcat options, and more.
The default run/debug configuration builds an APK, launches the default project activity, and uses the Select Deployment Target dialog for target device selection. If the default settings don’t suit your project or module, you can customize the run/debug configuration, or even create a new one, at the project, default, and module levels. To edit a run/debug configuration, select Run > Edit Configurations. For more information, see Create and Edit Run/Debug Configurations.
Change the build variant
By default, Android Studio builds the debug version of your app, which is intended for use only during development, when you click Run.
To change the build variant Android Studio uses, select Build > Select Build Variant in the menu bar.
For projects without native/C++ code, the Build Variants panel has two columns: Module and Active Build Variant. The Active Build Variant value for the module determines which build variant the IDE deploys to your connected device and is visible in the editor.

Figure 1. The Build Variants panel has two columns for projects that do not have native/C++ code
To switch between variants, click the Active Build Variant cell for a module and choose the desired variant from the list field.
For projects with native/C++ code, the Build Variants panel has three columns: Module, Active Build Variant, and Active ABI. The Active Build Variant value for the module determines the build variant that the IDE deploys to your device and is visible in the editor. For native modules, the Active ABI value determines the ABI that the editor uses, but does not impact what is deployed.

Figure 2. The Build Variants panel adds the Active ABI column for projects with native/C++ code
To change the build variant or ABI, click the cell for the Active Build Variant or Active ABI column and choose the desired variant or ABI from the list. After you change the selection, the IDE syncs your project automatically. Changing either column for an app or library module will apply the change to all dependent rows.
By default, new projects are set up with two build variants: a debug and release variant. You need to build the release variant to prepare your app for public release.
To build other variations of your app, each with different features or device requirements, you can define additional build variants.
Conflicts in Android Studio’s Build Variants dialog
In Android Studio’s Build Variants dialog, you might see error messages indicating conflicts between build variants, such as the following:
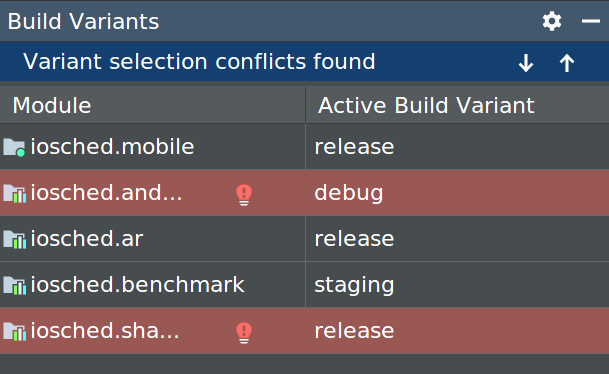
This error does not indicate a build issue with Gradle – it is only indicating that the Android Studio IDE itself cannot resolve symbols between the variants of the selected modules.
For example, if you have a module M1 that depends on variant v1 of module M2 , but M2 has variant v2 selected in the IDE, you have unresolved symbols in the IDE. Let’s say that M1 depends on a class Foo which is only available in v1 . When v2 is selected, that class is not known by the IDE and it will fail to resolve it and show errors in the code of M1 .
These error messages appear because the IDE cannot load code for multiple variants simultaneously. In terms of your app’s build, however, the variant selected in this dialog will have no effect because Gradle builds your app with the source code specified in your Gradle build recipes, not based on what’s currently loaded in the IDE.
Build your project
The Run button builds and deploys your app to a device. However, to build your app to share or upload to Google Play, you’ll need to use one of the options in the Build menu to compile parts or all of your project. Before you select any of the build options listed in table 1, make sure you first select the build variant you want to use.
Table 1. Build options in the Build menu.
| Menu Item | Description |
|---|---|
| Make Module | Compiles all source files in the selected module that have been modified since the last build, and all modules the selected module depends on recursively. The compilation includes dependent source files and any associated build tasks. You can select the module to build by selecting either the module name or one of its files in the Project window. |
| Make Project | Makes all modules. |
| Clean Project | Deletes all intermediate/cached build files. |
| Rebuild Project | Runs Clean Project for the selected build variant and produces an APK. |
| Build Bundle(s) / APK(s) > Build APK(s) | |
| Build Bundle(s) / APK(s) > Build Bundle(s) | |
| Brings up a dialog with a wizard to set up a new signing configuration, and build either a signed app bundle or APK. You need to sign your app with a release key before you can upload it to the Play Console. For more information about app signing, see Sign your app. |
Note: The Run button builds an APK with testOnly=»true» , which means the APK can only be installed via adb (which Android Studio uses). If you want a debuggable APK that people can install without adb, select your debug variant and click Build Bundle(s) / APK(s) > Build APK(s).
For details about the tasks that Gradle executes for each command, open the Build window as described in the next section. For more information about Gradle and the build process, see Configure Your Build.
Monitor the build process
You can view details about the build process by clicking View > Tool Windows > Build (or by clicking Build in the tool window bar). The window displays the tasks that Gradle executes in order to build your app, as shown in figure 3.
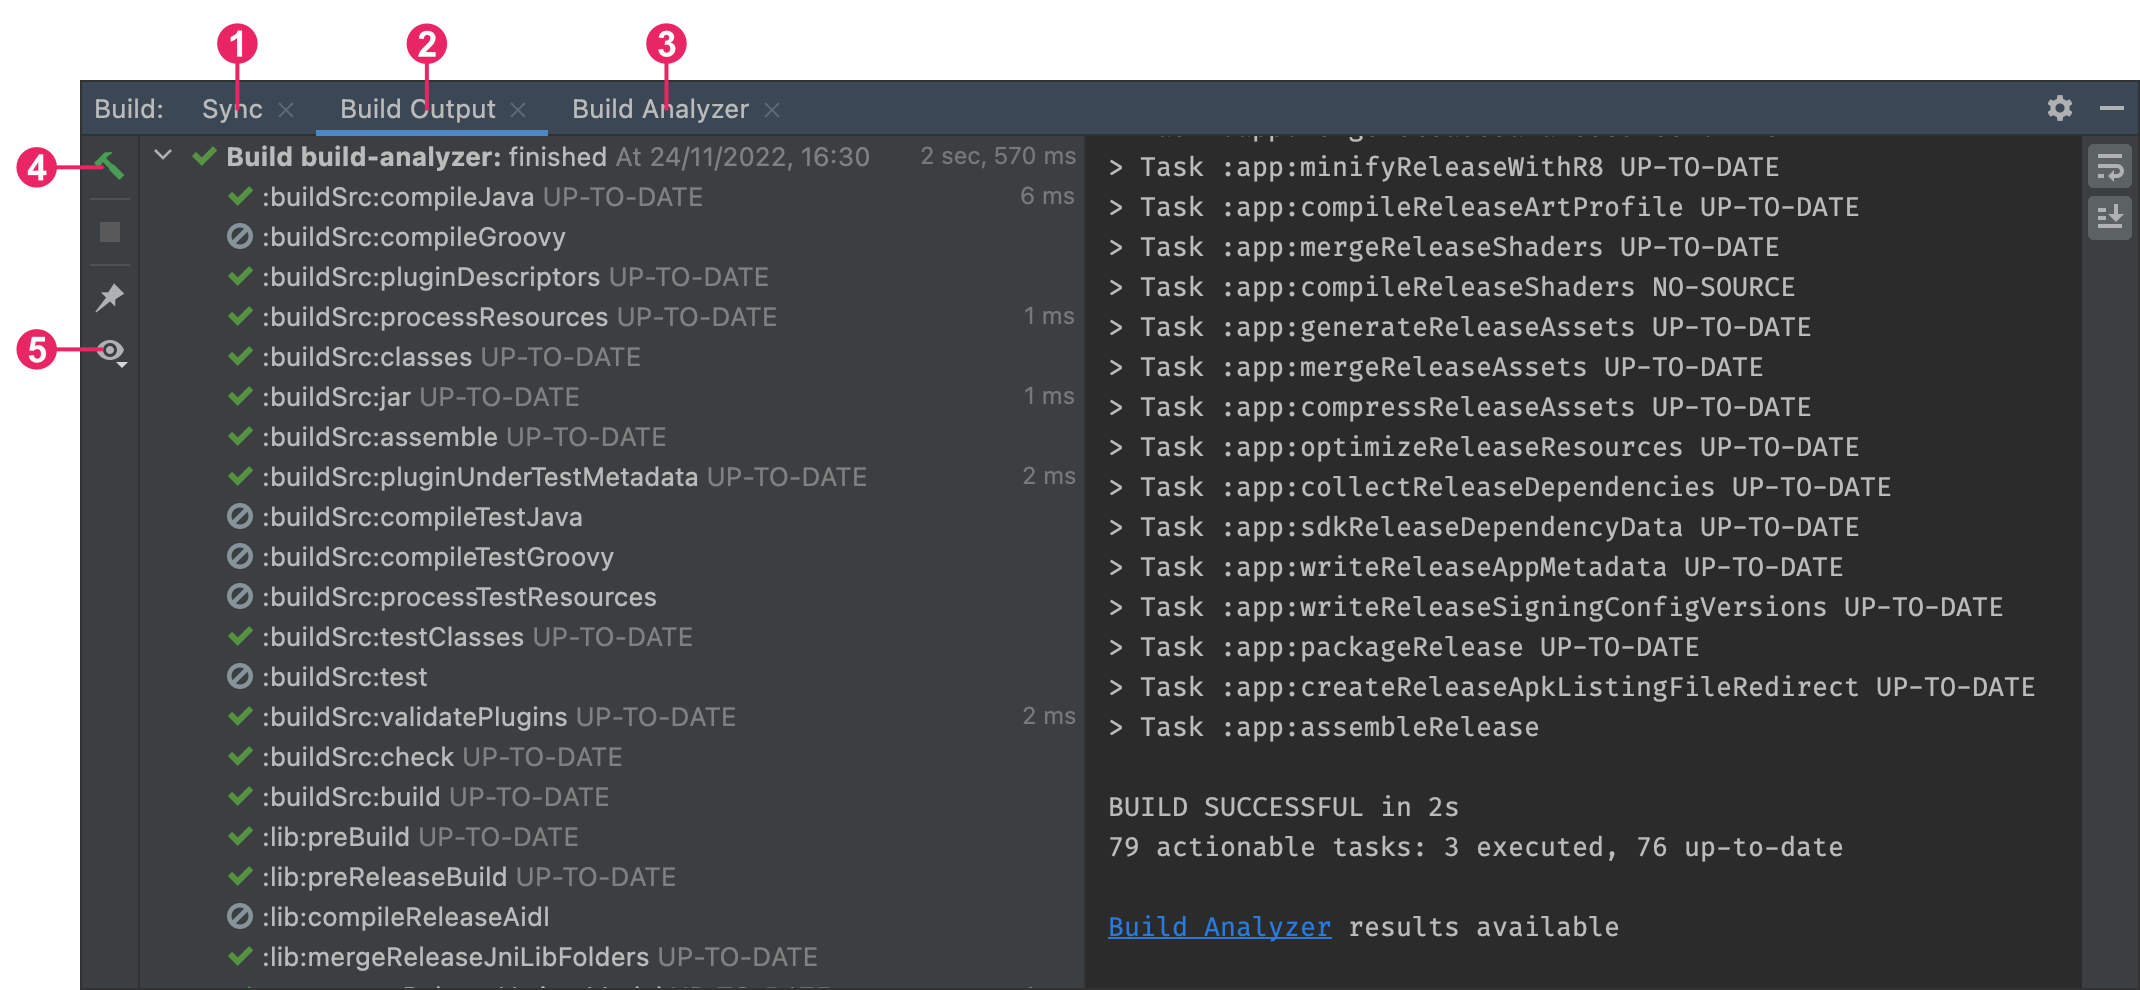
Figure 3. The Build output window in Android Studio
- Build tab: Displays the tasks Gradle executes as a tree, where each node represents either a build phase or a group of task dependencies. If you receive build-time or compile-time errors, inspect the tree and select an element to read the error output, as shown in figure 4.
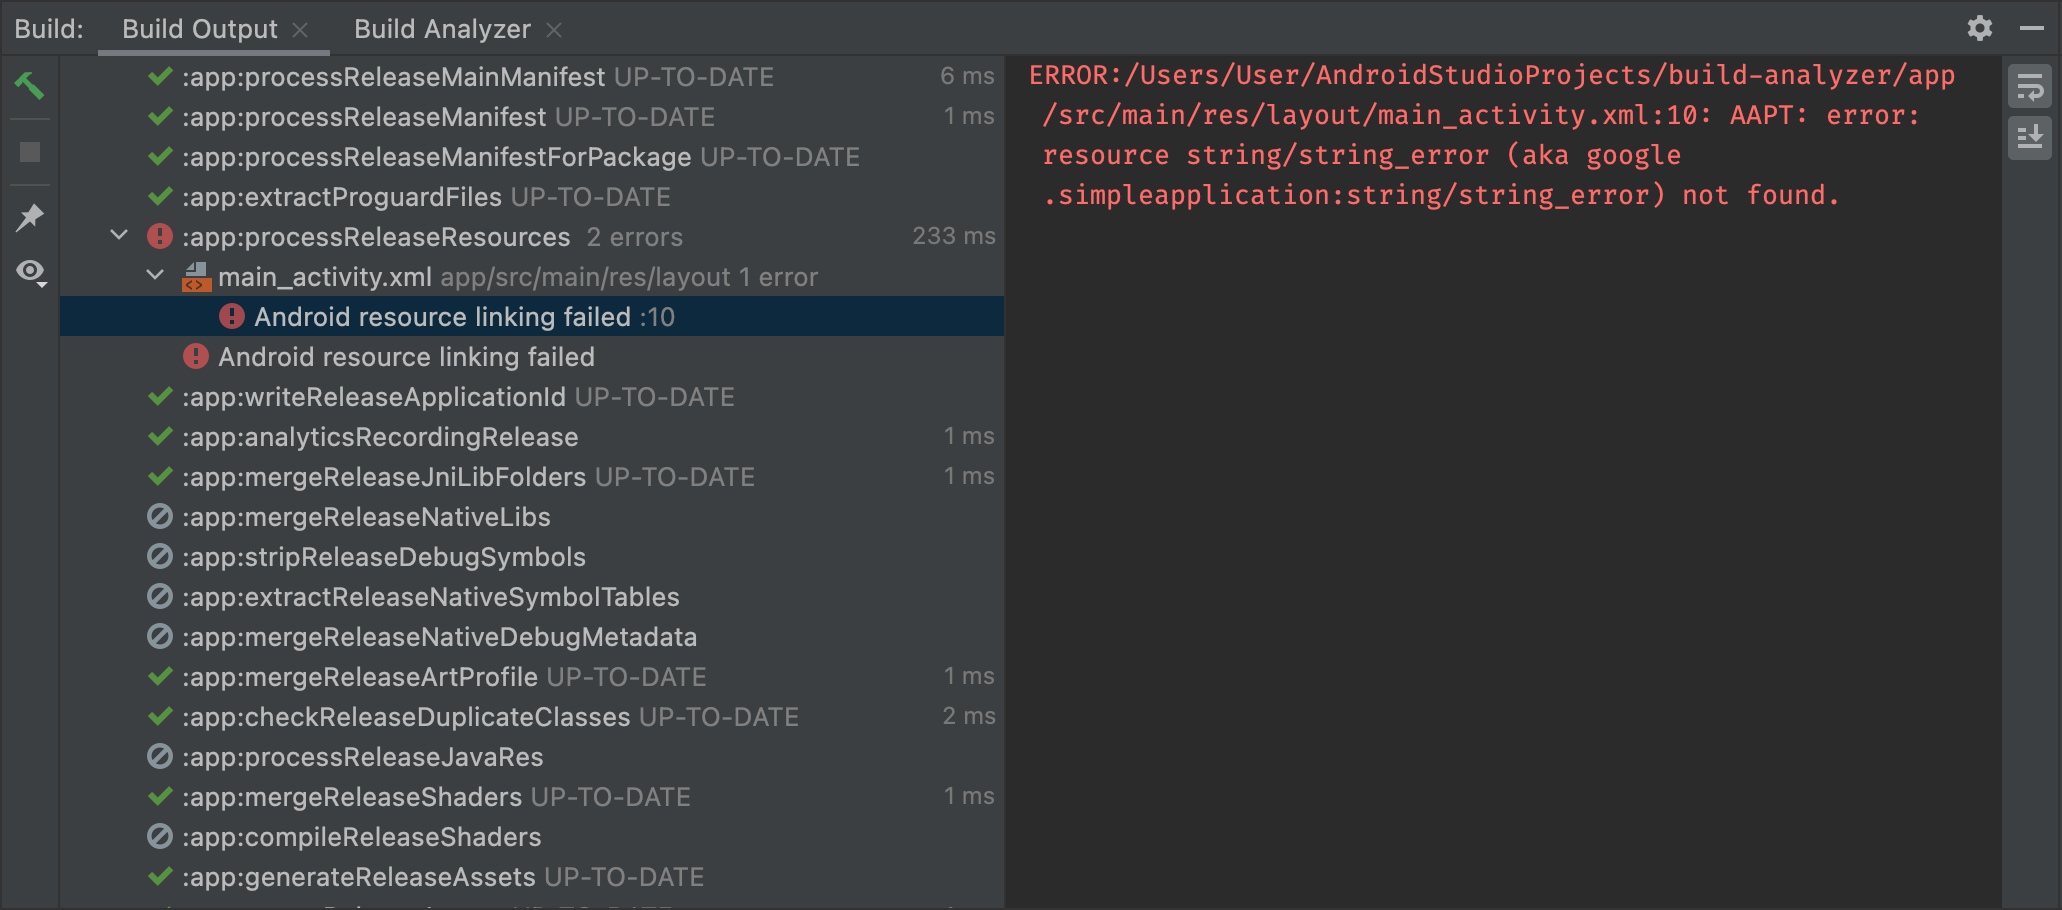
Figure 4. Inspect the Build output window for error messages
If your build variants use product flavors, Gradle also invokes tasks to build those product flavors. To view the list of all available build tasks, click View > Tool Windows > Gradle (or click Gradle in the tool window bar).
If an error occurs during the build process, Gradle may recommend some command-line options to help you resolve the issue, such as —stacktrace or —debug . To use command-line options with your build process:
- Open the Settings or Preferences dialog:
- On Windows or Linux, select File >Settings from the menu bar.
- On Mac OSX, select Android Studio >Preferences from the menu bar.
- Navigate to Build, Execution, Deployment >Compiler.
- In the text field next to Command-line Options, enter your command-line options.
- Click OK to save and exit.
Gradle applies these command-line options the next time you try building your app.
Apply Changes
In Android Studio 3.5 and higher, Apply Changes lets you push code and resource changes to your running app without restarting your app—and, in some cases, without restarting the current activity. This flexibility helps you control how much of your app is restarted when you want to deploy and test small, incremental changes while preserving your device’s current state. Apply Changes uses capabilities in the Android JVMTI implementation that are supported on devices running Android 8.0 (API level 26) or higher. To learn more about how Apply Changes works, see Android Studio Project Marble: Apply Changes.
Requirements
Apply Changes actions are only available when you meet the following conditions:
- You build the APK of your app using a debug build variant.
- You deploy your app to a target device or emulator that runs Android 8.0 (API level 26) or higher.
Use Apply Changes
Use the following options when you want to deploy your changes to a compatible device:
Apply Changes and Restart Activity
Attempts to apply both your resource and code changes by restarting your activity but without restarting your app. Generally, you can use this option when you’ve modified code in the body of a method or modified an existing resource.
You can also perform this action by pressing Ctrl+Alt+F10 (or Control+Shift+Command+R on macOS).
Apply Code Changes
Attempts to apply only your code changes without restarting anything. Generally, you can use this option when you’ve modified code in the body of a method but you have not modified any resources. If you’ve modified both code and resources, use Apply Changes and Restart Activity instead.
You can also perform this action by pressing Ctrl+F10 (or Control+Command+R on macOS).
Run
Deploys all changes and restarts the app. Use this option when the changes that you have made cannot be applied using either of the Apply Changes options. To learn more about the types of changes that require an app restart, see Limitations of Apply Changes.
Enable Run fallback for Apply Changes
After you’ve clicked either Apply Changes and Restart Activity or Apply Code Changes, Android Studio builds a new APK and determines whether the changes can be applied. If the changes can’t be applied and would cause Apply Changes to fail, Android Studio prompts you to Run your app again instead. However, if you don’t want to be prompted every time this occurs, you can configure Android Studio to automatically rerun your app when changes can’t be applied.
To enable this behavior, follow these steps:
Open the Settings or Preferences dialog:
- On Windows or Linux, select File > Settings from the menu bar.
- On macOS, select Android Studio > Preferences from the menu bar.
Navigate to Build, Execution, Deployment > Deployment.
Select the checkboxes to enable automatic Run fallback for either of the Apply Changes actions.
Click OK.
Platform-dependent changes
Some features of Apply Changes depend on specific versions of the Android platform. To apply these kinds of changes, your app must be deployed to a device running that version of Android (or higher).
| Type of change | Minimum platform version |
|---|---|
| Adding a method | Android 11 |
Limitations of Apply Changes
Apply Changes is designed to speed up the app deployment process. However, there are some limitations for when it can be used. If you encounter any issues while using Apply Changes, file a bug.
Code changes that require app restart
Some code and resource changes cannot be applied until the app is restarted, including the following:
- Adding or removing a field
- Removing a method
- Changing method signatures
- Changing modifiers of methods or classes
- Changing class inheritance
- Changing values in enums
- Adding or removing a resource
- Changing the app manifest
- Changing native libraries (SO files)
Libraries and plugins
Some libraries and plugins automatically make changes to your app’s manifest files or to resources that are referenced in the manifest. These automatic updates can interfere with Apply Changes in the following ways:
- If a library or plugin makes changes to your app’s manifest, you can’t use either Apply Code Changes or Apply Changes and Restart Activity and have to restart your app before you can see your changes.
- If a library or plugin makes changes to your app’s resource files, you can’t use Apply Code Changes , and you must use Apply Changes and Restart Activity to see your changes.
You can avoid these limitations by disabling all automatic updates for your debug build variants.
For example, Crashlytics updates app resources with a unique build ID during every build, which prevents you from using Apply Code Changes and requires you to restart your app’s activity to see your changes. You can disable this behavior so that you can use Apply Code Changes alongside Crashlytics with your debug builds.
Code that directly references content in an installed APK
If your code directly references content from your app’s APK that’s installed on the device, that code can cause crashes or misbehave after clicking Apply Code Changes . This behavior occurs because when you click Apply Code Changes, the underlying APK on the device is replaced during installation. In these cases, you can click Apply Changes and Restart Activity or Run , instead.
Content and code samples on this page are subject to the licenses described in the Content License. Java is a registered trademark of Oracle and/or its affiliates.
Источник


