- Using local.properties file to avoid API Keys check-in into Version Control System
- Fix “SDK location not found. Define location with sdk.dir in the local.properties file or with an ANDROID_HOME environment variable” in Android Studio
- Data and file storage overview
- Categories of storage locations
- Permissions and access to external storage
- Scoped storage
- View files on a device
- Additional resources
- Videos
- Add version.properties file to your Android Project
- Change version name and version code from one file and reflect the changes on all the product flavors
- Step1:
- Step2:
- Step3:
- Get Current location using FusedLocationProviderClient in Android
Using local.properties file to avoid API Keys check-in into Version Control System
One of the best benefits of being an Android Developer is that we can create and contribute to open source projects! We can share our code with millions of developers around the globe. Thanks to code hosting platforms like GitHub!
Now, when we make our code available as public repositories, we should ensure we take care of some things such as the sharing of private API keys, restricted URLs, etc., How can we achieve this by using the “local.properties” file in our root project? Let’s find out in this article.
Welcome to our MindOrks blog on Using local.properties file to avoid API Keys check-in into Version Control System.
Every time, we create a new project in Android Studio, we see a file created with the name “local.properties” containing the following content:
So local.properties is a file that is generated by Android Studio and it is recommended not to include this in the version control system.
So, if we take a look at our gitignore files in general, we have:
We can see that local.properties file is excluded in the version control system.
Tip: Updating the gitignore files with the relevant extensions and file folders is really important for creating an open-source project. Since the “local.properties” file is not shared in the version control system, we can use this for declaring our local user-specific variables or private variables such as API keys or restricted base URLs, etc.,
Let’s take a use case. Let’s consider our recently released open-source project on GitHub:
This project helps to build a ride-sharing Android Taxi Clone App like Uber, Lyft. You can fork it and learn many awesome functionalities. Please go through the Readme file for details of the project.
Now, since our use case is a ride-sharing application, we will be using google maps in it. To use Google Maps, the developer should have an associated API Key. Let’s see how we can achieve this by using “local.properties” file.
First of all, let’s append a parameter in the local.properties file:
Now, let’s extract this value and use it in our app-level Gradle file through a variable.
In order to access our API key, we can use:
There are some files that get generated during build time such as gradleResValues.xml, BuildConfig.java, etc. Let’s make the use of these files to store the value of our API key. How can we add values to files that are generated during the build process? We shall use our buildTypes section in our app-level build.gradle file
Now once we add this in our build.gradle file, we rebuild our project and we can see a file named gradleResValues.xml is generated in the res(generated) folder.
In order to use this value inside the application, we can try extracting the values like follows:
If we wish to store the value in the BuildConfig.java file, we can replace the resValue with buildConfigField in the app-level build.gradle file as follows:
After changing the build.gradle file, let’s rebuild the project and take a look at our BuildConfig.java file:
Now, we can access this parameter anywhere in the code like
Источник
Fix “SDK location not found. Define location with sdk.dir in the local.properties file or with an ANDROID_HOME environment variable” in Android Studio
SDK is a Software Development Kit. SDK brings together a group of tools that enable programing for mobile Applications such as Android, IOS. You can download SDK from HERE and then Extract/put it in the default folder if there is no such then make it. Default Path of SDK in PC is:
Windows:
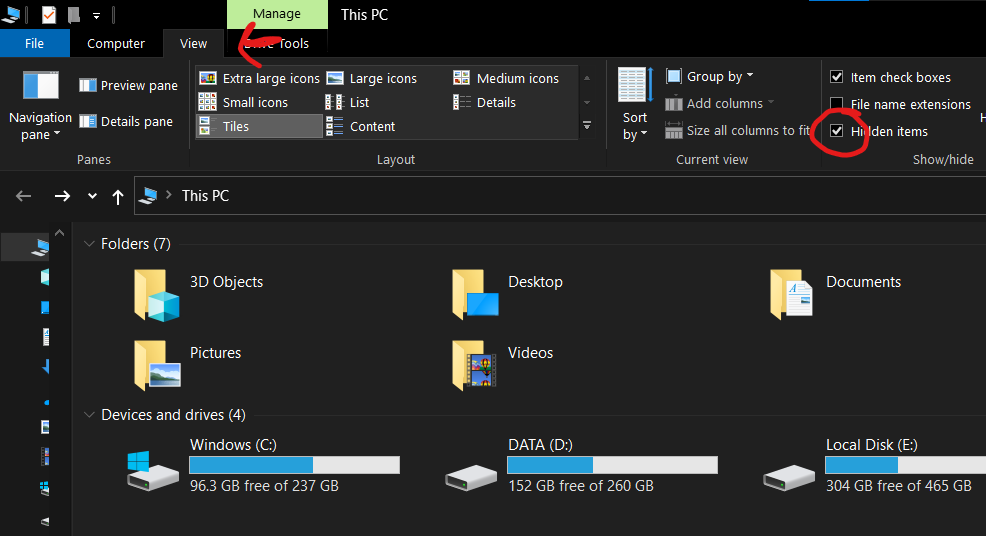
UserName above is the name of your PC. If you are not able to see AppData Folder then you have to change the View settings of File Explorer and mark Hidden Items.
Step 1. Go to the top of File Explorer and open drop-down
Step 2. Now go to View > Hidden Items
If this doesn’t work, Add ANDROID_HOME in Environment Variables. Go to System Properties -> Environment Variables -> Add Variable -> put Variable Name and Value.
Step 1. Open System Properties
Step 2. Select New and Insert Variable and Location
Step 3. Add Variable name: ANDROID_HOME and value: as your SDK path. If your path is something else not in C Drive you have to add that. Make sure you enter the correct path UserName below is the name of your PC. and press OK.
Now check the SDK location in your Android Studio and follow these steps.
Step 1. Go to the FILE > SETTINGS
Step 2. Search for SDK and place your SDK-LOCATION. **MAKE SURE YOU HAVE ADDED CORRECT PATH**
***IF YOUR LOCATION OF SDK IS NOT C DRIVE THEN YOU HAVE TO ADD CORRECT LOCATION***
Источник
Data and file storage overview
Android uses a file system that’s similar to disk-based file systems on other platforms. The system provides several options for you to save your app data:
- App-specific storage: Store files that are meant for your app’s use only, either in dedicated directories within an internal storage volume or different dedicated directories within external storage. Use the directories within internal storage to save sensitive information that other apps shouldn’t access.
- Shared storage: Store files that your app intends to share with other apps, including media, documents, and other files.
- Preferences: Store private, primitive data in key-value pairs.
- Databases: Store structured data in a private database using the Room persistence library.
The characteristics of these options are summarized in the following table:
| Type of content | Access method | Permissions needed | Can other apps access? | Files removed on app uninstall? | |
|---|---|---|---|---|---|
| App-specific files | Files meant for your app’s use only | From internal storage, getFilesDir() or getCacheDir() From external storage, getExternalFilesDir() or getExternalCacheDir() | Never needed for internal storage Not needed for external storage when your app is used on devices that run Android 4.4 (API level 19) or higher | No | Yes |
| Media | Shareable media files (images, audio files, videos) | MediaStore API | READ_EXTERNAL_STORAGE when accessing other apps’ files on Android 11 (API level 30) or higher READ_EXTERNAL_STORAGE or WRITE_EXTERNAL_STORAGE when accessing other apps’ files on Android 10 (API level 29) Permissions are required for all files on Android 9 (API level 28) or lower | Yes, though the other app needs the READ_EXTERNAL_STORAGE permission | No |
| Documents and other files | Other types of shareable content, including downloaded files | Storage Access Framework | None | Yes, through the system file picker | No |
| App preferences | Key-value pairs | Jetpack Preferences library | None | No | Yes |
| Database | Structured data | Room persistence library | None | No | Yes |
The solution you choose depends on your specific needs:
How much space does your data require? Internal storage has limited space for app-specific data. Use other types of storage if you need to save a substantial amount of data. How reliable does data access need to be? If your app’s basic functionality requires certain data, such as when your app is starting up, place the data within internal storage directory or a database. App-specific files that are stored in external storage aren’t always accessible because some devices allow users to remove a physical device that corresponds to external storage. What kind of data do you need to store? If you have data that’s only meaningful for your app, use app-specific storage. For shareable media content, use shared storage so that other apps can access the content. For structured data, use either preferences (for key-value data) or a database (for data that contains more than 2 columns). Should the data be private to your app? When storing sensitive data—data that shouldn’t be accessible from any other app—use internal storage, preferences, or a database. Internal storage has the added benefit of the data being hidden from users.
Categories of storage locations
Android provides two types of physical storage locations: internal storage and external storage. On most devices, internal storage is smaller than external storage. However, internal storage is always available on all devices, making it a more reliable place to put data on which your app depends.
Removable volumes, such as an SD card, appear in the file system as part of external storage. Android represents these devices using a path, such as /sdcard .
Apps themselves are stored within internal storage by default. If your APK size is very large, however, you can indicate a preference within your app’s manifest file to install your app on external storage instead:
Permissions and access to external storage
On earlier versions of Android, apps needed to declare the READ_EXTERNAL_STORAGE permission to access any file outside the app-specific directories on external storage. Also, apps needed to declare the WRITE_EXTERNAL_STORAGE permission to write to any file outside the app-specific directory.
More recent versions of Android rely more on a file’s purpose than its location for determining an app’s ability to access, and write to, a given file. In particular, if your app targets Android 11 (API level 30) or higher, the WRITE_EXTERNAL_STORAGE permission doesn’t have any effect on your app’s access to storage. This purpose-based storage model improves user privacy because apps are given access only to the areas of the device’s file system that they actually use.
Android 11 introduces the MANAGE_EXTERNAL_STORAGE permission, which provides write access to files outside the app-specific directory and MediaStore . To learn more about this permission, and why most apps don’t need to declare it to fulfill their use cases, see the guide on how to manage all files on a storage device.
Scoped storage
To give users more control over their files and to limit file clutter, apps that target Android 10 (API level 29) and higher are given scoped access into external storage, or scoped storage, by default. Such apps have access only to the app-specific directory on external storage, as well as specific types of media that the app has created.
Use scoped storage unless your app needs access to a file that’s stored outside of an app-specific directory and outside of a directory that the MediaStore APIs can access. If you store app-specific files on external storage, you can make it easier to adopt scoped storage by placing these files in an app-specific directory on external storage. That way, your app maintains access to these files when scoped storage is enabled.
To prepare your app for scoped storage, view the storage use cases and best practices guide. If your app has another use case that isn’t covered by scoped storage, file a feature request. You can temporarily opt-out of using scoped storage.
View files on a device
To view the files stored on a device, use Android Studio’s Device File Explorer.
Additional resources
For more information about data storage, consult the following resources.
Videos
Content and code samples on this page are subject to the licenses described in the Content License. Java is a registered trademark of Oracle and/or its affiliates.
Источник
Add version.properties file to your Android Project
Change version name and version code from one file and reflect the changes on all the product flavors

Jan 18, 2019 · 2 min read

T his story is from what I have learned today, As we all have the build variants in our project and In every product flavors we have version name and version code, whenever we published the build to the play store we increase our version code and version name and change in our all product flavor one by one….
What If we add a file called version.properties in our project and change the version name and version code from this file and then it will reflect it on our all the product flavors, let’s start how we gonna achieve this.
Step1:
A d d a file called version.properties in your project -> app folder.

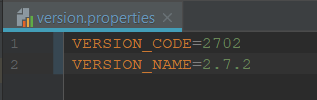
Step2:
Add version code and version name in this file.
Step3:
Now, this is the main part everything is set up now, and we need to read the file in our build.gradle.
That’s it now define the code and name in your every product flavor like below:
If you want to learn more related to Android then check it out the below link:
Источник
Get Current location using FusedLocationProviderClient in Android
Sep 4, 2018 · 4 min read
Hello to coders,
Previously we have taught you how you get current location using GPS/Network Provider. Then android has revealed FusedLocationProviderClient under GoogleApi. FusedLocationProviderClient is for interacting with the location using fused location provider.
( NOTE : To use this feature, GPS must be turned on your device. For manually ask the user to turn on GPS, please check next article)
So let’s get started for the tutorial for getting the current location.
First, add a dependency for location by play services:
Then define FusedLocationProviderClient:
Add permission in manifest.xml
Now ask for runtime permission for above android 6 OS devices
N o w, request for permission if not granted and get the result on onRequestPermissionsResult overridden method, check highlighted code below:
Here, when you allow using permission for an app, it will return to onRequestPermissionsResult method. And again get the last location and print location on textview.
Above code will work if an app has already granted the location permission
Here you can notice, why we put a condition that if(location!=null) before getting latitude-longitude. The location object may be null in the following situations:
- Location is turned off in the device settings. The result could be null even if the last location was previously retrieved because disabling location also clears the cache.
- The device never recorded its location, which could be the case of a new device or a device that has been restored to factory settings.
- Google Play services on the device have restarted, and there is no active Fused Location Provider client that has requested location after the services restarted. To avoid this situation you can create a new client and request location updates yourself.
Now if in case we can’t getting location then we have an option for request location updates. Location updates will give you continuous location at any specific time interval as per your request. Let’s move on location updates.
Here we definitely get the current location using this location updates. And once we get the location, we can also remove location continuous updates else you will get multiple locations updates. This will help you when you want to move the marker on the map as current location changes.
Now you can find some methods of location request like setPriority(), setInterval() and setFastestInterval().
- setPriority: The priority of the request is a strong hint to the LocationClient for which location sources to use. For example, PRIORITY_HIGH_ACCURACY is more likely to use GPS, and is more likely to use WIFI & Cell tower positioning, but it also depends on many other factors (such as which sources are available) and is implementation dependent.
- setInterval: Set the desired interval for active location updates, in milliseconds. The location client will actively try to obtain location updates for your application at this interval, so it has a direct influence on the amount of power used by your application. Choose your interval wisely.
- setFastestInterval: Explicitly set the fastest interval for location updates, in milliseconds. This controls the fastest rate at which your application will receive location updates, which might be faster than setInterval(long) in some situations (for example, if other applications are triggering location updates). This allows your application to passively acquire locations at a rate faster than it actively acquires locations, saving power.
Источник


