- Внедряем кросс-платформенные пуш-уведомления: начало
- Попробуем написать тестовое приложение
- Теперь добавим пользователей в наше приложение
- Надежность
- Push Notification Without using Firebase and Google Service? #13328
- Comments
- sgon00 commented Dec 4, 2017 •
- eseidelGoogle commented Dec 4, 2017
- micimize commented Apr 23, 2019
- pushy-me commented Aug 4, 2019 •
- aydin-faruk commented Mar 30, 2020
- eladnava commented Mar 30, 2020
- muhammad4eng commented May 19, 2020
- eladnava commented May 19, 2020 •
- How to Send Push Notifications With Firebase in Android (Guide)
- What is a Push Notification?
- What is FCM (Firebase Cloud Messaging)
- Send a Push Notification from Google Firebase (Step by Step)
- 1. Things You Need to Get Started
- 2. Create an Application in Android Studio
- 3. Setup Firebase for Push Notification
- Sign up for Firebase
- Send Notification from Firebase Console
Внедряем кросс-платформенные пуш-уведомления: начало
Добрый день! Меня зовут Владимир Столяров, я бэкенд-разработчик в команде Клиентские коммуникации в ДомКлике. В этой статье я расскажу о том, как внедрить кросс-платформенные пуш-уведомления. Хотя про это уже написано немало, я бы хотел рассказать о некоторых нюансах, с которыми нам пришлось столкнуться в процессе внедрения. Для лучшего понимания происходящего также напишем с вами небольшое веб-приложение, способное принимать пуши.

Для начала нужно понять, куда мы вообще хотим отправлять пуши. В нашем случае это веб-сайт, iOS-приложение и Android-приложение.
Начнем с веб-пушей. Для их получения браузер подключается к своему пуш-серверу, идентифицируется и принимает уведомления в сервис-воркер (в нем срабатывает событие push ). Нюанс тут в том, что у каждого браузера пуш-сервис свой:
- У Firefox он называется Mozilla Push Service. Его исходный код и спецификация протокола открыты, чем мы позже воспользовались.
- У Chrome это Google Cloud Messaging (не Firebase Cloud Messaging, что можно увидеть по именам доменов в исходном коде), и так далее.
Хорошая новость для нас в том, что веб-пуши стандартизированы IETF (https://datatracker.ietf.org/wg/webpush/documents/), и поддерживать разные форматы API для каждого браузера как на клиенте, так и на сервере нам не придется.
Теперь рассмотрим устройства на базе Android. Здесь есть несколько вариантов:
- Если в системе установлены Google Apps, то можно воспользоваться Firebase Cloud Messaging.
- Если у вас устройство от Huawei без Google Apps, то можно использовать Huawei Push Kit.
- Можно написать собственный пуш-сервер или воспользоваться готовыми проектами, например, https://bubu1.eu/openpush/, благо открытость платформы позволяет.
Далее идет iOS. В отличие от Android, способ отправить уведомления на устройства Apple всего один — использовать Apple Push Notification service (APNs).
Может возникнуть логичный вопрос: неужели придется поддерживать всё это многообразие стандартов, API и прочего на серверной стороне? На самом деле, всё не так уж и плохо, так как Firebase Cloud Messaging, помимо отправки на Android, покрывает еще и веб-пуши и работает с APNs. Так мы пришли к следующей схеме: на устройства Huawei без Google Apps отправляем через Huawei Push Kit, в остальных случаях пользуемся Firebase Cloud Messaging.
Несмотря на многообразие стандартов и сервисов, схема работы будет примерно одинаковой:
- Клиент подключается к пуш-серверу и получает уникальный идентификатор — токен.
- Клиент отправляет токен серверу конкретного приложения, чтобы стать связаным с учетной записью пользователя.
- Сервер приложений начинает по полученному токену отправлять пуши для конкретного пользователя.
Попробуем написать тестовое приложение
Для начала просто получим пуш-токен от Firebase и попробуем отправить пуш. Нужно зарегистрировать проект в консоли Firebase и получить конфигурацию для веб-приложения. Для корректного функционирования будет нужен локальный HTTP-сервер с передачей статики.
Сделаем страницу с одной кнопкой и необходимыми скриптами:
Также потребуется скрипт сервис-воркера. По умолчанию он подгружается автоматически по пути /firebase-messaging-sw.js . Для начала будем использовать готовый скрипт отсюда.
Открываем страницу, нажимаем на кнопку, разрешаем уведомления в браузере и копируем отображенный токен. Для удобства работы с API вручную можно создать долговременный ключ сервера (не сервисный аккаунт). Делаем простой запрос:
Тут есть важный момент, о котором можно забыть: пуш-токен никак не связан с пользователем приложения, он связан с конкретным получателем (т.е. с клиентской конфигурацией). На мобильных устройствах он связан с конкретной инсталляцией приложения.
Посмотрим, что нам приходит в браузер. В документации описан колбэк setBackgroundMessageHandler . Модифицируем сервис-воркер, добавив в конец файла код:
Открываем консоль сервис-воркера, снова отправляем пуш… и ничего не видим в консоли, хотя уведомление отобразилось. Почему же? Ответ в есть в документации:
Note: If you set notification fields in your message payload, your setBackgroundMessageHandler callback is not called, and instead the SDK displays a notification based on your payload.
В нашем случае в запросе есть поле notification и данный колбэк не вызывается. Это довольно важное замечание, к нему мы вернемся дальше.
Тем не менее, можно это обойти, обрабатывая входящие пуши вручную. Поменяем содержимое firebase-messaging-sw.js :
Здесь мы считываем полезную нагрузку в json и парсим ее в js-объект, который будет выведен в консоль, заодно показывая уведомление. Обратите внимание на waitUntil внутри обработчика: он нужен для того, чтобы сервис-воркер не завершил работу до окончания асинхронного вызова onPush .
Теперь добавим пользователей в наше приложение
Для удобства заведем новую страницу:
Нам понадобится простенький бэкенд, писать будем на Go. Тут приведу только пример кода, отвечающего за хранилище токенов:
В бэкенд также добавлен код отправки пушей конкретному пользователю.
Базово мы обеспечиваем следующую функциональность:
- При входе пользователя запрашиваем разрешение на показ уведомлений, и при согласии получаем пуш-токен и отправляем его на сервер. Пуш-токен привязывается к пользователю с помощью сессионных/авторизационных кук.
- При выходе мы инвалидируем пуш-токен. При следующей попытке отправить его Firebase нам ответит ошибкой, что такой токен не существует, и мы удалим его из хранилища.
- При обновлении пуш-токена мы отправляем новый в хранилище. Старый токен мы удалим уже при следующей отправке пуша.
Опишу несколько важных моментов, на которые мы наткнулись уже на практике (они отражены в примере):
- Пуш-токены имеют ограниченный срок жизни, однако узнать его из самого токена, на первый взгляд, невозможно. Судя по коду firebase-js-sdk, этот срок чуть больше недели, так как колбэк на обновление токена onTokenRefresh вызывается раз в неделю.
- Разные пользователи могут прислать одинаковые пуш-токены. Такое возможно в случае, если запрос на инвалидацию в Firebase не прошел успешно. Для решения этой проблемы мы в данном случае меняем владельца токена.
- У пользователя может завершиться сессия без явного логаута. Т.е. пользователь больше не авторизован, однако уведомления продолжают поступать. Способ решения этой проблемы зависит от архитектуры приложения. Мы при отправке пуш-токена на сервер сохраняем идентификатор пользователя еще и локально, при каждой загрузке страницы сверяя его с ответом на запрос о текущем пользователе. Если значения различаются или пользователь не авторизован, то пуш-токен инвалидируется. Однако у такого подхода всё же есть один недостаток: инвалидация происходит только в случае загрузки страницы сайта.
- Сохраняйте платформу, с которой получен токен. Это поможет при дальнейшей кастомизации: например, добавить возможность ответа в чат прямо из пуша (в Android/iOS можно, в браузере — нет), кнопки и прочее.
И вот, грабли собраны, доработки выложены в прод. Пуши ходят… или не ходят? Самое время поговорить про
Надежность
Никаких методов подтверждения доставки от клиента серверу приложений изначально не предусмотрено, хотя в Huawei над этим задумались и сделали. Поэтому нам придется реализовывать эту функциональность самим. Первое, что приходит в голову — отправлять на сервер HTTP-запрос при получении пуша. Для этого нам потребуется идентифицировать каждый пуш, благо и Firebase, и Huawei это позволяют: можно пробросить произвольные данные при отправке уведомления.
Идея следующая: мы генерируем одноразовый токен подтверждения (в нашем случае это просто UUID) и отправляем его в пуше. Клиент при получении и показе пуша делает HTTP-запрос, в который включается присланный токен подтверждения. Немного дорабатываем бекенд и firebase-messaging-sw.js :
И если с вебом нам хватило такой простой доработки, то с мобильными устройствами всё несколько сложнее. Помните про замечание в документации о setBackgroundMessageHandler ? Так вот, дело в том, что в Firebase (да и в Huawei) есть не совсем очевидное (по API) разделение на, условно, информационные пуши (если есть поле notification ) и data-пуши. По задумке, информационные пуши никак не обрабатываются приложением и на их основе сразу формируется уведомление, а data-пуши попадают в специальный обработчик и дальше приложение решает, что делать.
Если при получении веб-пушей с ними можно работать до показа, отказавшись от firebase-js-sdk в сервис-воркере, то в Android так не получится. Поэтому для Android мы перенесли всю нужную информацию исключительно в data и перестали отправлять notification , что позволило нам реализовать подтверждение доставки.
Для APNs же достаточно просто выставить mutable-content в 1, и тогда при обработке пуша можно будет выполнять некоторый код, но с довольно серьезными ограничениями, хотя этого вполне достаточно для простого HTTP-запроса. Собственно, именно из-за ограничений iOS при подтверждении пуша не задействуется пользовательская сессия, а используются одноразовые токены.
Отсюда вытекает еще одна интересная особенность: data-пуши можно использовать не только для уведомлений пользователя, но и для доставки какой-либо информации, настроек и прочего в приложение. Примерно таким способом, например, Telegram обходил блокировки, отправляя адреса серверов через пуши.
Мы же используем механизм подтверждения следующим образом: для некоторых типов уведомлений, если не дождались подтверждения через, скажем, 15 минут после отправки, отправляется смс. А чтобы исключить случай, когда после смс приходит пуш, можно выставить TTL при его отправке.
Также этот механизм позволяет нам собирать статистику по доставляемости. Исходя из собранных данных, доставляемость пушей по платформам получается примерно следующей:
- Android (исключая Huawei) — 40 %
- Web — 50 %
- iOS — 70 %
Для Huawei достаточное количество данных еще не накоплено. Следует сказать о том, что мы не предпринимали никаких действий по увеличению доли доставленных пушей, как это сделали, например, в Яндекс.Почте.
Итоговая архитектура получается примерно такой:
Полную версию проекта можно взять на GitHub.
В следующих частях я планирую рассказать о дополнительных возможностях, предоставляемых пуш-сервисами, более детально о подводных камнях на клиентских платформах, а также о том, как можно принимать веб-пуши, не используя браузер.
Источник
Push Notification Without using Firebase and Google Service? #13328
Comments
sgon00 commented Dec 4, 2017 •
Hi, are there any ways to do push notification in flutter without using firebase and google service? I can not use them because firebase and google service are blocked in China and in some other countries too. Thanks a lot.
The text was updated successfully, but these errors were encountered:
eseidelGoogle commented Dec 4, 2017
https://flutter.io/platform-channels/ are docs on writing a plugin around arbitrary system services.
micimize commented Apr 23, 2019
Currently, the most maintained 3rd party lib looks like flutter_local_notifications
pushy-me commented Aug 4, 2019 •
Pushy is a paid push notification solution that supports worldwide notification delivery, including delivery to Android devices in China.
aydin-faruk commented Mar 30, 2020
eladnava commented Mar 30, 2020
@aydin-faruk OneSignal uses Firebase Cloud Messaging and therefore cannot deliver notifications in China.
muhammad4eng commented May 19, 2020
@aydin-faruk OneSignal uses Firebase Cloud Messaging and therefore cannot deliver notifications in China.
Really ? So what is the problem
eladnava commented May 19, 2020 •
@Muhammad1122 FCM is blocked in China, and so is OneSignal, because China decided to block all Google services, and OneSignal relies on Google’s FCM. To deliver notifications to your Flutter app within China, you will need to use another service that does not use FCM behind-the-scenes.
Pushy is such a service, and it has an SDK for Flutter:
https://pushy.me/china
You can’t perform that action at this time.
You signed in with another tab or window. Reload to refresh your session. You signed out in another tab or window. Reload to refresh your session.
Источник
How to Send Push Notifications With Firebase in Android (Guide)
In this guide, you’ll learn how you can send push notifications using Firebase in Android.
Let’s get started.
Curious to see the end result of this tutorial? Watch!
What is a Push Notification?
Push notification is a simple message that appears with a notification in the notification tray or like a popup messaging – depends on the platform.
Push Notifications are usually pushed from backend servers to the clients like Firebase in this case. It is the way to deliver users a message without opening the app. It is a highly effective tool for developers and advertisers to re-target/re-engage your dormant users.
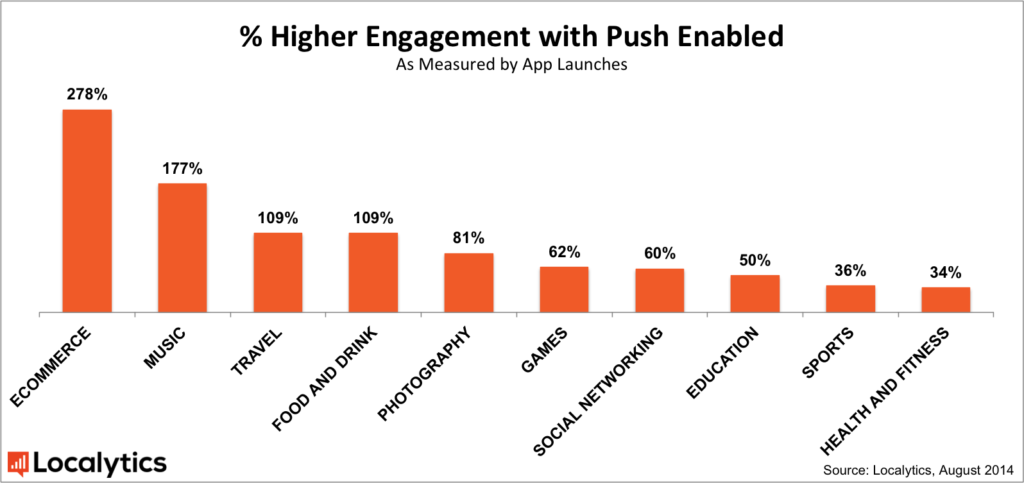
As you can see, the push notifications get benefits most from the eCommerce stores since users are excited about the new products.
What is FCM (Firebase Cloud Messaging)
Firebase Cloud Messaging is a new version of Google Cloud Messaging or GCM that is a cloud cross-platform messaging solution. You can use Firebase Cloud Messaging for any kind of end-user device including iOS, Android, or even web at no-cost.
Firebase allows two types of messages:
- Notification Notifications. The customer application will act differently based on if it is from the background or the foreground once it receives the FCM message. Considering that the Android program assembles the telling to you personally, this is among the simplest methods to send notifications to your customers. If your program receives an FCM message whenever it’s in the foreground, then the program will not manage this telling automatically, leaving one to process the message on your program’s onMessageReceived() callback. We are going to be researching onMessageReceived() later in this tutorial, but just bear in mind that if your program receives a message whenever it’s in the foreground, then by default this message will not be displayed to the consumer.
- DataNotifications, you may use info messages to send customized data components to the customer program. But, FCM does set a 4KB limitation on those information messages, therefore if your payload exceeds 4KB then you will want to fetch further information using WorkManager or the JobScheduler API.
NOTE: In this tutorial, we’ll be sending a notification message only.
Send a Push Notification from Google Firebase (Step by Step)
Here is the step by step guide how you can implement Firebase push notification with an example:
1. Things You Need to Get Started
2. Create an Application in Android Studio
- Open Android Studio and create a new project.
- Enter the app details – the app name, domain name, location – and leave the rest as default i.e., the empty activity, and minimum Android version. In my case, the package name of my app is ‘com.firebasetutorials.testingnotification’ but you can have one of your choices.
- After Android Studio finishes the building App for you, leave it, and move to the next step, we will soon get back to Android Studio.
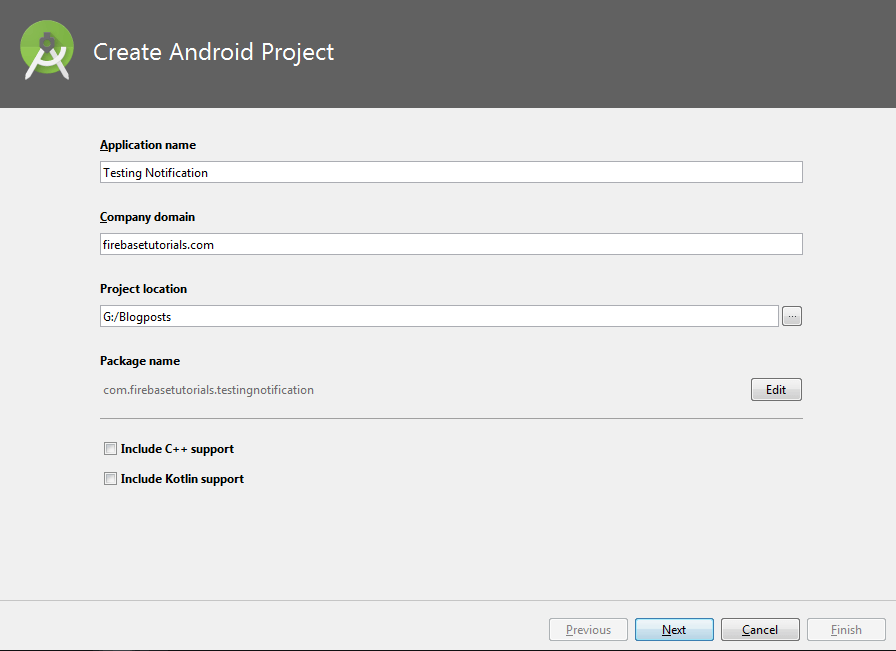 Creating Application in Android Studio for Firebase Push Notification
3. Setup Firebase for Push Notification
There are three steps to set up Firebase for your Android app notification:
Sign up for Firebase
Before anything, you need a Firebase account. Click here and signup for Firebase Console or sign in using your Google account.
- Create a Project
Now visit the Firebase Console and hit ‘Add Project’. Enter Project name, select Country/region. And hit ‘Create Project’
 Create project at Firebase Console for Android Push Notification
- Register App with Firebase
There are three simple steps to get your Android App Registered with Firebase:
Register App
After your first project is completed, you’ll see a page like below. Hit ‘Add Firebase to your Android App’
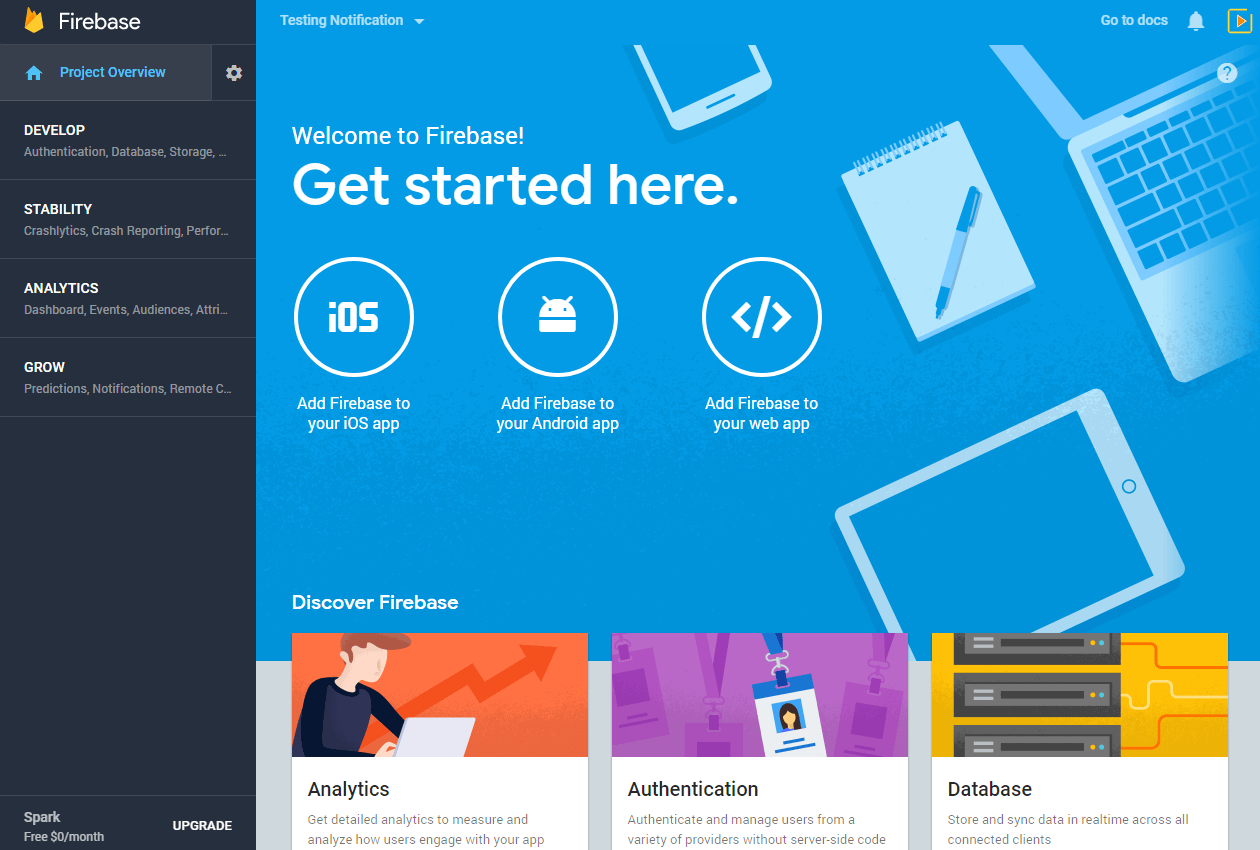 Adding Android app at Firebase Console for Android Push Notification
Enter ‘Android package name’. In my case, it is ‘com.firebasetutorials.testingnotification’ – you can enter one of your choices.
NOTE: Package name should be exactly the same as the app package name. Otherwise it will not work.
Enter ‘App nickname’. I’m entering the ‘Testing Notification App’ – you can enter anything; it has nothing to do with your app.
The third field is for ‘Debug signing certificate SHA-1’ you can skip it at this point as we are not going to use Firebase Authentication.
Hit ‘Register App’ to get your app registered with Firebase
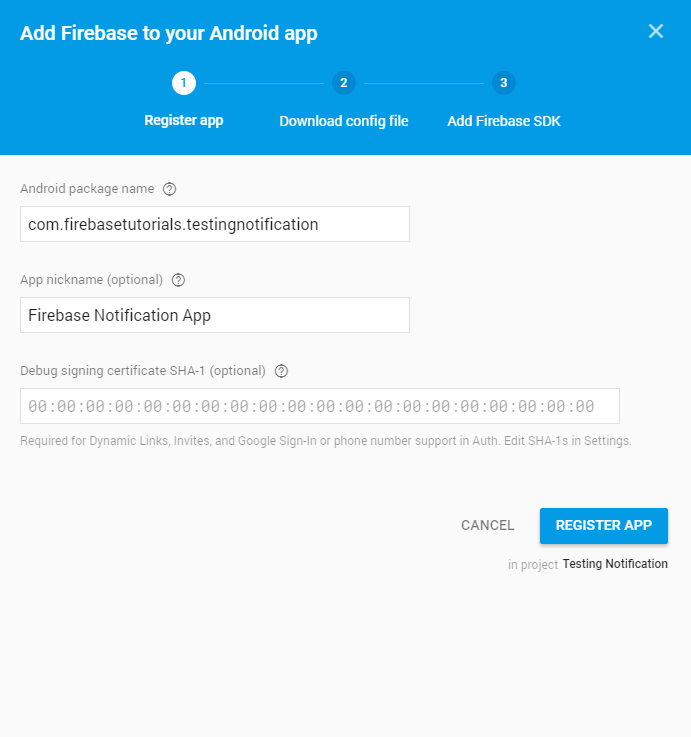 Registering App for Firebase Console Notification
Download Config Files
Hit ‘Download google-services.json’ button to download a JSON file. Save the JSON file under the app directory of your Android Studio project we just recently created.
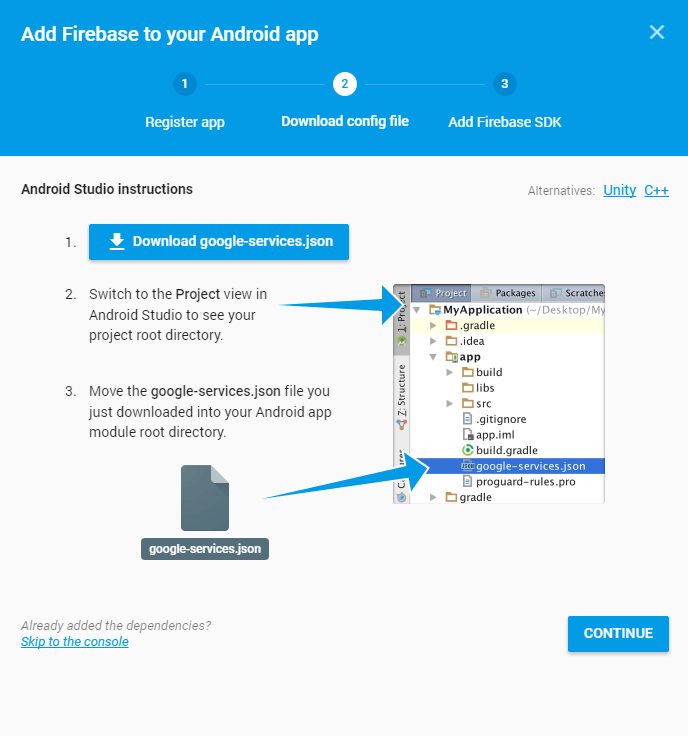 Downloading Config file for Android from Firebase Console
Add Firebase SDK
After downloading the JSON file under the App Directory of your project hit Continue on Firebase Console Dialog.
In Android Studio, open build.gradle file. You will find it in the project directory, but not the one that is in your app directory. Add the following line of code inside dependencies:
classpath ‘com.google.gms:google-services:3.2.0’
After adding the dependencies, your project will look like this:
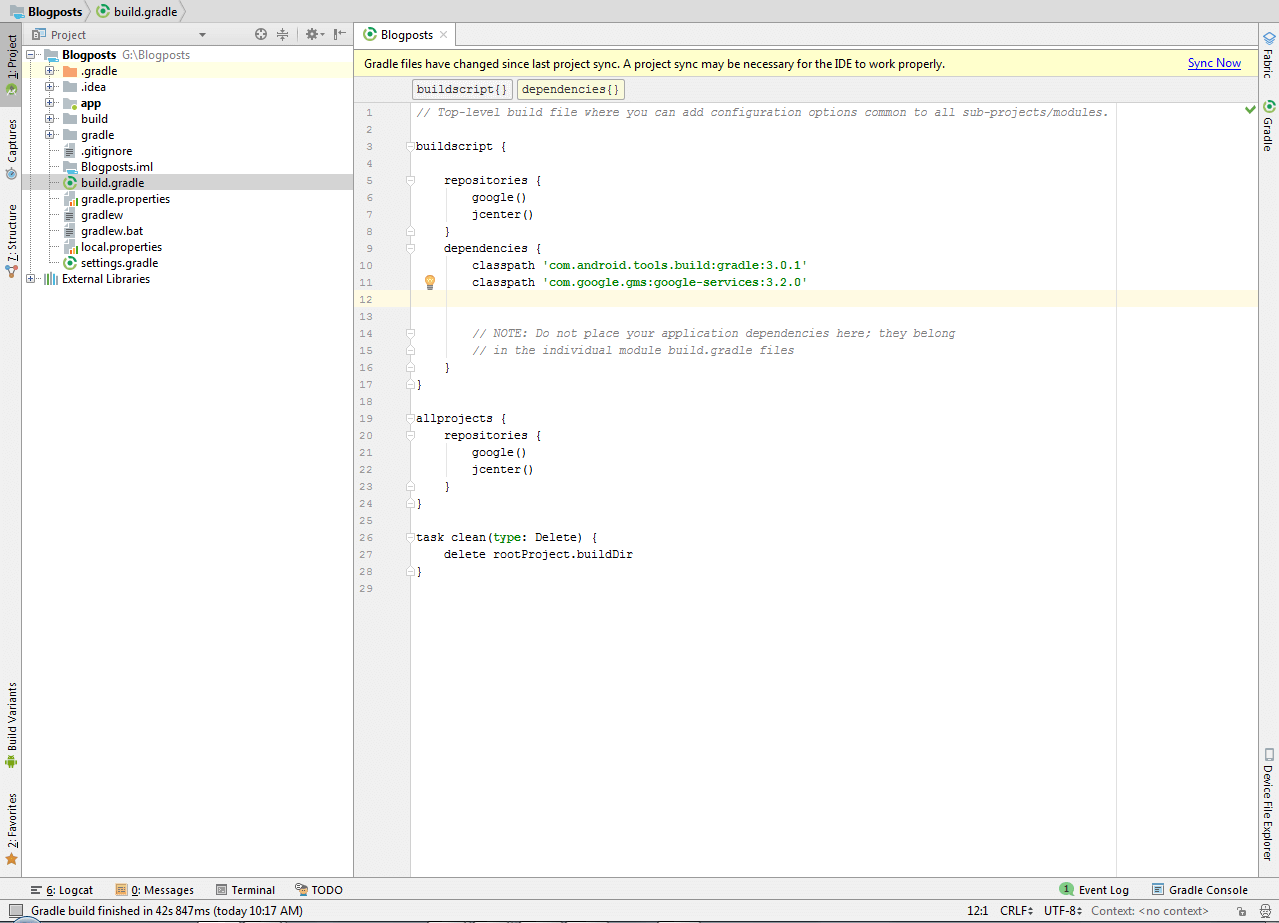 Added classpath in build.gradle for Firebase Push Notification in Android
After adding this, you will see a yellow message, asking you to sync the project. You can ignore it at the moment. Now head over to app-level build.gradle file. You will find it under the app directory of your project.
Add the following lines of in dependencies section
And at the end, outside of the dependencies section, add the following line and hit ‘Sync Now’
And your build.gradle file will look like this:
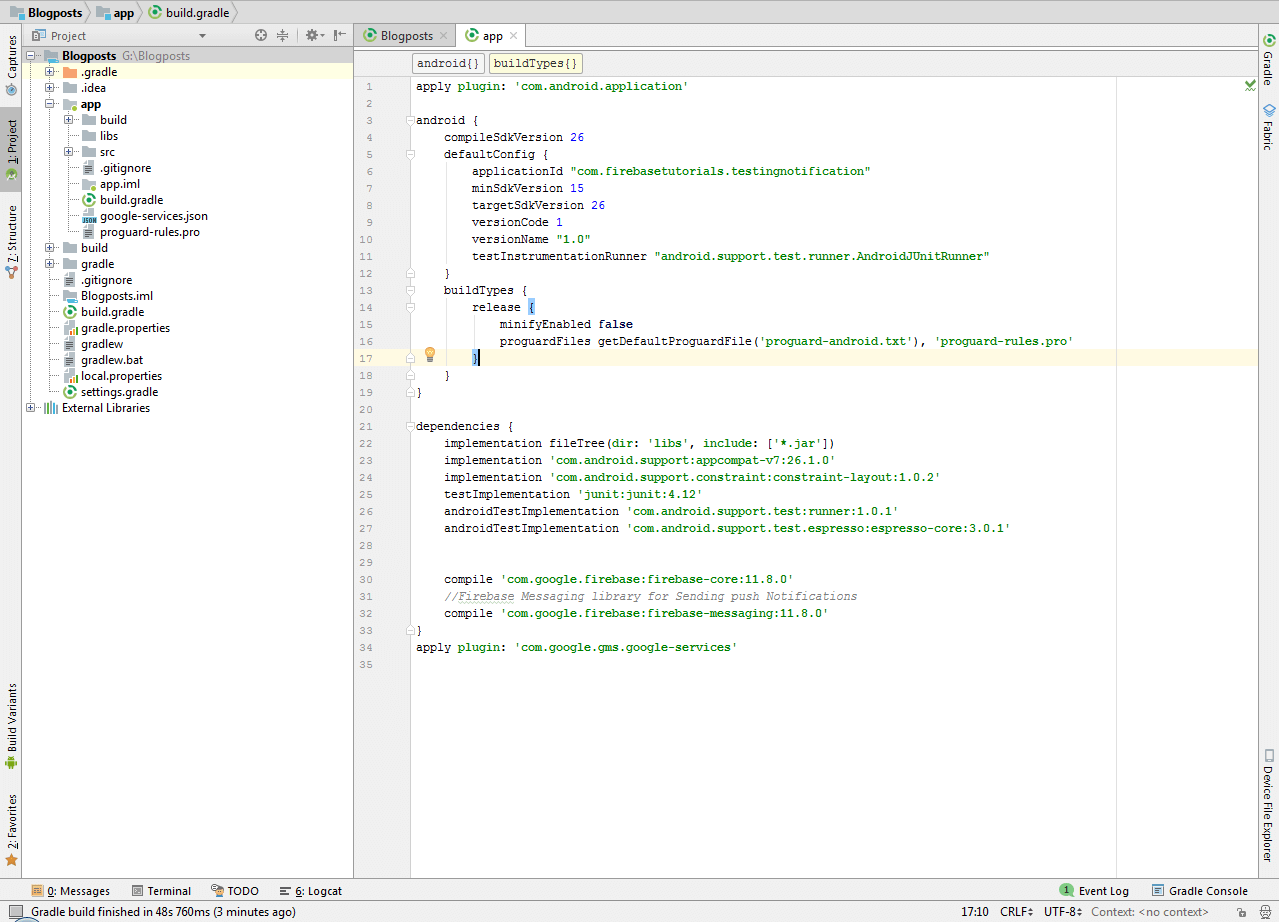 Implement Firebase SDK in Android Studio for Push notification | Build.gradle (App) Screenshot
That’s all we need to do in Android Studio.
Send Notification from Firebase Console
Get back to Firebase Console. Open the Firebase project, on the left pane select ‘Notification’ or click here
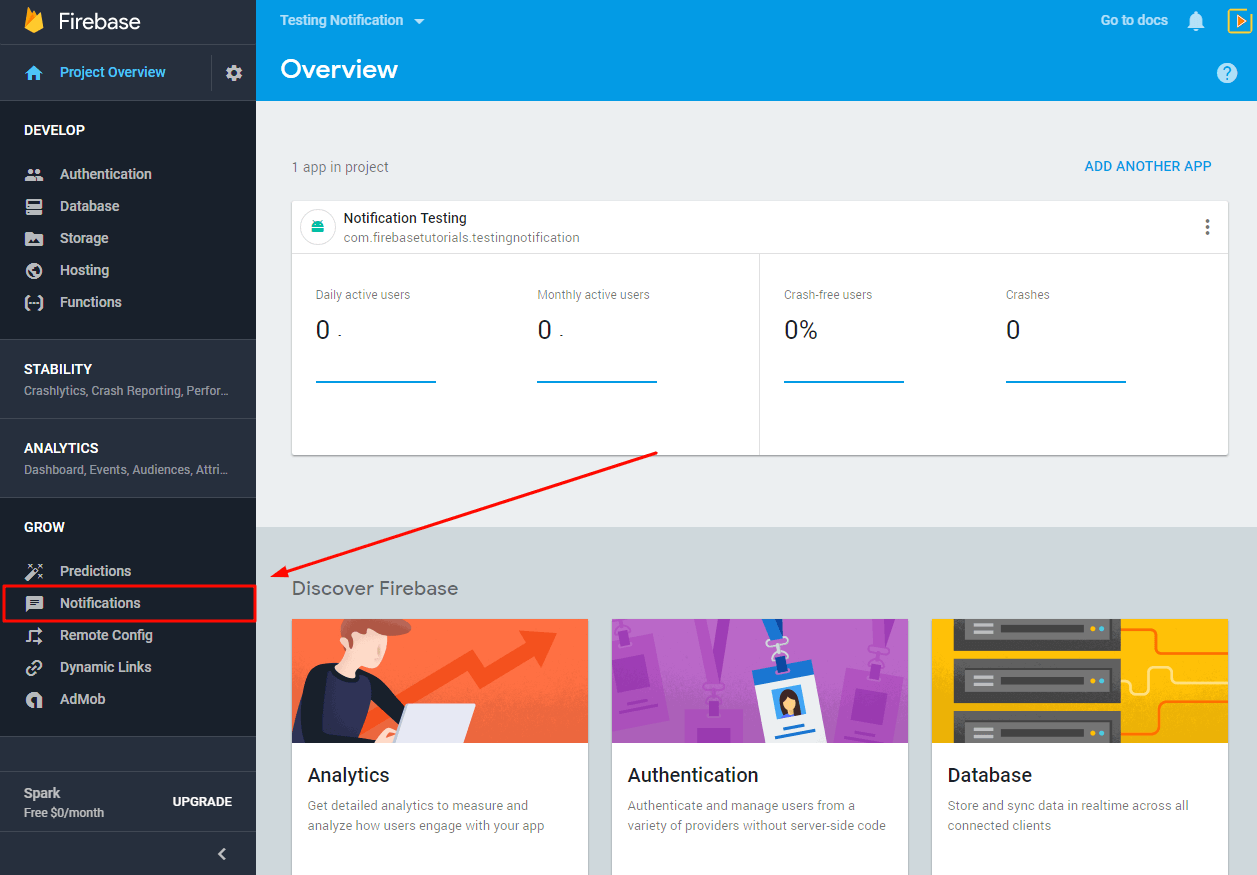 Firebase Notification in Firebase Console
Hit ‘SEND YOUR FIRST MESSAGE’
 Send First Notification in Firebase Console
And you’ll see the ‘Compose Message‘ form, where you can enter the details.
In ‘Message Text‘ enter the message that you want to be displayed in the Notification Bar of your Android App
In ‘Message Label‘ you can enter the message nickname, it has to do nothing with the notification at the client-side, it is just for saving purpose in Firebase Console.
In the ‘Delivery Date‘ drop-down, you can select the delivery time. If you select ‘Send Now‘ your message will be sent and displayed instantly. If you select ‘Send Later’ then some more options will be displayed asking for when you want to send the notification to your users.
You can mark the ‘Recipient Time Zone‘ option and your message will be delivered according to the recipient time zone or you can provide any custom timezone.
Recipient Time Zone is very useful because sometimes we want to send notification on some custom events like New Year. Due to timezone differences, your message can be shown to users before New Year and make them feel annoyed. So it’s better to use the ‘Recipient Time Zone‘ option with that kind of notification.
In this tutorial, we will select the ‘Send Now’ option to make the notification sent right now.
In the target section, we can target a custom range of users depending on their behavior and much more. We will be covering that all in a whole new section.
In the next drop-down, select the app package name. You can select multiple apps simultaneously, but they all need to be on the same project.
After that, there are ‘Conversion events’ options, here you can track the analytics data of your notification. The ‘Sent‘ and ‘Opened‘ are added by default, but you can add more.
Sent and Opened are shown in the Notification Section in Firebase to show you how many users received the notification message and how many opened it. We are not adding a conversion event for the sake of this tutorial.
In the end, there are few ‘Advanced Options’, but we will keep the default. Those are for Data Messages; we will cover that all in detail later.
Now hit, ‘Send Message‘ to make the notification sent to the client app.
Your Notification will be displayed on your Android Phone, and if you tap on that notification, it will open the app.
You can watch the video above if you don’t understand the text.
Ask any questions in the comment section below, our experts will be happy to help you at no extra cost.
Источник


