- В чем разница между Assets и Raw-ресурсами?
- Русские Блоги
- Что вам нужно знать о res / raw и assets в Android
- Assets Folder in Android Studio
- How the asset folder is different from the Resource Raw folder?
- But when to use which folder?
- How to Create Assets Folder in Android Studio?
- Resource Raw Folder in Android Studio
- How the Resource raw folder is different from the Assets folder?
- But when to use which folder?
- How to Create Resource Raw Folder in Android Studio?
В чем разница между Assets и Raw-ресурсами?
Assets и Raw-ресурсы – это механизмы, которые позволяют добавить дополнительные файлы произвольного формата в Android-приложение.
Для использования Assets создается директория src/main/assets . Эта директория может содержать произвольные файлы и поддиректории.
Для получения контента asset-файла используется метод Context.getAssets(), который возвращает объект класса AssetManager . Далее вызывается метод AssetManager.open(), который принимает имя файла и возвращает InputStream .
Если файла с заданным именем не существует, то метод open() бросает IOException .
Для использования Raw-ресурсов создается resource-директория res/raw . Эта директория подчиняется тем же правилам, что и другие ресурсы. Она может иметь квалификаторы (например -ru ), в ней нельзя создавать вложенные директории, а имена файлов должны быть в нижнем регистре.
Во время компиляции для каждого raw-файла создается id в классе R . Для файла sound.mp3 будет создан id R.raw.sound .
Для доступа к raw-ресурсу используется метод Resources.openRawResource(), который принимает id ресурса и возвращает InputStream .
Доступ к raw-ресурсам более эффективен и безопасен за счет статической генерации id. Также с помощью квалификаторов возможно использование разных файлов для различных конфигураций системы.
С другой стороны механизм Assets более гибкий, т.к. позволяет получать полное имя файла и создавать вложенные директории.
Источник
Русские Блоги
Что вам нужно знать о res / raw и assets в Android
Android предоставляет два каталога, чтобы мы могли хранить некоторые файлы, эти файлы не будут скомпилированы в двоичные файлы после упаковки и сохранятся в пакете apk без изменений. Мы часто сохраняем в нем видео или файлы базы данных. Давайте узнаем об этих двух.
Использование промышленного класса
- Сохраните некоторые файлы .db в активах. Например, сохраните информацию о присвоении номера, информацию о городе и соответствующем номере и т. Д. И сохраните ее локально при запуске apk, что удобно для использования в будущем.
- Сохраните некоторые статические html-страницы в активах, а затем загрузите их через WebView в действии.
- Сохраните видеофайл в формате raw и используйте его на странице приветствия. Когда вы впервые используете Best Miss, на странице приветствия будет видео, на котором различные знаменитости кричат о Best Miss. Это используемый метод.
Разница между двумя
- Поскольку raw является подкаталогом Resource (res), android автоматически сгенерирует идентификатор для файла в нем и будет сопоставлен с классом R. Когда мы посещаем, мы можем получить ссылку на файл через R.id.fileName. Файлы, хранящиеся в активах, не будут генерировать идентификатор, нам нужно получить к нему доступ через класс AssetManager.
- Подкаталоги не допускаются в необработанных файлах, но подкаталоги могут быть созданы в активах.
Как читать содержимое файла
Прочтите файловые ресурсы в res / raw, получите входной поток следующим образом для записи
Прочтите файловые ресурсы в разделе assets и получите входной поток для записи следующим образом
AssetManager am = getAssets();
InputStream is = am.open(«filename»);
1 м проблема ограничения
Размер одного файла, сохраненного в res / raw и assets, не может превышать 1 м. В противном случае при его использовании будет сообщено об ошибке. Так как это решить?
- Разбивайте большие файлы на маленькие, чтобы размер каждого файла не превышал 1 м.
- Сделайте так, чтобы имя каждого файла соответствовало определенным правилам именования.
- При использовании полученные маленькие имена файлов используются для создания входных потоков, чтобы объединить их в большой файл и скопировать на SD-карту. Ниже приведены некоторые примеры кодов.
Код для решения проблемы представлен ниже:
Как разделить большие файлы
public static void main(String[] args) throws Exception <
// Путь, по которому размещаются большие файлы
String path = «D:/»;
// Имя файла большого файла
String base = «demo»;
String ext = «.db»;
// Разделим каждый маленький файл по стандарту 1024 * 1024 байта или 1M
int split = 1024 * 1024;
byte[] buf = new byte[1024];
int num = 1;
// Создаем входной поток
File inFile = new File(path + base + ext);
FileInputStream fis = new FileInputStream(inFile);
while (true) <
// Назовите небольшой файл в виде «demo» + num + «. db», то есть demo1.db, demo2.db после разделения. . . . . .
FileOutputStream fos = new FileOutputStream(new File(path + base
+ num + ext));
for (int i = 0; i partFileList, String dst) throws IOException <
if (!new File(dst).exists()) <
OutputStream out = new FileOutputStream(dst);
byte[] buffer = new byte[1024];
InputStream in;
int readLen = 0;
for(int i=0;i
// Получаем входной поток
in = c.getAssets().open(partFileList.get(i));
while((readLen = in.read(buffer)) != -1) <
out.write(buffer, 0, readLen);
>
out.flush();
in.close();
>
// Закрываем выходной поток после записи всех небольших файлов, которые будут объединены в один файл
out.close();
>
>
Это нормально, большой файл скопирован по нужному вам пути.
Источник
Assets Folder in Android Studio
It can be noticed that unlike Eclipse ADT (App Development Tools), Android Studio doesn’t contain an Assets folder in which we usually use to keep the web files like HTML. Assets provide a way to add arbitrary files like text, XML, HTML, fonts, music, and video in the application. If one tries to add these files as “resources“, Android will treat them into its resource system and you will be unable to get the raw data. If one wants to access data untouched, Assets are one way to do it. But the question arises is why in the asset folder? We can do the same things by creating a Resource Raw Folder. So let discuss how the assets folder is different from the Resource Raw folder?
How the asset folder is different from the Resource Raw folder?
In Android one can store the raw asset file like JSON, Text, mp3, HTML, pdf, etc in two possible locations:
- assets
- res/raw folder

Both of them appears to be the same, as they can read the file and generate InputStream as below
But when to use which folder?
Below is some guidance that might be helpful to choose
1. Flexible File Name: (assets is better)
- assets: The developer can name the file name in any way, like having capital letters (fileName) or having space (file name).
- res/raw: In this case, the name of the file is restricted. File-based resource names must contain only lowercase a-z, 0-9, or underscore.
2. Store in subdirectory: (possible in assets)
- assets: If the developer wants to categories the files into subfolders, then he/she can do it in assets like below.

3. Compile-time checking: (possible in res/raw)
- assets: Here, the way to read it into InputStream is given below. If the filename doesn’t exist, then we need to catch it.
- res/raw folder: Here, the way to read it into InputStream is:
So putting a file in the res/raw folder will provide ensure the correct file-name during compile time check.
4. List filenames at runtime: (possible in assets)
- assets: If the developer wants to list all the files in the assets folder, he/she has used the list() function and provide the folder name or ” “ on the root folder as given below.
- res/raw: This is not possible in this folder. The developer has to know the filename during development, and not runtime.
So, in assets, one can read the filename during runtime, list them, and use them dynamically. In res/raw, one needs to code them ready, perhaps in the string resources file.
5. Filename accessible from XML: (possible in res/raw)
So if you need to access your file in any XML, put it in the res/raw folder. Let’s make a table to remember the whole scenario easily.
| Res/Raw Folder | ||||||
|---|---|---|---|---|---|---|
| Flexible File Name NO | ||||||
| Store in subdirectory NO | ||||||
| Compile-time checking YES | ||||||
| List filenames at runtime NO | ||||||
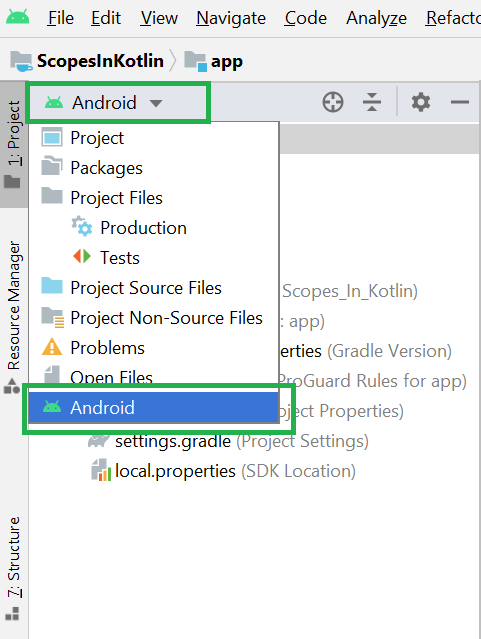
Filename accessible from XML How to Create Assets Folder in Android Studio?Now let’s discuss how to create an assets folder in the android studio. Below is the step-by-step process to create an assets folder in Android studio. Step 1: To create an asset folder in Android studio open your project in Android mode first as shown in the below image.
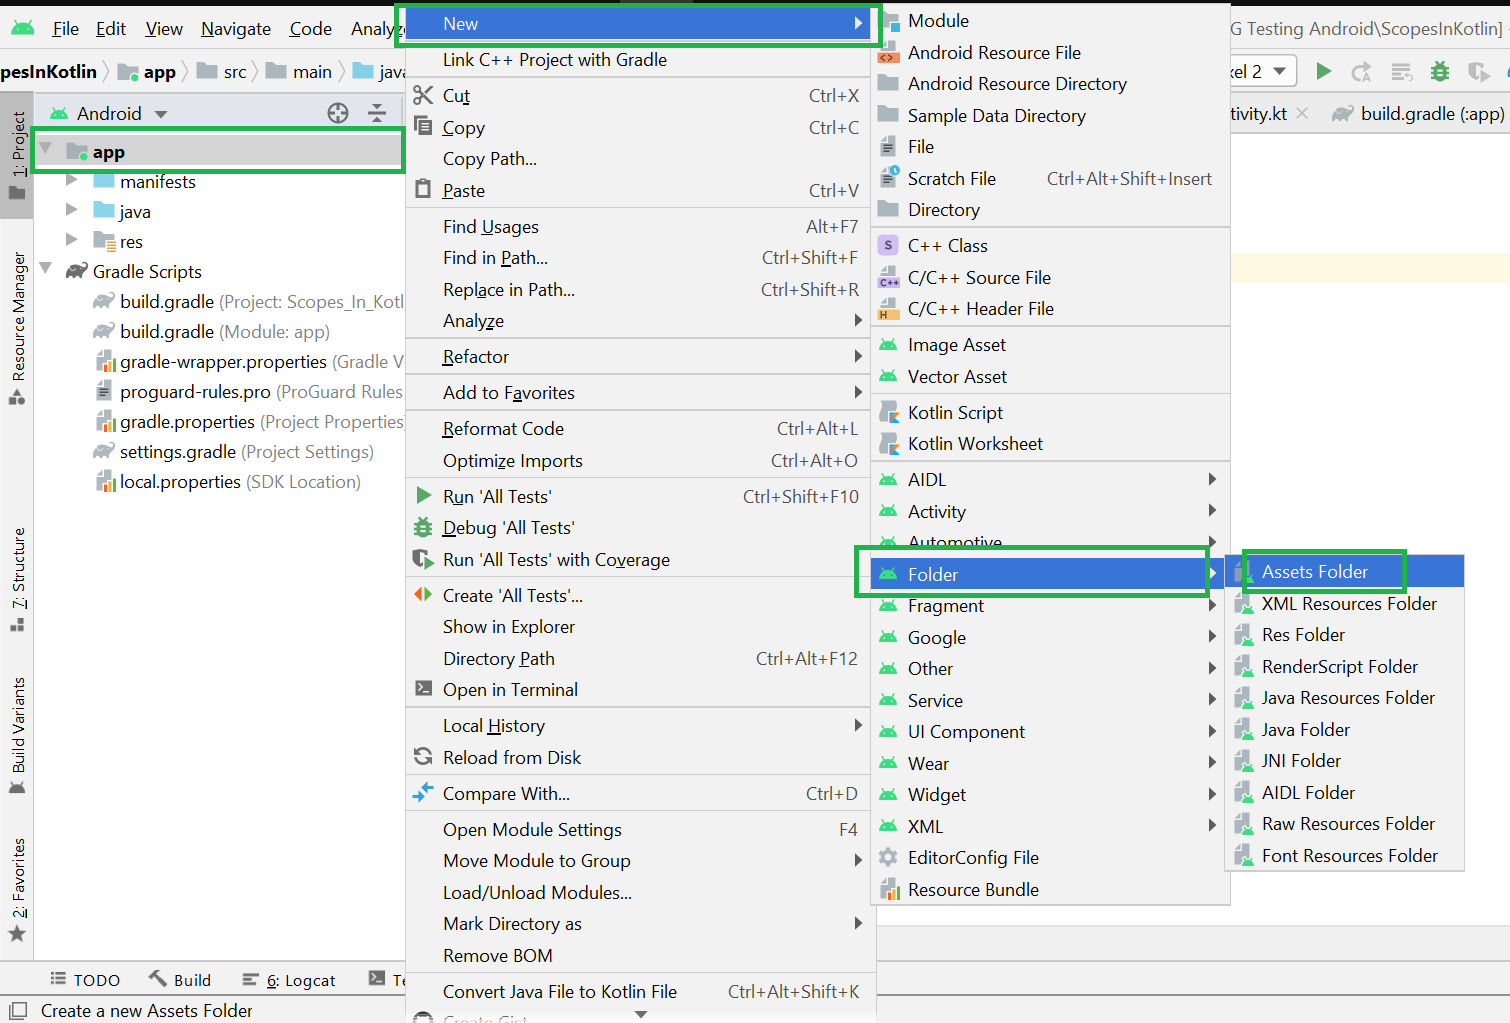
Step 2: Go to the app > right-click > New > Folder > Asset Folder and create the asset folder.
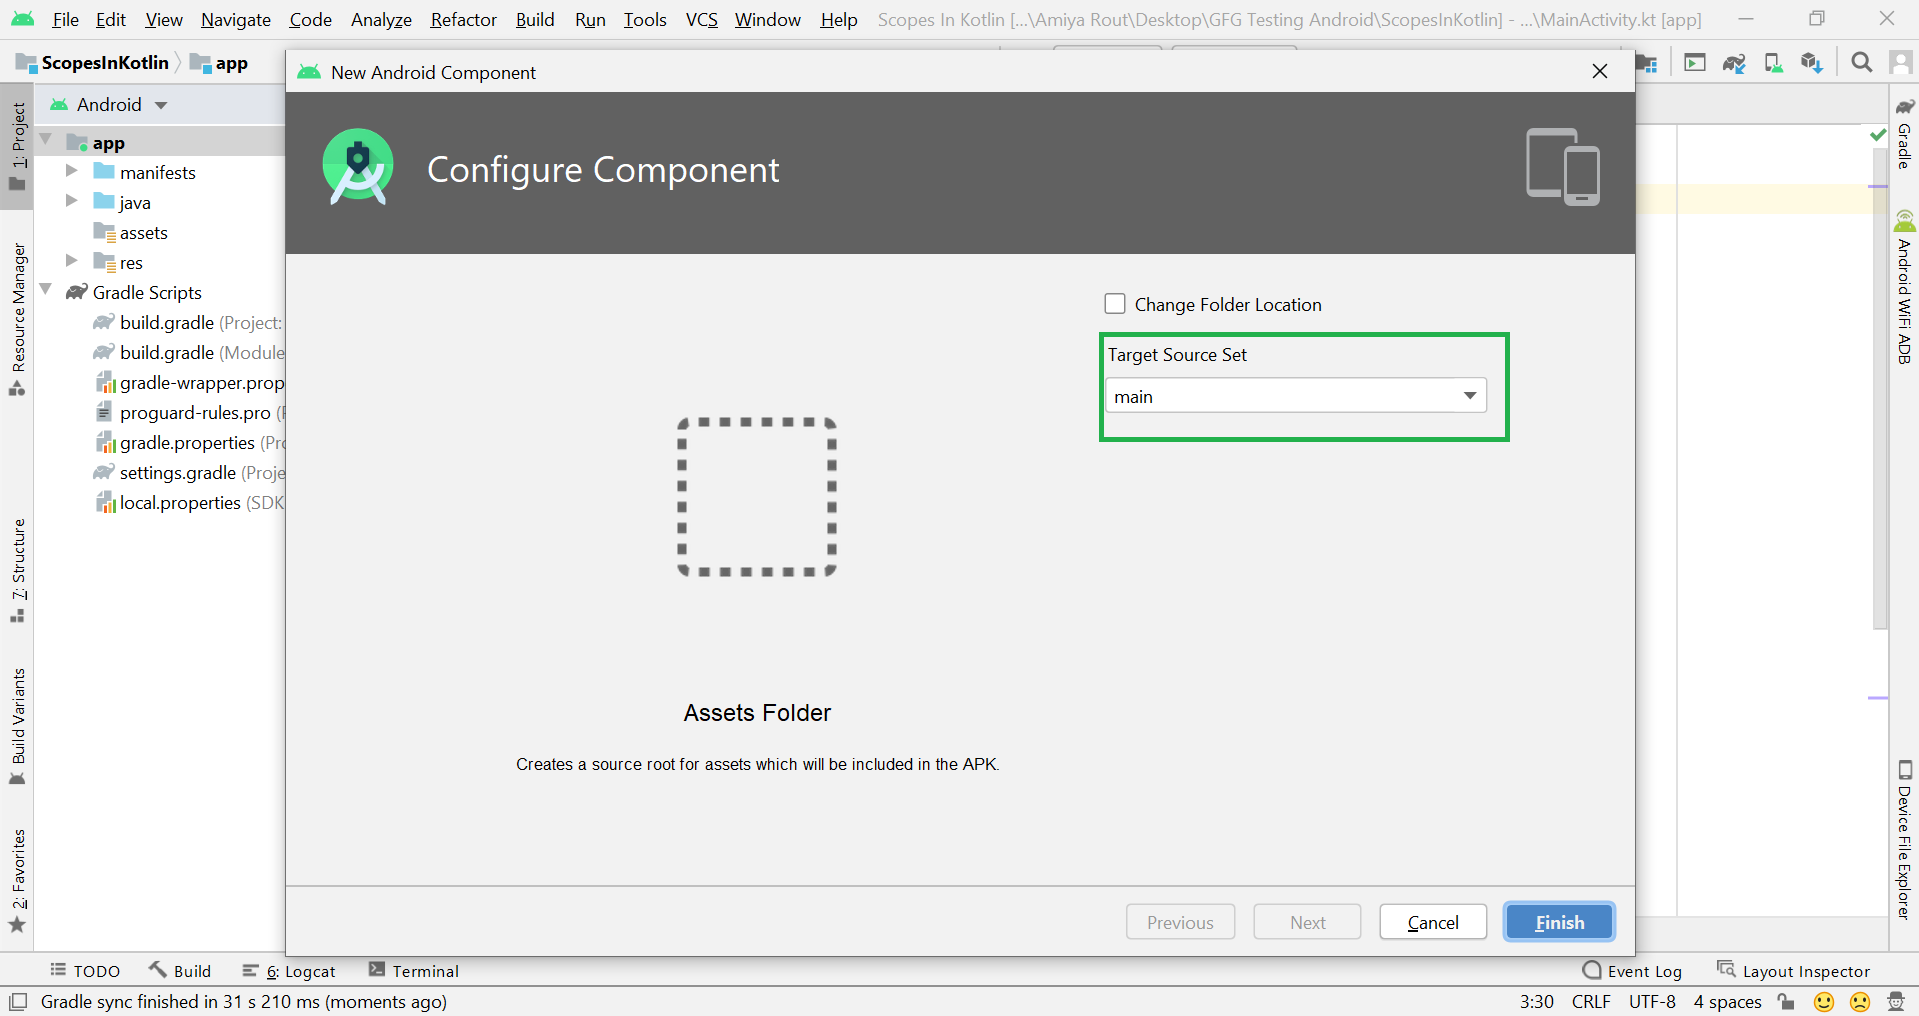
Step 3: Android Studio will open a dialog box. Keep all the settings default. Under the target source set, option main should be selected. and click on the finish button.
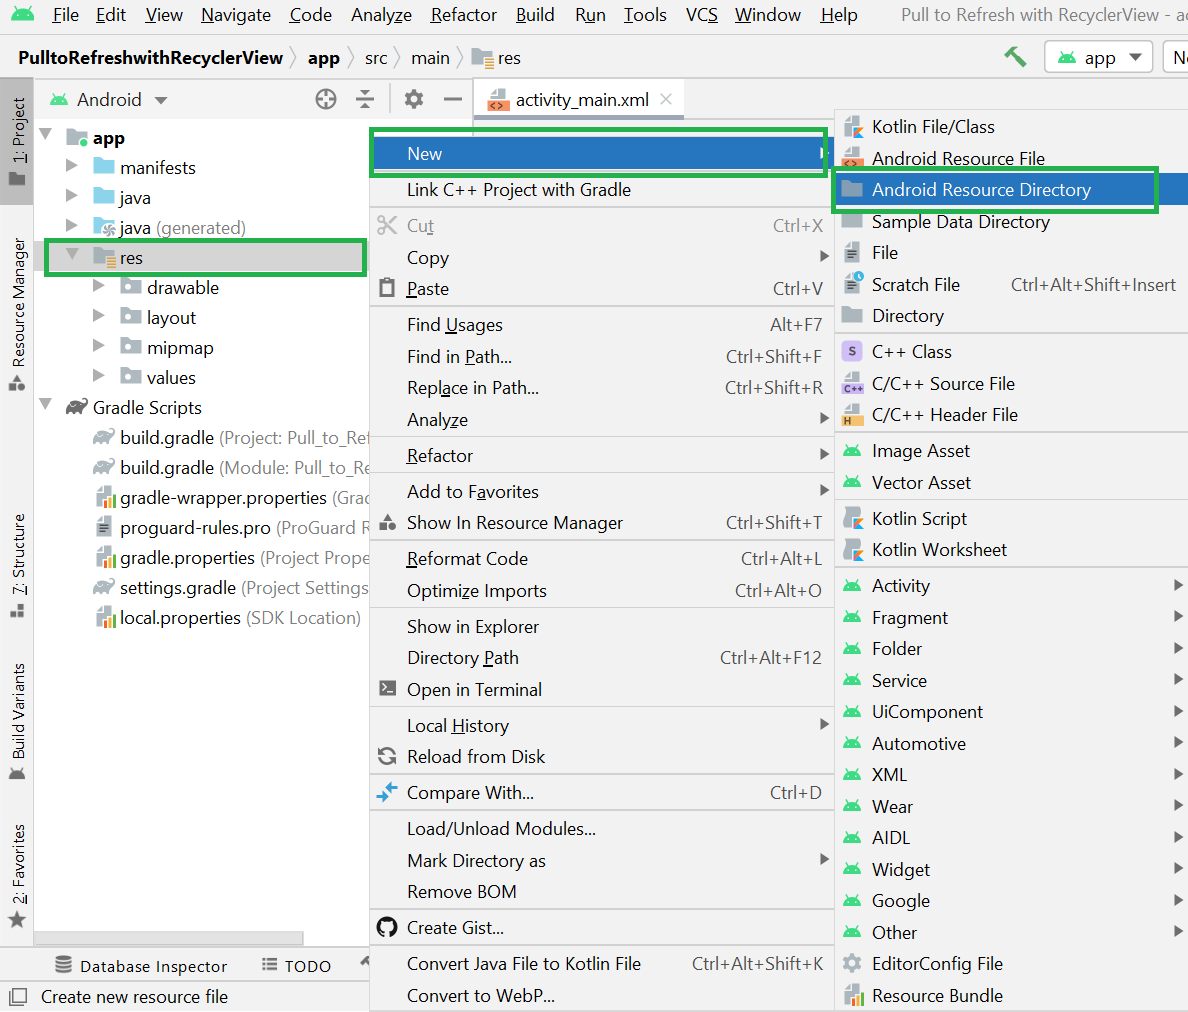
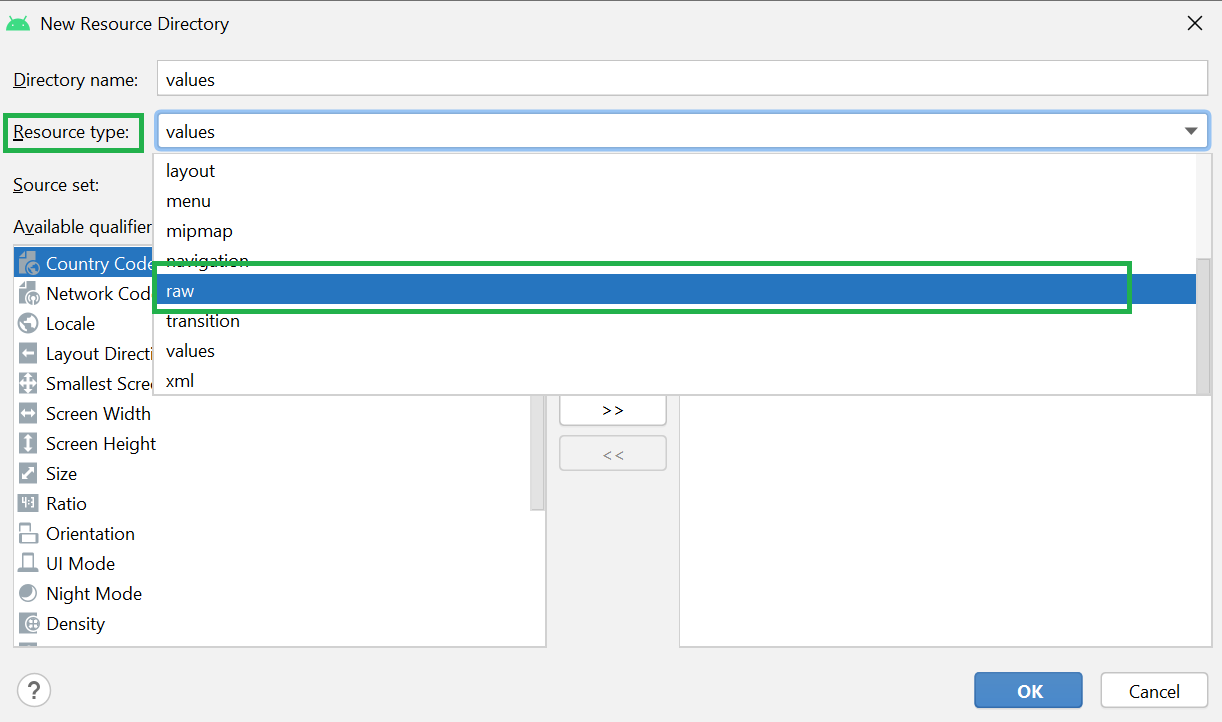
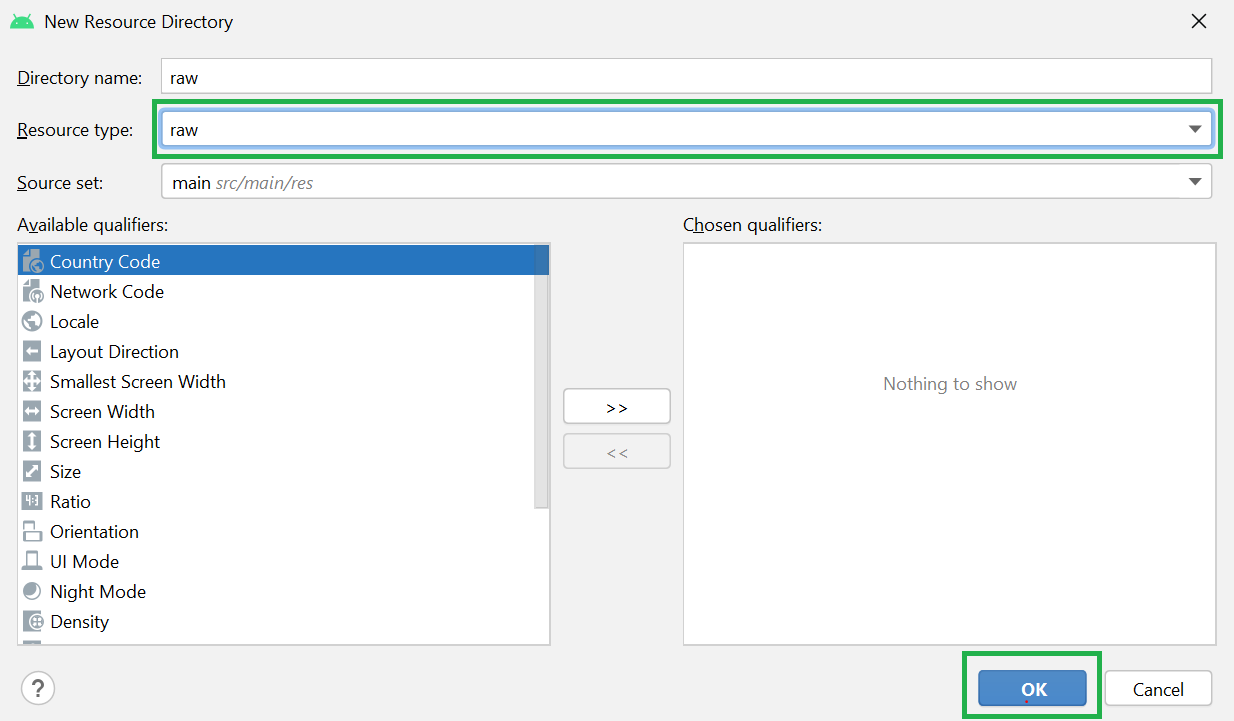
Step 4: Now open the app folder and you will find the assets folder by the name of “assets” as shown in the below image. Источник Resource Raw Folder in Android StudioThe raw (res/raw) folder is one of the most important folders and it plays a very important role during the development of android projects in android studio. The raw folder in Android is used to keep mp3, mp4, sfb files, etc. The raw folder is created inside the res folder: main/res/raw. So we will simply create it inside the res folder. But before creating a raw folder let’s have a look at the asset folder in android which acts the same role as the raw folder in android studio. So let discuss how the resource raw folder is different from the assets folder? How the Resource raw folder is different from the Assets folder?In Android one can store the raw asset file like JSON, Text, mp3, HTML, pdf, etc in two possible locations:
Both of them appear to be the same, as they can read the file and generate InputStream as below. But when to use which folder?Below is some guidance that might be helpful to choose 1. Flexible File Name: (assets is better)
2. Store in subdirectory: (possible in assets)
3. Compile-time checking: (possible in res/raw)
So putting a file in the res/raw folder will provide ensure the correct file-name during compile time check. 4. List filenames at runtime: (possible in assets)
So, in assets, one can read the filename during runtime, list them, and use them dynamically. In res/raw, one needs to code them ready, perhaps in the string resources file. 5. Filename accessible from XML: (possible in res/raw) So if you need to access your file in any XML, put it in the res/raw folder. Let’s make a table to remember the whole scenario easily.
|