- Android read all notifications
- How to view your notification history on Android
- Share this story
- Share All sharing options for: How to view your notification history on Android
- How to find your Notification Log
- What if I can’t find the Notification Log?
- Android — Notifications
- Create and Send Notifications
- Step 1 — Create Notification Builder
- Step 2 — Setting Notification Properties
- Step 3 — Attach Actions
- Step 4 — Issue the notification
- The NotificationCompat.Builder Class
- Example
- Big View Notification
Android read all notifications
Hello Friends,
Today, I am going to share a small tutorial on android «NotificationListenerService»
which help us to read the all app notifications. This tutorial covers following
points.


Feature:
1. We can easily read the notification of other android application or read all status bar
notification,
2. Read|Listen incoming whatsapp messages
3. Read all incoming SMS
4. Read all incoming calls
5. Battery Low
Step1 : Create a Notification Service Class :
This class extends NotificationListenerService class which contains
two method:
a) onNotificationPosted(StatusBarNotification sbn ) :
Implement this method to learn about new notifications as they are
posted by apps.
b) onNotificationRemoved(StatusBarNotification sbn ) :
Implement this method to learn when notifications are removed.
Note: The StatusBarNotifcation object contains extras, app package name and
ticker name
4. Android check Notification Access Setting is enable or not:
Hope, this will helps someone.
Enjoy Coding . 🙂
Источник
How to view your notification history on Android
Works on Pixels and other phones with stock Android
Share this story
Share All sharing options for: How to view your notification history on Android
/cdn.vox-cdn.com/uploads/chorus_image/image/61841687/akrales_180813_2827_0020.0.jpg)
Photo by Amelia Holowaty Krales / The Verge
If you’ve used Android for quite some time, it’s likely you’ve mistakenly swiped away a notification or two for one reason or another. Maybe you’re swiping in a hurry, or you accidentally cleared everything in the notification drawer without meaning to, or maybe you just wonder where all your notifications go and if there’s a historical list of them after you’ve dismissed them.
But don’t worry. You can find everything from missed messages, emails, app updates, and even system messages in the stock Notification Log option — if your phone can access it.
How to find your Notification Log
:no_upscale()/cdn.vox-cdn.com/uploads/chorus_asset/file/13301699/Screenshot_20181019_164402.png)
:no_upscale()/cdn.vox-cdn.com/uploads/chorus_asset/file/13301701/Screenshot_20181019_164415.png)
- Long-press anywhere on your home screen.
- Select “Widgets” from the pop-up menu.
- Scroll down and long-press the “Settings” widget, then place it on your home screen.
- You’ll get a list of features that the Settings shortcut can access. Tap “Notification Log.”
- Tap the widget and scroll through your past notifications.
What if I can’t find the Notification Log?
Every Android phone may not have the stock Notification Log. I tested this shortcut on the Google Pixel 2 XL, Pixel 3, and Razer Phone 2 — all phones with stock or near-stock versions of Android. The Samsung Galaxy S9 and LG G7 didn’t have the log listed anywhere within Android’s system settings. But if your phone doesn’t offer the log, there is a workaround for this, as written up by Rita El Khoury on Android Police.
The notification log is super user unfriendly and not the same as bringing back the swiped away notification at all.
We seriously need this as a standard Android feature, an undo button.
For phones that don’t have the default log (or if you want a more user-friendly experience), you can also download Unnotification. The app brings back your last dismissed notification, as well as your notification history. You can find the app on the Play Store.
Update April 2nd, 2020, 4:50PM ET: This article was originally published on October 19th, 2018, and it has been updated to slightly change the directions and to link directly to the review of Unnotifcation.
Vox Media has affiliate partnerships. These do not influence editorial content, though Vox Media may earn commissions for products purchased via affiliate links. For more information, see our ethics policy.
Источник
Android — Notifications
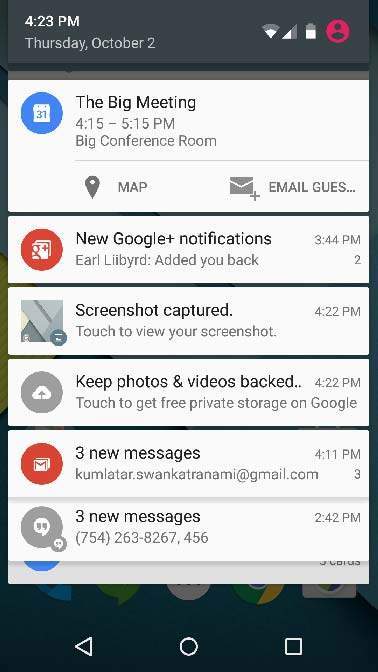
A notification is a message you can display to the user outside of your application’s normal UI. When you tell the system to issue a notification, it first appears as an icon in the notification area. To see the details of the notification, the user opens the notification drawer. Both the notification area and the notification drawer are system-controlled areas that the user can view at any time.
Android Toast class provides a handy way to show users alerts but problem is that these alerts are not persistent which means alert flashes on the screen for a few seconds and then disappears.
To see the details of the notification, you will have to select the icon which will display notification drawer having detail about the notification. While working with emulator with virtual device, you will have to click and drag down the status bar to expand it which will give you detail as follows. This will be just 64 dp tall and called normal view.
Above expanded form can have a Big View which will have additional detail about the notification. You can add upto six additional lines in the notification. The following screen shot shows such notification.
Create and Send Notifications
You have simple way to create a notification. Follow the following steps in your application to create a notification −
Step 1 — Create Notification Builder
As a first step is to create a notification builder using NotificationCompat.Builder.build(). You will use Notification Builder to set various Notification properties like its small and large icons, title, priority etc.
Step 2 — Setting Notification Properties
Once you have Builder object, you can set its Notification properties using Builder object as per your requirement. But this is mandatory to set at least following −
A small icon, set by setSmallIcon()
A title, set by setContentTitle()
Detail text, set by setContentText()
You have plenty of optional properties which you can set for your notification. To learn more about them, see the reference documentation for NotificationCompat.Builder.
Step 3 — Attach Actions
This is an optional part and required if you want to attach an action with the notification. An action allows users to go directly from the notification to an Activity in your application, where they can look at one or more events or do further work.
The action is defined by a PendingIntent containing an Intent that starts an Activity in your application. To associate the PendingIntent with a gesture, call the appropriate method of NotificationCompat.Builder. For example, if you want to start Activity when the user clicks the notification text in the notification drawer, you add the PendingIntent by calling setContentIntent().
A PendingIntent object helps you to perform an action on your applications behalf, often at a later time, without caring of whether or not your application is running.
We take help of stack builder object which will contain an artificial back stack for the started Activity. This ensures that navigating backward from the Activity leads out of your application to the Home screen.
Step 4 — Issue the notification
Finally, you pass the Notification object to the system by calling NotificationManager.notify() to send your notification. Make sure you call NotificationCompat.Builder.build() method on builder object before notifying it. This method combines all of the options that have been set and return a new Notification object.
The NotificationCompat.Builder Class
The NotificationCompat.Builder class allows easier control over all the flags, as well as help constructing the typical notification layouts. Following are few important and most frequently used methods available as a part of NotificationCompat.Builder class.
| Sr.No. | Constants & Description | |||||||||||||||
|---|---|---|---|---|---|---|---|---|---|---|---|---|---|---|---|---|
| 1 |
| Step | Description |
|---|---|
| 1 | You will use Android studio IDE to create an Android application and name it as tutorialspoint under a package com.example.notificationdemo. |
| 2 | Modify src/MainActivity.java file and add the code to notify(«»), if user click on the button,it will call android notification service. |
| 3 | Create a new Java file src/NotificationView.java, which will be used to display new layout as a part of new activity which will be started when user will click any of the notifications |
| 4 | Modify layout XML file res/layout/activity_main.xml to add Notification button in relative layout. |
| 5 | Create a new layout XML file res/layout/notification.xml. This will be used as layout file for new activity which will start when user will click any of the notifications. |
| 6 | No need to change default string constants. Android studio takes care of default string constants |
| 7 | Run the application to launch Android emulator and verify the result of the changes done in the application. |
Following is the content of the modified main activity file src/com.example.notificationdemo/MainActivity.java. This file can include each of the fundamental lifecycle methods.
Following will be the content of res/layout/notification.xml file −
Following is the content of the modified main activity file src/com.example.notificationdemo/NotificationView.java.
Following will be the content of res/layout/activity_main.xml file −
Following will be the content of res/values/strings.xml to define two new constants −
Following is the default content of AndroidManifest.xml −
Let’s try to run your tutorialspoint application. I assume you had created your AVD while doing environment set-up. To run the APP from Android Studio, open one of your project’s activity files and click Run  icon from the toolbar. Android Studio installs the app on your AVD and starts it and if everything is fine with your setup and application, it will display following Emulator window −
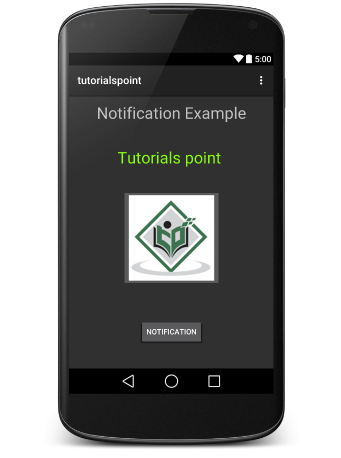
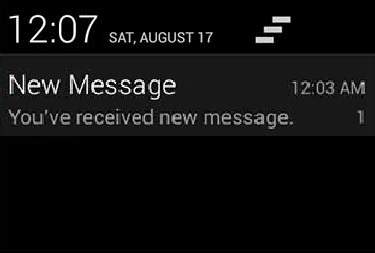
Now click button, you will see at the top a message «New Message Alert!» will display momentarily and after that you will have following screen having a small icon at the top left corner.
Now lets expand the view, long click on the small icon, after a second it will display date information and this is the time when you should drag status bar down without releasing mouse. You will see status bar will expand and you will get following screen −
Big View Notification
The following code snippet demonstrates how to alter the notification created in the previous snippet to use the Inbox big view style. I’m going to update displayNotification() modification method to show this functionality −
Now if you will try to run your application then you will find following result in expanded form of the view −
Источник


