- RecyclerView inside Fragment with Android Studio
- Understand the Concept
- RecyclerView
- CardView
- Fragment
- Let’s jump to the implementation
- Prepare the Android Studio
- Add the Dependencies
- Add RecyclerView to layout
- Create a CardView layout
- Create an Adapter for the RecyclerView
- Set the Adapter to RecyclerView on Fragment class
- Last but not least, don’t forget to Run your ‘app’ to see the result!
- Closing Statement
- Create RecyclerView in Android Fragment
- Step 1: Create a Basic Activity Project
- Step 2: Create a RecyclerView resource
- Step 3: Create a FrameLayout with TextView
- Step 5: Create Recycler ViewHolder
- Step 6: Create RandomNumListAdapter
- Result: RecyclerView with a list of random numbers
- О чём молчит developer.android.com про RecyclerView?
- Минимальный адаптер для RecyclerView
- Листинг 1
- Листинг 2
- Алгоритм 1
- Алгоритм 2
- Проблема
- Устранение проблемы
- Алгоритм 3
- Алгоритм 3′
- Вывод и рекомендация
RecyclerView inside Fragment with Android Studio


In developing an Android application, there are two approaches. Native and Hybrid. Native applications developed for a specific platform, meanwhile hybrid applications developed for multiple platforms on a single base. In native, Android applications are written in Java-based, and iOS are written in Swift. My Software Development Project was requested by our client to use Native apps to develop our project. So, we use both Kotlin and Swift language for our project.
“The secret of getting ahead is getting started” — Mark Twain
My job during this development is developing the Android one. We use Android Studio as our IDE. It is an official IDE by Google for developing Android applications. Well, this is my last article related to my Software Development Project course. This time, I want to share my experience using Android Studio and Kotlin for the first time, especially in making a Recycler View, and to be more complicated, it is also inside a Fragment.
First thing first, please make sure you’ve already prepared this:
Understand the Concept
Before we start, you need to know what is exactly RecyclerView, CardView, and Fragment. For a more complete explanation, please see Android Developers.
RecyclerView
Sometimes in an application, we want to display a large set of data. Here we certainly need a view that can handle it. Several different components work together to display the data. All container for the User Interface is a RecyclerView object that you add to the layout. LayoutManager such as LinearLayoutManager or GridLayourManager could be your layout manager to fill the RecyclerView.

CardView
Package view of Material Design which commonly used for wrapping data, package data in several views. This view has a drop shadow and a corner radius. This is a subclass of FrameLayout.

Fragment
A fragment represents a portion of User Interface in a FragmentActivity. Multiple fragments could be combined in a single activity and reuse a fragment in multiple activities. We implement this fragment because at the end we want to make this recycler view page could be slide to another page. Here’s the illustration of it.
Let’s jump to the implementation
Here I want to make a RecyclerView consist of CardView, which is inside a Fragment.
Prepare the Android Studio
1. Create a New Project on Android Studio. Choose Empty Activity.

2. Add your file name, then click Finish

Add the Dependencies
Adding the dependencies for RecyclerView and CardView on your build.gradle (app stage).
Then do the Sync Project with Gradle Files
Add RecyclerView to layout
Next, add RecyclerView code on your res/layout XML file. Because I want to make it inside a Fragment, which could work with FrameLayout. So, the Root Element is FrameLayout.
- Right-click the layout folder and go to New > Layout resource file
- Add your file name
- Select the Root Element with FrameLayout, then click OK

Create the layout with ConstraintLayout and RecyclerView.
Here’s the layout.

Create a CardView layout
Same as adding RecyclerView to layout, but the Root Element is CardView or androidx.cardview.widget.CardView.
I divided the row inside the CardView with LinearLayout, which is inside a RelativeLayout to makes them responsive. To insert the font and strings to the XML, don’t forget to add the resources first on the values folder. You can see the tutorial on my article about implement design guidelines here.
Here’s the layout.

Create an Adapter for the RecyclerView
On making RecylerView, there is must be an adapter to connect the RecyclerView with the CardView. The views in the list are represented by view holder objects. By extending RecyclerView.ViewHolder, these objects are instances of a class you defined. Each view holder is in charge of showing a single item with a view. This shows a list of questions, each view holder might represent a single question. The RecyclerView creates the same number of view holders as are expected to show the on-screen portion of the dynamic content. As the user scrolls through the list, the RecyclerView takes the off-screen views and rebinds them to the data which is scrolling onto the screen. The view holder objects are managed by an adapter, by extending RecyclerView.Adapter. This adapter created view holders as needed and also binds it to the data.
Here’s my model are a component that will be on the card later, such a code, category, and content. This fragment class will call the layout we’ve made before.
In the upcoming implementation, the data for the components are automatically fetched from the API. This code only shows if the data are input manually from the array.
For the simple implementation, create ViewHolder as an inner class on the RecyclerAdapter class.
DetailPertanyaan is an activity if the card has been clicked. For the supporting method in RecyclerAdapter class, add this code below the ViewHolder class.
onCreateViewHolder() needs to construct a RecyclerView.ViewHolder and set the view to display its contents. It would set the view by inflating the CardView layout.
onBindViewHolder() uses the view holder’s position to determine what the contents should be.
Set the Adapter to RecyclerView on Fragment class
This class will call the layout that consists of the RecyclerView and connect the adapter with the RecyclerView.
onViewCreated() will set the RecyclerAdapter to the RecyclerView layout.
Last but not least, don’t forget to Run your ‘app’ to see the result!

I will not explain more about the further Fragment implementation, you can use TabLayout as the sections pager adapter and ViewPager to make the page could be slide to the next fragment. This tutorial I made only for one fragment. There are so many inspirations and tutorials out there to explore more about this layout. This card also could be clicked and go to another activity, and the tutorials are also available on the internet. Hehe
Closing Statement
On developing my project with Android Kotlin, there are so many lessons that I learned. This is not the only task that I do, there is also another task. I learned a lot about this new framework, I use Android Studio and Kotlin for the first time. I learned it from the basics. Before we start the project, our client gave us a free course in Udemy on Android Fundamentals. You also can learn it here.
When I first succeed in making the sign-in layout, I am feeling very very joyful! My layout for the sign-in page was made on the Design option. It is very easy because you will feel like design a mockup, just drag and choose the details on the Attributes. As time goes by, I easily understand how to make the UI for Android and made the layout on the Text option, so I literally code the layout. I also learn how to make a SwipeRefreshLayout, Onboarding pages, and account page. There are also different obstacles in every task I did. I can increase my ability in every task I did on this project. So, if you want to learn about the native mobile application you could use Kotlin as your programming language and Android Studio for the IDE.
With this article, I officially finished my individual review writings on what has been learned and implemented in developing a project. Thank you for reading all my individual review, I’ll be glad that you read this last sentence. Especially, thank you Mr. Mishbah for grading all these articles 😀
Источник
Create RecyclerView in Android Fragment


Android Official Documentation provided a tutorial for creating a RecyclerView in Activity. However, it is a bit different when trying to create a RecyclerView in Fragment instead.
Step 1: Create a Basic Activity Project
Open Android Studio, Create new project -> select Basic Activity -> Finish Application creation. Once you run the app on emulator, you will see a single activity application with a button which allows you to switch between two fragments.
Step 2: Create a RecyclerView resource
We are going to create a RecyclerView resource in SecondFragment. Go to /res/layout/fragment_second.xml, add the following lines to create RecyclerView:
Alternatively, we can also use Palette in Android Studio to create RecyclerView:
- Drag RecyclerView from Palette to Layout in fragment_second.xml (using Design view).
- Define RecyclerView id as `recyclerview`.
- Since this is created under ConstraintLayout, define Constraint Widget in 4 directions under Layout.
Step 3: Create a FrameLayout with TextView
After creating RecyclerView, we need to define resource for each item (TextView) in RecyclerView. Create a new file under /res/layout/: frame_textview.xml:

Copy the following lines to this new file.
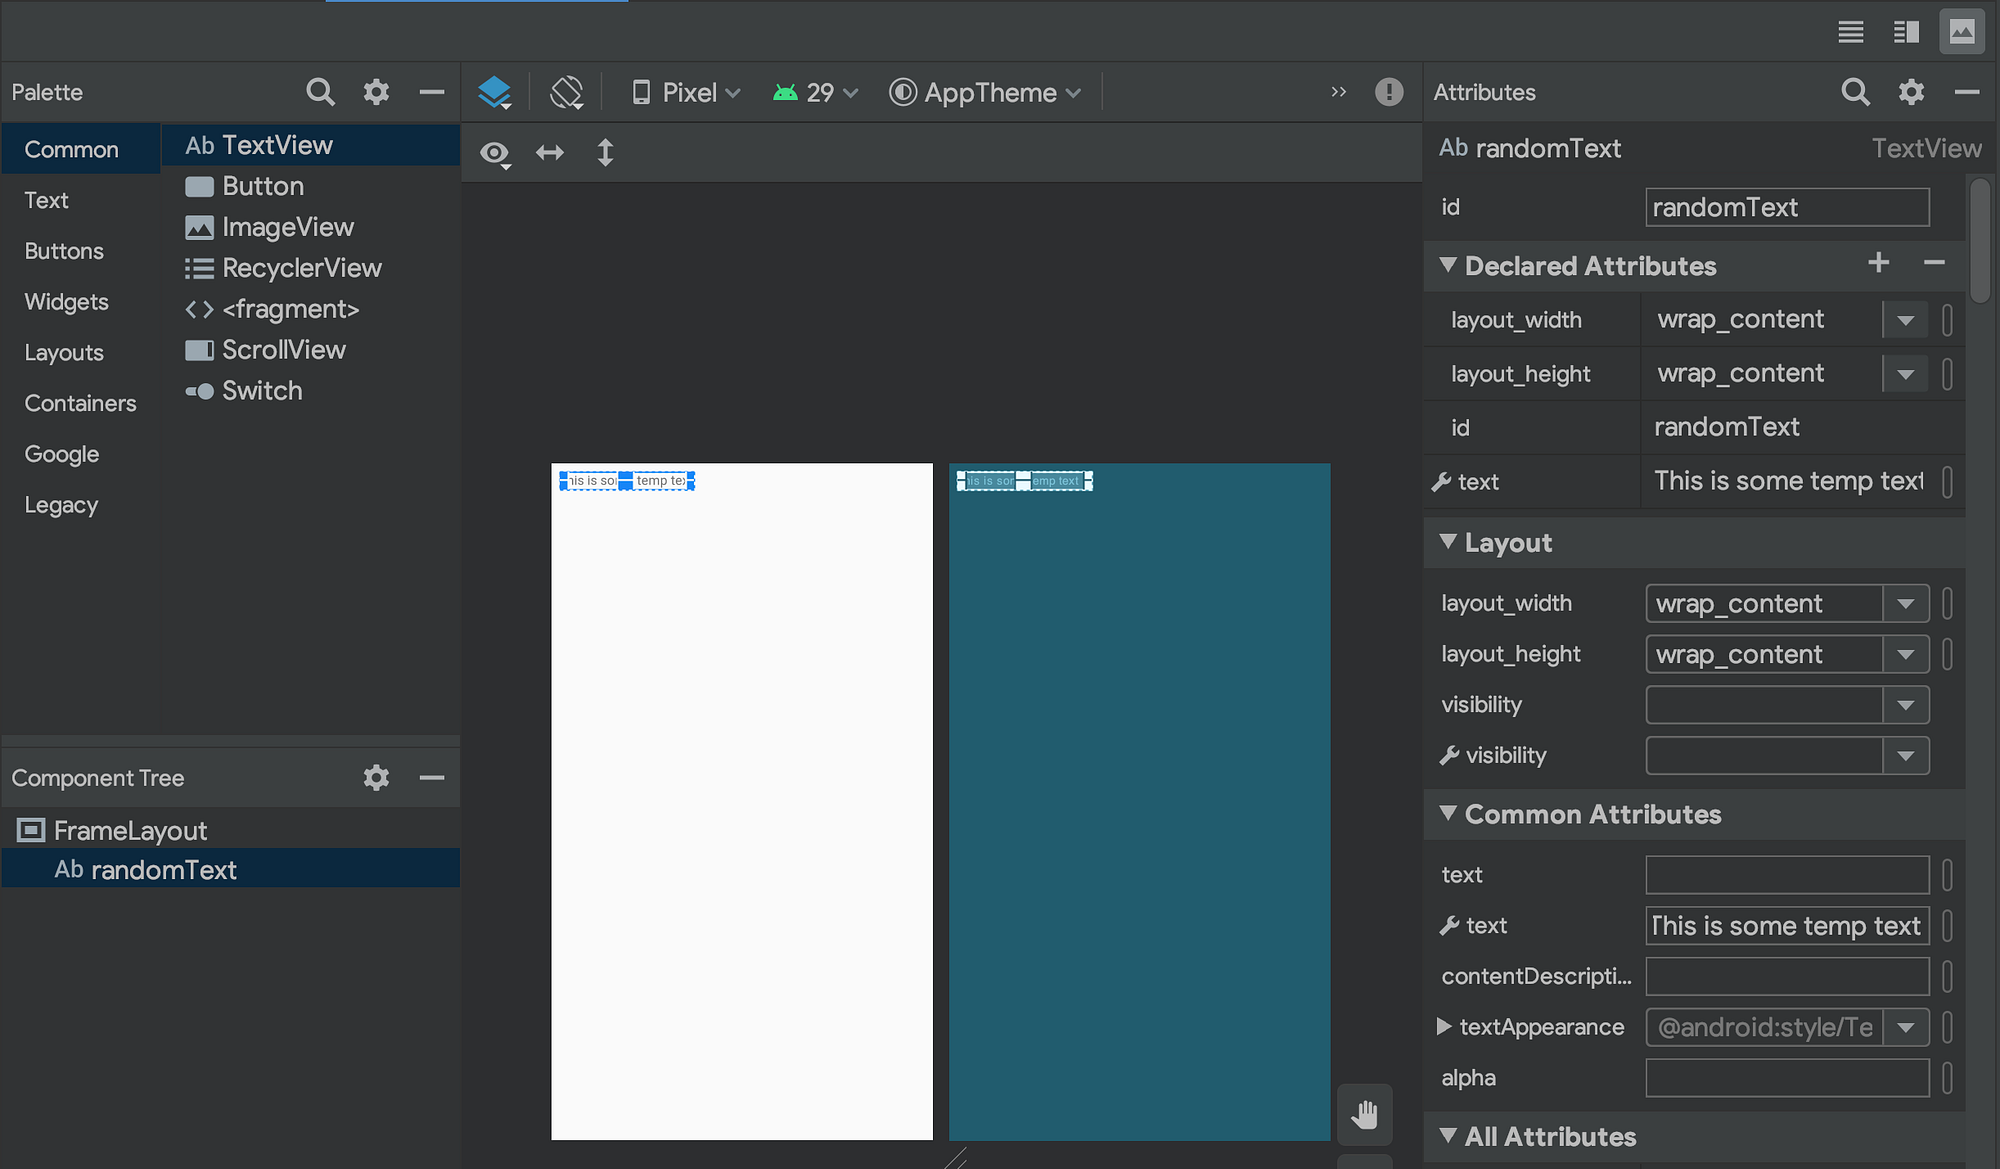
Alternatively, you can also use Palette to create TextView
- Drag TextView from Palette to Layout in frame_textview.xml (using Design view).
- Define TextView id as `randomText`
Step 4: Add RecyclerView in Fragment
Under recyclerview/SecondFragment.java, add the following lines to inject recyclerView to fragment. Note that ReyclerView needs to be retrieved by using the view.findViewById() instead findViewById() directly. view can retrieved from inflater.inflate().
Step 5: Create Recycler ViewHolder
Under recyclerview/, create RecyclerViewHolder.java, add the following lines to define how to create a ViewHolder. One ViewHolder contains necessary UI information about one item in RecyclerView. In this example, itemView is the FrameLayout component from step #3. We need to retrieve and store TextView randomText from FrameLayout .
Step 6: Create RandomNumListAdapter
Under recyclerview/, create RandomNumListAdapter.java, add the following lines to define how to adapter data to RecyclerView.
Here we want to show a list of Random numbers in RecyclerView, therefore we take a randomness seed as parameter in constructor.
In getItemViewType(), we will provide the layout file which contains the TextView for list item. In this example, this is frame_textview from Step #3 .
In onCreateViewHolder(), we take the viewType which is the returned by getItemViewType(). After inflating FrameLayout to get View object, we then can use RecyclerViewHolder created by Step #5 for return value.
In onBindViewHolder(), we will bind the RecyclerViewHolder to RecyclerView. In this example, we will generate a random number at runtime for this view item. Note that random number will be generated every time a ViewHolder is bind to RecyclerView, so we can implicitly know that if an item is unbind and bind again at the same position.
Result: RecyclerView with a list of random numbers
Now all the code changes are done, run the app again and click NEXT button on emulator. If you see a list of random numbers as below, congratulations! You have created a RecyclerView in this fragment!
If you scroll down the RecyclerView, you will see more random numbers. And if you scroll up, you will find that the numbers are different than the number at the same position before. That is because the view item out of screen will be automatically recycled and bind as another view item currently on the screen. Everytime an item is bind to RecyclerView, this app will generate a new random number and set to TextView.
Источник
О чём молчит developer.android.com про RecyclerView?
Вопрос о жизненном цикле (life cycle) активности (activity) или фрагмента (fragment) андроид-приложения чрезвычайно важен для практикующего андроидчика (андроид-разработчика). Почему? Потому что порядок выполнения обратных вызовов всех методов, связанных с состоянием жизненного цикла (onCreate(), onStart() и т.д.), жёстко задан и неправильное его применение приведёт к неработоспособности приложения. При чём здесь жизненный цикл? — спросит внимательный хаброчитатель. Ведь в заголовке, вроде бы, речь не о нём? Отвечаю: между жизненным циклом активности и работой RecyclerView есть нечто общее — это НАЛИЧИЕ ЖЁСТКОГО ПОРЯДКА выполнения методов обратного вызова при использовании данного виджета, и, следовательно, необходимость ЕГО ПРАВИЛЬНО ПРИМЕНЯТЬ.
Если этого не делать, то списки могут вести себя крайне загадочным образом.
Минимальный адаптер для RecyclerView
Например. Есть такой адаптер списка со стандартным минимальным нополнением:
Листинг 1
В коде метода onBindViewHolder() адаптера нашего списка, элементы которого содержат чек-бокс (CheckBox), есть обращение к методу обработчика (holder‘a), в котором считываются данные из подключенной к адаптеру коллекции и на их основании устанавливается его — чек-бокса — состояние, а также к различным элементам интерфейса подключаются необходимые слушатели (Listener):
Листинг 2
Слушатели при установке флага и выполнении некоего условия изменяют данные в коллекции, а при его невыполнении выводят на экран или одно, или другое диалоговое окно.
Получается примерно так:
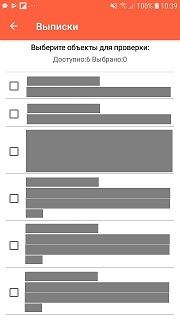
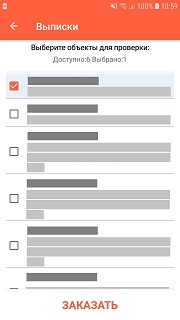
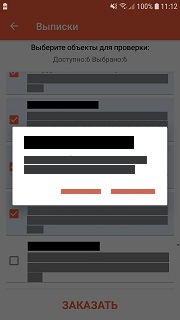
На Рис-1 — сформированный список. На Рис-2 — Отмеченный элемент списка. На Рис-3 — диалог, сообщающий о нарушении условия при отметке очередного элемента.
Для получения результата с Рис-1 менеджером разметки списка (LayoutManager‘ом) выполняется такой порядок вызова необходимых функций:
Алгоритм 1
Алгоритм 2
Всё замечательно! Если бы не «Но». Вернее НО!
Проблема
При прокрутке длинного списка, содержащего хотя бы пару десятков позиций, мы без всяких других действий будем получать сообщение с Рис-3.
Устранение проблемы
Причина в том, что при написании кода адаптера МЫ НЕ УЧЛИ ПОРЯДОК ВЫПОЛНЕНИЯ функций обратного вызова, перечисленных здесь и здесь при прокрутке. А он таков:
Алгоритм 3
Но это ещё не всё. При «поумолчательных» настройках менеджера разметки каждый отключенный от окна элемент списка не долго остаётся в очереди для быстрого доступа. Как только их там оказывается 2 — они перемещаются менеджером в очередь утилизированных экземпляров, что отмечается вызовом метода Rv_Adapter.onViewRecycled() для каждого утилизируемого пункта списка и наоборот.
По этому Алгоритм 3 на самом деле выглядит так:
Алгоритм 3′
Из приведённого Алгоритма 3′ видно, что в случае пролистывания списка более, чем на max количество позиций вью в нём будут создаваться заново, для чего будет задействован метод Rv_Adapter.onBindViewHolder(holder, visiblePos), который будет повторять действия пользователя.
Вывод и рекомендация
Для того, чтобы избежать повторения операций в методе onBindViewHolder(holder, visiblePos) при скроллинге списка на количество позиции, большее, чем max необходимо:
Источник


