- Получить состояние экрана (активно/заблокировано)
- Monitor Network Requests and Responses on Android Studio
- Full-Screen Intent Notifications — Android
- What are Full-Screen Intents?
- Why should Full-Screen Intents be used?
- When should Full-Screen Intents be used?
- Show me the code
- 1. Notify while the app on the foreground.
- 2. Schedule Full-Screen Intent Notification
- 3. Full-Screen Intent on Lock Screen with a Keyguard
- Conclusion
- Android: Как программно включать и выключать экран?
- Broadcasts overview
- About system broadcasts
- Changes to system broadcasts
- Android 9
- Android 8.0
- Android 7.0
- Receiving broadcasts
- Manifest-declared receivers
- Kotlin
- Context-registered receivers
- Kotlin
- Kotlin
- Effects on process state
- Kotlin
- Sending broadcasts
- Kotlin
- Restricting broadcasts with permissions
- Sending with permissions
- Kotlin
- Receiving with permissions
- Kotlin
- Security considerations and best practices
Получить состояние экрана (активно/заблокировано)
Как получить в каком состоянии телефон в активном или экран заблокирован или телефон лежит бездействует(но при этом у телефона блокировки экрана не не поставлена, не запоролен).
Нашел только как заблокировать экран
Но пока что не знаю чем мне это поможет, ещё встречается что то про
android.intent.action.ACTION_SCREEN_ON
android.intent.action.ACTION_SCREEN_OFF
Но как это работает я так и не понял
Как сохранить состояние хронометра при повороте экрана?
в программе запускается хронометр Chronometer chronometer = (Chronometer).
Галочка активно/не активно, управляющая активностью поля
Здравствуйте, нужна помощь, если кто может помогите, есть форма регистрации. Вопрос вот в чем с.
Как получить сигнал с клавиатуры, если активно другое приложение
Всем привет. Хочу реализовать вызов приложения, которое в данный момент не является активным.
 Как получить масштаб элементов экрана или реальное разрешение экрана
Как получить разрешение экрана с учетом масштабирования, вот такой код и подобный ему дает неверный.
shavuz, А не подскажите как с этим работать. вместо Log.i(TAG,»Screen went ON»); делать статическую переменную и из другова клася у неё спрашивать труе или фальше она или же это не события и я узнаю о состоянии когда спрошу тем самым обращаться к классу MyBroadCastReciever
Я прока что просто не до понял принцип работы extends BroadcastReceiver
Тес самым телефон сам оповестит приложение когда он меняет состояние или всеже программа должна сама узновать у телефона в каком же он сейчас состоянии.
shavuz, Вроди бы сделал все как вы написали но ни какой реакции
Или эмулятор не умеет работать с SCREEN_OFF и SCREEN_ON
В итоге сколько не нажимаю на верхнюю кнопку включить выключить но в Run ни чего не появляется типо
System.out.println(«MyReceiver»);
или
System.out.println(«Screen ON»);
или
System.out.println(«Screen went OFF»);
shavuz, Все равно тишина
$ adb shell am start -n «com.example.avastscan.avastscan/com.example.avastscan.avastscan.MainActivity» -a android.intent.action.MAIN -c android.intent.category.LAUNCHER
Client not ready yet..Waiting for process to come online
Waiting for process to come online
Connected to process 3295 on device sas [emulator-5554]
I/InstantRun: Instant Run Runtime started. Android package is com.example.avastscan.avastscan, real application class is null.
E/InstantRun: Could not find slices in APK; aborting.
W/InstantRun: No instant run dex files added to classpath
D/dalvikvm: GC_FOR_ALLOC freed 391K, 14% free 2810K/3256K, paused 3ms, total 3ms
D/dalvikvm: GC_FOR_ALLOC freed 416K, 16% free 2833K/3372K, paused 2ms, total 3ms
Или я все таки должен из другова кода где хочу получить состояние надо найти как залезть в onReceive
Добавлено через 1 минуту
shavuz, у вас не будет готового проекта?
Источник
Monitor Network Requests and Responses on Android Studio

Dec 21, 2017 · 4 min read
Android Studio 3.0 has an improved Android Profiler. One nice addition in the profiler tool is that the network inspector added to Network section. Using that now we can see the network traffic originating from app in debug and see the responses as well. Those who were using Charles Proxy or similar tool will easily realise how convenient it is. We can get rid of one tool* and no more annoying HTTP proxy configuring and removing configuration after usage.
But there are few cat c hes. First thing is it will work only if you are using HttpURLConnection or OkHttp for network calls in your app. If you are using some other libraries for network request, probably you’ll get the following message on Network profiler
“Network Profiling Data Unavailable: There is no information for the network traffic you’ve selected.”
Second issue that you may face is that you might not be able to see the network request and response in all of your devices / emulators. You’ll need a device with API 26(Android 8.0) or above. Which is a serious issue for most of the developers. Android 8.0 is the latest release, and there are only very few actual devices running that. Many flagships are still awaiting Oreo update. Simulators are here to help. But how many of us really use AVDs? I personally don’t like it. They are still very slow(Definitely improved a lot in last few years)
Now let’s see how we can actually see the request-response in Android Studio and what are the things available in that
You’ll be familiar with the following Android Profiler window which sits normally at the bottom of Android Studio. And you’ll be using it once in a while or daily.

It have different profiler outputs like CPU, Memory, Network etc. Click on that network output which shows a blue and kind of orange spikes. It will expand to something like this.

The blue and orange spikes indicate received and send data respectively. So if you have a series of calls going on these spikes will be continuous. To see data that has been transferred between app and server. Select a particular region in the spike area. You can do this by dragging from start to end of the range. You’ll see something like this after selecting the area.
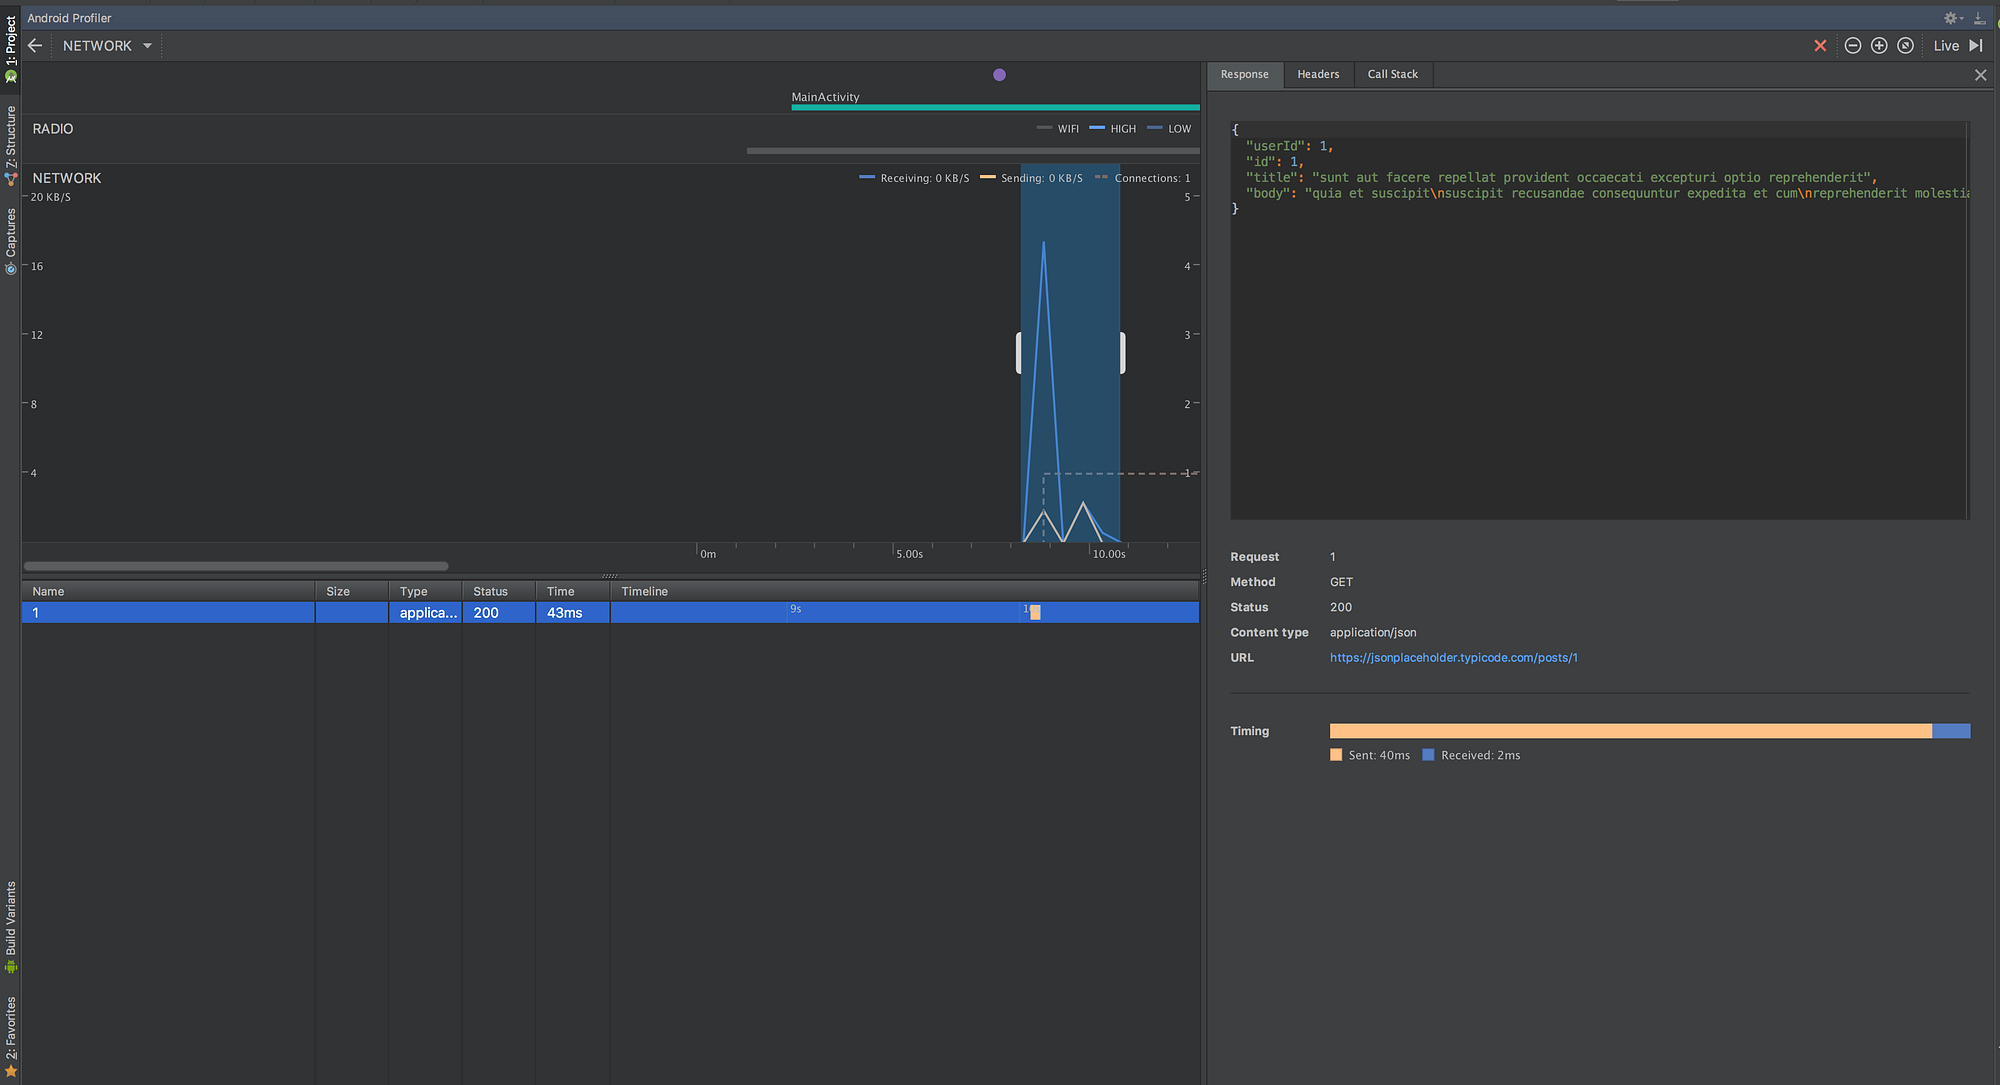
Here you can see a table below the spikes, thats the place where it lists the api calls happened between the selected range. On the right side the request response data, header etc can be inspected. In the above example name of the api is shown as one, because I have used a dummy api for this and the api was something like /posts/1.
I have tried to look into the network traffic generated from a webview. Profiler gave the default unavailable error message. I haven’t checked whether there are any tweaks to make it work. But my best guess is that it wont’t be showing data transfer originated from webviews. I will be updating that also when I have confirmation on that.
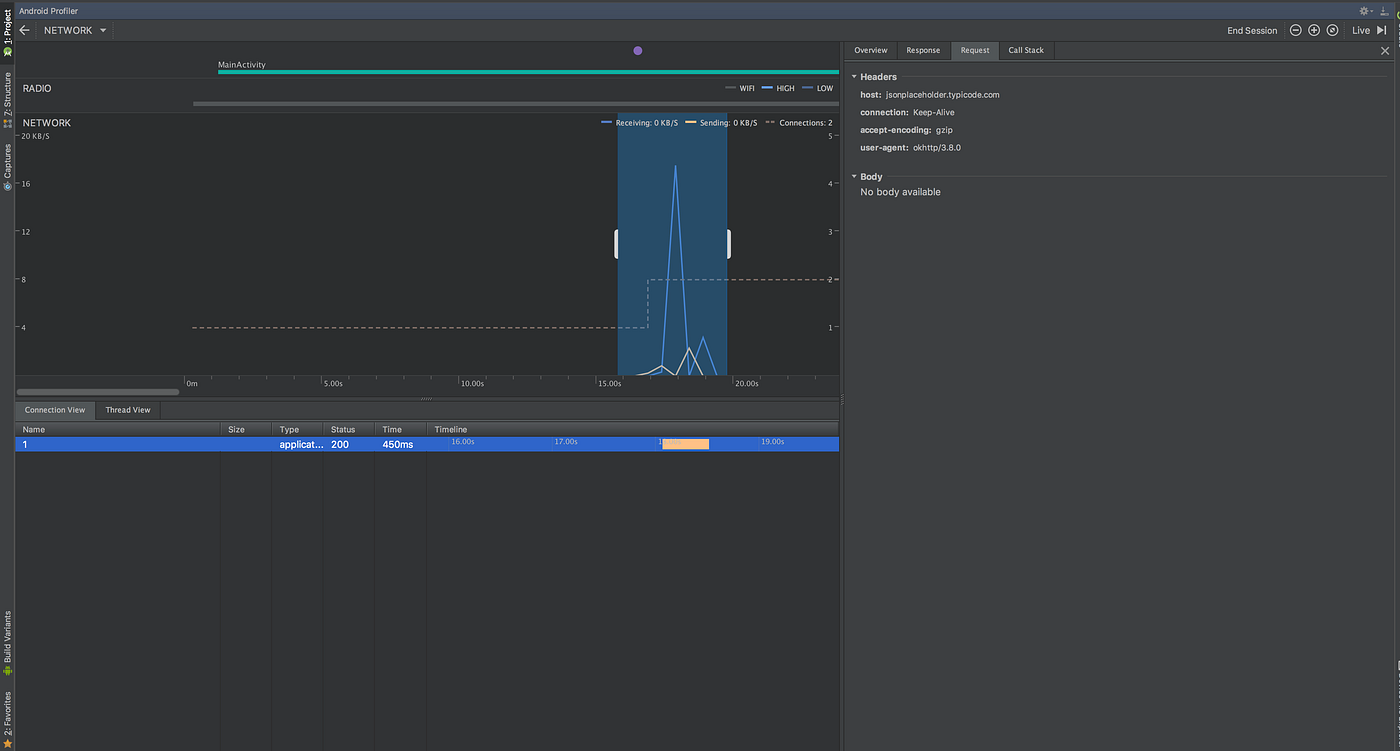
When Android Studio 3 was released the network monitor had the options only to view network responses and response headers. But no way to see the request params. But it is now available in the canary channel. Following is the screenshot of the above api response monitor example in Android Studio Canary 8 with request param option
So you might be wondering will it work only for API calls, or work with other web resources as well. I have tried monitoring the request and responses of image loading through some of the famous image loading libraries like Picasso, Glide, Fresco etch. Read more about it here.
Источник
Full-Screen Intent Notifications — Android

Mar 18, 2020 · 4 min read

What are Full-Screen Intents?
Full-Screen Intents are Intents that can launch in full-screen and can be used for showing a full-screen notification.
Well, I guess that needs a bit more explanation so keep on reading.
Why should Full-Screen Intents be used?
A restriction was added with Android Q where an app couldn’t start an activity if not meeting the criteria. Although this breaks a lot of things, it doesn’t affect full-screen intents. (see Restrictions on starting activities from the background)
Ian Lake from the Android Toolkit team said the following on a Stackoverflow question:
Full screen intent has been the recommended best practice for alarms since it was introduced in API 9 and was even more important with the introduction of heads up notifications (where your alarm shows as a heads up notification if the user is actively using their device)
When should Full-Screen Intents be used?
Full-screen inte n ts were added to the framework since forever and it is the recommended way of launching an activity while the system is locked or busy.
- Incoming call: When there is an incoming call, the system launches a full-screen activity if the phone is locked or shows a normal notification with high priority.
- Alarm Clock: An alarm clock can use full-screen intent to either show an activity or a notification with high priority.
Notifications with a Full-Screen Intent are less intrusive to the user and there is less chance to break in the future with any API changes.
Show me the code
Note: On Android 10 and above to use a full-screen intent, a special permission needs to be declared in the Manifest.
We are going to explore three different scenarios:
- Notify while the app is on the foreground
- Schedule Full-Screen Intent Notification
- Full-Screen Intent on Lock Screen with a Keyguard
Disclaimer: Some logic will be omitted for demonstration purposes
1. Notify while the app on the foreground.

In order to show a full-screen intent, we need to first build the notification and set the full-screen intent to the notification.
To build the intent we need a pending intent, which can be achieved using PendingIntent.
Don’t forget to add in your AndroidManifest.xml’s Activity the following as well:
2. Schedule Full-Screen Intent Notification
Building the notification is identical to the previous example. The main difference is that the notification is not built by an Activity but by a BroadcastReceiver to enable scheduling in the future using AlarmManager.
AlarmManager needs a PendingIntent with a BroadcastReceiver.
The Receiver below is called in two cases:
- When the system is locked
- When the system is not locked
3. Full-Screen Intent on Lock Screen with a Keyguard
Keyguard could prevent the notification from being displayed.
Let’s see an example to visualize it.
The framework provides some flags to dismiss keyguard.
Note: To be able to turn on the screen we need to also request it using the:
Time for an extension function that sets both flags with backward compatibility 🚀

Conclusion
Using Full-Screen Intents is easy and it’s the recommended way of launching an activity, especially for alarms.
The API should be used with care, and developers shouldn’t abuse it as it’s quite intrusive especially when the screen wakes up.
Источник
Android: Как программно включать и выключать экран?
Прежде чем пометить этот пост как «дублирующий», я пишу его, потому что никакое другое сообщение не содержит решения проблемы.
Я пытаюсь выключить устройство, затем через несколько минут или смены датчика снова включаю.
Отключить тесты дисплея
Я могу выключить экран, используя:
Мне не удалось выключить экран с помощью метода wl.release ().
Включите тест дисплея
Моя первая догадка, как следует, не работает. Ничего не происходит, экран остается выключенным.
Я также попытался использовать wakelocks, но безуспешно.
Наконец, я попробовал следующее, но безрезультатно.
В общем, я не получаю никаких ошибок в консоли ни для одного из этих методов. Мой тестовый текст «Экран должен быть включен» появляется на экране, когда я включаю устройство с помощью кнопки питания. Это показывает, что код должен был работать. Пожалуйста, отвечайте только в том случае, если вы протестировали код, похоже, что многие функции, такие как params.screenBrightness = -1 , не работают должным образом согласно sdk.
Я предполагаю, что вы хотите, чтобы это действовало только тогда, когда ваше приложение находится на переднем плане.
Не выключает экран в традиционном понимании. Это делает экран максимально тусклым. В стандартной платформе есть ограничение на то, насколько тусклым он может быть; Если ваше устройство действительно позволяет экрану полностью отключиться, то это некоторая особенность реализации этого устройства, а не поведение, на которое вы можете рассчитывать на разных устройствах.
Фактически, использование этого в сочетании с FLAG_KEEP_SCREEN_ON означает, что вы никогда не позволите экрану выключиться (и, следовательно, устройству перейти в режим низкого энергопотребления), даже если конкретное устройство позволяет вам установить яркость экрана на полную. Имейте это в виду. Вы будете использовать гораздо больше энергии, чем если бы экран был действительно выключен.
Теперь, чтобы вернуть экран к нормальной яркости, достаточно установить значение яркости:
Я не могу объяснить, почему это не заменит ранее установленное вами значение 0. В качестве теста вы можете попробовать установить принудительную полную яркость, чтобы добиться этой конкретной яркости:
Это определенно работает. Например, приложения Google Книги используют это, чтобы вы могли настроить яркость экрана на затемнение при использовании книги, а затем вернуться к обычной яркости при выключении.
Чтобы облегчить отладку, вы можете использовать «adb shell dumpsys window», чтобы увидеть текущее состояние вашего окна. В данных для вашего окна он сообщит вам текущие LayoutParams, которые были установлены для него. Убедитесь, что ценность, которую вы думаете, действительно существует.
И снова FLAG_KEEP_SCREEN_ON — это отдельная концепция; он и яркость не влияют друг на друга напрямую. (И не было бы причин снова устанавливать флаг при отмене яркости, если вы уже установили его при установке яркости на 0. Флаг останется установленным, пока вы его не измените.)
Источник
Broadcasts overview
Android apps can send or receive broadcast messages from the Android system and other Android apps, similar to the publish-subscribe design pattern. These broadcasts are sent when an event of interest occurs. For example, the Android system sends broadcasts when various system events occur, such as when the system boots up or the device starts charging. Apps can also send custom broadcasts, for example, to notify other apps of something that they might be interested in (for example, some new data has been downloaded).
Apps can register to receive specific broadcasts. When a broadcast is sent, the system automatically routes broadcasts to apps that have subscribed to receive that particular type of broadcast.
Generally speaking, broadcasts can be used as a messaging system across apps and outside of the normal user flow. However, you must be careful not to abuse the opportunity to respond to broadcasts and run jobs in the background that can contribute to a slow system performance, as described in the following video.
About system broadcasts
The system automatically sends broadcasts when various system events occur, such as when the system switches in and out of airplane mode. System broadcasts are sent to all apps that are subscribed to receive the event.
The broadcast message itself is wrapped in an Intent object whose action string identifies the event that occurred (for example android.intent.action.AIRPLANE_MODE ). The intent may also include additional information bundled into its extra field. For example, the airplane mode intent includes a boolean extra that indicates whether or not Airplane Mode is on.
For more information about how to read intents and get the action string from an intent, see Intents and Intent Filters.
For a complete list of system broadcast actions, see the BROADCAST_ACTIONS.TXT file in the Android SDK. Each broadcast action has a constant field associated with it. For example, the value of the constant ACTION_AIRPLANE_MODE_CHANGED is android.intent.action.AIRPLANE_MODE . Documentation for each broadcast action is available in its associated constant field.
Changes to system broadcasts
As the Android platform evolves, it periodically changes how system broadcasts behave. Keep the following changes in mind if your app targets Android 7.0 (API level 24) or higher, or if it’s installed on devices running Android 7.0 or higher.
Android 9
Beginning with Android 9 (API level 28), The NETWORK_STATE_CHANGED_ACTION broadcast doesn’t receive information about the user’s location or personally identifiable data.
In addition, if your app is installed on a device running Android 9 or higher, system broadcasts from Wi-Fi don’t contain SSIDs, BSSIDs, connection information, or scan results. To get this information, call getConnectionInfo() instead.
Android 8.0
Beginning with Android 8.0 (API level 26), the system imposes additional restrictions on manifest-declared receivers.
If your app targets Android 8.0 or higher, you cannot use the manifest to declare a receiver for most implicit broadcasts (broadcasts that don’t target your app specifically). You can still use a context-registered receiver when the user is actively using your app.
Android 7.0
Android 7.0 (API level 24) and higher don’t send the following system broadcasts:
Also, apps targeting Android 7.0 and higher must register the CONNECTIVITY_ACTION broadcast using registerReceiver(BroadcastReceiver, IntentFilter) . Declaring a receiver in the manifest doesn’t work.
Receiving broadcasts
Apps can receive broadcasts in two ways: through manifest-declared receivers and context-registered receivers.
Manifest-declared receivers
If you declare a broadcast receiver in your manifest, the system launches your app (if the app is not already running) when the broadcast is sent.
To declare a broadcast receiver in the manifest, perform the following steps:
Specify the element in your app’s manifest.
The intent filters specify the broadcast actions your receiver subscribes to.
Subclass BroadcastReceiver and implement onReceive(Context, Intent) . The broadcast receiver in the following example logs and displays the contents of the broadcast:
Kotlin
The system package manager registers the receiver when the app is installed. The receiver then becomes a separate entry point into your app which means that the system can start the app and deliver the broadcast if the app is not currently running.
The system creates a new BroadcastReceiver component object to handle each broadcast that it receives. This object is valid only for the duration of the call to onReceive(Context, Intent) . Once your code returns from this method, the system considers the component no longer active.
Context-registered receivers
To register a receiver with a context, perform the following steps:
Kotlin
Kotlin
Context-registered receivers receive broadcasts as long as their registering context is valid. For an example, if you register within an Activity context, you receive broadcasts as long as the activity is not destroyed. If you register with the Application context, you receive broadcasts as long as the app is running.
To stop receiving broadcasts, call unregisterReceiver(android.content.BroadcastReceiver) . Be sure to unregister the receiver when you no longer need it or the context is no longer valid.
Be mindful of where you register and unregister the receiver, for example, if you register a receiver in onCreate(Bundle) using the activity’s context, you should unregister it in onDestroy() to prevent leaking the receiver out of the activity context. If you register a receiver in onResume() , you should unregister it in onPause() to prevent registering it multiple times (If you don’t want to receive broadcasts when paused, and this can cut down on unnecessary system overhead). Do not unregister in onSaveInstanceState(Bundle) , because this isn’t called if the user moves back in the history stack.
Effects on process state
The state of your BroadcastReceiver (whether it is running or not) affects the state of its containing process, which can in turn affect its likelihood of being killed by the system. For example, when a process executes a receiver (that is, currently running the code in its onReceive() method), it is considered to be a foreground process. The system keeps the process running except under cases of extreme memory pressure.
However, once your code returns from onReceive() , the BroadcastReceiver is no longer active. The receiver’s host process becomes only as important as the other app components that are running in it. If that process hosts only a manifest-declared receiver (a common case for apps that the user has never or not recently interacted with), then upon returning from onReceive() , the system considers its process to be a low-priority process and may kill it to make resources available for other more important processes.
For this reason, you should not start long running background threads from a broadcast receiver. After onReceive() , the system can kill the process at any time to reclaim memory, and in doing so, it terminates the spawned thread running in the process. To avoid this, you should either call goAsync() (if you want a little more time to process the broadcast in a background thread) or schedule a JobService from the receiver using the JobScheduler , so the system knows that the process continues to perform active work. For more information, see Processes and Application Life Cycle.
The following snippet shows a BroadcastReceiver that uses goAsync() to flag that it needs more time to finish after onReceive() is complete. This is especially useful if the work you want to complete in your onReceive() is long enough to cause the UI thread to miss a frame (>16ms), making it better suited for a background thread.
Kotlin
Sending broadcasts
Android provides three ways for apps to send broadcast:
- The sendOrderedBroadcast(Intent, String) method sends broadcasts to one receiver at a time. As each receiver executes in turn, it can propagate a result to the next receiver, or it can completely abort the broadcast so that it won’t be passed to other receivers. The order receivers run in can be controlled with the android:priority attribute of the matching intent-filter; receivers with the same priority will be run in an arbitrary order.
- The sendBroadcast(Intent) method sends broadcasts to all receivers in an undefined order. This is called a Normal Broadcast. This is more efficient, but means that receivers cannot read results from other receivers, propagate data received from the broadcast, or abort the broadcast.
- The LocalBroadcastManager.sendBroadcast method sends broadcasts to receivers that are in the same app as the sender. If you don’t need to send broadcasts across apps, use local broadcasts. The implementation is much more efficient (no interprocess communication needed) and you don’t need to worry about any security issues related to other apps being able to receive or send your broadcasts.
The following code snippet demonstrates how to send a broadcast by creating an Intent and calling sendBroadcast(Intent) .
Kotlin
The broadcast message is wrapped in an Intent object. The intent’s action string must provide the app’s Java package name syntax and uniquely identify the broadcast event. You can attach additional information to the intent with putExtra(String, Bundle) . You can also limit a broadcast to a set of apps in the same organization by calling setPackage(String) on the intent.
Note: Although intents are used for both sending broadcasts and starting activities with startActivity(Intent) , these actions are completely unrelated. Broadcast receivers can’t see or capture intents used to start an activity; likewise, when you broadcast an intent, you can’t find or start an activity.
Restricting broadcasts with permissions
Permissions allow you to restrict broadcasts to the set of apps that hold certain permissions. You can enforce restrictions on either the sender or receiver of a broadcast.
Sending with permissions
When you call sendBroadcast(Intent, String) or sendOrderedBroadcast(Intent, String, BroadcastReceiver, Handler, int, String, Bundle) , you can specify a permission parameter. Only receivers who have requested that permission with the tag in their manifest (and subsequently been granted the permission if it is dangerous) can receive the broadcast. For example, the following code sends a broadcast:
Kotlin
To receive the broadcast, the receiving app must request the permission as shown below:
You can specify either an existing system permission like SEND_SMS or define a custom permission with the
element. For information on permissions and security in general, see the System Permissions.
Receiving with permissions
If you specify a permission parameter when registering a broadcast receiver (either with registerReceiver(BroadcastReceiver, IntentFilter, String, Handler) or in tag in your manifest), then only broadcasters who have requested the permission with the tag in their manifest (and subsequently been granted the permission if it is dangerous) can send an Intent to the receiver.
For example, assume your receiving app has a manifest-declared receiver as shown below:
Or your receiving app has a context-registered receiver as shown below:
Kotlin
Then, to be able to send broadcasts to those receivers, the sending app must request the permission as shown below:
Security considerations and best practices
Here are some security considerations and best practices for sending and receiving broadcasts:
If you don’t need to send broadcasts to components outside of your app, then send and receive local broadcasts with the LocalBroadcastManager which is available in the Support Library. The LocalBroadcastManager is much more efficient (no interprocess communication needed) and allows you to avoid thinking about any security issues related to other apps being able to receive or send your broadcasts. Local Broadcasts can be used as a general purpose pub/sub event bus in your app without any overheads of system wide broadcasts.
If many apps have registered to receive the same broadcast in their manifest, it can cause the system to launch a lot of apps, causing a substantial impact on both device performance and user experience. To avoid this, prefer using context registration over manifest declaration. Sometimes, the Android system itself enforces the use of context-registered receivers. For example, the CONNECTIVITY_ACTION broadcast is delivered only to context-registered receivers.
Do not broadcast sensitive information using an implicit intent. The information can be read by any app that registers to receive the broadcast. There are three ways to control who can receive your broadcasts:
- You can specify a permission when sending a broadcast.
- In Android 4.0 and higher, you can specify a package with setPackage(String) when sending a broadcast. The system restricts the broadcast to the set of apps that match the package.
- You can send local broadcasts with LocalBroadcastManager .
When you register a receiver, any app can send potentially malicious broadcasts to your app’s receiver. There are three ways to limit the broadcasts that your app receives:
- You can specify a permission when registering a broadcast receiver.
- For manifest-declared receivers, you can set the android:exported attribute to «false» in the manifest. The receiver does not receive broadcasts from sources outside of the app.
- You can limit yourself to only local broadcasts with LocalBroadcastManager .
The namespace for broadcast actions is global. Make sure that action names and other strings are written in a namespace you own, or else you may inadvertently conflict with other apps.
Because a receiver’s onReceive(Context, Intent) method runs on the main thread, it should execute and return quickly. If you need to perform long running work, be careful about spawning threads or starting background services because the system can kill the entire process after onReceive() returns. For more information, see Effect on process state To perform long running work, we recommend:
- Calling goAsync() in your receiver’s onReceive() method and passing the BroadcastReceiver.PendingResult to a background thread. This keeps the broadcast active after returning from onReceive() . However, even with this approach the system expects you to finish with the broadcast very quickly (under 10 seconds). It does allow you to move work to another thread to avoid glitching the main thread.
- Scheduling a job with the JobScheduler . For more information, see Intelligent Job Scheduling.
Do not start activities from broadcast receivers because the user experience is jarring; especially if there is more than one receiver. Instead, consider displaying a notification.
Content and code samples on this page are subject to the licenses described in the Content License. Java is a registered trademark of Oracle and/or its affiliates.
Источник


