- How to Clear DNS Cache on Windows, Mac, Android & iOS
- Clear DNS Cache on Windows
- Use Command Prompt to Clear DNS Cache
- Use Windows PowerShell to Clear DNS Cache
- Clear DNS Cache on Mac
- Clear DNS Cache on Android
- Enable/Disable Airplane Mode on Android
- Hard-Reboot Android Device
- Clear Chrome’s Internal DNS Cache
- Reset Android Network Settings
- Clear DNS Cache on iPhone
- Enable/Disable Airplane Mode on iPhone
- Force-Restart iPhone
- Reset iPhone Network Settings
- Don’t Forget the Browser Cache
- How to Clear DNS Cache on Android Devices
- Clear DNS Cache on Android through Browser
- Clear DNS Cache in Chrome
- Change DNS Settings on Android
- Change DNS Settings of WiFi network
- Change DNS Settings through Third Party App
- Clear DNS Cache on Android To Fix Problems with Webpages
- How to Flush DNS Cache on Android
- What is DNS Cache?
- How to Flush DNS Cache on Android phone
- Method 1: Clear Browser Cache
- 1. Flush DNS cache on Chrome
- 2. Flush DNS cache in Mozilla Firefox
- 3. Flush DNS cache in Opera for Android
- Method 3: Modify Wi-Fi Network
- Method 4: Change DNS Settings in DNS Changer App
- Conclusion
How to Clear DNS Cache on Windows, Mac, Android & iOS
If you have website connection problems, try this
When you browse the internet, a Domain Name System (DNS) service will actively translate, or “resolve,” the various web addresses that you come across into a format that your Windows, Mac, Android, or iOS device understands. These addresses are then cached locally to help speed things up.
But if something changes in the meantime, your web browser may run into connectivity issues and fail to load some websites properly. In that case, you must get rid of the DNS cache to force your device to look up each web address again.
![]()
On Windows and macOS, you can clear the DNS cache quickly using the Command Prompt, Windows PowerShell, and Terminal consoles. On Android and iOS, however, the procedure isn’t as straightforward and you’ll have to try a few methods one at a time.
Clear DNS Cache on Windows
If you have a PC with Windows 7, Windows 8, Windows 8.1, or Windows 10 installed, you can use the Command Prompt console to clear the DNS cache.
Alternatively, you can use the Windows PowerShell console in Windows 8/8.1/10 to get the same result.
Use Command Prompt to Clear DNS Cache
1. Press Windows+R to open the Run box. Then, type cmd and select OK.
2. Type the following into the Command Prompt console:
ipconfig /flushdns
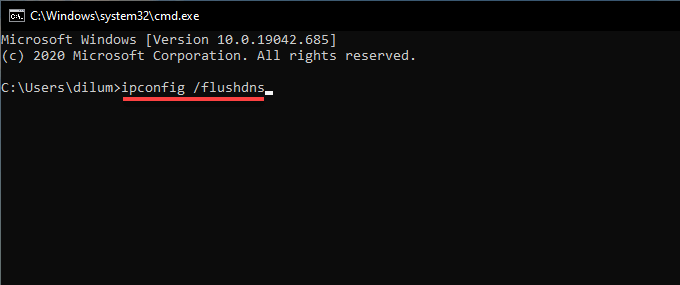
3. Press Enter.
Use Windows PowerShell to Clear DNS Cache
1. Right-click the Start button and select Windows PowerShell. Or, press Windows+R, type powershell.exe, and select OK.
2. Type the following into the Windows PowerShell console:
Clear-DnsClientCache
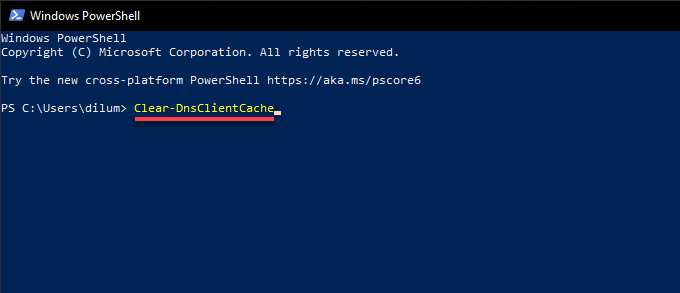
3. Press Enter.
Clear DNS Cache on Mac
You can clear the DNS cache on a Mac using Terminal. This applies to macOS Big Sur 11.0, macOS Catalina 10.15, and macOS Mojave 10.14, including earlier versions of macOS dating back to OS X Mavericks 10.9.
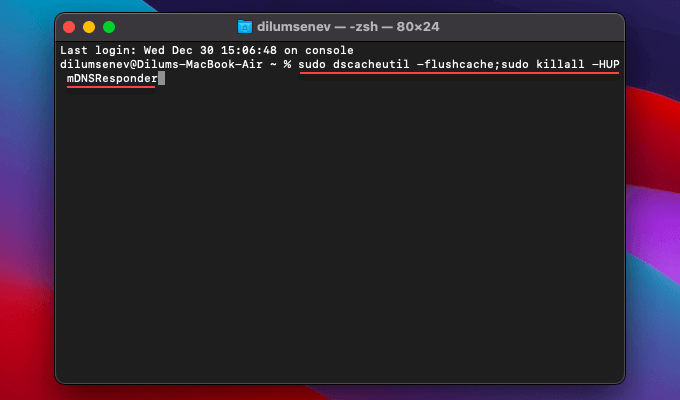
1. Go to Finder > Applications > Utilities and launch Terminal.
2. Copy and paste the following command:
sudo dscacheutil -flushcache;sudo killall -HUP mDNSResponder
Note: In OS X Yosemite versions starting 10.10.0 through 10.10.3, you must use the following command instead:
sudo discoveryutil mdnsflushcache;sudo discoveryutil udnsflushcaches
3. Press Enter. When Terminal prompts you for an administrator password, type it and press Enter again.
Clear DNS Cache on Android
On Android, either toggling Airplane Mode on/off or performing a hard reboot usually clears the DNS cache. Additionally, you can see if flushing Google Chrome’s internal DNS cache can help. If nothing works, you must perform a network settings reset.
Enable/Disable Airplane Mode on Android
You can enable/disable Airplane Mode via your Android device’s Quick Settings pane. Just swipe down from the top of the screen once or twice to reveal the Airplane Mode icon. Then, tap it to enable Airplane Mode. Wait for a few seconds and tap it again to disable Airplane Mode.

Hard-Reboot Android Device
If turning Airplane Mode on/off didn’t help, try hard-rebooting your Android device. Usually, that involves pressing and holding the Power button for 10-20 seconds. If you can’t do a hard-reboot that way, it’s best to perform a Google search with your Android’s model name for specific instructions.
Clear Chrome’s Internal DNS Cache
Google Chrome, Android’s built-in native web browser, features an internal DNS cache. Try clearing it out.
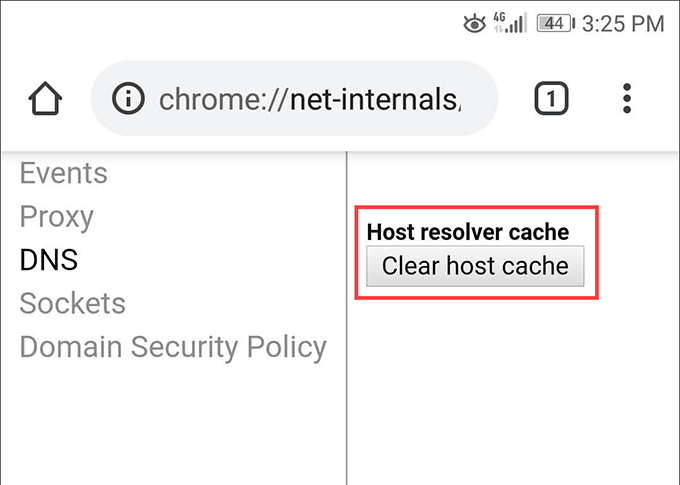
1. Open Google Chrome. Then, type the following path into the address bar and tap Enter:
chrome://net-internals/#DNS
2. Select the DNS side-tab and tap Clear host cache.
3. Select the Sockets side-tab and tap Close idle sockets, followed by Flush socket pools.
Reset Android Network Settings
A network settings reset requires you to dig into the Settings app on your Android smartphone. The steps below may not appear the same on your end, but you should get the idea.
Note: The reset procedure will delete all saved Wi-Fi connections and passwords on your Android device, so do be prepared to set up everything from scratch again.
1. Open the Settings app on your Android device.
2. Tap System.
3. Tap Reset.
4. Tap Network Settings Reset.
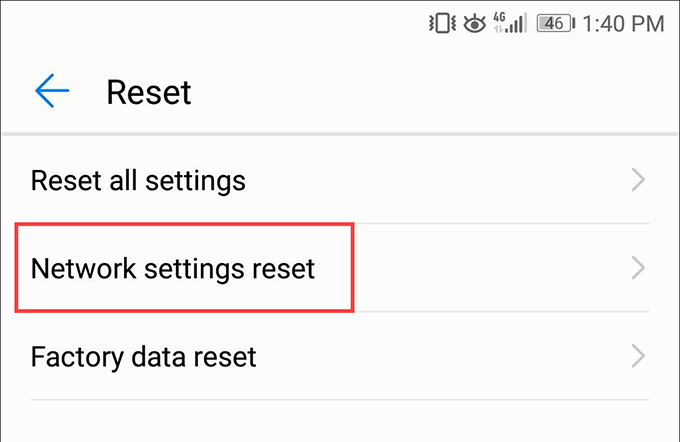
5. Tap Network Settings Reset again to confirm.
Clear DNS Cache on iPhone
If you use an iPhone, enabling/disabling Airplane mode, force-restarting the device, or resetting the network settings should help you clear the DNS cache.
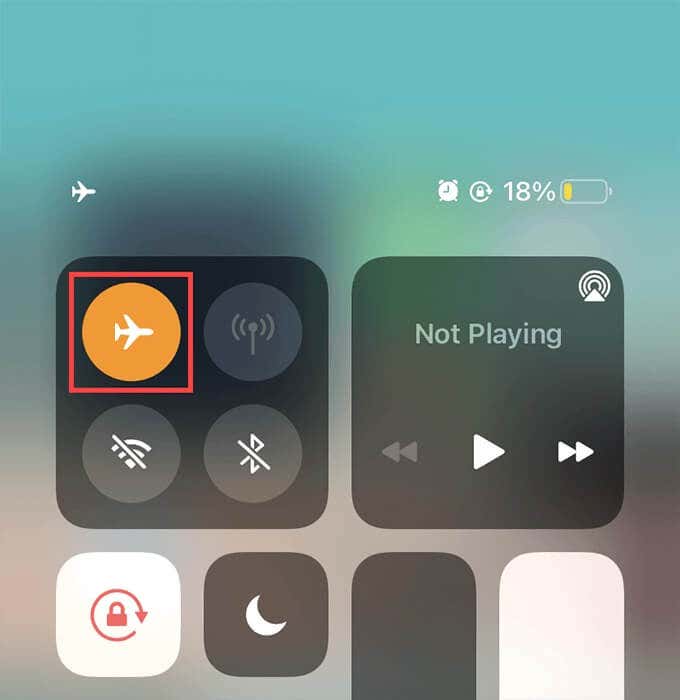
Enable/Disable Airplane Mode on iPhone
Swipe down from the top right of the iPhone’s screen to open the Control Center. If your device uses Touch ID, swipe up from the bottom of the screen instead.
Then, tap the Airplane Mode icon. Wait for a few seconds and tap the Airplane Mode icon again.
Force-Restart iPhone
Force-restarting an iPhone requires pressing specific button combinations that change depending on the make and model of your device.
iPhone 8 and newer: Quickly press the release the Volume Up button, press and release Volume Down button, and press and hold the Side button until the Apple logo shows up on the screen
iPhone 7: Press and hold both the Volume Down and Side buttons at the same time until you see the Apple logo on the screen.
iPhone 6s and earlier: Hold down both the Side/Top and Home buttons together until the Apple logo shows up on the screen.
Reset iPhone Network Settings
An iPhone network settings reset will not only clear the DNS cache, but also all saved Wi-Fi networks and passwords. Unless you rely solely on cellular data, you must manually reconnect to each Wi-Fi network afterward. Only try this if the other methods failed to work.
1. Open your iPhone’s Settings app.
2. Tap General.
3. Tap Reset.
4. Tap Reset Network Settings.

5. Tap Reset Network Settings again to confirm.
Don’t Forget the Browser Cache
Flushing out the DNS cache alone may not be enough. Web browsers cache all sorts of other web content locally, and that can cause lots of issues as well. If you continue to experience problems while loading websites, try clearing the browser cache. Also, don’t forget to troubleshoot other network-related issues.
Dilum Senevirathne is a freelance tech writer and blogger with three years of experience writing for online technology publications. He specializes in topics related to iOS, iPadOS, macOS, and Google web apps. When he isn’t hammering away at his Magic Keyboard, you can catch him binge-watching productivity hacks on YouTube. Read Dilum’s Full Bio
Источник
How to Clear DNS Cache on Android Devices
You must have come across a situation when a webpage that you regularly visit, just fails to load up on your Android device’s browser, when it’s loading fine on your other devices. Well, this is a problem we’ve all faced and it arises due to corruption in the DNS Cache. For people unaware, the DNS cache is a file that includes the hostnames and IP addresses of the websites to make sure that the next time you visit the same website, it loads up faster. However, problems arise when the IP address of a webpage changes before the device or the browser updates the cache, resulting in webpages not loading up.
So, if you have been facing this issue on an Android smartphone, here are the ways to clear DNS cache on Android:
Clear DNS Cache on Android through Browser
You can easily flush the DNS cache on your Android device through the browser you are using. You can just head to your browser’s settings and clear browsing data and cache and that should do the job. You can even do this by going to Settings->Apps->Browser (the browser app you are using). Here, you can just go to “Storage” and tap on “Clear Cache“.
![]()
Clear DNS Cache in Chrome
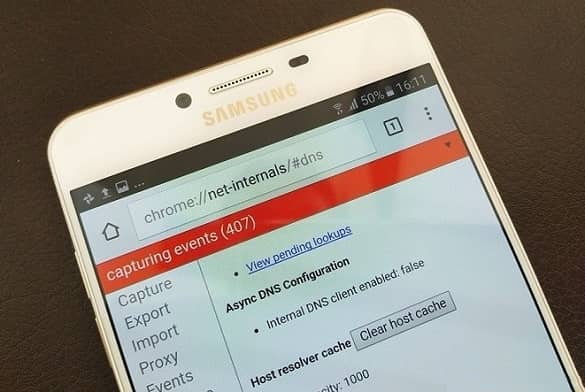
If you are using Chrome, you can clear DNS cache through a better way. You can just open Chrome and in the address bar, enter “chrome://net-internals/#DNS” (without the quotes, obviously). Here, you will find the various domain name caches. You can just tap on the “Clear host cache” option to flush DNS cache in Chrome.
![]()
You can also make sure to “Flush sockets” along with “Clear cache” by tapping on the drop-down button at the end of the red bar. You can just select one of the options and hit the “Clear host cache” button again.
![]()
Change DNS Settings on Android
If clearing the DNS cache on Android does not fix the problems, you might want to try changing the DNS settings on your Android device. There are two ways to change DNS settings on Android.
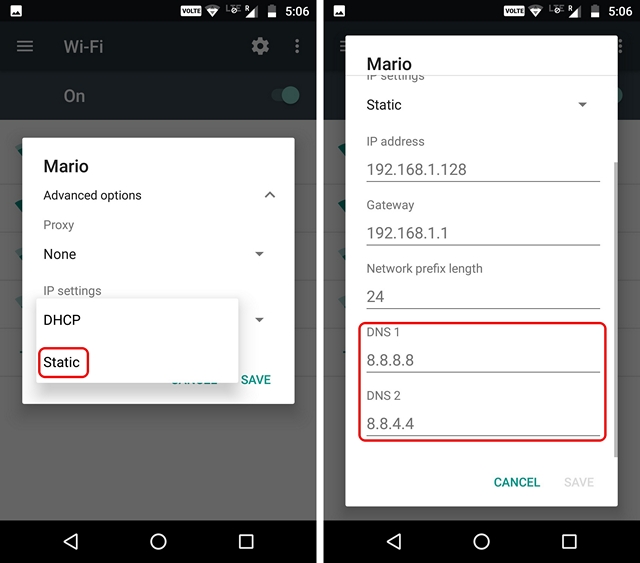
Change DNS Settings of WiFi network
If you are connected to a WiFi network, you can change the DNS setting for that particiular WiFi network. Here are the steps to do so:
1. First, head to Settings->WiFi. Here, long press on the network you want to modify DNS for.
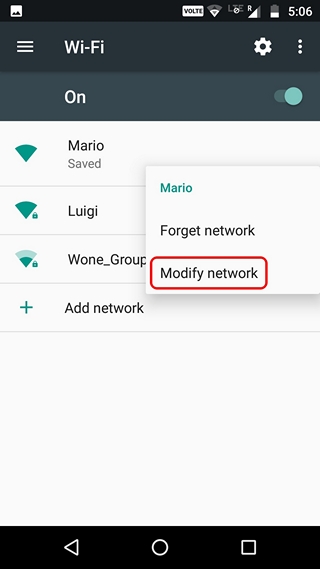
2. In the pop-up that opens up, tap on the “Advanced options” button. Then, choose the “IP settings” to be “Static“. Now, you can scroll down below, where you will find the option to enter a DNS address manually.
Change DNS Settings through Third Party App
There are various third party apps on Android that let you change the DNS settings. We are using DNS Changer (no root 3G/WiFi) app, which as the name suggests lets you change the DNS for every network. You can download the app from the Play Store. It’s available for free but includes ads.
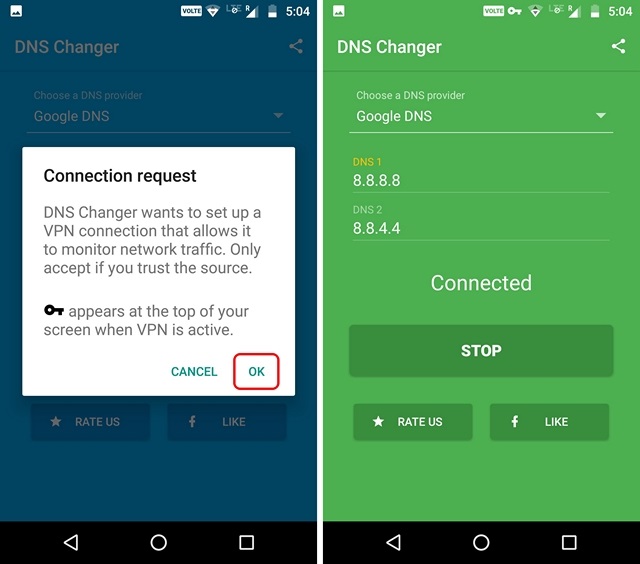
1. After you installed the app, you can just launch it and you will see that the main page of the app features a “Start” button to change the DNS setting to your desired option. You can choose from Google DNS, Open DNS, Yandex DNS, Level3 DNS or set your own custom DNS address.
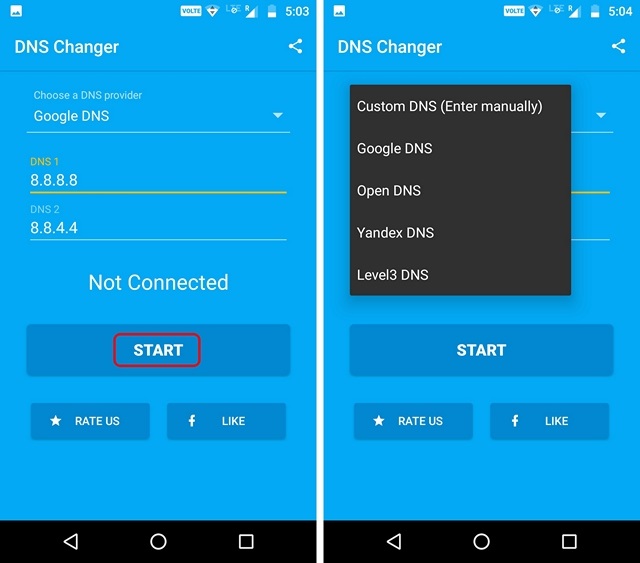
2. Then, you can just hit the Start button and a connection request will pop up. Allow it and the new DNS setting will be enabled on your Android device.
Clear DNS Cache on Android To Fix Problems with Webpages
Well, those were some easy steps to clear DNS cache on Android or to change the DNS settings on Android devices. So, now you know what to do when a webpage isn’t loading up. If you have any better methods, do let us know about it in the comments section below.
Источник
How to Flush DNS Cache on Android
You might have heard about the word cache. In computer language, the cache is a storage location that temporarily stores data to load a website faster. It allows you to reuse the previously retrieved data. But what is DNS cache on Android and why clear this cache memory?
Cached data generally stores files, images, scripts, and multimedia from the visited website and applications. Whether it is Windows, Linux, Mac, Android, or iOS, every device and operating system has some kind of cache. Each device has a reserved space for caching purposes.
Sometimes, a website takes a long time to load than usual. Besides, some web pages show error connecting to server messages. This problem occurs due to the DNS cache corruption. At such times, you can flush DNS cache files on your Android device to easily fix the issue.
What is DNS Cache?
A DNS cache aka Domain Name Server resolver cache is a temporary database that collects and stores the recently visited websites and their IP addresses. Hence, in the future, if you try to re-visit the domain; the cached data will quickly load, thus making the browser speed faster.
How to Flush DNS Cache on Android phone
Here is the list of methods that can help you clear DNS cache on your Android phone.
Method 1: Clear Browser Cache
The first trick is an easy way to delete DNS cache on Android. Here we’ll clear the cache of the Android browser that you’re using.
1. Flush DNS cache on Chrome
- Launch the Chrome browser on your Android phone.
- Type chrome://net-internals/#DNS in the Chrome address bar and press Enter.
- This will show you a list of domain name caches.
- Click on the Clear Host Cache button to flush DNS cache in Chrome.
- Furthermore, tap on the drop-down button on the red bar.
- Then, select the Flush Sockets and Clear Cache options, and then again tap the Clear Host Cache button.
- Note that you can choose only one option at once. Hence, you need to reload the page twice.
2. Flush DNS cache in Mozilla Firefox
- On your Android phone, launch the Mozilla Firefox app.
- Click on the ⋮ icon on the top right corner and open Settings.
- On the next screen, tap on the Privacy button.
- Now, click on the Clear Now option. A pop-up screen will appear.
- Here, you can check or un-check the browsing history, downloads, form & search history, cookies & active logins, and saved passwords.
- At last, click on the Clear Data button to flush the DNS cache on the Mozilla Firefox browser.
3. Flush DNS cache in Opera for Android
- Open the Opera browser on your mobile phone.
- Tap on the Opera icon at the bottom of the app.
- Click on the Clear browsing data option.
- From the pop-up screen, you can tick or un-tick browsing history, cookies & data, and saved passwords.
- Finally, tap on the OK button to clear the DNS cache from the Opera Mini browser.
Method 3: Modify Wi-Fi Network
If you are using the internet through a WiFi network, you can easily flush the DNS cache by changing the DNS settings of the WiFi network. For doing so, follow the below steps:
- On your Android phone, go to Settings > WiFi.
- Long press on the WiFi network that you want to modify.
- Click on the Modify network option.
- A pop-up window will appear. Simply tap on the Advanced options button.
- Moreover, change the IP Settings to Static.
- Scroll down and manually enter the DNS address.
Method 4: Change DNS Settings in DNS Changer App
There are plenty of third-party apps to flush DNS cache on Android. However, most of the application requires a root access. Hence, we’ll use the Free DNS changer app that works without root and easily clears the cache files.
- Install DNS Changer app on your Android device.
- Launch the application.
- From the main menu page, you can choose a particular DNS Provider.
- There are various DNS providers such as Google DNS, Open DNS, Yandex DNS, and Level3 DNS.
- You can also type your custom DNS address.
- Finally, click on the Start button to change the DNS settings.
- A connection request will pop up on your screen. Simple tap on the OK button.
Conclusion
Finally! This is how you can flush DNS cache on Android smartphones and tablets. For any difficulty, kindly comment below.
Источник


