How To: Re-partition Your Android Tablet Or Smartphone? (All Options Included: Change Size, FS Type, Etc…)
A general and inclusive walk-through on how to re-partition an Android device: create, delete or resize partitions, change file system types, labels and more… The guide before you consists of 2 parts: The first – a general explanation regarding the partitioning process and the tools needed. The second part – a live example of how
The guide before you consists of 2 parts:
- The first – a general explanation regarding the partitioning process and the tools needed.
- The second part – a live example of how it’s done on a real device (physical, as opposed to virtual) with genuine screenshots.
Note: as much as I’d like to, I do not currently possess the resources to grant readers technical support. The guide itself, in the vast majority of cases should be sufficient help. For any individual issue please refer to online forums which are meant for that purpose.
Why Re-Partition?
If you’re here out of curiosity or any other reason than necessity, you may wonder: “why would anyone want to repartition a smartphone / tablet?”.
To answer, each person probably has their own reason, a couple of such I can think of are:
- In the case of an upgrade, when there’s not enough space on one partition but others has aplenty.
- When you don’t have enough space to install more apps – since your data partition is full – so you want to resize that partition.
Of course, some cases can be resolved via a more simple solution, however, if you want to deal with the problem directly and not just bypassing it – repartition is perhaps the best way to go.
On the same note though, I must warn anybody who tries repartitioning his/her Android device.
Requirements
– ADB (Android Debug Bridge) installed – the reason we use ADB is it gives us a wider range of options in comparison to other software, such as Odin for instance, which only has limited set of features when it comes to repartitioning.
– Partitioning tool – you may already have one installed on your device by default (I’ll explain later where to look for it), but just in case you haven’t here’s one for ARM 32-bit:
Note, if you’re unsure about the architecture type of your device, you may try look for it online or use Android system info apps like this one.
– CLI (Command Line Interface) familiarity – the guide revolves around executing various commands in order to go through the partitioning process. There’s no GUI (Graphical User Interface) software that can achieve the same results at the moment.
– Backup (Optional) – I recommend you backup everything prior to making any changes.
Partitioning Steps
In order to re-partition your device, basically, these are the steps you’ll need to make:
1. Connect your device to your PC.
2. Open up a command shell, on Windows you’d probably use CMD / PowerShell, on Mac / Linux – Terminal.
2-a. Reboot into recovery mode. (Optional, depends on the partition you plan to modify)
3. Use ADB to connect to your device.
4. Launch a partitioning software.
5. Start partitioning.
6. Reinstall any required system file in case you’ve deleted those and afterwards you may exit the shell and reboot your device.
Explaining The Steps
1. We use another machine, in this case our PC, in order to re-partition Android, because we want to have access to our Android system just in case something goes wrong during the partitioning, and also, since Android system cannot be run and resized at the same time.
2. This step is rather self explanatory. We must use a flexible tool that will assist us re-partitioning.
2-a. If you wish to modify any partition other than the recovery partition, I recommend booting into recovery mode in order to do so.
Being inside recovery mode wouldn’t interfere with the process as you may delete the system partition and its files. Furthermore, it might become handy in case you’ll need to reinstall Android system.
3. ADB is an official Android developers tool and it also happens to be the most suitable tool for the job at the moment.
To make sure ADB recognizes your device, issue:
If you’re device is recognized you’ll see output similar to this:

Check that ADB recognizes your device
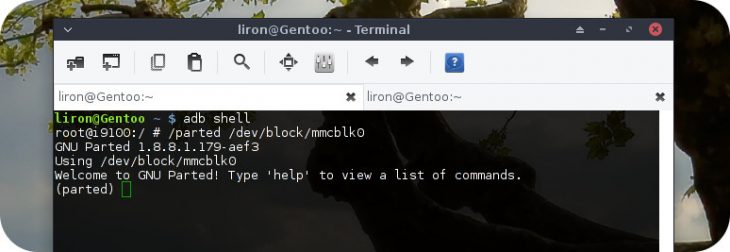
To connect to your device you issue both:
adb root
adb shell
You should see a new command line host-name with a “#” sign next to it which indicates you’re connected as root user.
Note, you may need to navigate the command line shell into adb directory prior to issuing the commands.
4. In this step we launch the partitioning program we’re going to use by typing the name of the program and the right path to the block where our partitions lie (some devices may have more than one block).
Type fdisk /PATH/TO/DEVICE/BLOCK or parted /PATH/TO/DEVICE/BLOCK.
In case you get an output similar to the following in return: /sbin/sh: parted: not found then it means parted tool is probably not installed.
Look for partitioning tools inside /sbin directory (or /system/bin if it’s mounted), and use what you find in there.
If you don’t have any partitioning tool pre-installed on your device, you may use the one mentioned in the ‘Requirements’ section if your device is of similar architecture, otherwise, google for a suitable one online.
To install the partitioning tool on your device, first exit the device shell (type exit, press enter), then issue the following (extract the file in case it is compressed prior to doing so):
adb push /LOCATION/OF/PARTITIONING-TOOL /DESTINATION/OF/PARTITIONING-TOOL
This will install the partitioning tool on your device where it’ll remain until you reboot (upon reboot, Android automatically deletes unfamiliar files).
If Android complains you don’t have writing permissions to push the program into it, execute:
adb shell mount -o remount,rw /
This should remount the file system root directory with read & write permissions.
5. Step 5 may seem the shortest of all the above steps but it’s actually the longest and most important one.
Since this step depends on what you’re actually intending to do with your device – it doesn’t say much, it is an open step, open for your decisions that is.
By typing the help command of your partitioning tool you’ll get a list of the options available to you. For example, these are a few of the options you’ll see in parted:
- rm NUMBER – will delete a partition
- mkpart – will create a partition
- unit UNIT – will set unit type, for example “unit b” will set parted to use bytes, “unit gb” for Giga bytes, etc… (Tip: use bytes for maximum accuracy).
- name NUMBER NAME – lets you name the partition (upon making any changes, don’t forget to name the partitions properly).
- q – quit parted.
Important Things To Note:
- fdisk executes your commands only when changes are saved whereas Parted executes them instantly.
- fdisk may not fully support GPT partition table, thus in case yours is GPT, it’s recommended to use Parted instead.
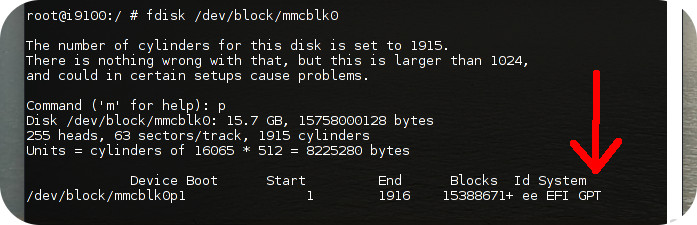
fdisk indicates a GPT table
6. When you’re done partitioning, reinstall required system files by using the recovery mode options available on the device, and only then exit the shell and reboot. Otherwise, you may not be able to boot at all. 🙁
Check out page #2 for a step by step example.
Источник
[INFO] ANDROID DEVICE PARTITIONS and FILESYSTEMS
Breadcrumb
mirfatif
Senior Member
NOTE:
I’m not a developer or something even near to that. I’m a newbie and will be, seems so. All information provided here is copied and compiled from different internet sources like this and many others.
This information is according to best of my knowledge and comprehension and is just for curious souls like me who want to understand things in quite simple words. It might be wrong and I will open-heartedly welcome any correction or addition from anyone.
I’m not responsible for any harm to you or your device resulting from this.
1. PARTITION TABLE
The Phone’s Internal Memory (eMMC or UFS; not the SD card) is solid-state (flash) memory, aka NAND. Raw NAND, as it’s called, is basically a pure flash memory dependent on CPU to control it. But in order to use flash memory just like a traditional hard drive (block device), NAND is equipped with an (embedded multimedia) micro-controller. It’s called eMMC.
eMMC can be partitioned much like a hard drive on PC. PC’s have traditionally been partitioned with BIOS compatible Master Boot Record (MBR) scheme in which first sector of disk contains the details of partitions called Partition Table. Limited size of boot sector (512 bytes) puts a limitation of at maximum 4 (primary) partitions listed in MBR. Extended partition has been used for 4+ partitions.
GUID Partition Table (GPT) was introduced with UEFI booting system which isn’t dependent on first boot sector and hence may contain up to 128 partitions. GPT also does CRC check, has backup GPT, identifies partitions by GUID and partitions have a label.
Android devices use GPT. We can view and manipulate GPT using Linux tools such as parted and gdisk while fdisk is the traditional tool for MBR partitions.
To view partition table on internal memory:
(The external SD Card can also be partitioned to include a section dedicated to storing user apps (like Link2SD does) or to create partitions for secondary or tertiary OS on Android device using some multiboot kernel and recovery system). Even we can put whole OS/ROM on an SD card.
2. BRIEF INTRO
Contents of Android partitions can be partially or completely modified by flashing an image (filesystem .img or executable binary or a flashable zip) to them. But we never need to modify most of them and whatever manufacturer wrote on them, resides there unmodified (read-only) for the whole of device life. A user uses only one partition /data to save personal data like photos, music etc. All the other are for device to run. There are typically in the range of 50 partitions on an Android device but only a few partitions are modified for the purpose of adding new features or upgrading the device. A custom ROM or minor upgrade is also limited to modify /boot , /system and /data partitions usually. Most of the partitions are almost intact, containing bootloaders, firmwares, settings etc. Here is a «summarized» detail to these partitions which matter to a common but interested user.
On most devices /system and /data are larger partitions (on some devices /custom or a similar partition too) covering almost 90% of eMMC. All others are smaller ones of a few KB’s or MB’s.
3. SoC / CHIPSET / PROCESSORS RELATED PARTITIONS
SoC is the first component when we start a PC or Mobile phone which initialzes hardware and processors and loads bootloaders in memory to bootstrap OS. It’s an integrated chip containing multiple things e.g. CPU, GPU, modem, wifi etc. It varies for device manufacturers and SoC vendors (chipset plus processor).
Some partitions are specific to SoC, most of them are closed-source executable binary blobs (like aboot , sbl , rpm , tz , cmnlib , devcfg , keymaster , lksecapp and others on a Qualcomm device), loaded step-by-step by bootloaders.
MODEM or RADIO — the phone’s radio
Also called baseband, it is responsible for signals and on older devices may control wifi, bluetooth, and GPS (on most newer devices, these are handled by the kernel and ROM). Upgrades are country dependent and may improve or diminish battery performance, network signal strength, and roaming capability. It is also sometimes required to have a minimum Baseband version to use a ROM so that the RIL will play nice with the Baseband.
Modem firmware is a mini-OS for the cellular radio chip which has its own processor. Firmware is a general term, firmware exists for a lot of things on phone. The wireless chip for WiFi, GPS, and Bluetooth often has a firmware as can the GPU core among other things. These firmware files are usually located inside the SYSTEM or VENDOR partition. The modem firmware is special because it has its own separate Baseband Processor (BP) so the firmware is left out of the system image in its own partition.
Modem is not an Android-specific partition. It is tied to the hardware of the phone, but the kernel has a code allowing Android to interact with the hardware. But the baseband processor (BP) — which runs modem and is responsible for all communication through mobile networks e.g. call, SMS and internet — is totally isolated from Application Processor (the one we call CPU) and is not governed by Android kernel; it runs an independent RTOS.
RIL /Radio Interface Layer
This is not a separate partition, but a part of the ROM and is like a driver for the Radio. RIL daemons provides telephony and cellular data i.e. adds phone to smartphone. There is a matching RIL for each Baseband version and you can flash it to match your Baseband after flashing a ROM. Having mismatched RIL and Baseband can range from having no effect at all, slight battery drain, loss of roaming, or even no connection to the cell network. Many ROMs keep their RIL updated to the latest. Job of the RIL is to translate all the telephony requests from the Android telephony framework and map them to the corresponding AT commands to the modem, and back again. AT set of commands is used to communicate with modem i.e. baseband processor (BP) which is a must have processor on Android devices in addition to normal CPU i.e. Application Processor (AP).
TZ (TrustZone) — used by ARM processors as an additional lock to security features. It combines user’s encryption key with a hardware specific key generated by encryption processor (like TPM on Windows) to make security breaching more difficult. It can also be used to implement Trusted Execution Environment (TEE).
RPM (Resource/Power Management) which starts executing Primary/Primitive BootLoader (PBL) in BootROM — controls power to radio, modem etc.
DSP (Digital Signal Processor) — by Qualcomm to assist in things like smooth video playback (realtime media and sensors processor) as well as runs RTOS for modem
HYP (Hypervisor) — Virtual Machine Monitor, to enable Virtual Machine platform
4. BOOTLOADERS
Bootloaders — in many steps — hand over charge to kernel after loading in RAM. These are mostly standalone ELF executable files becuase at this stage no filesystem is loaded and only executable code may work. These are all closed source components on Android device, provided by SoC vendors — either built-in or as binary blobs.
SBL — Secondary bootloader loaded by SoC, loads ABOOT in memory, also provides (Emergency) Download Mode (EDL) on many devices, a Firmware Update Protocol.
ABOOT (bootloader.img or aboot.mbn file in Factory Firmware) — Applications Bootloader is the main bootloader responsible for loading kernel or recovey and fastboot — a Firmware Update Protocol — as well.
Kernelflinger is a similar bootloader on Intel devices.
Read ANDROID BOOT PROCESS to know more about bootloaders.
5. CORE AOSP PARTITIONS
BOOT — Kernel and initramfs (modern form of of ramdisk and ramfs/tmpfs)
A kernel is a layer of code that allows the OS and applications to interface with your phone’s hardware. The degree to which you can access your phone’s hardware features depends on the quality of code in the kernel. Several kernel code improvements give us additional features from our hardware that the stock kernel does not. When you flash a custom ROM, you automatically get a kernel. But you can also flash a standalone kernel on top of the existing one, effectively overwriting it. These days, the difference in custom kernels is less about new features and more about alternate configurations. Choosing a custom kernel is basically choosing one that works best with your ROM.
Device Tree Blob (DTB), along with hardware drivers, are baked with kernel source in boot.img. DTB is loaded by bootloader at boot time and passed to kernel so that it can discover hardware and create node points accordingly.
On a Linux system init along with scripts, binaries kernel drivers and modules (in initrd.img), kernel (vmlinuz executable) and bootloader configuration along with modules, they all reside on root or a separate partition (mounted) at /boot. While on Android, init along with a few binaries and configuration files and kernel reside in a separate partition named «boot» with a special filesystem. Boot.img is created using tools like mkbootimg after building kernel.
This is how kenrel and DTB are built:
vmlinux >Image >zImage / Image.gz >Image.gz-dtb
- vmlinux: Large sized non-bootable Linux kernel (executable) with debug symbols, just an intermediate step to producing vmlinuz
- vmlinux.bin: Same as vmlinux binary but with removed symbols, produced by ‘objcopy’
- vmlinuz: Compressed and bootable Linux kernel file; one of zImage or bzImage formats; compressed using zlib, LZMA, gzip or bzip2 etc.
- zImage: Smaller format, for old kernels
- bzImage: Big zImage
- Image: vmlinux.bin of embedded devices
- Image.gz: zImage or bzImage of embedded devices
.dts (multiple) .dtb (1 or more)
Converted using dtc (device tree compiler)
- .dtb is appended to zImage / Image.gz i.e. zImage-dtb / Image.gz-dtb (simply concatenate)
- zImage-dtb > dtb Can be extracted using split-appended-dtb
- Packed as a part of kernel, «—dt» option is not needed when creating boot.img
- mkbootimg —kernel *.Image.gz-dtb —ramdisk *.cpio.gz —base . . . —offset . . . —tag-address . . . —cmdline . . .
- .dtb is extracted as a part of kernel by unpackbootimg
.dtbdtb.img
Converted using mkdtimg
- dtb.img is for dtb partition or second stage of boot.img
- boot.img is created by using —dt option:
- mkbootimg —dt dt.img —kernel *.Image.gz —ramdisk *.cpio.gz —base . . . —offset . . . —tag-address . . . —cmdline . . .
- dtb.img is extracted separately by unpackbootimg
Further Reading: Device Tree Overlays and Android Boot and Recovery Images
SYSTEM — ROM / OS
Contains system applications and libraries that have AOSP source code. During normal operation, this partition is mounted read-only; its contents change only during an OTA update or when flashing a new OS. Most ROM’s don’t allow root level (Admin rights in Windows) access by default. So, «rooting» is required to modify the contents of this partition. This is the actual User Interface we use on our phone i.e. system apps are installed on this partition on /system/app directory. Another important directory is /system/bin which contains executable binaries to perform each and every action by OS in background (as daemons) or by user in shell (bash) scripts or CLI (command line interface). These are native binaries (developed in C / C++ mostly) as opposed to Android apps which are developed in Java. A minimal form of Linux commands is also included in AOSP as toolbox or toybox (or user can add busybox or individual static binaries). /system/lib directory contains native libraries (shared by applications commonly) with .so extensions just like .dll on Windows.
VENDOR
This partition is replaced with a shortcut (symbolic link in fact) to /system/vendor directory. It contains system applications and libraries that do not have source code available on AOSP but added by vendors (OEM’s). During normal operation, this partition is mounted read-only; its contents change only during an OTA update. It also contains SoC firmware images i.e. hardware specific libraries and binaries (OpenGL, ISP. ).
Proprietary blobs (HALs) usually live in (/system)/vendor as shared libraries (.so files) which are loaded by Android binders when processes call a hardware component. HAL (hardware abstraction layer) is userspace alternative to traditional Linux’s system calls for drivers and is a kind of Google’s standardization for OEMs/hardware vendors, though being abandoned by mainstream Linux.
PROJECT TREBLE
In an ideal world, there should be a generic AOSP OS and a single kernel for all Android devices, not tied to hardware and vendors. But unfortunately it isn’t so because unlike PC world, there is no standardization in mobile world. AOSP is heavily modified on silicon vendor (SoC) as well as phone vendor level. One of the worst outcome of this situation is almost no Long Term Support (LTS). There are delayed or none updates once the consumers have phone, making it vulnerable to security issues and missing new features. Project Treble (starting from Android-8) addresses this issue somewhat by creating a separation between hardware specific code and generic AOSP code.
Previously, phone vendors used to get AOSP code from Google, mixing it with their own cutomizations (UI, apps etc.) and the hardware specific code from SoC vendor. If a minor fix needed to be applied to AOSP code, the whole process had to be repeated because code was intermingled and fixing one thing broke the other. Google resolved this issue by specifying /vendor partition for hardware specific code, /system containing only generic code. Interaction with AOSP code will be through HIDL interfaces, thus making it possible to upgrade the both codes independently. /oem and /odm partitions were added previously for the same purpose.
USERDATA
User applications are installed in different folders under /data. Apps data (user and system) is stored in /data/data. User personal data and some apps data is stored in /data/media. /data/media is also emulated as internal SDCard at /storage/emulated and symlinked at /sdcard. Personalized and apps settings are also stored in this partition. A folder /data/dalvik contains, in simple words, extracted apps to boost loading process. Java bytecode of Android apps is converted to executable code (.odex) by Dalvik Virtual Machine, separate instance of which is launched by zygote (an Android init daemon) for every app.
This partition is not normally touched by the OTA update process. A Factory Reset wipes this partition, normally excluding /data/media i.e. personal data.
When you do a factory reset (AKA: wipe, hard reset, factory wipe, etc.), you are erasing the /data and /cache partitions. Note that a factory reset does NOT put your phone back to its factory state from an OS standpoint. OS upgrades will stay because the OS lives in /system, and that is not touched during a factory reset. So it’s not a factory reset. It’s a factory DATA reset actually.
RECOVERY
Holds alternate boot partition and the recovery program that lets the device boot into a recovery console for performing advanced recovery and maintenance operations. It contains a second complete Linux system i.e. independent OS, including a user-interface application, kernel and the special recovery binary that reads a package and uses its contents to update i.e. flash or wipe itself or any other partition particularly during OTA updates.
Recovery is also the most commonly used method to flash custom ROM’s.
ADB sideload mode through PC is a replacement of flashing files (usually .zip) through Recovery. ADB works when phone is switched on in Recovery (or ROM). ADB/fastboot setup is to be made on PC to use this mode.
CACHE — cached (frequently accessed) data from OS usage and contains the firmware update package downloaded from server during OTA updates. Temporary holding area used by a few applications with the expectation that files can disappear at any time. Major use is by recovery and OTA updates. Recovery last_log is also written to this partition.
6. OTHER PARTITIONS
CUST — also CUSTOM or PRELOAD on some devices, it’s used by stock ROM’s, holding some preloaded system apps and regional settings which are installed on first use.
MISC — also FOTA on older devices
It’s a tiny partition used by recovery to communicate with bootloader store away some information about what it’s doing in case the device is restarted while the OTA package is being applied.
It is a boot mode selector used to pass data among various stages of the boot chain (boot into recovery mode, fastboot etc.). e.g. if it is empty (all zero), system boots normally. If it contains recovery mode selector, system boots into recovery mode.
It may also carry some necessarily required information in the form of switches to control hardware or settings related tasks such as CID (Carrier or Region ID) information and USB configurations etc.
PERSIST — contains data which shouldn’t be changed after the device is shipped, e.g. DRM related files, sensor reg file (sns.reg) and calibration data of chips; wifi, bluetooth, camera etc.
Some package installers such as OpenGapps also make use of this partition to read configuration file.
EFS, MODEMST1, MODEMST2, FSG, BACKUP
These all are related to IMEI; a unique number used by GSM networks to identify and trace a mobile phone.
EFS may contain hardware info like configuration files, WiFi/BlueTooth MAC’s, IMEI (or ESN for a CDMA based device) etc.
EFS and MODEMST1 may be a single partition on some phones.
FSG (FileSystem Golden copy) and BACKUP are backups of MODEMST1 and MODEMST2 respectively. If MODEMST1 or MODEMST2 are erased (by wrong factory flashing say) and phone notices an invalid partition, FSG and BACKUP will be restored.
MODEMST1 and MODEMST2 also contains modem firmware files.
PARAM — stores a number of parameters, variables and settings of the hardware. It contains info whether MODEMST partitions are backed up or not. Also debug settings, custom ROMs flash count, current stage boot process etc.
OEM — like VENDOR, it incorporates OEM (Original Equipment Manufacturer i.e. hardware manufacturer or Mobile Phone brand) small customization (modifications) to original Android (AOSP) during OTA updates such as customized system properties values etc.
PAD — related to OEM
OTA, FOTA — OTA updates
DDR — Double Data Rate RAM
FSC — Modem FileSystem Cookies
SSD — Secure Software Download, a memory based file system for secure storage, stores some encrypted RSA keys
DEVINFO — device information including: is_unlocked (aboot), is_tampered, is_verified, charger_screen_enabled, display_panel, bootloader_version, radio_version etc. Contents of this partition are displayed by «fastboot oem device-info» command in human readable format. Before loading boot.img or recovery.img, bootloader verifies the locked state from this partition.
CONFIG/FRP/PDB — saves state of Factory Reset Protection (FRP), «Allow bootloader (OEM) unlocking» . (Developer Options), asks already associated account info. This partition is erased/reset if Factory Reset done from Settings.
DEVCFG — used by TZ for upgrades
LKSECAPP — «LK (Little Kernel) Security App», related to RPM, TZ online verification / update
LIMITS — Qualcomm Limits Management Hardware (LMh) driver in SBL writes the data in this partition to use for later reboots
SYSCFG — Qualcomm CPR (Core Power Reduction) Regulator for better performance and power saving of application processor by voltage control
DIP, MDTP — boot verification, use Qualcomm SafeSwitch technology to lock and track theft phones
CMNLIB, KEYMASTER — verified boot
SEC — contains fuse settings, mainly for secure boot (signing bootloaders for chain of trust) and oem setting
KEYSTORE — related to /data Full Disc Encryption (FDE)
MCFG — (Modem Configuration Framework) — on dual SIM devices, loads MBN (modem binary) files depending on SIM/carrier
SPLASH — splash image or boot logo which appears when device boots (at ABOOT stage).
CHGLOGO — charging screen that appears when charger is connected to powered off device.
MSADP, APDP, DPO — related to debug policies
GROW — empty for future expansion
7. FILESYSTEMS
Supported filesystems by your kernel can be viwewd by:
Partitions with Mountable Filesystems
Following partitions are mounted during boot process:
system, vendor, odm, userdata (mounted at /data), cache, cust, persist (mounted at /persist or /mnt/vendor/persist), modem (mounted at /firmware or /vendor/firmware_mnt), dsp (mounted at /dsp or /vendor/dsp)
Modem is formatted as vfat while all others are usually ext4 or f2fs on newer devices.
All of these are listed in /fstab.* file which is processes by init. Starting with Android 8.0 (Treble release), fstab.* is moved to /vendor/etc/ and system, vendor and odm entries are included in dtb.
Other partitions don’t contain a mountable filesystem. However, we may try to get an idea of the contents by reading smaller partitions e.g.:
Pseudo / Virtual / in-Memory Filesystems (Kernel space)
These filesystems don’t rely on a physical persistent storage but just live in RAM, to provide kernel services interfaces in user space.
rootfs (/) — mounted by kernel before calling init. More details here
sysfs (/sys) — information related to devices, populated by kernel
devpts (/dev/pts) — character device files representing slave side of pseudo terminal pairs
proc (/proc) — information related to all processes, updated as processes are started / killed
tmpfs (/dev) — all device nodes updated from sysfs, accessible from user space
configfs (/config) — intergrated with userspace sdcardfs, controls apps permissions to directories on internal/external sdcard by VOLume Daeomon, a replacement of fusefs
pstore (/sys/fs/pstore) — persistent storage, a replacement of /proc/last_kmsg, saves last kernel console messages on panic / crashes / sudden reboots, solution to volatile nature of pseudo filesystems
cgroup — cgroups manage hardware resources allocation to processes as per load
selinuxfs (/sys/fs/selinux) — implementation of Security-Enahanced Linux, a mandatory access controls (MAC) to manage file permissions, better than traditional Discretionary Access Control (DAC) mechanism (Read-Write-eXecute) of Linux
debugfs (/sys/kernel/debug) — to monitor and debug kernel space implementations from user space
tracefs (/sys/kernel/debug/tracing) — debugfs with better security
functionfs (/dev/usb-ffs/adb) — integrated with configfs, manages USB gadgets, ADB is implemented through functionfs on Android
8. Factory Firmware and Flashable ROMs:
When you flash a custom ROM, that ROM typically includes a kernel and an OS. That means the /boot and /system partitions will be modified at a minimum. Some ROMs require a clean install, so a format of the /data and /cache partitions is sometimes built into the .zip that you flash. This is essentially doing a Factory Reset.
Read here to know more about flashing partitions.
Factory Firmware contains original iamge files of almsot all important partitions. It’s provided by OEM’s, usually as a package which also incude a flasher software for PC. Or a general flasher software may be uses such as QFIL.
ROM Development
A ROM developer downloads AOSP source code from Google while device tree, driver binaries and kernel source code is provided by (ODM’s through) OEM’s, if they are generous enough. OEM’s manufacture and sell devices themselves while ODM’s sell to white-labelers who brand them under their own names. Original Android kernel tree is provided by Google which in turn is taken from Linux and then modified by Google for Android-specific needs.
Источник


